check engine LINCOLN MKZ 2015 Owner's Guide
[x] Cancel search | Manufacturer: LINCOLN, Model Year: 2015, Model line: MKZ, Model: LINCOLN MKZ 2015Pages: 516, PDF Size: 4.48 MB
Page 312 of 516
General
•
Store all vehicles in a dry, ventilated
place.
• Protect from sunlight, if possible.
• If vehicles are stored outside, they
require regular maintenance to protect
against rust and damage.
Body
• Wash your vehicle thoroughly to remove
dirt, grease, oil, tar or mud from exterior
surfaces, rear-wheel housing and the
underside of front fenders.
• Periodically wash your vehicle if it is
stored in exposed locations.
• Touch-up exposed or primed metal to
prevent rust.
• Cover chrome and stainless steel parts
with a thick coat of auto wax to prevent
discoloration. Re-wax as necessary when
you wash your vehicle.
• Lubricate all hood, door and trunk lid
hinges, and latches with a light grade oil. •
Cover interior trim to prevent fading.
• Keep all rubber parts free from oil and
solvents.
Engine
• The engine oil and filter should be
changed prior to storage because used
engine oil contains contaminates that
may cause engine damage.
• Start the engine every 15 days for a
minimum of 15 minutes. Run at fast idle
with the climate controls set to defrost
until the engine reaches normal
operating temperature.
• With your foot on the brake, shift through
all the gears while the engine is running.
• We recommend that you change the
engine oil before you use your vehicle
again.
Fuel system
• Fill the fuel tank with high-quality fuel
until the first automatic shutoff of the fuel
pump nozzle. Cooling system
•
Protect against freezing temperatures.
• When removing your vehicle from
storage, check coolant fluid level.
Confirm that there are no cooling system
leaks and that fluid is at the
recommended level.
Battery
• Check and recharge as necessary. Keep
connections clean.
• If storing your vehicle for more than 30
days without recharging the battery, we
recommend that you disconnect the
battery cables to maintain battery charge
for quick starting.
Note: It is necessary to reset memory
features if battery cables are disconnected.
Brakes
• Make sure the brakes and parking brake
release fully.
Tires
• Maintain recommended air pressure.
309
MKZ (), enUSA Vehicle Care
Page 315 of 516
Do not attempt to repair punctures larger
than 0.24 in (6 mm) or damage to the tire's
sidewall. The tire may not completely seal.
Loss of air pressure may adversely affect tire
performance. For this reason:
Note: Do not drive the vehicle above 50 mph
(80 km/h)
.
Note: Do not drive further than
120 mi
(200 km). Drive only to the closest authorized
Ford dealer or tire repair shop to have your
tire inspected.
• Drive carefully and avoid abrupt steering
maneuvers.
• Periodically monitor tire inflation pressure
in the affected tire. If the tire is losing
pressure, have the vehicle towed.
• Read the information in the Tips for Use
of the Kit section to make sure safe
operation of the kit and your vehicle.
Tips for Use of the Kit
To ensure safe operation of the kit: •
Read all instructions and cautions fully.
• Before operating the kit, make sure your
vehicle is safely off the road and away
from moving traffic. Turn on the hazard
lights.
• Always set the parking brake to ensure
the vehicle does not move unexpectedly.
• Do not remove any foreign objects, such
as nails or screws, from the tire.
• When using the kit, leave the engine
running (only if the vehicle is outdoors or
in a well-ventilated area) so the
compressor does not drain the vehicle
battery.
• Do not allow the compressor to operate
continuously for more than 15 minutes.
This will help prevent the compressor
from overheating.
• Never leave the kit unattended when it
is operating.
• Sealant compound contains latex. Make
sure that you use the non-latex gloves
provided to avoid an allergic reaction.
• Keep the kit away from children. •
Only use the kit when the ambient
temperature is between -22°F (-30°C) and
158°F (70°C)
.
• Only use the sealing compound before
the use by date. The use by date is on
the lower right hand corner of the label
located on the sealant canister (bottle).
Check the use by date regularly and
replace the canister after four years.
• Do not store the kit unsecured inside the
passenger compartment of the vehicle
as it may cause injury during a sudden
stop or crash. Always store the kit in its
original location.
• After sealant use, the tire pressure
monitoring system sensor and valve stem
on the wheel must be replaced by an
authorized Ford dealer.
• When inflating a tire or other objects, use
the black air hose only. Do not use the
transparent hose which is designed for
sealant application only.
• Operating the kit could cause an
electrical disturbance in radio, CD, and
DVD player operation.
312
MKZ (), enUSA Wheels and Tires
Page 316 of 516
What to do when a Tire Is Punctured
A tire puncture within the tire tread area can
be repaired in two stages with the kit.
•
In the first stage, the tire will be reinflated
with a sealing compound and air. After
the tire has been reinflated, you will need
to drive the vehicle a short distance 4 mi
(6 km) to distribute the sealant in the tire.
• In the second stage, you will need to
check the tire pressure and adjust, if
necessary, to the vehicle tire inflation
pressure.
First Stage: Reinflating the Tire with
Sealing Compound and Air WARNINGS
Do not stand directly over the kit while
inflating the tire. If you notice any
unusual bulges or deformations in the tire
sidewall during inflation, stop and call
roadside assistance. If the tire does not inflate to the
recommended tire pressure within 15
minutes, stop and call roadside assistance. Preparation: Park the vehicle in a safe, level
and secure area, away from moving traffic.
Turn the hazard lights on. Apply the parking
brake and turn the engine off. Inspect the
flat tire for visible damage.
Sealant compound contains latex. To avoid
any allergic reactions, use the non-latex
gloves located in the accessory box on the
underside of the kit housing.
Do not remove any foreign object that has
pierced the tire. If a puncture is located in
the tire sidewall, stop and call roadside
assistance.
1.
Remove the valve cap from the tire valve.
2. Unwrap the clear tube from the compressor housing.
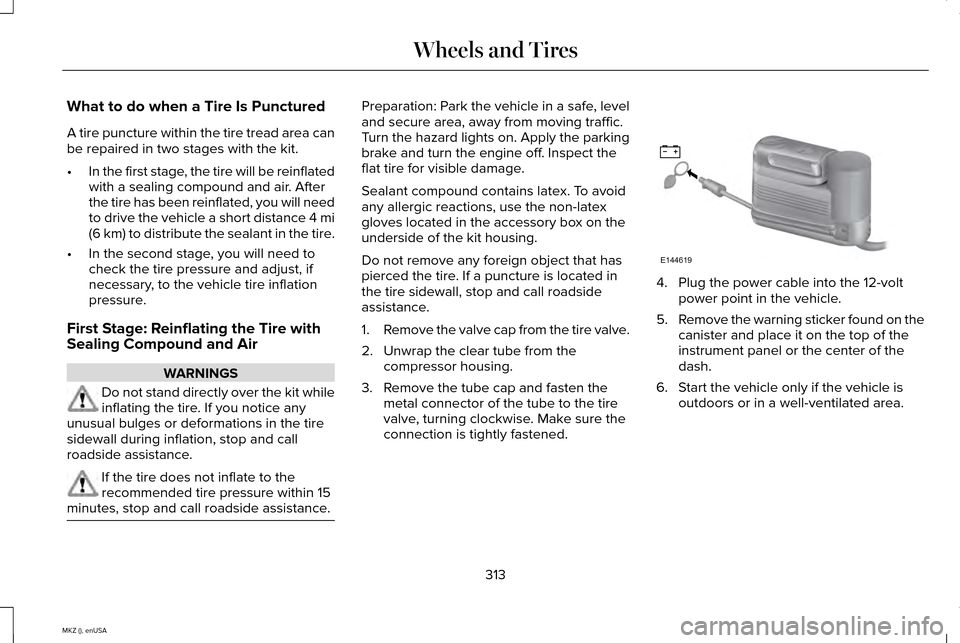
3. Remove the tube cap and fasten the metal connector of the tube to the tire
valve, turning clockwise. Make sure the
connection is tightly fastened. 4. Plug the power cable into the 12-volt
power point in the vehicle.
5. Remove the warning sticker found on the
canister and place it on the top of the
instrument panel or the center of the
dash.
6. Start the vehicle only if the vehicle is outdoors or in a well-ventilated area.
313
MKZ (), enUSA Wheels and TiresE144619
Page 322 of 516
•
Only use the sealing compound before
the use-by date. The use-by date is on a
label on the sealant canister and can be
seen through the rectangular viewing
window on the bottom of the compressor.
Check the use-by date regularly and
replace the canister after four years of
non-use.
• Do not store the kit unsecured inside the
passenger compartment of the vehicle
as it may cause injury during a sudden
stop or crash. Always store the kit in its
original location.
• After sealant use, the tire pressure
monitoring system sensor and valve stem
on the wheel must be replaced by an
authorized Ford dealer.
• Operating the kit could cause an
electrical disturbance in radio, CD, and
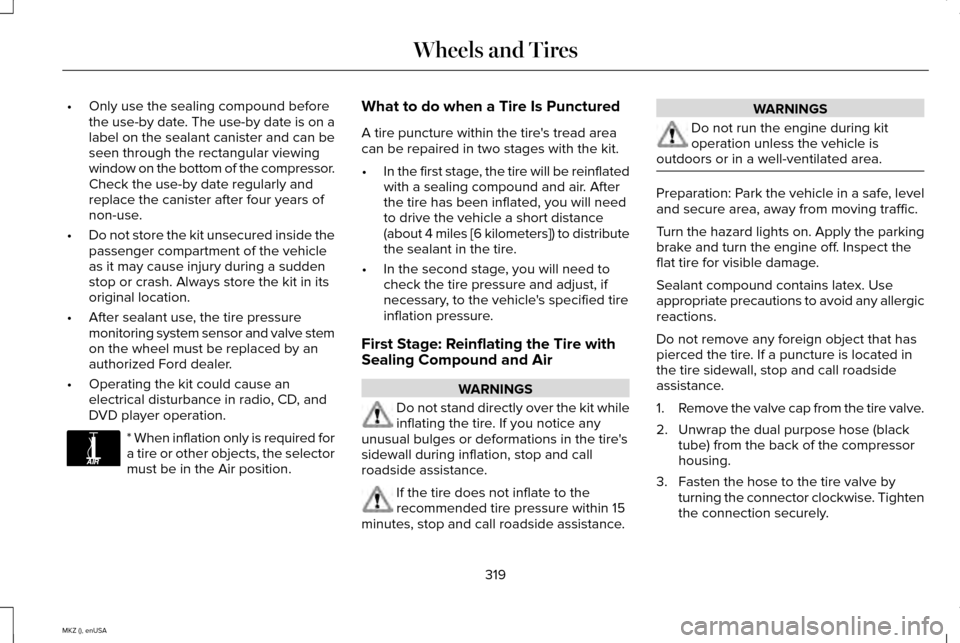
DVD player operation. * When inflation only is required for
a tire or other objects, the selector
must be in the Air position. What to do when a Tire Is Punctured
A tire puncture within the tire's tread area
can be repaired in two stages with the kit.
•
In the first stage, the tire will be reinflated
with a sealing compound and air. After
the tire has been inflated, you will need
to drive the vehicle a short distance
(about 4 miles [6 kilometers]) to distribute
the sealant in the tire.
• In the second stage, you will need to
check the tire pressure and adjust, if
necessary, to the vehicle's specified tire
inflation pressure.
First Stage: Reinflating the Tire with
Sealing Compound and Air WARNINGS
Do not stand directly over the kit while
inflating the tire. If you notice any
unusual bulges or deformations in the tire's
sidewall during inflation, stop and call
roadside assistance. If the tire does not inflate to the
recommended tire pressure within 15
minutes, stop and call roadside assistance. WARNINGS
Do not run the engine during kit
operation unless the vehicle is
outdoors or in a well-ventilated area. Preparation: Park the vehicle in a safe, level
and secure area, away from moving traffic.
Turn the hazard lights on. Apply the parking
brake and turn the engine off. Inspect the
flat tire for visible damage.
Sealant compound contains latex. Use
appropriate precautions to avoid any allergic
reactions.
Do not remove any foreign object that has
pierced the tire. If a puncture is located in
the tire sidewall, stop and call roadside
assistance.
1.
Remove the valve cap from the tire valve.
2. Unwrap the dual purpose hose (black tube) from the back of the compressor
housing.
3. Fasten the hose to the tire valve by turning the connector clockwise. Tighten
the connection securely.
319
MKZ (), enUSA Wheels and TiresE175978
Page 359 of 516
VEHICLE IDENTIFICATION
NUMBER
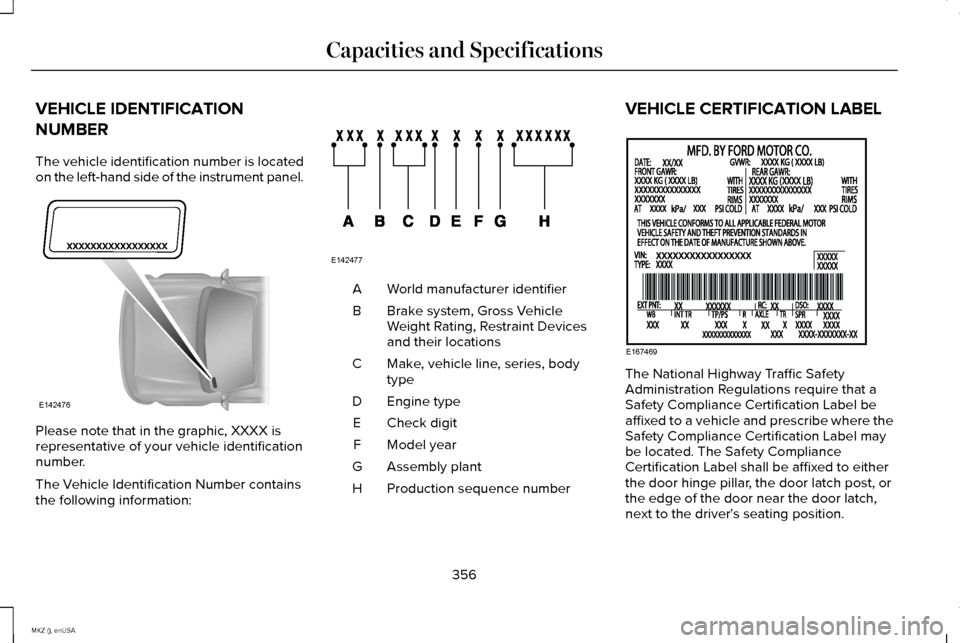
The vehicle identification number is located
on the left-hand side of the instrument panel.
Please note that in the graphic, XXXX is
representative of your vehicle identification
number.
The Vehicle Identification Number contains
the following information: World manufacturer identifier
A
Brake system, Gross Vehicle
Weight Rating, Restraint Devices
and their locations
B
Make, vehicle line, series, body
type
C
Engine type
D
Check digit
E
Model year
F
Assembly plant
G
Production sequence number
H VEHICLE CERTIFICATION LABEL
The National Highway Traffic Safety
Administration Regulations require that a
Safety Compliance Certification Label be
affixed to a vehicle and prescribe where the
Safety Compliance Certification Label may
be located. The Safety Compliance
Certification Label shall be affixed to either
the door hinge pillar, the door latch post, or
the edge of the door near the door latch,
next to the driver's seating position.
356
MKZ (), enUSA Capacities and SpecificationsE142476 E142477 E167469
Page 483 of 516
Make sure to change your vehicle
’s oils and
fluids at the specified intervals or in
conjunction with a repair. Flushing is a viable
way to change fluid for many vehicle
sub-systems during scheduled maintenance. It is critical that systems are flushed only with
new fluid that is the same as that required
to fill and operate the system or using a
Ford-approved flushing chemical.
Owner Checks and Services
Make sure you perform the following basic
maintenance checks and inspections every
month or at six-month intervals. Check every month
Engine oil level.
Function of all interior and exterior lights.
Tires (including spare) for wear and proper pressure. Windshield washer fluid level. Check every six months
Battery connections. Clean if necessary.
Body and door drain holes for obstructions. Clean if necessary. Cooling system fluid level and coolant strength.
Door weatherstrips for wear. Lubricate if necessary.
Hinges, latches and outside locks for proper operation. Lubricate if necessary. Parking brake for proper operation.
480
MKZ (), enUSA Scheduled Maintenance
Page 484 of 516
Check every six months
Safety belts and seat latches for wear and function.
Safety warning lamps (brake, ABS, airbag and safety belt) for operation.
Washer spray and wiper operation. Clean or replace blades as necessary.
Multi-Point Inspection
In order to keep your vehicle running right,
it is important to have the systems on your
vehicle checked regularly. This can help
identify potential issues and prevent major
problems. We recommend having the
following multi-point inspection performed
at every scheduled maintenance interval to
help make sure your vehicle keeps running
great. Multi-Point inspection
Hazard warning system operation
Accessory drive belt(s)
Horn operation
Battery performance
Radiator, cooler, heater and air conditioning hoses
Engine air filter
Suspension components for leaks or damage
Exhaust system
481
MKZ (), enUSA Scheduled Maintenance
Page 485 of 516
Multi-Point inspection
Steering and linkage
Exterior lamps operation
Tires (including spare) for wear and proper pressure**
Fluid levels *
; fill if necessary
Windshield for cracks, chips or pits
For oil and fluid leaks
Washer spray and wiper operation
Half-shaft dust boots
* Brake, coolant recovery reservoir, automatic transmission and window washer
** If your vehicle is equipped with a temporary mobility kit, check the tir\
e sealant expiration Use By date on the canister. Replace as needed.
Be sure to ask your dealership service
advisor or technician about the multi-point
vehicle inspection. It is a comprehensive way
to perform a thorough inspection of your
vehicle. Your checklist gives you immediate
feedback on the overall condition of your
vehicle. NORMAL SCHEDULED
MAINTENANCE
Intelligent Oil-Life Monitor®
Your vehicle is equipped with an Intelligent
Oil-Life Monitor that determines when you
should change the engine oil based on how
your vehicle is used. By using several
important factors in its calculations, the
monitor helps reduce the cost of owning your
vehicle and reduces environmental waste at
the same time.This means you do not have to remember to
change the oil on a mileage-based schedule.
Your vehicle lets you know when an oil
change is due by displaying ENGINE OIL
CHANGE DUE or OIL CHANGE REQUIRED
in the information display.
The following table provides examples of
vehicle use and its impact on oil change
intervals. It is a guideline only. Actual oil
change intervals depend on several factors
and generally decrease with severity of use.
482
MKZ (), enUSA Scheduled Maintenance
Page 488 of 516
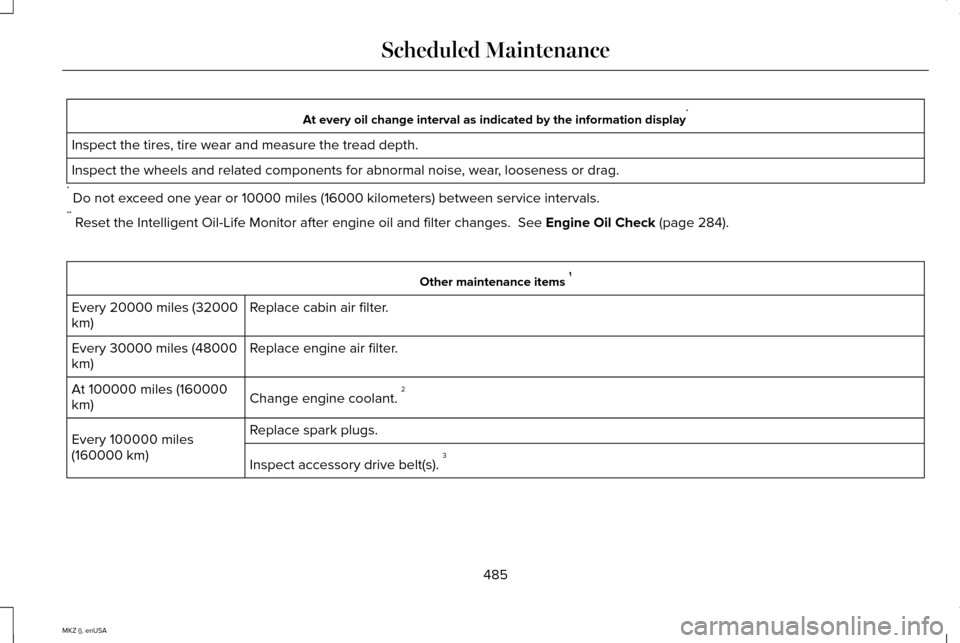
At every oil change interval as indicated by the information display
*
Inspect the tires, tire wear and measure the tread depth.
Inspect the wheels and related components for abnormal noise, wear, looseness or drag.
* Do not exceed one year or 10000 miles (16000 kilometers) between service interv\
als.
** Reset the Intelligent Oil-Life Monitor after engine oil and filter change\
s. See Engine Oil Check (page 284). Other maintenance items
1
Replace cabin air filter.
Every 20000 miles (32000
km)
Replace engine air filter.
Every 30000 miles (48000
km)
Change engine coolant. 2
At 100000 miles (160000
km)
Replace spark plugs.
Every 100000 miles
(160000 km)
Inspect accessory drive belt(s). 3
485
MKZ (), enUSA Scheduled Maintenance
Page 492 of 516
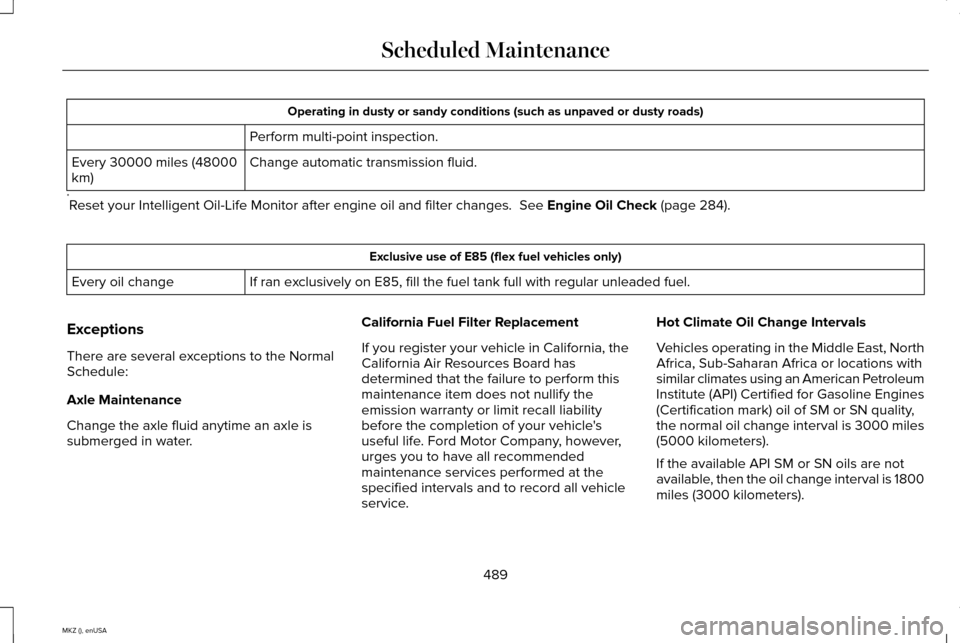
Operating in dusty or sandy conditions (such as unpaved or dusty roads)\
Perform multi-point inspection.
Change automatic transmission fluid.
Every 30000 miles (48000
km)
* Reset your Intelligent Oil-Life Monitor after engine oil and filter chang\
es. See Engine Oil Check (page 284). Exclusive use of E85 (flex fuel vehicles only)
If ran exclusively on E85, fill the fuel tank full with regular unleaded fuel.
Every oil change
Exceptions
There are several exceptions to the Normal
Schedule:
Axle Maintenance
Change the axle fluid anytime an axle is
submerged in water. California Fuel Filter Replacement
If you register your vehicle in California, the
California Air Resources Board has
determined that the failure to perform this
maintenance item does not nullify the
emission warranty or limit recall liability
before the completion of your vehicle's
useful life. Ford Motor Company, however,
urges you to have all recommended
maintenance services performed at the
specified intervals and to record all vehicle
service.Hot Climate Oil Change Intervals
Vehicles operating in the Middle East, North
Africa, Sub-Saharan Africa or locations with
similar climates using an American Petroleum
Institute (API) Certified for Gasoline Engines
(Certification mark) oil of SM or SN quality,
the normal oil change interval is 3000 miles
(5000 kilometers).
If the available API SM or SN oils are not
available, then the oil change interval is 1800
miles (3000 kilometers).
489
MKZ (), enUSA Scheduled Maintenance