check engine LINCOLN MKZ 2015 Owner's Manual
[x] Cancel search | Manufacturer: LINCOLN, Model Year: 2015, Model line: MKZ, Model: LINCOLN MKZ 2015Pages: 516, PDF Size: 4.48 MB
Page 243 of 516
Before Towing a Trailer
Practice turning, stopping and backing up to
get the feel of your vehicle-trailer
combination before starting on a trip. When
turning, make wider turns so the trailer
wheels clear curbs and other obstacles.
When Towing a Trailer
•
Do not drive faster than 70 mph (113
km/h) during the first 500 miles (800
kilometers).
• Do not make full-throttle starts.
• Check your hitch, electrical connections
and trailer wheel lug nuts thoroughly after
you have traveled 50 miles (80
kilometers).
• When stopped in congested or heavy
traffic during hot weather, place the
gearshift in position P to aid engine and
transmission cooling and to help A/C
performance.
• Turn off the speed control with heavy
loads or in hilly terrain. The speed control
may turn off automatically when you are
towing on long, steep grades. •
Shift to a lower gear when driving down
a long or steep hill. Do not apply the
brakes continuously, as they may
overheat and become less effective.
• If your transmission is equipped with a
Grade Assist or Tow/Haul feature, use
this feature when towing. This provides
engine braking and helps eliminate
excessive transmission shifting for
optimum fuel economy and transmission
cooling.
• Allow more distance for stopping with a
trailer attached. Anticipate stops and
brake gradually.
• Avoid parking on a grade. However, if
you must park on a grade:
1. Turn the steering wheel to point your vehicle tires away from traffic flow.
2. Set your vehicle parking brake.
3. Place the automatic transmission in position
P.
4. Place wheel chocks in front and back of the trailer wheels. (Chocks not included
with vehicle.) Launching or Retrieving a Boat or
Personal Watercraft (PWC)
Note:
Disconnect the wiring to the trailer
before
backing the trailer into the water.
Note: Reconnect the wiring to the trailer
after
removing the trailer from the water.
When backing down a ramp during boat
launching or retrieval:
• Do not allow the static water level to rise
above the bottom edge of the rear
bumper.
• Do not allow waves to break higher than
6 inches (15 centimeters) above the
bottom edge of the rear bumper.
Exceeding these limits may allow water to
enter vehicle components:
• Causing internal damage to the
components.
• Affecting driveability, emissions, and
reliability.
240
MKZ (), enUSA Towing
Page 248 of 516
Note:
Driving through standing water can
cause vehicle damage.
Note: Engine damage can occur if water
enters the air filter.
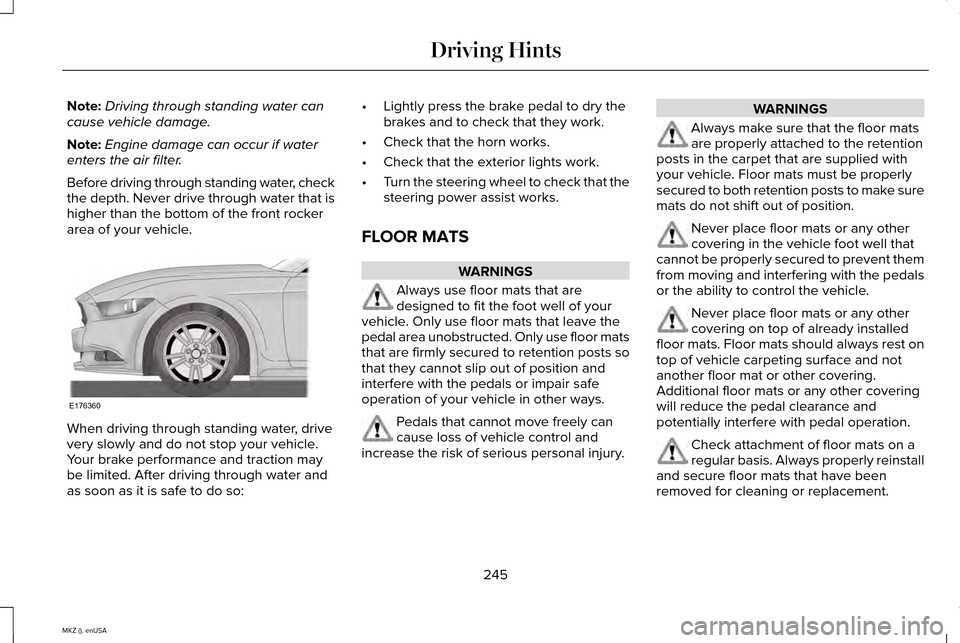
Before driving through standing water, check
the depth. Never drive through water that is
higher than the bottom of the front rocker
area of your vehicle. When driving through standing water, drive
very slowly and do not stop your vehicle.
Your brake performance and traction may
be limited. After driving through water and
as soon as it is safe to do so: •
Lightly press the brake pedal to dry the
brakes and to check that they work.
• Check that the horn works.
• Check that the exterior lights work.
• Turn the steering wheel to check that the
steering power assist works.
FLOOR MATS WARNINGS
Always use floor mats that are
designed to fit the foot well of your
vehicle. Only use floor mats that leave the
pedal area unobstructed. Only use floor mats
that are firmly secured to retention posts so
that they cannot slip out of position and
interfere with the pedals or impair safe
operation of your vehicle in other ways. Pedals that cannot move freely can
cause loss of vehicle control and
increase the risk of serious personal injury. WARNINGS
Always make sure that the floor mats
are properly attached to the retention
posts in the carpet that are supplied with
your vehicle. Floor mats must be properly
secured to both retention posts to make sure
mats do not shift out of position. Never place floor mats or any other
covering in the vehicle foot well that
cannot be properly secured to prevent them
from moving and interfering with the pedals
or the ability to control the vehicle. Never place floor mats or any other
covering on top of already installed
floor mats. Floor mats should always rest on
top of vehicle carpeting surface and not
another floor mat or other covering.
Additional floor mats or any other covering
will reduce the pedal clearance and
potentially interfere with pedal operation. Check attachment of floor mats on a
regular basis. Always properly reinstall
and secure floor mats that have been
removed for cleaning or replacement.
245
MKZ (), enUSA Driving HintsE176360
Page 281 of 516
GENERAL INFORMATION
Have your vehicle serviced regularly to help
maintain its roadworthiness and resale value.
There is a large network of Ford authorized
dealers that are there to help you with their
professional servicing expertise. We believe
that their specially trained technicians are
best qualified to service your vehicle properly
and expertly. They are supported by a wide
range of highly specialized tools developed
specifically for servicing your vehicle.
To help you service your vehicle, we provide
scheduled maintenance information which
makes tracking routine service easy. See
Scheduled Maintenance (page 478).
If your vehicle requires professional service,
your authorized dealer can provide the
necessary parts and service. Check your
warranty information to find out which parts
and services are covered.
Use only recommended fuels, lubricants,
fluids and service parts conforming to
specifications. Motorcraft® parts are
designed and built to provide the best
performance in your vehicle. Precautions
•
Do not work on a hot engine.
• Make sure that nothing gets caught in
moving parts.
• Do not work on a vehicle with the engine
running in an enclosed space, unless you
are sure you have enough ventilation.
• Keep all open flames and other burning
material (such as cigarettes) away from
the battery and all fuel related parts.
Working with the Engine Off
1. Set the parking brake and shift to
P
(Park).
2. Turn off the engine and remove the key (if equipped).
3. Block the wheels. Working with the Engine On WARNING
To reduce the risk of vehicle damage
and/or personal burn injuries, do not
start your engine with the air cleaner
removed and do not remove it while the
engine is running. 1. Set the parking brake and shift to
P
(Park).
2. Block the wheels
278
MKZ (), enUSA Maintenance
Page 287 of 516
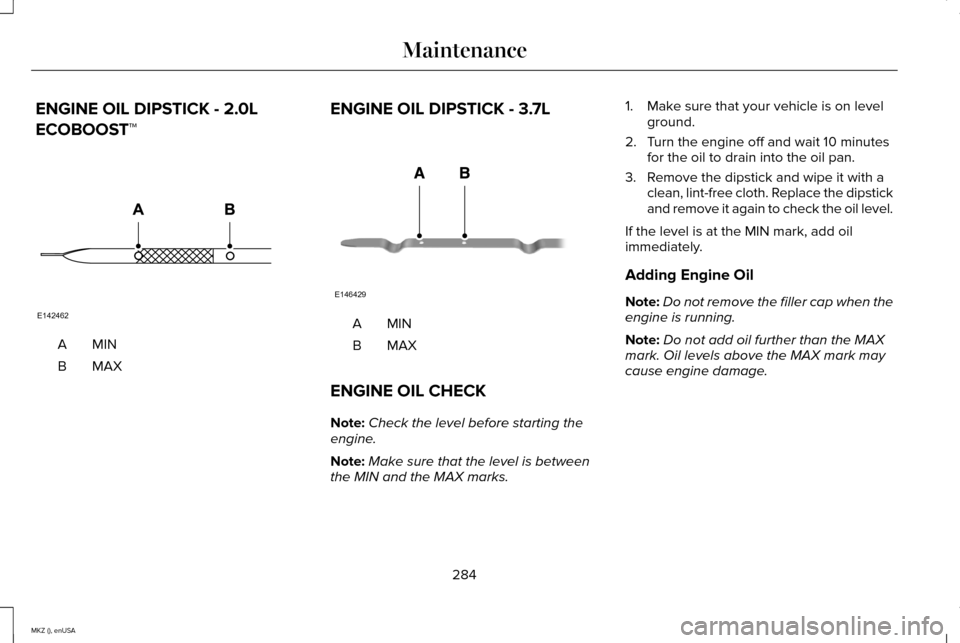
ENGINE OIL DIPSTICK - 2.0L
ECOBOOST™
MINA
MAXB
ENGINE OIL DIPSTICK - 3.7L MINA
MAXB
ENGINE OIL CHECK
Note: Check the level before starting the
engine.
Note: Make sure that the level is between
the MIN and the MAX marks. 1. Make sure that your vehicle is on level
ground.
2. Turn the engine off and wait 10 minutes for the oil to drain into the oil pan.
3. Remove the dipstick and wipe it with a clean, lint-free cloth. Replace the dipstick
and remove it again to check the oil level.
If the level is at the MIN mark, add oil
immediately.
Adding Engine Oil
Note: Do not remove the filler cap when the
engine is running.
Note: Do not add oil further than the MAX
mark. Oil levels above the MAX mark may
cause engine damage.
284
MKZ (), enUSA MaintenanceE142462 E146429
Page 288 of 516
Only use oils certified for gasoline engines
by the American Petroleum Institute (API).
An oil with this trademark symbol conforms
to the current engine and emission system
protection standards and fuel economy
requirements of the International Lubricants
Specification Advisory Council (ILSAC),
comprised of U.S. and Japanese automobile
manufacturers.
1. Remove the filler cap.
2. Add engine oil that meets the Ford
specifications. See Capacities and
Specifications (page 353).
3. Replace the filler cap. Turn it until you feel a strong resistance. ENGINE COOLANT CHECK WARNINGS
Do not add engine coolant when the
engine is hot. Steam and scalding
liquids released from a hot cooling system
can burn you badly. Also, spilling coolant on
hot engine parts can burn you. Do not put engine coolant in the
windshield washer fluid container. If
sprayed on the windshield, engine coolant
could make it difficult to see through the
windshield. To reduce the risk of personal injury,
make sure the engine is cool before
unscrewing the coolant pressure relief cap.
The cooling system is under pressure. steam
and hot liquid can come out forcefully when
you loosen the cap slightly. Do not add coolant further than the
MAX mark. Checking the Engine Coolant
When the engine is cold, check the
concentration and level of the engine coolant
at the intervals listed in the scheduled
maintenance information.
See Scheduled
Maintenance (page 478).
Note: Make sure that the coolant level is
between the MIN and MAX marks on the
coolant reservoir.
Note: Coolant expands when it is hot. The
level may extend beyond the MAX mark.
Note: If the level is at the MIN mark, below
the MIN mark, or empty, add coolant
immediately. See
Adding Engine Coolant
in this chapter.
Maintain coolant concentration within 48%
to 50%, which equates to a freeze point
between -30°F (-34°C) and -34°F (-37°C).
Note: For best results, coolant concentration
should be tested with a refractometer such
as Robinair Coolant and Battery
Refractometer 75240. We do not
recommend the use of hydrometers or
coolant test strips for measuring coolant
concentrations.
285
MKZ (), enUSA MaintenanceE142732
Page 289 of 516
Note:
Automotive fluids are not
interchangeable. Do not use engine coolant,
antifreeze or windshield washer fluid outside
of its specified function and vehicle location.
Adding Engine Coolant
Note: Do not use stop leak pellets, cooling
system sealants or additives as they can
cause damage to the engine cooling or
heating systems. Your warranty may not
cover these damages.
Note: During normal vehicle operation, the
engine coolant may change color from
orange to pink or light red. As long as the
engine coolant is clear and uncontaminated,
this color change does not indicate that the
engine coolant has degraded, nor does it
require that you drain the engine coolant,
flush the system or replace the engine
coolant. Do not mix different colors or types of
coolant in your vehicle. Mixing of engine
coolants may harm your engine
’s cooling
system. The use of an improper coolant may
harm engine and cooling system
components and may void the warranty. Use
prediluted engine coolant meeting the Ford
specification. See Capacities and
Specifications (page 353).
In case of emergency, you can add a large
amount of water without engine coolant in
order to reach a vehicle service location. In
this instance, qualified personnel:
1. Must drain the cooling system.
2. Chemically clean the coolant system with
Motorcraft Premium Cooling System
Flush.
3. Refill with engine coolant as soon as possible.
Water alone, without engine coolant, can
cause engine damage from corrosion,
overheating or freezing. Do not use the following as a coolant
substitute:
•
Alcohol.
• Methanol.
• Brine.
• Any engine coolant mixed with alcohol
or methanol antifreeze or coolant.
Alcohol and other liquids can cause engine
damage from overheating or freezing.
Do not add extra inhibitors or additives to
the coolant. These can be harmful and
compromise the corrosion protection of the
engine coolant.
When adding coolant:
1. Unscrew the cap slowly. Any pressure will escape as you unscrew the cap.
2. Add prediluted engine coolant meeting the Ford specification.
See Capacities
and Specifications (page 353).
3. Check the coolant level in the coolant reservoir the next few times you drive
your vehicle.
286
MKZ (), enUSA Maintenance
Page 291 of 516
Once the engine temperature cools, the
engine can be re-started. Take your vehicle
to an authorized dealer as soon as possible
to minimize engine damage.
When Fail-Safe Mode Is Activated
WARNINGS
Fail-safe mode is for use during
emergencies only. Operate your
vehicle in fail-safe mode only as long as
necessary to bring your vehicle to rest in a
safe location and seek immediate repairs.
When in fail-safe mode, your vehicle will have
limited power, will not be able to maintain
high-speed operation, and may completely
shut down without warning, potentially losing
engine power, power steering assist, and
power brake assist, which may increase the
possibility of a crash resulting in serious
injury. Never remove the coolant reservoir
cap while the engine is running or hot. You have limited engine power when in the
fail-safe mode, so drive your vehicle with
caution. Your vehicle will not maintain
high-speed operation and the engine will
operate poorly.
Remember that the engine is capable of
automatically shutting down to prevent
engine damage. In this situation:
1. Pull off the road as soon as safely
possible and switch off the engine.
2. Tow your vehicle to an authorized dealer.
3. If this is not possible, wait a short period
for the engine to cool.
4. Check the coolant level and add if low.
5. Re-start the engine and drive your vehicle
to an authorized dealer.
Note: Driving your vehicle without repair
increases the chance of engine damage.
See an authorized dealer as soon as
possible. AUTOMATIC TRANSMISSION
FLUID CHECK
6F35/HF35 transmission (If Equipped)
Note: Transmission fluid should be checked
by an authorized dealer. If required, fluid
should be added by an authorized dealer.
The automatic transmission does not have
a transmission fluid dipstick.
Refer to your scheduled maintenance
information for scheduled intervals for fluid
checks and changes. Your transmission does
not consume fluid. However, the fluid level
should be checked if the transmission is not
working properly, (For example: if the
transmission slips or shifts slowly) or if you
notice some sign of fluid leakage.
See
Scheduled Maintenance (page 478).
Do not use supplemental transmission fluid
additives, treatments or cleaning agents. The
use of these materials may affect
transmission operation and result in damage
to internal transmission components.
288
MKZ (), enUSA Maintenance
Page 292 of 516
6F50/6F55 Transmission (If Equipped)
WARNINGS
The dipstick cap and surrounding
components may be hot; gloves are
recommended. Use gloves when moving the air filter
assembly. Components will be hot.
Note:
Automatic transmission fluid expands
when warmed. To obtain an accurate fluid
check, drive the vehicle until it is warmed up
(approximately 20 miles [30 kilometers]). If
your vehicle has been operated for an
extended period at high speeds, in city traffic
during hot weather or pulling a trailer, the
vehicle should be turned off until normal
operating temperatures are reached to allow
the fluid to cool before checking. Depending
on vehicle use, cooling times could take up
to 30 minutes or longer. Refer to your scheduled maintenance
information for scheduled intervals for fluid
checks and changes. Your transmission does
not consume fluid. However, the fluid level
should be checked if the transmission is not
working properly. For example, if the
transmission slips or shifts slowly or if you
notice some sign of fluid leakage.
1.
Drive the vehicle 20 miles (30 kilometers)
or until it reaches normal operating
temperature
2. Park the vehicle on a level surface and engage the parking brake.
3. With the parking brake engaged and your
foot on the brake pedal, start the engine
and move the gearshift lever through all
of the gear ranges. Allow a minimum of
10 seconds for each gear to engage.
4. Put the gearshift lever in
P (Park) and
leave the engine running.
Note: You will need to move the air filter
assembly to access the transmission
dipstick. 5.
Remove the dipstick, wiping it clean with
a clean, dry lint free rag. If necessary,
refer to Under hood overview in this
chapter for the location of the dipstick.
6. Install the dipstick making sure it is fully seated in the filler tube by turning it to
the locked position.
7. Remove the dipstick and inspect the fluid
level. The fluid should be in the
designated areas for normal operating
temperature.
Moving the Air Filter Assembly (Accessing
the Dipstick) WARNING
Do not run engine with the air filter
disconnected.
289
MKZ (), enUSA Maintenance
Page 295 of 516
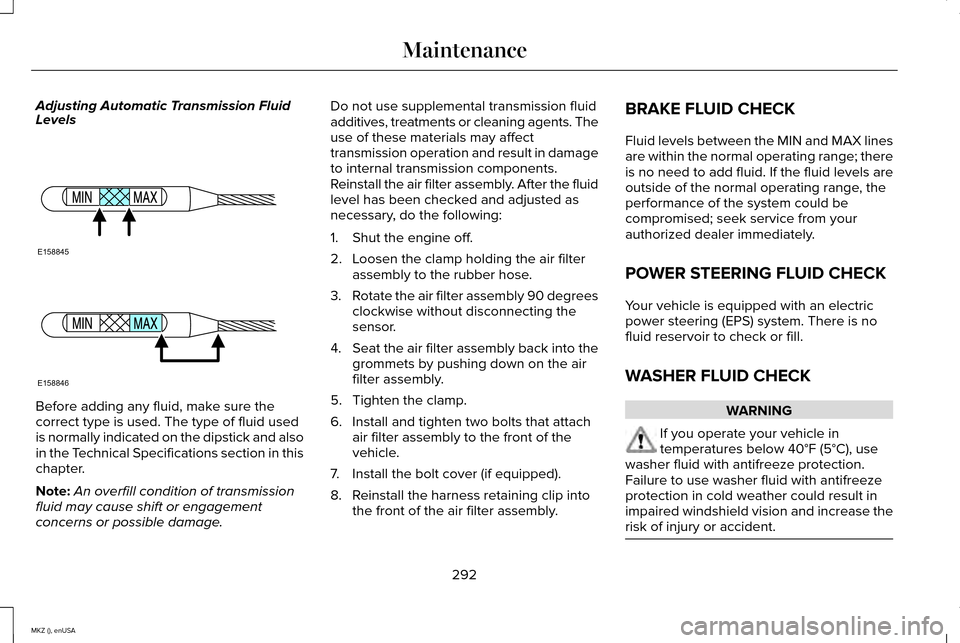
Adjusting Automatic Transmission Fluid
Levels
Before adding any fluid, make sure the
correct type is used. The type of fluid used
is normally indicated on the dipstick and also
in the Technical Specifications section in this
chapter.
Note:
An overfill condition of transmission
fluid may cause shift or engagement
concerns or possible damage. Do not use supplemental transmission fluid
additives, treatments or cleaning agents. The
use of these materials may affect
transmission operation and result in damage
to internal transmission components.
Reinstall the air filter assembly. After the fluid
level has been checked and adjusted as
necessary, do the following:
1. Shut the engine off.
2. Loosen the clamp holding the air filter
assembly to the rubber hose.
3. Rotate the air filter assembly 90 degrees
clockwise without disconnecting the
sensor.
4. Seat the air filter assembly back into the
grommets by pushing down on the air
filter assembly.
5. Tighten the clamp.
6. Install and tighten two bolts that attach air filter assembly to the front of the
vehicle.
7. Install the bolt cover (if equipped).
8. Reinstall the harness retaining clip into the front of the air filter assembly. BRAKE FLUID CHECK
Fluid levels between the MIN and MAX lines
are within the normal operating range; there
is no need to add fluid. If the fluid levels are
outside of the normal operating range, the
performance of the system could be
compromised; seek service from your
authorized dealer immediately.
POWER STEERING FLUID CHECK
Your vehicle is equipped with an electric
power steering (EPS) system. There is no
fluid reservoir to check or fill.
WASHER FLUID CHECK
WARNING
If you operate your vehicle in
temperatures below 40°F (5°C), use
washer fluid with antifreeze protection.
Failure to use washer fluid with antifreeze
protection in cold weather could result in
impaired windshield vision and increase the
risk of injury or accident. 292
MKZ (), enUSA MaintenanceE158845 E158846
Page 298 of 516
7. While the engine is running, step on the
brake pedal and shift the transmission to
N.
8. Allow the engine to run for at least one minute by pressing on the accelerator
pedal.
9. Drive your vehicle at least 10 miles (16 kilometers) to completely relearn the idle
and fuel trim strategy.
Note: Certain features may not operate if
the Battery Monitor System is not reset with
a scan tool following a jump start or battery
replacement. Normal electrical accessory
operation should resume after your vehicle
is left undisturbed for 8 hours.
Note: If you do not allow the engine to
relearn the idle and fuel trim strategy, the
idle quality of your vehicle may be adversely
affected until the engine computer
eventually relearns the idle trim and fuel trim
strategy. Note:
Always dispose of automotive
batteries in a responsible manner. Follow
your local authorized standards for disposal.
Call your local authorized recycling center
to find out more about recycling automotive
batteries.
Note: It is recommended that the negative
battery cable terminal be disconnected from
the battery if you plan to store your vehicle
for an extended period of time.
CHECKING THE WIPER BLADES Run the tip of your fingers over the edge of
the blade to check for roughness.
Clean the wiper blades with washer fluid or
water applied with a soft sponge or cloth.CHANGING THE WIPER BLADES
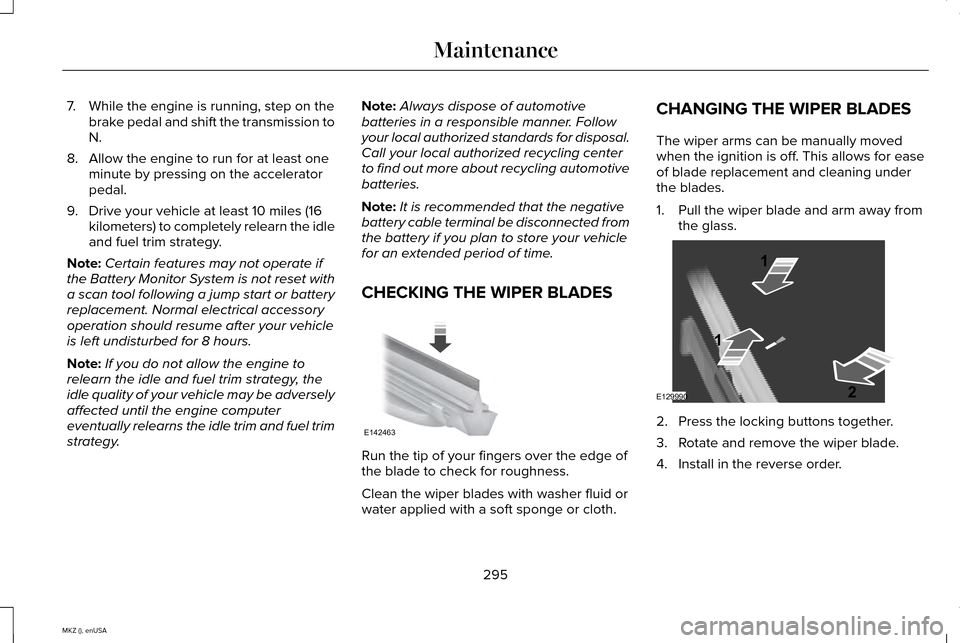
The wiper arms can be manually moved
when the ignition is off. This allows for ease
of blade replacement and cleaning under
the blades.
1. Pull the wiper blade and arm away from
the glass. 2. Press the locking buttons together.
3. Rotate and remove the wiper blade.
4. Install in the reverse order.
295
MKZ (), enUSA MaintenanceE142463 E129990
1
1 2