spare tire location LINCOLN MKZ 2017 Owners Manual
[x] Cancel search | Manufacturer: LINCOLN, Model Year: 2017, Model line: MKZ, Model: LINCOLN MKZ 2017Pages: 564, PDF Size: 5.54 MB
Page 262 of 564
ROADSIDE ASSISTANCE
Vehicles Sold in the United States:
Getting Roadside Assistance
If you ever need help on the road, the Lincoln
Motor Company is there for you with
nationwide, 24-hours-a-day,
seven-days-a-week assistance.
The service is available:
•
Throughout the life of the vehicle for
original owners.
• For six years or 68,351 mi (110,000 km)
(whichever comes first) within the
extended powertrain warranty coverage
period for subsequent owners.
• For the coverage period listed on the
Roadside Assistance Card included in
your Owner's Manual portfolio.
This complimentary Roadside Assistance
program is separate from the New Vehicle
Limited Warranty, and includes:
• A flat tire change with a good spare
(except vehicles supplied with a tire
inflation kit).
• Battery jump start. •
Lock-out assistance (key replacement
cost is the client's responsibility).
• Fuel delivery — independent service
contractors, if not prohibited by state,
local or municipal law shall deliver up to
2 gal (8 L)
of gasoline or 5 gal (20 L) of
diesel fuel to a disabled vehicle.
Roadside Assistance limits fuel delivery
service to two no-charge occurrences
within a 12-month period.
• Winch out — available within 98 ft (30 m)
of a paved or county maintained road,
no recoveries.
• Towing — independent service
contractors, if not prohibited by state,
local or municipal law shall tow Lincoln
eligible vehicles to the client's selling or
preferred dealer within 99 mi (160 km) of
the disablement location or to the nearest
Lincoln dealer. If a client requests a tow
to a selling or preferred dealer that is
more than
99 mi (160 km) from the
disablement location, the client shall be
responsible for any mileage costs in
excess of
99 mi (160 km). Roadside Assistance includes up to $200
coverage for a towed trailer if the disabled
eligible vehicle requires service at the
nearest authorized dealer. If the towing
vehicle is operational but the trailer is not,
then the trailer does not qualify for any
roadside services.
Vehicles Sold in the United States:
Using Roadside Assistance
United States Lincoln vehicle clients who
require Roadside Assistance, call
1-800-521-4140.
If you need to arrange roadside assistance
for yourself, Lincoln Motor Company will
reimburse a reasonable amount for towing
to the nearest Lincoln dealership within 99 mi
(160 km)
. To obtain reimbursement
information, United States Lincoln vehicle
clients, call 1-800-521-4140. Lincoln Motor
Company will ask you to submit your original
receipts.
259
MKZ (CC9) Canada/United States of America, enUSA, First Printing Roadside Emergencies
Page 268 of 564
If you need to have your vehicle towed,
contact a professional towing service, or if
you are a member of a roadside assistance
program, your roadside assistance service
provider.
We recommend the use of a wheel lift and
dollies or flatbed equipment to tow your
vehicle. Do not tow with a slingbelt. Lincoln
Motor Company has not approved a slingbelt
towing procedure. Vehicle damage may
occur if towed incorrectly, or by any other
means.
Lincoln Motor Company produces a towing
manual for all authorized tow truck operators.
Have your tow truck operator refer to this
manual for proper hook-up and towing
procedures for your vehicle.
It is acceptable to have your front-wheel
drive vehicle towed from the front if using
proper wheel lift equipment to raise the front
wheels off the ground. When towing in this
manner, the rear wheels can remain on the
ground.
Front-wheel drive vehicles must have the
front wheels placed on a tow dolly when
towing your vehicle from the rear using
wheel lift equipment. This prevents damage
to the transmission.
Towing an all-wheel drive vehicle requires
that all wheels be off the ground, such as
using a wheel lift and dollies or flatbed
equipment. This prevents damage to the
transmission, all-wheel drive system and
vehicle.
TOWING POINTS
Due to local market requirements in some
countries, some vehicles may be equipped
with a recovery hook.
Recovery Hook Location
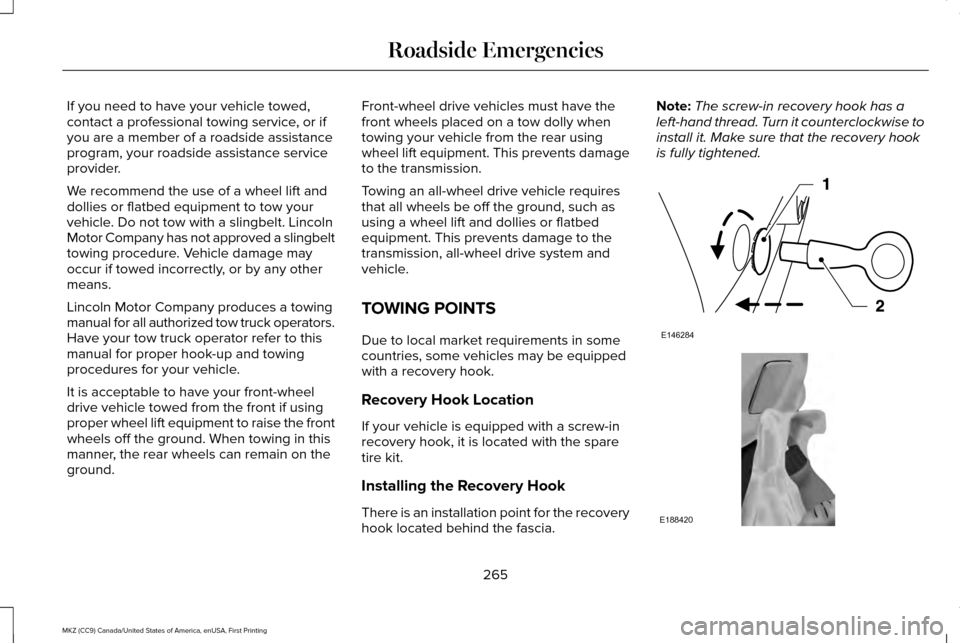
If your vehicle is equipped with a screw-in
recovery hook, it is located with the spare
tire kit.
Installing the Recovery Hook
There is an installation point for the recovery
hook located behind the fascia.Note:
The screw-in recovery hook has a
left-hand thread. Turn it counterclockwise to
install it. Make sure that the recovery hook
is fully tightened. 265
MKZ (CC9) Canada/United States of America, enUSA, First Printing Roadside EmergenciesE146284 E188420
Page 348 of 564
Location of the Tire Label
You will find a Tire Label containing tire
inflation pressure by tire size and other
important information located on the
B-Pillar or the edge of the driver’
s door.
Inflating Your Tires
Safe operation of your vehicle requires
that your tires are properly inflated.
Remember that a tire can lose up to half
of its air pressure without appearing flat.
Every day before you drive, check your
tires. If one looks lower than the others,
use a tire gauge to check pressure of all
tires and adjust if required.
At least once a month and before long
trips, inspect each tire and check the tire
pressure with a tire gauge (including
spare, if equipped). Inflate all tires to the
inflation pressure recommended by Ford
Motor Company. You are strongly urged to buy a reliable
tire pressure gauge, as automatic
service station gauges may be
inaccurate. Ford recommends the use
of a digital or dial-type tire pressure
gauge rather than a stick-type tire
pressure gauge.
Use the recommended cold inflation
pressure for optimum tire performance
and wear. Under-inflation or
over-inflation may cause uneven
treadwear patterns
WARNING
Under-inflation is the most common
cause of tire failures and may result
in severe tire cracking, tread separation
or blowout, with unexpected loss of
vehicle control and increased risk of
injury. Under-inflation increases sidewall
flexing and rolling resistance, resulting
in heat buildup and internal damage to
the tire. It also may result in unnecessary
tire stress, irregular wear, loss of vehicle
control and accidents. A tire can lose up
to half of its air pressure and not appear
to be flat! Always inflate your tires to the Ford
recommended inflation pressure even
if it is less than the maximum inflation
pressure information found on the tire.
The Ford recommended tire inflation
pressure is found on the Safety
Compliance Certification Label (affixed
to either the door hinge pillar, door-latch
post, or the door edge that meets the
door-latch post, next to the driver's
seating position), or Tire Label which is
located on the B-Pillar or the edge of the
driver’
s door. Failure to follow the tire
pressure recommendations can cause
uneven treadwear patterns and
adversely affect the way your vehicle
handles
Maximum Inflation Pressure is the tire
manufacturer's maximum permissible
pressure and the pressure at which the
maximum load can be carried by the tire.
This pressure is normally higher than the
manufacturer’ s recommended cold
inflation pressure which can be found
on the Safety Compliance Certification
Label (affixed to either the door hinge
pillar, door-latch post, or the door edge
345
MKZ (CC9) Canada/United States of America, enUSA, First Printing Wheels and Tires
Page 360 of 564
When Inflating Your Tires
When putting air into your tires (such as at a
gas station or in your garage), the tire
pressure monitoring system may not respond
immediately to the air added to your tires.
It may take up to two minutes of driving over
20 mph (32 km/h) for the light to turn off after
you have filled your tires to the
recommended inflation pressure
How Temperature Affects Your Tire
Pressure
The tire pressure monitoring system monitors
tire pressure in each pneumatic tire. While
driving in a normal manner, a typical
passenger tire inflation pressure may
increase about 2 to 4 psi (14 to 28 kPa) from
a cold start situation. If the vehicle is
stationary overnight with the outside
temperature significantly lower than the
daytime temperature, the tire pressure may
decrease about 3 psi (21 kPa) for a drop of
30°F (17°C) in ambient temperature. This
lower pressure value may be detected by
the tire pressure monitoring system as being
significantly lower than the recommended
inflation pressure and activate the system
warning light for low tire pressure. If the low
tire pressure warning light is on, visually
check each tire to verify that no tire is flat. If
one or more tires are flat, repair as
necessary. Check the air pressure in the road
tires. If any tire is under-inflated, carefully
drive the vehicle to the nearest location
where air can be added to the tires. Inflate
all the tires to the recommended inflation
pressure.
CHANGING A ROAD WHEEL
WARNINGS
The use of tire sealant may damage
your tire pressure monitoring system
and should only be used in roadside
emergencies. If you must use a sealant, the
Ford Tire Mobility Kit sealant should be used.
The tire pressure monitoring system sensor
and valve stem on the wheel must be
replaced by an authorized dealer after use
of the sealant. WARNINGS
If the tire pressure monitor sensor
becomes damaged, it will no longer
function. See Tire Pressure Monitoring
System (page 353). Note:
The tire pressure monitoring system
indicator light will illuminate when the spare
tire is in use. To restore the full function of
the monitoring system, all road wheels
equipped with tire pressure monitoring
sensors must be mounted on the vehicle.
If you get a flat tire while driving, do not apply
the brake heavily. Instead, gradually
decrease your speed. Hold the steering
wheel firmly and slowly move to a safe place
on the side of the road.
Have a flat serviced by an authorized dealer
in order to prevent damage to the tire
pressure monitoring system sensors.
See
Tire Pressure Monitoring System (page 353).
Replace the spare tire with a road tire as
soon as possible. During repairing or
replacing of the flat tire, have an authorized
dealer inspect the tire pressure monitoring
system sensor for damage.
357
MKZ (CC9) Canada/United States of America, enUSA, First Printing Wheels and Tires
Page 361 of 564
Dissimilar Spare Wheel and Tire
Assembly Information
WARNING
Failure to follow these guidelines could
result in an increased risk of loss of
vehicle control, injury or death. If you have a dissimilar spare wheel and tire,
then it is intended for temporary use only.
This means that if you need to use it, you
should replace it as soon as possible with a
road wheel and tire assembly that is the
same size and type as the road tires and
wheels that were originally provided by Ford.
If the dissimilar spare tire or wheel is
damaged, it should be replaced rather than
repaired.
Important Use of Spare Wheel
A dissimilar spare wheel and tire assembly
is defined as a spare wheel and tire assembly
that is different in brand, size or appearance
from the road tires and wheels and can be
one of three types:
1. T-type mini-spare.
*
2. Full-size dissimilar spare with label on wheel. **
3. Full-size dissimilar spare without label on
wheel.
* This spare tire begins with the letter T for
tire size and may have Temporary Use Only
molded in the sidewall.
** This spare tire has a label on the wheel that
states: THIS WHEEL AND TIRE ASSEMBLY
FOR TEMPORARY USE ONLY.
Driving with a T-type Mini-spare or Full-size
Dissimilar Spare With Label on Wheel
Do not:
• Exceed 50 mph (80 km/h).
• Load the vehicle beyond maximum
vehicle load rating listed on the Safety
Compliance Label. •
Tow a trailer.
• Use snow chains on the end of the
vehicle with the dissimilar spare tire.
• Use more than one dissimilar spare tire
at a time.
• Use commercial car washing equipment.
• Try to repair the dissimilar spare tire.
Use of the above dissimilar spare wheel at
any one wheel location can lead to
impairment of the following:
• Handling, stability and braking
performance.
• Comfort and noise.
• Ground clearance and parking at curbs.
• Winter weather driving capability.
• Wet weather driving capability.
• All-wheel driving capability (if applicable).
Driving With a Full-size Dissimilar Spare
Wheel and Tire Assembly
Do not:
• Exceed 70 mph (113 km/h).
• Use more than one dissimilar spare
wheel and tire assembly at a time.
358
MKZ (CC9) Canada/United States of America, enUSA, First Printing Wheels and Tires
Page 362 of 564
•
Use commercial car washing equipment.
• Use snow chains on the end of the
vehicle with the dissimilar spare wheel
and tire assembly.
Use of the above dissimilar spare wheel at
any one wheel location can lead to
impairment of the following:
• Handling, stability and braking
performance.
• Comfort and noise.
• Ground clearance and parking at curbs.
• Winter weather driving capability.
• Wet weather driving capability.
• All-wheel driving capability.
Give additional caution to the following when
driving with the full-size dissimilar spare
wheel and tire assembly:
• Towing a trailer.
• Driving vehicles equipped with a camper
body.
• Driving vehicles with a load on the cargo
rack. Drive cautiously when using a full-size
dissimilar spare wheel and tire assembly and
seek service as soon as possible.
Changing a Road Wheel Procedure (If
Equipped) WARNINGS
When one of the front wheels is off the
ground, the transmission alone will not
prevent the vehicle from moving or slipping
off the jack, even if the transmission is in park
(P). To help prevent your vehicle from
moving when you change a tire, be
sure to place the transmission in park (P), set
the parking brake and block (in both
directions) the wheel that is diagonally
opposite (other side and end of the vehicle)
to the tire being changed. Never get underneath a vehicle that is
supported only by a jack. If your vehicle
slips off the jack, you or someone else could
be seriously injured. WARNINGS
Do not attempt to change a tire on the
side of the vehicle close to moving
traffic. Pull far enough off the road to avoid
the danger of being hit when operating the
jack or changing the wheel. Always use the jack provided as
original equipment with your vehicle.
If using a jack other than the one provided
as original equipment with your vehicle,
make sure the jack capacity is adequate for
the vehicle weight, including any vehicle
cargo or modifications. Note:
Passengers should not remain in your
vehicle when the vehicle is being jacked.
1. Park on a level surface, set the parking brake and activate the hazard flashers.
2. Place the transmission in park (P) and turn the engine off. For vehicles with a
manual transmission, place the
transmission in reverse ®) after the
engine is turned off.
359
MKZ (CC9) Canada/United States of America, enUSA, First Printing Wheels and Tires
Page 555 of 564
Auxiliary Power Points.................................156
110 Volt AC Power Point....................................156
12 Volt DC Power Point......................................156
Locations...............................................................156
AWD See: All-Wheel Drive...........................................179
B
Battery See: Changing the 12V Battery........................312
Blind Spot Information System..................231 Switching the System Off and On..................233
System Errors......................................................233
Using the System................................................231
Bonnet Lock See: Opening and Closing the Hood............295
Booster Seats..................................................28
Types of Booster Seats.......................................29
Brake Fluid Check..........................................311
Brakes..............................................................188 General Information............................................188
Breaking-In....................................................256
Bulb Specification Chart..............................316
C
Cabin Air Filter
...............................................138 California Proposition 65
...............................12
Capacities and Specifications - 2.0L.......374 Specifications......................................................375
Capacities and Specifications - 3.0L.......379 Specifications.......................................................381
Capacities and Specifications...................367
Car Wash See: Cleaning the Exterior................................
321
Center Console..............................................158 Rear Seat Armrest...............................................158
Changing a Bulb
............................................316
Lamp Assembly Condensation........................316
Replacing Bulbs...................................................316
Changing a Fuse..........................................292 Fuses.....................................................................292
Changing a Road Wheel.............................357 Changing a Road Wheel Procedure..............
359
Dissimilar Spare Wheel and Tire Assembly Information......................................................358
Stowing the Flat Tire..........................................363
Stowing the Flat Tire Using the Retainer Strap..................................................................363
Changing the 12V Battery...........................312
Changing the Engine Air Filter..................319
Changing the Wiper Blades........................314
Checking MyKey System Status.................62 MyKey Distance....................................................62
Number of Admin Keys.......................................63 Number of MyKeys...............................................62
Checking the Wiper Blades........................314
Child Restraint and Seatbelt Maintenance...................................................41
Child Restraint Positioning
............................31
Child Safety.......................................................17
General Information...............................................17
Child Safety Locks..........................................32 Left-Hand Side.......................................................33
Right-Hand Side....................................................33
Cleaning Leather Seats..............................326
Cleaning Products
.......................................320
Cleaning the Alloy Wheels.........................327
Cleaning the Engine....................................322
Cleaning the Exterior
....................................321
Exterior Chrome Parts........................................321
Exterior Plastic Parts..........................................322
Stripes or Graphics............................................322
Underbody...........................................................322
Under Hood.........................................................322
Cleaning the Instrument Panel and Instrument Cluster Lens
...........................325
Cleaning the Interior....................................323
Cleaning Alcantara Microfiber Cloth
Fabric................................................................324
Cleaning the Windows and Wiper Blades
...........................................................323
Clearing All MyKeys.......................................62
552
MKZ (CC9) Canada/United States of America, enUSA, First Printing Index
Page 563 of 564
Towing Points................................................265
Installing the Recovery Hook..........................265
Recovery Hook Location..................................265
Towing the Vehicle on Four Wheels
.......254
Emergency Towing............................................254
Recreational Towing..........................................254
Towing.............................................................249
Traction Control.............................................194 Principle of Operation........................................194
Transmission Code Designation...............373
Transmission...................................................173
Transmission See: Transmission................................................173
Transporting the Vehicle............................264
Type Approvals.............................................546 RF Certification Logos for Tire Pressure
Monitoring Sensor(s).....................................546
U
Under Hood Overview - 2.0L
....................297
Under Hood Overview - 3.0L....................299
Universal Garage Door Opener
.................151
HomeLink Wireless Control System................151
Using Adaptive Cruise Control..................216 Automatic Cancellation....................................220
Blocked Sensor..................................................222
Canceling the Set Speed.................................
220 Changing the Set Speed..................................220
Detection Issues..................................................221
Following a Vehicle.............................................218
Following a Vehicle to a Complete Stop.......218
Hilly Condition Usage........................................221
Overriding the System......................................220
Park Brake Application......................................221
Resuming the Set Speed.................................
220
Setting the Adaptive Cruise Speed................217
Setting the Adaptive Cruise Speed When Your Vehicle is Stationary.......................................
217
Setting the Gap Distance..................................218
Switching Adaptive Cruise Control Off..........221
Switching Adaptive Cruise Control On..........217
Switching to Normal Cruise Control..............224
System Not Available........................................222
Using All-Wheel Drive..................................179 Driving In Special Conditions With All-Wheel
Drive (AWD).......................................................181
Operating AWD Vehicles With Spare or Mismatched Tires............................................181
Using Cruise Control....................................215 Switching Cruise Control Off............................216
Switching Cruise Control On............................215
Using MyKey With Remote Start Systems..........................................................63
Using Snow Chains......................................352
Using Stability Control
..................................197 Using Summer Tires
....................................352
Using Traction Control.................................194 Switching the System Off..................................194
System Indicator Lights and Messages.........
194
Using a Switch......................................................194
Using the Information Display Controls.........194
Using Voice Recognition............................408 Audio Voice Commands....................................410
Climate Voice Commands..................................411
Mobile App Voice Commands.........................415
Navigation Voice Commands...........................414
Phone Voice Commands....................................411
SiriusXM Traffic and Travel Link Voice
Commands.......................................................416
Voice Settings Commands................................417
Utilizing the Mediation/Arbitration Program (Canada Only)
.............................................270
V
Vehicle Care
..................................................320
General Information...........................................320
Vehicle Certification Label.........................372
Vehicle Identification Number...................372
Vehicle Storage
.............................................327
Battery...................................................................328
Body.......................................................................327
Brakes...................................................................328
560
MKZ (CC9) Canada/United States of America, enUSA, First Printing Index