buttons LINCOLN MKZ 2018 Owners Manual
[x] Cancel search | Manufacturer: LINCOLN, Model Year: 2018, Model line: MKZ, Model: LINCOLN MKZ 2018Pages: 595, PDF Size: 5.06 MB
Page 71 of 595
LOCKING AND UNLOCKING
You can use the power door lock control orthe remote control to lock and unlock yourvehicle.
Power Door Locks
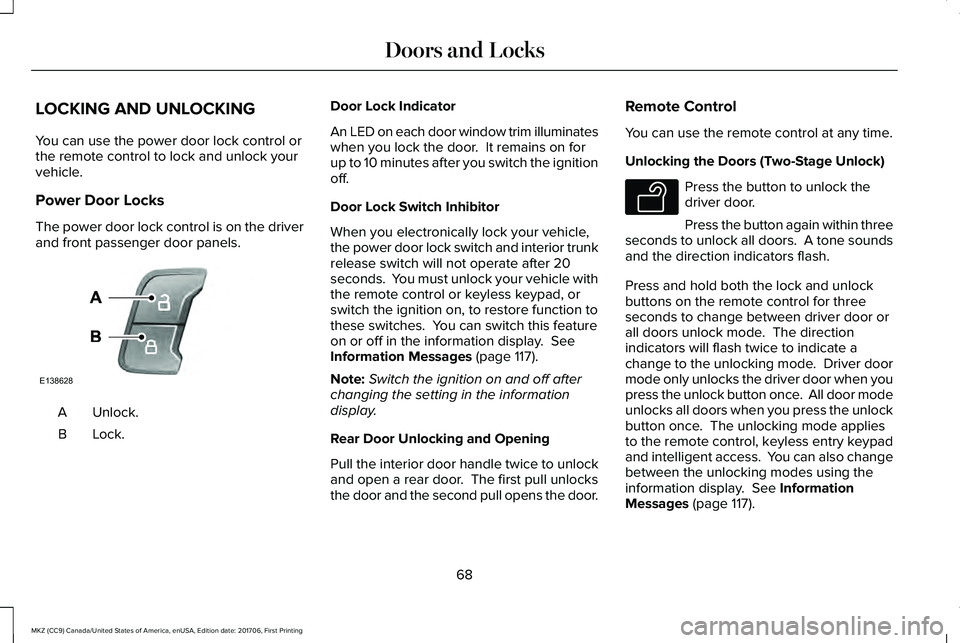
The power door lock control is on the driverand front passenger door panels.
Unlock.A
Lock.B
Door Lock Indicator
An LED on each door window trim illuminateswhen you lock the door. It remains on forup to 10 minutes after you switch the ignitionoff.
Door Lock Switch Inhibitor
When you electronically lock your vehicle,the power door lock switch and interior trunkrelease switch will not operate after 20seconds. You must unlock your vehicle withthe remote control or keyless keypad, orswitch the ignition on, to restore function tothese switches. You can switch this featureon or off in the information display. SeeInformation Messages (page 117).
Note:Switch the ignition on and off afterchanging the setting in the informationdisplay.
Rear Door Unlocking and Opening
Pull the interior door handle twice to unlockand open a rear door. The first pull unlocksthe door and the second pull opens the door.
Remote Control
You can use the remote control at any time.
Unlocking the Doors (Two-Stage Unlock)
Press the button to unlock thedriver door.
Press the button again within threeseconds to unlock all doors. A tone soundsand the direction indicators flash.
Press and hold both the lock and unlockbuttons on the remote control for threeseconds to change between driver door orall doors unlock mode. The directionindicators will flash twice to indicate achange to the unlocking mode. Driver doormode only unlocks the driver door when youpress the unlock button once. All door modeunlocks all doors when you press the unlockbutton once. The unlocking mode appliesto the remote control, keyless entry keypadand intelligent access. You can also changebetween the unlocking modes using theinformation display. See InformationMessages (page 117).
68
MKZ (CC9) Canada/United States of America, enUSA, Edition date: 201706, First Printing
Doors and LocksE138628 E138629
Page 77 of 595
Note:Let the power system operate thedecklid after pressing the control. Pushingor pulling the decklid may activate theobstacle detection feature and stop thepower operation.
With the Decklid Close Button
Press the button inside the decklidon the left-hand side.
Obstacle Detection
The decklid will reverse to full open if itdetects an obstacle while closing. Threechimes will sound as the decklid begins toreopen. Remove the obstacle to close thedecklid.
Note:Before driving your vehicle, check theinstrument cluster for a trunk ajar or doorajar message or warning indicator. Failureto do this could result in unintentionallyleaving the decklid open while driving.
The decklid will stop and three chimes willsound if it detects an obstacle while opening.Remove the obstacle to operate the decklid.
Resetting the Power Decklid
The decklid may not operate correctly andyou may need to reset it if:
•The vehicle battery charge is low.
•You disconnect the battery.
•You manually close the decklid and leaveit unlatched.
To reset the power decklid:
1. Disconnect the battery for 20 secondsthen reconnect the battery.
2. Manually close the decklid making sureit is fully closed.
3.Power open the decklid using the remotecontrol or instrument panel button.
KEYLESS ENTRY
SECURICODE™ KEYLESS ENTRYKEYPAD
The keypad is located near the driverwindow. It is invisible until you touch it, thenit lights up so you can see and touch theappropriate buttons.
Note:If you enter your entry code too faston the keypad, the unlock function may notwork. Re-enter your entry code more slowly.
You can use the keypad to:
•Lock or unlock the doors.
•Program and erase personal entry codes.
•Arm and disarm the anti-theft alarm.
•Release the trunk.
Note:The keypad does not operate a powerdecklid.
74
MKZ (CC9) Canada/United States of America, enUSA, Edition date: 201706, First Printing
Doors and LocksE194407 E138637
Page 79 of 595
To Unlock All Doors
Enter the factory-set code or your personalcode, then press 3·4 within five seconds.
To Lock All Doors
Press and hold 7·8 and 9·0 at the same timewith the driver door closed. You do not needto enter the keypad code first.
To Release the Trunk
Enter the factory-set code or your personalcode, then press 5·6 within five seconds.
Note:The keypad does not operate a powerdecklid.
Displaying the Factory Set Code
Note:You need to have two programmedintelligent access keys for this procedure.
To display the factory-set code in theinformation display:
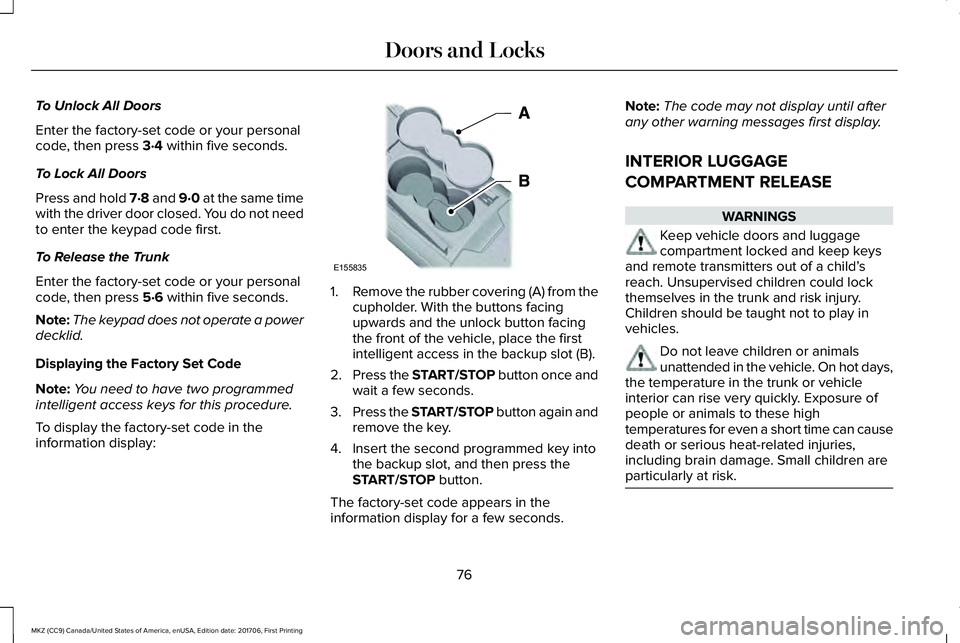
1.Remove the rubber covering (A) from thecupholder. With the buttons facingupwards and the unlock button facingthe front of the vehicle, place the firstintelligent access in the backup slot (B).
2.Press the START/STOP button once andwait a few seconds.
3.Press the START/STOP button again andremove the key.
4. Insert the second programmed key intothe backup slot, and then press theSTART/STOP button.
The factory-set code appears in theinformation display for a few seconds.
Note:The code may not display until afterany other warning messages first display.
INTERIOR LUGGAGE
COMPARTMENT RELEASE
WARNINGS
Keep vehicle doors and luggagecompartment locked and keep keysand remote transmitters out of a child’sreach. Unsupervised children could lockthemselves in the trunk and risk injury.Children should be taught not to play invehicles.
Do not leave children or animalsunattended in the vehicle. On hot days,the temperature in the trunk or vehicleinterior can rise very quickly. Exposure ofpeople or animals to these hightemperatures for even a short time can causedeath or serious heat-related injuries,including brain damage. Small children areparticularly at risk.
76
MKZ (CC9) Canada/United States of America, enUSA, Edition date: 201706, First Printing
Doors and LocksE155835
Page 82 of 595

You must have two previously programmedintelligent access keys inside your vehicleand the new unprogrammed intelligentaccess keys readily accessible. See anauthorized dealer to have the spare keyprogrammed if two previously programmedkeys are not available.
Make sure that your vehicle is off beforebeginning this procedure. Make sure thatyou close all the doors before beginning andthat they remain closed throughout theprocedure. Perform all steps within 30seconds of starting the sequence. Stop andwait for at least one minute before startingagain if you perform any steps out ofsequence.
Read and understand the entire procedurebefore you begin.
1.Remove the rubber covering (A) from thecupholder. With the buttons facingupwards and the unlock button facingthe front of the vehicle, place the firstintelligent access in the backup slot (B).
2. Press the push button ignition switch.
3. Wait five seconds and then press thepush button ignition switch again.
4. Remove the intelligent access key.
5. Within 10 seconds, place a secondprogrammed intelligent access key in thebackup slot. Press the push buttonignition switch.
6. Wait five seconds and then press thepush button ignition switch again.
7. Remove the intelligent access key.
8. Place the unprogrammed intelligentaccess key in the backup slot and pressthe push button ignition switch.
Programming is now complete. Verify theremote control functions operate and yourvehicle starts with the new intelligent accesskey.
If programming was not successful, wait 10seconds and repeat Steps 1 through 7. If youare still unsuccessful, take your vehicle toyour authorized dealer.
ANTI-THEFT ALARM
The system will warn you of an unauthorizedentry to your vehicle. It will be triggered ifany door, the luggage compartment or thehood is opened without using the key,remote control or keyless entry keypad.
The direction indicators will flash and thehorn will sound if unauthorized entry isattempted while the alarm is armed.
79
MKZ (CC9) Canada/United States of America, enUSA, Edition date: 201706, First Printing
SecurityE155835
Page 114 of 595
GENERAL INFORMATION
WARNING
Driving while distracted can result inloss of vehicle control, crash and injury.We strongly recommend that you useextreme caution when using any device thatmay take your focus off the road. Yourprimary responsibility is the safe operationof your vehicle. We recommend against theuse of any hand-held device while drivingand encourage the use of voice-operatedsystems when possible. Make sure you areaware of all applicable local laws that mayaffect the use of electronic devices whiledriving.
You can control various systems on yourvehicle using the information display controlson the steering wheel. The informationdisplay shows the corresponding information.
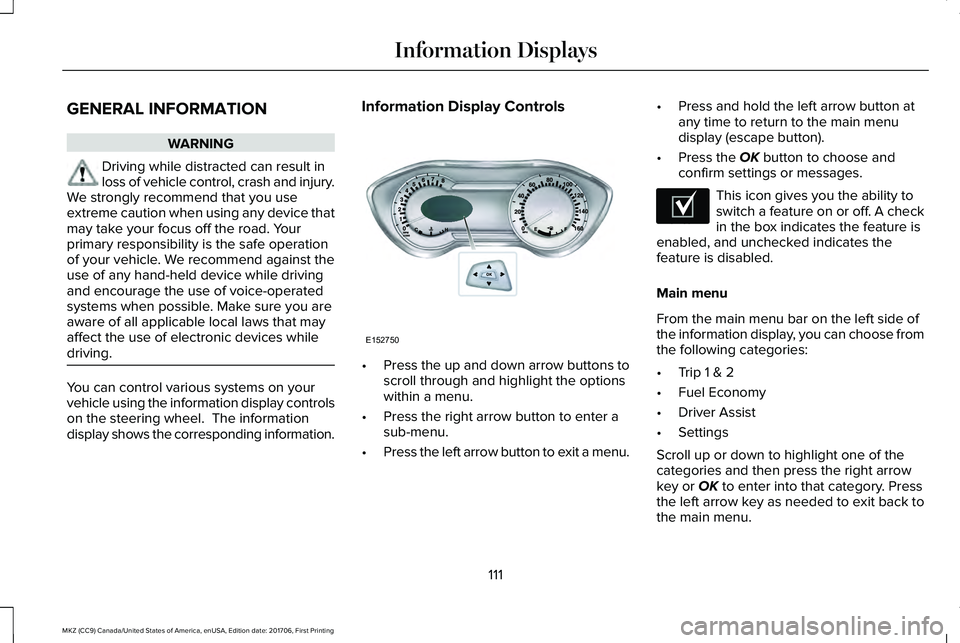
Information Display Controls
•Press the up and down arrow buttons toscroll through and highlight the optionswithin a menu.
•Press the right arrow button to enter asub-menu.
•Press the left arrow button to exit a menu.
•Press and hold the left arrow button atany time to return to the main menudisplay (escape button).
•Press the OK button to choose andconfirm settings or messages.
This icon gives you the ability toswitch a feature on or off. A checkin the box indicates the feature isenabled, and unchecked indicates thefeature is disabled.
Main menu
From the main menu bar on the left side ofthe information display, you can choose fromthe following categories:
•Trip 1 & 2
•Fuel Economy
•Driver Assist
•Settings
Scroll up or down to highlight one of thecategories and then press the right arrowkey or OK to enter into that category. Pressthe left arrow key as needed to exit back tothe main menu.
111
MKZ (CC9) Canada/United States of America, enUSA, Edition date: 201706, First Printing
Information DisplaysE152750 E204495
Page 115 of 595
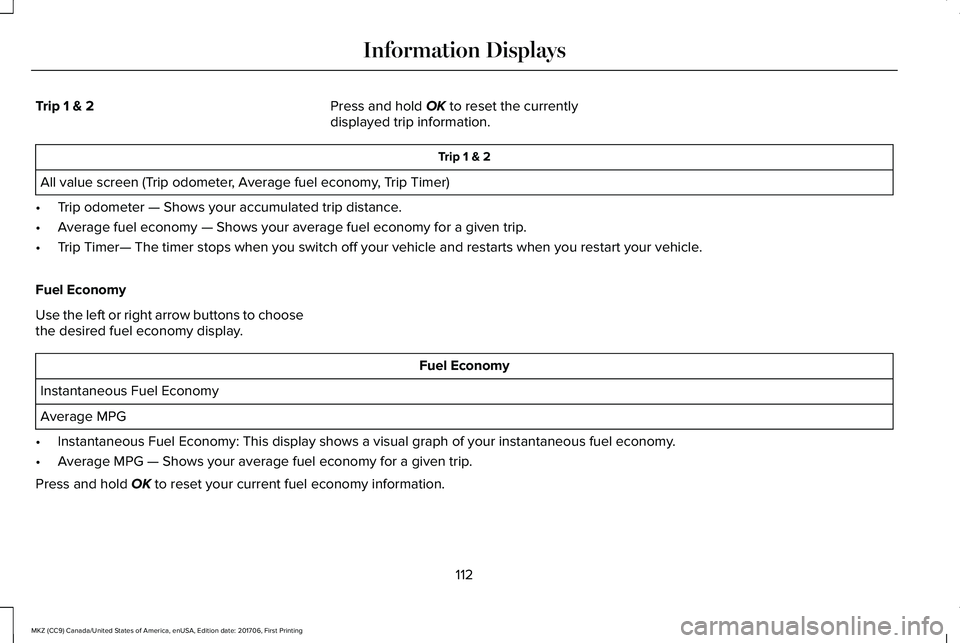
Trip 1 & 2Press and hold OK to reset the currentlydisplayed trip information.
Trip 1 & 2
All value screen (Trip odometer, Average fuel economy, Trip Timer)
•Trip odometer — Shows your accumulated trip distance.
•Average fuel economy — Shows your average fuel economy for a given trip.
•Trip Timer— The timer stops when you switch off your vehicle and restarts when you restart your vehicle.
Fuel Economy
Use the left or right arrow buttons to choosethe desired fuel economy display.
Fuel Economy
Instantaneous Fuel Economy
Average MPG
•Instantaneous Fuel Economy: This display shows a visual graph of your instantaneous fuel economy.
•Average MPG — Shows your average fuel economy for a given trip.
Press and hold OK to reset your current fuel economy information.
112
MKZ (CC9) Canada/United States of America, enUSA, Edition date: 201706, First Printing
Information Displays
Page 116 of 595
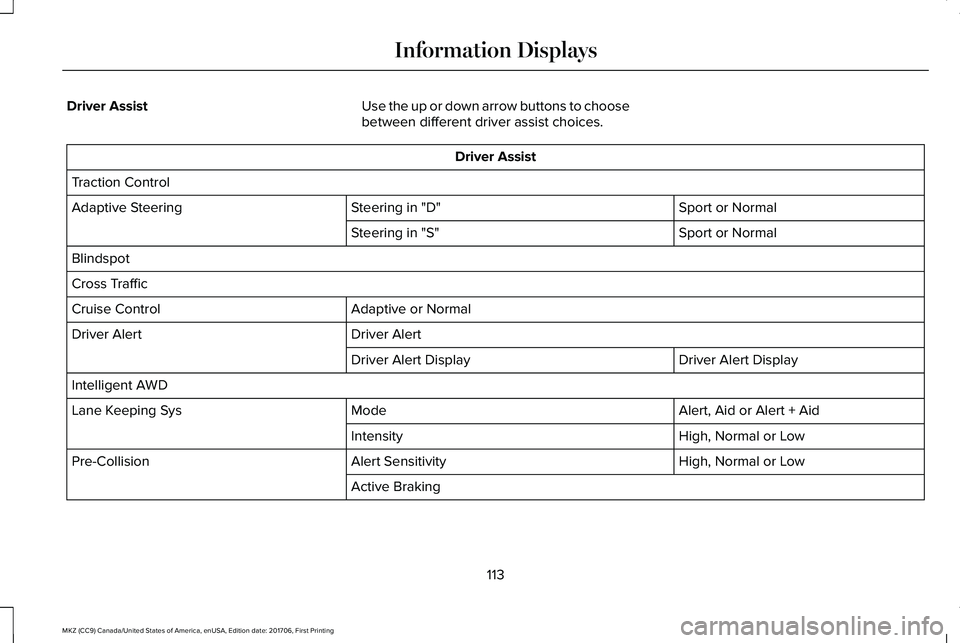
Driver AssistUse the up or down arrow buttons to choosebetween different driver assist choices.
Driver Assist
Traction Control
Sport or NormalSteering in "D"Adaptive Steering
Sport or NormalSteering in "S"
Blindspot
Cross Traffic
Adaptive or NormalCruise Control
Driver AlertDriver Alert
Driver Alert DisplayDriver Alert Display
Intelligent AWD
Alert, Aid or Alert + AidModeLane Keeping Sys
High, Normal or LowIntensity
High, Normal or LowAlert SensitivityPre-Collision
Active Braking
113
MKZ (CC9) Canada/United States of America, enUSA, Edition date: 201706, First Printing
Information Displays
Page 117 of 595
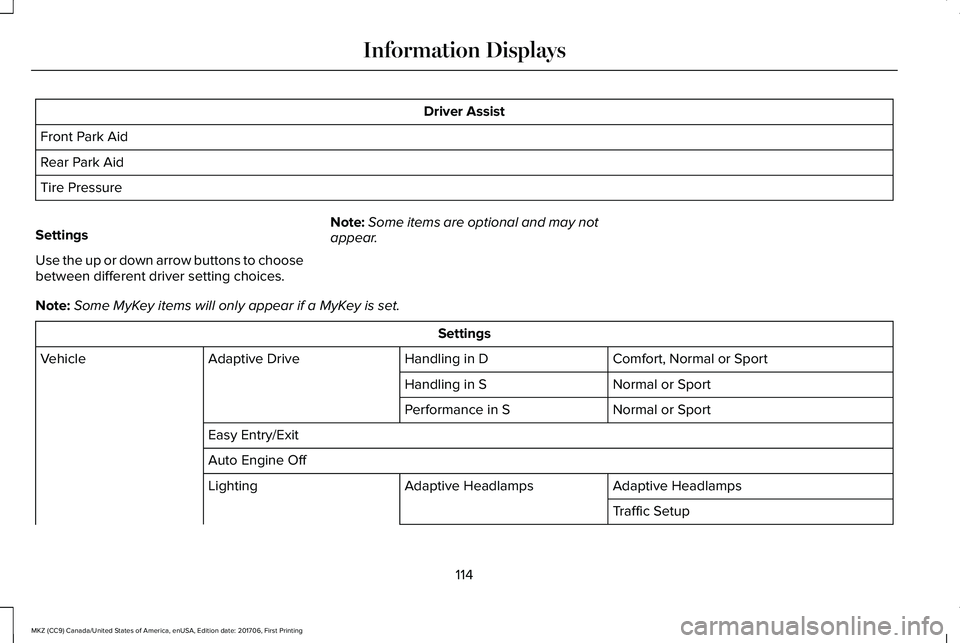
Driver Assist
Front Park Aid
Rear Park Aid
Tire Pressure
Settings
Use the up or down arrow buttons to choosebetween different driver setting choices.
Note:Some items are optional and may notappear.
Note:Some MyKey items will only appear if a MyKey is set.
Settings
Comfort, Normal or SportHandling in DAdaptive DriveVehicle
Normal or SportHandling in S
Normal or SportPerformance in S
Easy Entry/Exit
Auto Engine Off
Adaptive HeadlampsAdaptive HeadlampsLighting
Traffic Setup
114
MKZ (CC9) Canada/United States of America, enUSA, Edition date: 201706, First Printing
Information Displays
Page 148 of 595
Lowering the Head Restraint
1. Press and hold button C.
2. Push the head restraint down.
Removing the Head Restraint
1.Pull the head restraint up until it reachesits highest position.
2. Press and hold buttons C and D.
3. Pull the head restraint up.
Installing the Head Restraint
Align the steel stems into the guide sleevesand push the head restraint down until itlocks.
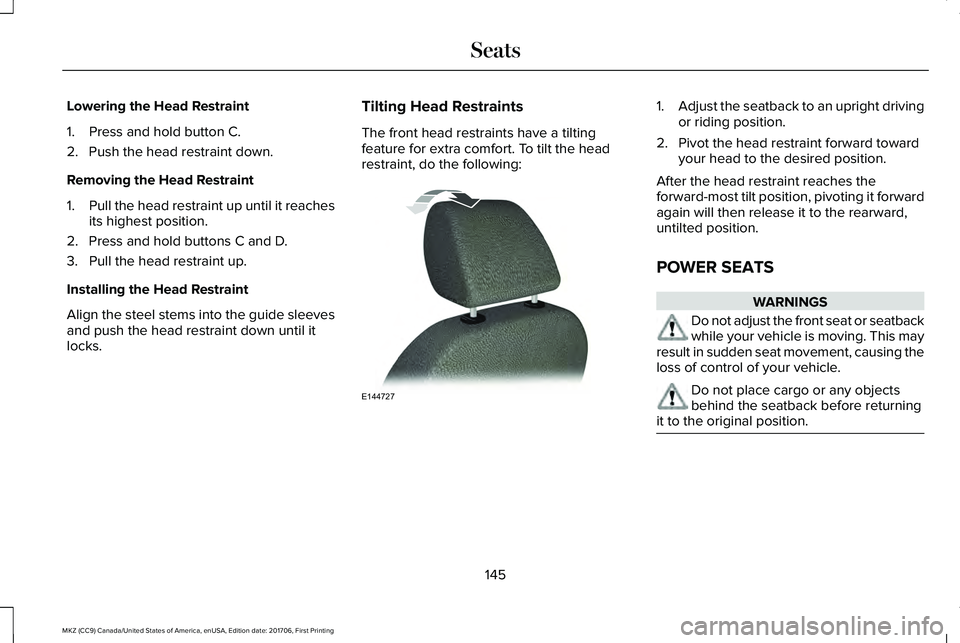
Tilting Head Restraints
The front head restraints have a tiltingfeature for extra comfort. To tilt the headrestraint, do the following:
1.Adjust the seatback to an upright drivingor riding position.
2. Pivot the head restraint forward towardyour head to the desired position.
After the head restraint reaches theforward-most tilt position, pivoting it forwardagain will then release it to the rearward,untilted position.
POWER SEATS
WARNINGS
Do not adjust the front seat or seatbackwhile your vehicle is moving. This mayresult in sudden seat movement, causing theloss of control of your vehicle.
Do not place cargo or any objectsbehind the seatback before returningit to the original position.
145
MKZ (CC9) Canada/United States of America, enUSA, Edition date: 201706, First Printing
SeatsE144727
Page 158 of 595
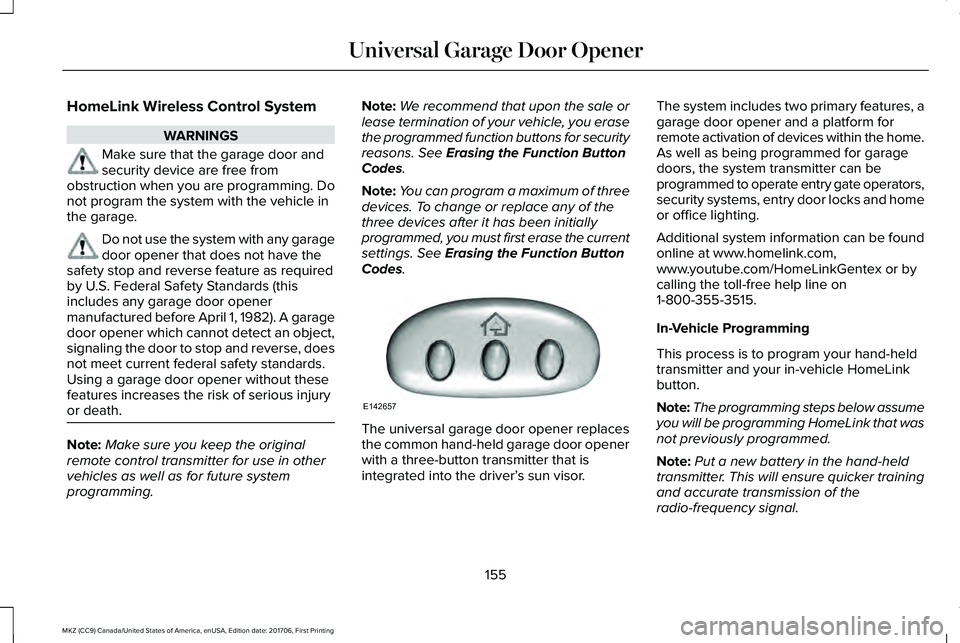
HomeLink Wireless Control System
WARNINGS
Make sure that the garage door andsecurity device are free fromobstruction when you are programming. Donot program the system with the vehicle inthe garage.
Do not use the system with any garagedoor opener that does not have thesafety stop and reverse feature as requiredby U.S. Federal Safety Standards (thisincludes any garage door openermanufactured before April 1, 1982). A garagedoor opener which cannot detect an object,signaling the door to stop and reverse, doesnot meet current federal safety standards.Using a garage door opener without thesefeatures increases the risk of serious injuryor death.
Note:Make sure you keep the originalremote control transmitter for use in othervehicles as well as for future systemprogramming.
Note:We recommend that upon the sale orlease termination of your vehicle, you erasethe programmed function buttons for securityreasons. See Erasing the Function ButtonCodes.
Note:You can program a maximum of threedevices. To change or replace any of thethree devices after it has been initiallyprogrammed, you must first erase the currentsettings. See Erasing the Function ButtonCodes.
The universal garage door opener replacesthe common hand-held garage door openerwith a three-button transmitter that isintegrated into the driver’s sun visor.
The system includes two primary features, agarage door opener and a platform forremote activation of devices within the home.As well as being programmed for garagedoors, the system transmitter can beprogrammed to operate entry gate operators,security systems, entry door locks and homeor office lighting.
Additional system information can be foundonline at www.homelink.com,www.youtube.com/HomeLinkGentex or bycalling the toll-free help line on1-800-355-3515.
In-Vehicle Programming
This process is to program your hand-heldtransmitter and your in-vehicle HomeLinkbutton.
Note:The programming steps below assumeyou will be programming HomeLink that wasnot previously programmed.
Note:Put a new battery in the hand-heldtransmitter. This will ensure quicker trainingand accurate transmission of theradio-frequency signal.
155
MKZ (CC9) Canada/United States of America, enUSA, Edition date: 201706, First Printing
Universal Garage Door OpenerE142657