cooling LINCOLN MKZ 2018 Owners Manual
[x] Cancel search | Manufacturer: LINCOLN, Model Year: 2018, Model line: MKZ, Model: LINCOLN MKZ 2018Pages: 595, PDF Size: 5.06 MB
Page 141 of 595
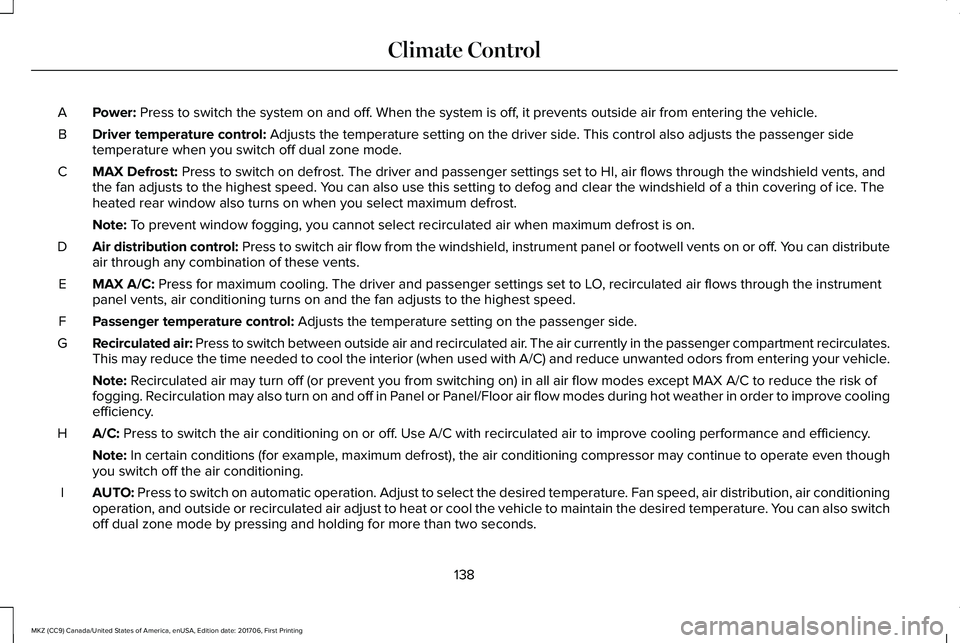
Power: Press to switch the system on and off. When the system is off, it prevents outside air from entering the vehicle.A
Driver temperature control: Adjusts the temperature setting on the driver side. This control also adjusts the passenger sidetemperature when you switch off dual zone mode.B
MAX Defrost: Press to switch on defrost. The driver and passenger settings set to HI, air flows through the windshield vents, andthe fan adjusts to the highest speed. You can also use this setting to defog and clear the windshield of a thin covering of ice. Theheated rear window also turns on when you select maximum defrost.
C
Note: To prevent window fogging, you cannot select recirculated air when maximum defrost is on.
Air distribution control: Press to switch air flow from the windshield, instrument panel or footwell vents on or off. You can distributeair through any combination of these vents.D
MAX A/C: Press for maximum cooling. The driver and passenger settings set to LO, recirculated air flows through the instrumentpanel vents, air conditioning turns on and the fan adjusts to the highest speed.E
Passenger temperature control: Adjusts the temperature setting on the passenger side.F
Recirculated air: Press to switch between outside air and recirculated air. The air currently in the passenger compartment recirculates.This may reduce the time needed to cool the interior (when used with A/C) and reduce unwanted odors from entering your vehicle.G
Note: Recirculated air may turn off (or prevent you from switching on) in all air flow modes except MAX A/C to reduce the risk offogging. Recirculation may also turn on and off in Panel or Panel/Floor air flow modes during hot weather in order to improve coolingefficiency.
A/C: Press to switch the air conditioning on or off. Use A/C with recirculated air to improve cooling performance and efficiency.H
Note: In certain conditions (for example, maximum defrost), the air conditioning compressor may continue to operate even thoughyou switch off the air conditioning.
AUTO: Press to switch on automatic operation. Adjust to select the desired temperature. Fan speed, air distribution, air conditioningoperation, and outside or recirculated air adjust to heat or cool the vehicle to maintain the desired temperature. You can also switchoff dual zone mode by pressing and holding for more than two seconds.
I
138
MKZ (CC9) Canada/United States of America, enUSA, Edition date: 201706, First Printing
Climate Control
Page 143 of 595
Note:The system adjusts to heat or cool theinterior to the temperature you select asquickly as possible.
Note:For the system to function efficiently,the instrument panel and side air ventsshould be fully open.
Note:If you select AUTO during cold outsidetemperatures, the system directs air flow tothe windshield and side window vents. Inaddition, the fan may run at a slower speeduntil the engine warms up.
Note:If you select AUTO during hottemperatures and the inside of the vehicleis hot, the system uses recirculated air tomaximize interior cooling. Fan speed mayalso reduce until the air cools.
Quickly Heating the Interior
1. Press AUTO.
2. Adjust the temperature function to thedesired setting.
Recommended Settings for Heating
1. Press AUTO.
2. Adjust the temperature function to thedesired setting. Use 72°F (22°C) as astarting point, then adjust the setting asnecessary.
Quickly Cooling the Interior
1. Press MAX A/C.
Recommended Settings for Cooling
1. Press AUTO.
2. Adjust the temperature function to thedesired setting. Use 72°F (22°C) as astarting point, then adjust the setting asnecessary.
Defogging the Side Windows in ColdWeather
1. Press defrost.
2. Adjust the temperature control to thedesired setting. Use 72°F (22°C) as astarting point, then adjust the setting asnecessary.
HEATED WINDOWS AND MIRRORS
Note:Make sure the engine is runningbefore operating the heated windows.
Note:Depending on your remote startsettings, the heated windows, mirrors andwipers may remain on after remote startingthe vehicle.
Heated Rear Window
Press the button to clear theheated rear window of thin ice andfog. The heated rear window turnsoff after a short period of time. Press thebutton again to switch it off.
Note: Do not use razor blades or othersharp objects to clean or remove decals fromthe inside of the heated rear window. Thevehicle warranty does not cover damagecaused to the heated rear window grid lines.
Heated Exterior Mirrors (If Equipped)
When you switch the heated rear windowon, the heated exterior mirrors turn on.
140
MKZ (CC9) Canada/United States of America, enUSA, Edition date: 201706, First Printing
Climate ControlE184884
Page 156 of 595
WARNING
People who are unable to feel pain totheir skin because of advanced age,chronic illness, diabetes, spinal cord injury,medication, alcohol use, exhaustion or otherphysical conditions, must exercise care whenusing the heated seat. The heated seat maycause burns even at low temperatures,especially if used for long periods of time.Do not place anything on the seat thatinsulates against heat, such as a blanket orcushion. This may cause the heated seat tooverheat. Do not puncture the seat with pins,needles or other pointed objects. This maydamage the heating element which maycause the heated seat to overheat. Anoverheated seat may cause serious personalinjury.
Do not do the following:
•Place heavy objects on the seat.
•Operate the heated seat if water or anyother liquid spills on the seat. Allow theseat to dry thoroughly.
•Operate the heated seats unless theengine is running. Doing so can causethe battery to lose charge.
Touch the heated seat symbol to cyclethrough the various heat settings and off.More indicator lights indicate warmersettings.
Cooled Seats
The cooled seats will only function when theengine is running.
To operate the cooled seats:
Press the cooled seat symbol to cyclethrough the various cooling settings and off.More indicator lights indicate cooler settings.
If the engine falls below 350 RPM while thecooled seats are on, the feature will turn itselfoff. You will need to reactivate it.
Climate controlled seat air filterreplacement
Your vehicle is equipped with lifetime airfilters that are integrated with the seats.Regular maintenance or replacement is notneeded.
153
MKZ (CC9) Canada/United States of America, enUSA, Edition date: 201706, First Printing
SeatsE146322 E146309
Page 191 of 595
Operating AWD Vehicles With Spareor Mismatched Tires
WARNING
Only use replacement tires and wheelsthat are the same size, load index,speed rating and type (such as P-metricversus LT-metric or all-season versusall-terrain) as those originally provided byFord. The recommended tire and wheel sizemay be found on either the SafetyCompliance Certification Label (affixed toeither the door hinge pillar, door-latch post,or the door edge that meets the door-latchpost, next to the driver’s seating position), orthe Tire Label which is located on the B-Pillaror edge of the driver’s door. If thisinformation is not found on these labels, thenyou should contact your authorized dealeras soon as possible. Use of any tire or wheelnot recommended by Ford can affect thesafety and performance of your vehicle,which could result in an increased risk of lossof vehicle control, vehicle rollover, personalinjury and death.
A spare tire of a different size other than thetire provided should never be used. TheAWD system may disable automatically andenter front-wheel drive only mode to protectdriveline components if a non-full sized tireis installed. This condition may display anAWD OFF message in the informationdisplay. If there is an AWD OFF message inthe information display from using a non-fullsized spare tire, this indicator should turn offafter reinstalling the repaired or replacednormal road tire and cycling the ignition offand on. It is recommended to reinstall therepaired or replaced road tire as soon aspossible.
Major dissimilar tire sizes between the frontand rear axles (for example, 17 inch lowprofile tires on the front axle and 22 inch highprofile tires on the rear axle) could cause theAWD system to stop functioning and defaultto front-wheel drive or damage the AWDsystem. However, the AWD system iscapable of tolerating any combination of newand worn tires of the same original tire size.For example, using 3 worn tread tires and 1new tread tire all of the same original tiresize, can be tolerated by the AWD system.
Driving In Special Conditions With All-Wheel Drive (AWD)
AWD vehicles are equipped for driving onsand, snow, mud and rough roads and haveoperating characteristics that are somewhatdifferent from conventional vehicles, both onand off the highway.
When driving at slow speeds in deep sandunder high outside temperatures, use a lowgear when possible. Lower gear operationwill maximize the engine and transmissioncooling capability.
Under severe operating conditions, the A/Cmay cycle on and off to protect overheatingof the engine.
Basic operating principles in specialconditions
•Drive slower in strong crosswinds whichcan affect the normal steeringcharacteristics of your vehicle.
•Be extremely careful when driving onpavement made slippery by loose sand,water, gravel, snow or ice.
188
MKZ (CC9) Canada/United States of America, enUSA, Edition date: 201706, First Printing
All-Wheel Drive (If Equipped)
Page 193 of 595
acceleration or braking which could resultin an increased risk of loss of vehiclecontrol, vehicle rollover and/or personalinjury. Use all available road surface toreturn the vehicle to a safe direction oftravel.
•In the event of an emergency stop, avoidskidding the tires and do not attempt anysharp steering wheel movements.
•If the vehicle goes from one type ofsurface to another (that is, from concreteto gravel) there will be a change in theway the vehicle responds to a maneuver(steering, acceleration or braking). Again,avoid these abrupt inputs.
Sand
Most of the time traction control improvestire traction by managing wheel slip throughBrake, Engine, and AWD calibrations.However, during low speed driving, disablingtraction control in deep sand can help keepthe wheels moving to maintain vehiclemomentum.
When driving over sand, try to keep all fourwheels on the most solid area of the trail.Avoid reducing the tire pressures but shiftto a lower gear and drive steadily throughthe terrain. Apply the accelerator slowly andavoid spinning the wheels.
Do not drive your vehicle in deep sand foran extended period of time. This could causethe AWD system to overheat and default tofront-wheel drive. If this occurs, an AWD OFFmessage displays in the information display.To resume normal AWD function as soon aspossible, stop the vehicle in a safe locationand stop the engine for at least 10 minutes.After the engine has been restarted and theAWD system has adequately cooled, theAWD OFF message turns off and normalAWD function returns. In the event theengine is not stopped, the AWD OFFmessage turns off when the system coolsand normal AWD function returns.
When driving at slow speeds in deep sandunder high outside temperatures, use L (Low)gear when possible. L (Low) gear operationwill maximize the engine and transmissioncooling capability.
Under severe operating conditions, the A/Cmay cycle on and off to protect overheatingof the engine.
Avoid excessive speed because vehiclemomentum can work against you and causethe vehicle to become stuck to the point thatassistance may be required from anothervehicle. Remember, you may be able to backout the way you came if you proceed withcaution.
Mud and Water
If you must drive through high water, driveslowly. Traction or brake capability may belimited.
When driving through water, determine thedepth; avoid water higher than the bottomof the wheel rims (for cars) or the bottom ofthe hubs (for trucks) (if possible) and proceedslowly. If the ignition system gets wet, thevehicle may stall.
190
MKZ (CC9) Canada/United States of America, enUSA, Edition date: 201706, First Printing
All-Wheel Drive (If Equipped)
Page 263 of 595
Trailer lamps are required on most towedvehicles. Make sure all running lights, brakelights, turn signals and hazard lights areworking.
Before Towing a Trailer
Practice turning, stopping and backing up toget the feel of your vehicle-trailercombination before starting on a trip. Whenturning, make wider turns so the trailerwheels clear curbs and other obstacles.
When Towing a Trailer
•Do not drive faster than 70 mph(113 km/h) during the first 500 mi(800 km).
•Do not make full-throttle starts.
•Check your hitch, electrical connectionsand trailer wheel lug nuts thoroughly afteryou have traveled 50 miles (80kilometers).
•When stopped in congested or heavytraffic during hot weather, place thegearshift in position P to aid engine andtransmission cooling and to help A/Cperformance.
•Turn off the speed control with heavyloads or in hilly terrain. The speed controlmay turn off automatically when you aretowing on long, steep grades.
•Shift to a lower gear when driving downa long or steep hill. Do not apply thebrakes continuously, as they mayoverheat and become less effective.
•If your transmission is equipped with aGrade Assist or Tow/Haul feature, usethis feature when towing. This providesengine braking and helps eliminateexcessive transmission shifting foroptimum fuel economy and transmissioncooling.
•Allow more distance for stopping with atrailer attached. Anticipate stops andbrake gradually.
•Avoid parking on a grade. However, ifyou must park on a grade:
1. Turn the steering wheel to point yourvehicle tires away from traffic flow.
2. Set your vehicle parking brake.
3. Place the automatic transmission inposition P.
4. Place wheel chocks in front and back ofthe trailer wheels. (Chocks not includedwith vehicle.)
Launching or Retrieving a Boat orPersonal Watercraft (PWC)
Note:Disconnect the wiring to the trailerbefore backing the trailer into the water.
Note:Reconnect the wiring to the trailerafter removing the trailer from the water.
When backing down a ramp during boatlaunching or retrieval:
•Do not allow the static water level to riseabove the bottom edge of the rearbumper.
•Do not allow waves to break higher than6 in (15 cm) above the bottom edge ofthe rear bumper.
Exceeding these limits may allow water toenter vehicle components:
•Causing internal damage to thecomponents.
•Affecting driveability, emissions, andreliability.
260
MKZ (CC9) Canada/United States of America, enUSA, Edition date: 201706, First Printing
Towing
Page 313 of 595
From the main menu scroll to:
Action and descriptionMessage
Press the right arrow button,then from this menu scroll tothe following message.
Settings
Press the right arrow button,then from this menu scroll tothe following message.
Vehicle
Press the right arrow button,then from this menu scroll tothe following message.
Oil Life
Press and hold the OK buttonuntil the instrument clusterdisplays the followingmessage.
Hold OK toReset
Reset Successful
When the oil change indicatorresets the instrument clusterdisplays 100%.
Remaining Life
{00}%
Action and descriptionMessage
If the instrument clusterdisplays one of the followingmessages, repeat theprocess.
Not Reset
Reset Cancelled
ENGINE COOLANT CHECK
WARNINGS
Never remove the coolant reservoircap when the engine is running or hot.
Do not put coolant in the windshieldwasher reservoir. If sprayed on thewindshield, coolant could make it difficult tosee through the windshield.
To reduce the risk of personal injury,make sure the engine is cool beforeunscrewing the coolant pressure relief cap.The cooling system is under pressure. Steamand hot liquid can come out forcefully whenyou loosen the cap slightly.
WARNINGS
Do not add coolant further than theMAX mark.
When the engine is cold, check theconcentration and level of the coolant at theintervals listed in the scheduled maintenanceinformation. See Scheduled Maintenance(page 509).
Note:Make sure that the coolant level isbetween the MIN and the MAX marks onthe coolant reservoir.
Note: Coolant expands when it is hot. Thelevel may extend beyond the MAX mark.
Maintain coolant concentration within 48%to 50%, which equates to a freeze pointbetween -30°F (-34°C) and -34°F (-37°C).Coolant concentration should be checkedusing a refractometer. We recommend,Robinair® Coolant and Battery Refractometer75240 (Rotunda tool part number:ROB75240). We do not recommend the useof hydrometers or coolant test strips formeasuring coolant concentration.
310
MKZ (CC9) Canada/United States of America, enUSA, Edition date: 201706, First Printing
Maintenance
Page 314 of 595
Note:Automotive fluids are notinterchangeable. Do not use coolant orwindshield washer fluid outside of itsspecified function and vehicle location.
Note: Do not use stop leak pellets, coolingsystem sealants, or non-specified additivesas they can cause damage to the enginecooling or heating systems. Resultingcomponent damage may not be covered bythe vehicle Warranty.
Adding Coolant
WARNINGS
Do not add engine coolant when theengine is hot. Failure to follow thisinstruction could result in personal injury.
Never remove the coolant reservoircap when the engine is running or hot.
It is very important to use prediluted coolantmeeting the correct specification in order toavoid plugging the small passageways in theengine cooling system. See Capacities andSpecifications (page 380). Incorrectprediluted coolant use can cause damagenot covered by the vehicle Warranty.
If the coolant level is at or below theminimum mark, add prediluted coolantimmediately.
To top up the coolant level do the following:
1. Unscrew the cap slowly. Any pressureescapes as you unscrew the cap.
2. Add prediluted coolant meeting thecorrect specification. See Capacities andSpecifications (page 373).
3.Add enough prediluted coolant to reachthe correct level.
4. Replace the coolant reservoir cap, turnit clockwise until you feel a strongresistance.
5. Check the coolant level in the coolantreservoir the next few times you driveyour vehicle.
Note:During normal vehicle operation, thecoolant may change color from orange topink or light red. As long as the coolant isclear and uncontaminated, this color changedoes not indicate the coolant has degradednor does it require the coolant to be drained,the system to be flushed, or the coolant tobe replaced.
Do not mix different colors or types ofprediluted coolant in your vehicle. Mixing ofprediluted coolant or using an incorrectprediluted coolant may harm the engine orcooling system components and may not becovered by the vehicle Warranty.
In case of emergency, you can add a largeamount of water without engine coolant inorder to reach a vehicle service location. Inthis instance, qualified personnel:
1. Must drain the cooling system.
2. Chemically clean the cooling system.
3. Refill with prediluted coolant as soon aspossible.
Water alone, without prediluted coolant, cancause engine damage from corrosion,overheating or freezing.
Do not use the following as a coolantsubstitute:
•Alcohol.
•Methanol.
•Brine.
•Any coolant mixed with alcohol ormethanol antifreeze.
311
MKZ (CC9) Canada/United States of America, enUSA, Edition date: 201706, First Printing
Maintenance
Page 315 of 595
Alcohol and other liquids can cause enginedamage from overheating or freezing.
Do not add extra inhibitors or additives tothe coolant. These can be harmful andcompromise the corrosion protection of thecoolant.
Recycled Coolant
We do not recommend the use of recycledcoolant as an approved recycling process isnot yet available.
Dispose of used engine coolant in anappropriate manner. Follow yourcommunity's regulations and standards forrecycling and disposing of automotive fluids.
Severe Climates
If you drive in extremely cold climates:
•It may be necessary to increase thecoolant concentration above 50%.
•A coolant concentration of 60% providesimproved freeze point protection. Coolant concentrations above 60%decrease the overheat protectioncharacteristics of the coolant and maycause engine damage.
If you drive in extremely hot climates:
•It may be necessary to decrease thecoolant concentration to 40%.
•A coolant concentration of 40% providesimproved overheat protection. Coolantconcentrations below 40% decrease thefreeze and corrosion protectioncharacteristics of the coolant and maycause engine damage.
Vehicles driven year-round in non-extremeclimates should use prediluted coolant foroptimum cooling system and engineprotection.
Fail-Safe Cooling
Fail-safe cooling allows you to temporarilydrive your vehicle before any incrementalcomponent damage occurs. The fail-safedistance depends on ambient temperature,vehicle load and terrain.
How Fail-Safe Cooling Works
If the engine begins to overheat, the coolanttemperature gauge moves toward the redzone:
A warning lamp illuminates and amessage may appear in theinformation display.
If the engine reaches a presetover-temperature condition, the engineautomatically switches to alternating cylinderoperation. Each disabled cylinder acts as anair pump and cools the engine.
312
MKZ (CC9) Canada/United States of America, enUSA, Edition date: 201706, First Printing
Maintenance
Page 318 of 595
6F50/6F55 Transmission (If Equipped)
WARNINGS
The dipstick cap and surroundingcomponents may be hot; gloves arerecommended.
Use gloves when moving the air filterassembly. Components will be hot.
Note:Automatic transmission fluid expandswhen warmed. To obtain an accurate fluidcheck, drive the vehicle until it is warmed up(approximately 20 miles [30 kilometers]). Ifyour vehicle has been operated for anextended period at high speeds, in city trafficduring hot weather or pulling a trailer, thevehicle should be turned off until normaloperating temperatures are reached to allowthe fluid to cool before checking. Dependingon vehicle use, cooling times could take upto 30 minutes or longer.
Refer to your scheduled maintenanceinformation for scheduled intervals for fluidchecks and changes. Your transmission doesnot consume fluid. However, the fluid levelshould be checked if the transmission is notworking properly. For example, if thetransmission slips or shifts slowly or if younotice some sign of fluid leakage.
1.Drive the vehicle 20 miles (30 kilometers)or until it reaches normal operatingtemperature
2. Park the vehicle on a level surface andengage the parking brake.
3.With the parking brake engaged and yourfoot on the brake pedal, start the engineand move the gearshift lever through allof the gear ranges. Allow a minimum of10 seconds for each gear to engage.
4. Put the gearshift lever in P (Park) andleave the engine running.
Note:You will need to move the air filterassembly to access the transmissiondipstick.
5.Remove the dipstick, wiping it clean witha clean, dry lint free rag. If necessary,refer to Under hood overview in thischapter for the location of the dipstick.
6. Install the dipstick making sure it is fullyseated in the filler tube by turning it tothe locked position.
7.Remove the dipstick and inspect the fluidlevel. The fluid should be in thedesignated areas for normal operatingtemperature.
Moving the Air Filter Assembly (Accessingthe Dipstick)
WARNING
Do not run engine with the air filterdisconnected.
315
MKZ (CC9) Canada/United States of America, enUSA, Edition date: 201706, First Printing
Maintenance