transmission LINCOLN MKZ 2018 Owners Manual
[x] Cancel search | Manufacturer: LINCOLN, Model Year: 2018, Model line: MKZ, Model: LINCOLN MKZ 2018Pages: 595, PDF Size: 5.06 MB
Page 6 of 595
Heated Seats...................................................151
Climate Controlled Seats............................152
Rear Seat Armrest.........................................154
Universal Garage Door Opener
Universal Garage Door Opener................155
Auxiliary Power Points
Auxiliary Power Points.................................160
Storage Compartments
Center Console.............................................162
Overhead Console.......................................162
Starting and Stopping the
Engine
General Information......................................163
Keyless Starting.............................................163
Starting a Gasoline Engine.........................164
Engine Block Heater....................................166
Fuel and Refueling
Safety Precautions........................................168
Fuel Quality.....................................................168
Fuel Filler Funnel Location.........................169
Running Out of Fuel.....................................169
Refueling...........................................................171
Fuel Consumption.........................................174
Engine Emission Control
Emission Law..................................................176
Catalytic Converter........................................177
Transmission
Automatic Transmission..............................180
All-Wheel Drive
Using All-Wheel Drive..................................186
Brakes
General Information......................................195
Hints on Driving With Anti-LockBrakes..........................................................196
Electric Parking Brake..................................196
Auto Hold........................................................198
Traction Control
Principle of Operation..................................201
Using Traction Control.................................201
Stability Control
Principle of Operation.................................203
Using Stability Control................................204
Parking Aids
Principle of Operation.................................206
Rear Parking Aid...........................................206
Front Parking Aid..........................................207
Side Sensing System..................................208
Active Park Assist..........................................210
Rear View Camera........................................219
Cruise Control
Principle of Operation.................................222
Using Cruise Control...................................222
Using Adaptive Cruise Control.................223
Driving Aids
Driver Alert......................................................231
3
MKZ (CC9) Canada/United States of America, enUSA, Edition date: 201706, First Printing
Table of Contents
Page 7 of 595

Lane Keeping System.................................233
Blind Spot Information System.................238
Cross Traffic Alert.........................................240
Steering...........................................................244
Pre-Collision Assist......................................245
Drive Control.................................................249
Load Carrying
Load Limit........................................................251
Towing
Towing a Trailer............................................256
Recommended Towing Weights...............257
Essential Towing Checks...........................259
Towing the Vehicle on Four Wheels........261
Driving Hints
Breaking-In.....................................................263
Economical Driving......................................263
Driving Through Water...............................263
Floor Mats......................................................264
Roadside Emergencies
Roadside Assistance...................................266
Hazard Flashers............................................267
Fuel Shutoff....................................................267
Jump Starting the Vehicle..........................268
Post-Crash Alert System..............................271
Transporting the Vehicle.............................271
Towing Points................................................272
Customer Assistance
Getting the Services You Need................274
In California (U.S. Only)...............................275
The Better Business Bureau (BBB) AutoLine Program (U.S. Only)........................276
Utilizing the Mediation/Arbitration Program(Canada Only)............................................277
Getting Assistance Outside the U.S. andCanada........................................................278
Ordering Additional Owner'sLiterature....................................................280
Reporting Safety Defects (U.S. Only)......280
Reporting Safety Defects (CanadaOnly).............................................................281
Fuses
Fuse Specification Chart............................282
Changing a Fuse..........................................299
Maintenance
General Information.....................................302
Opening and Closing the Hood...............302
Under Hood Overview - 2.0L....................304
Under Hood Overview - 3.0L....................306
Engine Oil Dipstick - 2.0L...........................308
Engine Oil Dipstick - 3.0L...........................308
Engine Oil Check.........................................308
Oil Change Indicator Reset.......................309
Engine Coolant Check.................................310
Automatic Transmission Fluid Check.......314
Brake Fluid Check.........................................318
Washer Fluid Check......................................319
Fuel Filter.........................................................319
Changing the 12V Battery...........................319
Checking the Wiper Blades........................321
Changing the Wiper Blades.......................321
Adjusting the Headlamps..........................322
Changing a Bulb...........................................323
4
MKZ (CC9) Canada/United States of America, enUSA, Edition date: 201706, First Printing
Table of Contents
Page 8 of 595
Bulb Specification Chart.............................323
Changing the Engine Air Filter.................325
Vehicle Care
General Information.....................................326
Cleaning Products........................................326
Cleaning the Exterior...................................327
Waxing............................................................328
Cleaning the Engine....................................328
Cleaning the Windows and WiperBlades.........................................................329
Cleaning the Interior....................................329
Cleaning the Instrument Panel andInstrument Cluster Lens..........................331
Cleaning Leather Seats..............................332
Repairing Minor Paint Damage.................332
Cleaning the Wheels...................................333
Vehicle Storage.............................................333
Body Styling Kits...........................................335
Wheels and Tires
Tire Sealant and Inflator Kit.......................336
Tire Care.........................................................343
Using Summer Tires....................................357
Using Snow Chains......................................358
Tire Pressure Monitoring System.............359
Changing a Road Wheel.............................363
Technical Specifications..............................371
Capacities and Specifications
Engine Specifications - 2.0L......................373
Engine Specifications - 3.0L......................374
Motorcraft Parts - 2.0L.................................375
Motorcraft Parts - 3.0L.................................377
Vehicle Identification Number...................378
Vehicle Certification Label.........................378
Transmission Code Designation...............379
Capacities and Specifications - 2.0L.......380
Capacities and Specifications - 3.0L.......387
Audio System
General Information.....................................394
Audio Unit......................................................395
USB Port..........................................................397
SYNC™ 3
General Information.....................................398
Home Screen.................................................415
Using Voice Recognition.............................416
Entertainment................................................427
Climate............................................................440
Phone..............................................................444
Navigation......................................................452
Apps.................................................................463
Settings...........................................................466
SYNC™ 3 Troubleshooting..........................486
Accessories
Accessories...................................................504
Lincoln Protect
Lincoln Protect..............................................506
Scheduled Maintenance
General Maintenance Information...........509
Normal Scheduled Maintenance..............513
Special Operating Conditions ScheduledMaintenance...............................................517
5
MKZ (CC9) Canada/United States of America, enUSA, Edition date: 201706, First Printing
Table of Contents
Page 17 of 595
On Board Diagnostics Data LinkConnector
WARNING
Do not connect wireless plug-indevices to the data link connector.Unauthorized third parties could gain accessto vehicle data and impair the performanceof safety related systems. Only allow repairfacilities that follow our service and repairinstructions to connect their equipment tothe data link connector.
Your vehicle has an OBD Data LinkConnector (DLC) that is used in conjunctionwith a diagnostic scan tool for vehiclediagnostics, repairs and reprogrammingservices. Installing an aftermarket device thatuses the DLC during normal driving forpurposes such as remote insurance companymonitoring, transmission of vehicle data toother devices or entities, or altering theperformance of the vehicle, may cause
interference with or even damage to vehiclesystems. We do not recommend or endorsethe use of aftermarket plug-in devices unlessapproved by Ford. The vehicle Warranty willnot cover damage caused by an aftermarketplug-in device.
MOBILE COMMUNICATIONS
EQUIPMENT
WARNING
Driving while distracted can result inloss of vehicle control, crash and injury.We strongly recommend that you useextreme caution when using any device thatmay take your focus off the road. Yourprimary responsibility is the safe operationof your vehicle. We recommend against theuse of any hand-held device while drivingand encourage the use of voice-operatedsystems when possible. Make sure you areaware of all applicable local laws that mayaffect the use of electronic devices whiledriving.
Using mobile communications equipment isbecoming increasingly important in theconduct of business and personal affairs. However, you must not compromise yourown or others’ safety when using suchequipment. Mobile communications canenhance personal safety and security whenappropriately used, particularly in emergencysituations. Safety must be paramount whenusing mobile communications equipment toavoid negating these benefits. Mobilecommunication equipment includes, but isnot limited to, cellular phones, pagers,portable email devices, text messagingdevices and portable two-way radios.
EXPORT UNIQUE OPTIONS
For your particular global region, your vehiclemay be equipped with features and optionsthat are different from the features andoptions that are described in this Owner’sManual. A market unique supplement maybe supplied that complements this book. Byreferring to the market unique supplement,if provided, you can properly identify thosefeatures, recommendations and
14
MKZ (CC9) Canada/United States of America, enUSA, Edition date: 201706, First Printing
Introduction
Page 47 of 595

Deactivating and Activating the Belt-MinderFeature
WARNING
While the system allows you todeactivate it, this system is designedto improve your chances of being safelybelted and surviving an accident. Werecommend you leave the system activatedfor yourself and others who may use thevehicle.
Note:The driver and front passengerwarnings switch on and off independently.When you perform this procedure for oneseating position, do not buckle the otherposition as this will terminate the process.
Read Steps 1 - 4 thoroughly beforeproceeding with the programmingprocedure.
Before following the procedure, make surethat:
•The parking brake is set.
•The transmission is in park (P) or neutral(N).
•The ignition is off.
•The driver and front passenger safetybelts are unbuckled.
1. Switch the ignition on. Do not start thevehicle.
2. Wait until the safety belt warning lightturns off (about one minute). After Step2, wait an additional 5 seconds beforeproceeding with Step 3. Once you startStep 3, you must complete the procedurewithin 30 seconds.
3.For the seating position you are switchingoff, buckle then unbuckle the safety beltthree times at a moderate speed, endingin the unbuckled state. After Step 3, thesafety belt warning light turns on.
4. While the safety belt warning light is on,buckle and then unbuckle the safety belt.After Step 4, the safety belt warning lightflashes for confirmation.
•This will switch the feature off for thatseating position if it is currently on.
•This will switch the feature on for thatseating position if it is currently off.
CHILD RESTRAINT AND SEATBELT
MAINTENANCE
Inspect the vehicle seatbelts and childrestraint systems periodically to make surethey work properly and are not damaged.Inspect the vehicle seatbelts to make surethere are no nicks, tears or cuts. Replace ifnecessary. All vehicle seatbelt assemblies,including retractors, buckles, front seatbeltbuckle assemblies, buckle supportassemblies (slide bar-if equipped), shoulderbelt height adjusters (if equipped), shoulderbelt guide on seatback (if equipped), rearinflatable seatbelts (if equipped), childrestraint LATCH and tether anchors, andattaching hardware, should be inspectedafter a crash. Read the child restraintmanufacturer's instructions for additionalinspection and maintenance informationspecific to the child restraint.
44
MKZ (CC9) Canada/United States of America, enUSA, Edition date: 201706, First Printing
Seatbelts
Page 63 of 595
5. Reinstall the battery cover and the keyblade.
Car Finder
Press the button twice within threeseconds. A tone sounds and thedirection indicators will flash. Werecommend you use this method to locateyour vehicle, rather than using the panicalarm.
Sounding the Panic Alarm
Note:The panic alarm only operates whenthe ignition is off.
Press the button to sound thepanic alarm. Press the buttonagain or switch the ignition on toturn it off.
Remote Start
WARNING
To avoid exhaust fumes, do not useremote start if your vehicle is parkedindoors or in areas that are not wellventilated.
Note:Do not use remote start if your fuellevel is low.
The remote start button is on thetransmitter.
This feature allows you to start your vehiclefrom the outside. The transmitter has anextended operating range.
You can configure your automatic climatecontrol to operate when you remote startyour vehicle. See Climate Control (page137).
Many states and provinces have restrictionsfor the use of remote start. Check your localand state or provincial laws for specificrequirements regarding remote startsystems.
The remote start system does not work if anyof the following occur:
•The ignition is on.
•The anti-theft alarm triggers.
•You switch the feature off in theinformation display.
•The hood is open.
•The transmission is not in park (P).
•The battery voltage is below theminimum operating voltage.
Remote Control Feedback (If Equipped)
An LED on the remote control provides statusfeedback of remote start or stop commands.
StatusLED
Remote startsuccessfulSolid green
Remote stopsuccessfulSolid red
Request failed orstatus not receivedBlinking red
Status incompleteBlinking green
60
MKZ (CC9) Canada/United States of America, enUSA, Edition date: 201706, First Printing
Keys and Remote ControlsE138623 E138624 E138625
Page 73 of 595
With your intelligent access key within 3 ft(1 m) of your vehicle, touch the outer doorhandle lock sensor for approximately onesecond to lock, being careful to not touchthe unlock sensor on the back of the doorhandle at the same time. After locking, youcan immediately pull on the door handle toconfirm locking occurred withoutinadvertently unlocking.
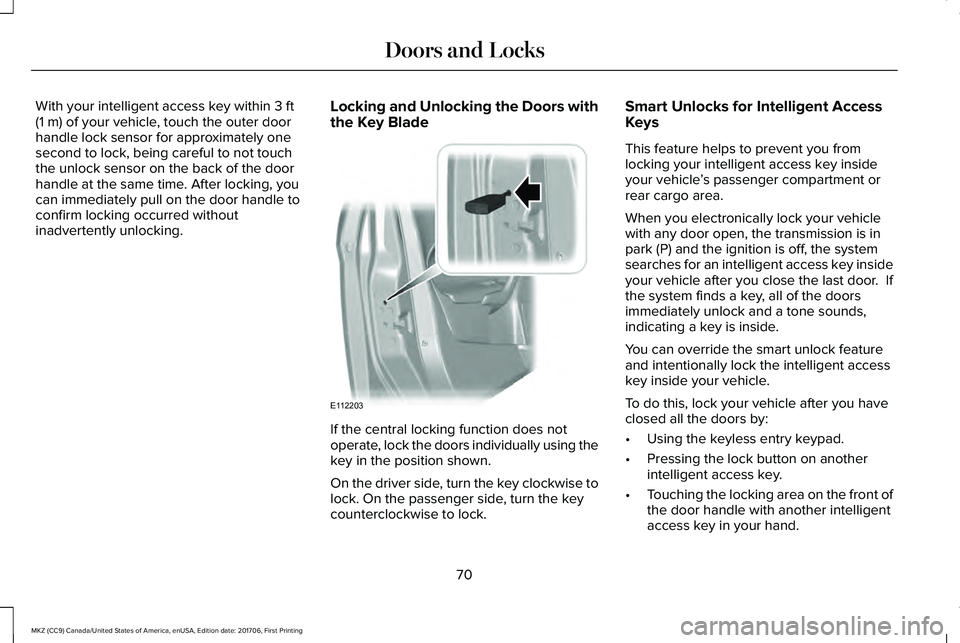
Locking and Unlocking the Doors withthe Key Blade
If the central locking function does notoperate, lock the doors individually using thekey in the position shown.
On the driver side, turn the key clockwise tolock. On the passenger side, turn the keycounterclockwise to lock.
Smart Unlocks for Intelligent AccessKeys
This feature helps to prevent you fromlocking your intelligent access key insideyour vehicle’s passenger compartment orrear cargo area.
When you electronically lock your vehiclewith any door open, the transmission is inpark (P) and the ignition is off, the systemsearches for an intelligent access key insideyour vehicle after you close the last door. Ifthe system finds a key, all of the doorsimmediately unlock and a tone sounds,indicating a key is inside.
You can override the smart unlock featureand intentionally lock the intelligent accesskey inside your vehicle.
To do this, lock your vehicle after you haveclosed all the doors by:
•Using the keyless entry keypad.
•Pressing the lock button on anotherintelligent access key.
•Touching the locking area on the front ofthe door handle with another intelligentaccess key in your hand.
70
MKZ (CC9) Canada/United States of America, enUSA, Edition date: 201706, First Printing
Doors and LocksE112203
Page 74 of 595
When you open one of the front doors andlock your vehicle using the power door lockcontrol, all doors will lock then unlock if:
•The ignition is on.
•The ignition is off and the transmissionis not in park (P).
Autolock (If Equipped)
Autolock locks all the doors when:
•All doors are closed.
•The ignition is on.
•You shift into any gear putting yourvehicle in motion.
•Your vehicle reaches a speed greaterthan 12 mph (20 km/h).
Autolock repeats when:
•You open then close any door while theignition is on and your vehicle speed is9 mph (15 km/h) or lower.
•Your vehicle reaches a speed greaterthan 12 mph (20 km/h).
Autounlock
Autounlock unlocks all the doors when:
•The ignition is on, all the doors areclosed, and your vehicle has beenmoving at a speed greater than 12 mph(20 km/h).
•Your vehicle comes to a stop and youswitch the ignition off or to the accessoryposition.
•You open the driver door within 10minutes of switching the ignition off or toaccessory.
Note:The doors do not autounlock if youelectronically lock your vehicle after youswitch the ignition off and before you openthe driver door.
Enabling or Disabling Autolock andAutounlock
Note:You can switch autounlock andautolock on or off independently of eachother.
Autolock is not configurable in all markets.If the autolock settings are not available inyour information display, the system is notconfigurable. See General Information(page 111).
Illuminated Entry
The interior lamps and some exterior lampsilluminate when you unlock the doors withthe remote control.
The illuminated entry system turns off thelights if:
•The ignition is on.
•You press the remote control lock button.
•After 25 seconds of illumination.
The lights do not turn off if:
•You turn them on with the lamp control.
•Any door is open.
Illuminated Exit
The interior lamps and some exterior lampsilluminate when all doors are closed and youswitch the ignition off.
71
MKZ (CC9) Canada/United States of America, enUSA, Edition date: 201706, First Printing
Doors and Locks
Page 76 of 595
You can switch the power decklid feature onor off in the information display. See GeneralInformation (page 111). The remote controland instrument panel button will still operatethe decklid regardless of the setting.
Opening and Closing the Power
Decklid
Note:You can reverse the decklidmovement. Press the instrument panel ordecklid button again, or press the remotecontrol button twice.
Note:Do not push or pull on the powerdecklid while it is under operation, as thismay cause damage to your vehicle.
The decklid will only operate with thetransmission in park (P).
If the decklid reverses or starts to close afteran open request, you will hear a fastcontinuous chime. This indicates excessiveload on the decklid or a possible gas strutfailure. If the decklid continues to close afteropening, have the system checked by anauthorized dealer.
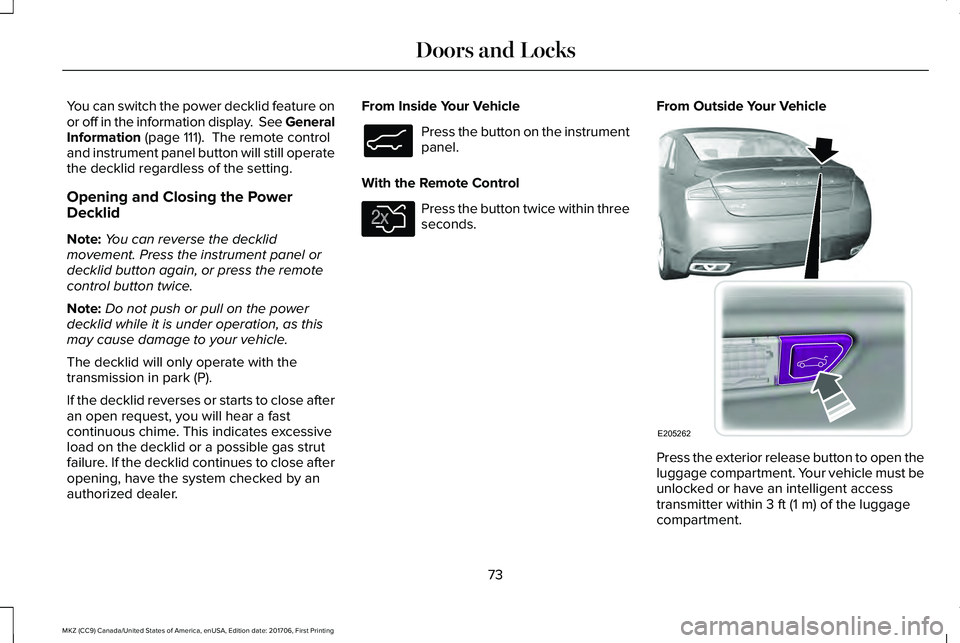
From Inside Your Vehicle
Press the button on the instrumentpanel.
With the Remote Control
Press the button twice within threeseconds.
From Outside Your Vehicle
Press the exterior release button to open theluggage compartment. Your vehicle must beunlocked or have an intelligent accesstransmitter within 3 ft (1 m) of the luggagecompartment.
73
MKZ (CC9) Canada/United States of America, enUSA, Edition date: 201706, First Printing
Doors and LocksE138633 E138630 E205262
Page 94 of 595
Type One - Conventional (Non-Configurable)
The daytime running lamps turn on when:
1. Switching the ignition on.
2. The transmission is not in park (P) forvehicles with automatic transmissions, orreleasing the parking brake for vehicleswith manual transmissions.
3. The lighting control is in the off, parkinglamp or autolamps positions.
4. The headlamps are off.
Type Two - Configurable
Switch the daytime running lamps on or offusing the information display. SeeInformation Displays (page 111).
The daytime running lamps turn on when:
1. The lamps are on in the informationdisplay.
2. Switching the ignition on.
3. The transmission is not in park (P) forvehicles with automatic transmissions, orreleasing the parking brake for vehicleswith manual transmissions.
4. The lighting control is in the autolampsposition.
5. The headlamps are off.
The other lighting control switch positionsdo not turn on the daytime running lamps.
If the daytime running lamps are off in theinformation display, the lamps stay off in allswitch positions.
AUTOMATIC HIGH BEAM
CONTROL (If Equipped)
WARNING
The system does not relieve you ofyour responsibility to drive with duecare and attention. You may need to overridethe system if it does not turn the high beamson or off.
The system turns on high beams if it is darkenough and no other traffic is present. If itdetects an approaching vehicle’s headlampsor tail lamps, or street lighting ahead, thesystem turns off high beams before they candistract other road users. Low beams remainon.
Note:The system may not operate properlyif the sensor is blocked. Keep the windshieldfree from obstruction or damage.
Note:The system may not operate properlyin cold or inclement conditions. You canswitch on the high beams by overriding thesystem.
Note:If the system detects a blockage, forexample bird droppings, bug splatter, snowor ice, the system goes into low beam modeuntil you clear the blockage. A message mayappear in the information display if thecamera is blocked.
Note:Using much larger tires or equippingvehicle accessories such as snowplows canmodify your vehicle's ride height anddegrade automatic high beam controlperformance.
91
MKZ (CC9) Canada/United States of America, enUSA, Edition date: 201706, First Printing
Lighting