ECU LINCOLN MKZ 2020 User Guide
[x] Cancel search | Manufacturer: LINCOLN, Model Year: 2020, Model line: MKZ, Model: LINCOLN MKZ 2020Pages: 561, PDF Size: 5.7 MB
Page 40 of 561
•
Seatbelt pretensioners at the front
outermost and second row outermost
seating positions.
• Belt tension sensor at the front outermost
passenger seating position. •
Seatbelt warning light and chime. •
Crash sensors and monitoring system
with readiness indicator.
The seatbelt pretensioners are designed to
tighten the seatbelts when activated. In
frontal and near-frontal crashes, the seatbelt
pretensioners may be activated alone or, if
the crash is of sufficient severity, together
with the front airbags. The pretensioners may
also activate when a Safety Canopy airbag
deploys. FASTENING THE SEATBELTS
The front outboard and rear safety restraints
in the vehicle are combination lap and
shoulder belts.
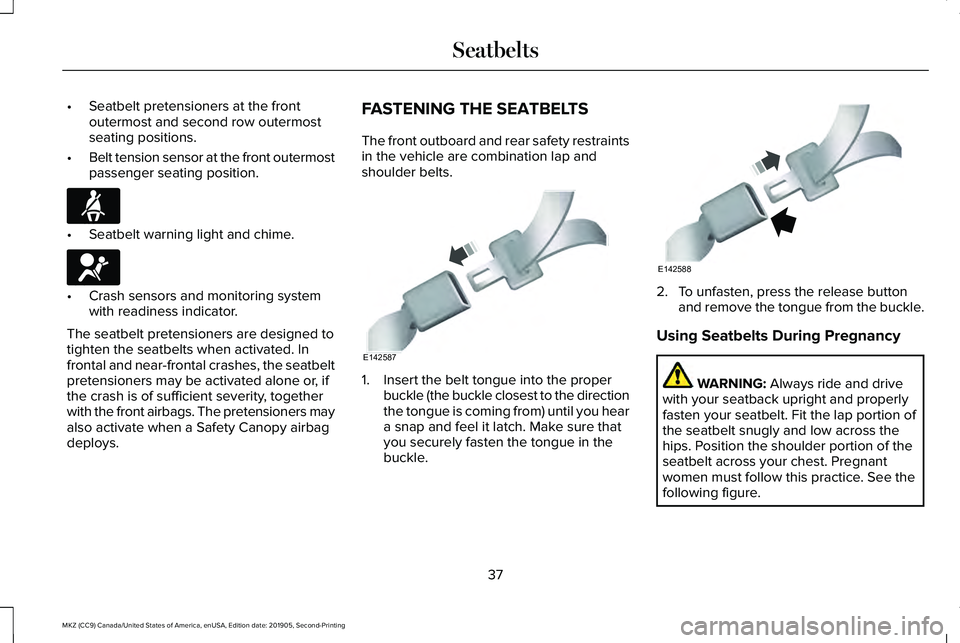
1. Insert the belt tongue into the proper
buckle (the buckle closest to the direction
the tongue is coming from) until you hear
a snap and feel it latch. Make sure that
you securely fasten the tongue in the
buckle. 2. To unfasten, press the release button
and remove the tongue from the buckle.
Using Seatbelts During Pregnancy WARNING: Always ride and drive
with your seatback upright and properly
fasten your seatbelt. Fit the lap portion of
the seatbelt snugly and low across the
hips. Position the shoulder portion of the
seatbelt across your chest. Pregnant
women must follow this practice. See the
following figure.
37
MKZ (CC9) Canada/United States of America, enUSA, Edition date: 201905, Second-Printing SeatbeltsE71880 E67017 E142587 E142588
Page 58 of 561
WHAT IS 911 ASSIST
911 Assist is a SYNC system feature that can
call for help if you are in an accident. If a
crash deploys an airbag, excluding knee
airbags and rear inflatable seatbelts [if
equipped], or activates the fuel pump
shut-off, your SYNC-equipped vehicle may
be able to contact emergency services by
dialing 911 through a paired and connected
Bluetooth enabled phone. You can learn
more about the 911 Assist feature, by visiting:
Website
www.owner.lincoln.com
www.syncmyride.ca
www.syncmaroute.ca
Not all crashes will deploy an airbag or
activate the fuel pump shut-off, the triggers
for 911 Assist. If a connected cell phone
sustains damage or loses its connection to
SYNC during a crash, SYNC will search for
and try to connect to a previously paired cell
phone. SYNC will then attempt to call the
emergency services. Before making the call:
•
SYNC provides a short window of time,
about 10 seconds, to cancel the call. If
you fail to cancel the call, SYNC attempts
to dial 911.
• SYNC says the following, or a similar
message: SYNC will attempt to call 911,
to cancel the call, press Cancel on your
screen or press and hold the phone
button on your steering wheel.
If you do not cancel the call, and SYNC
makes a successful call, a pre-recorded
message plays for the 911 operator, and then
the occupant(s) in your vehicle is able to talk
with the operator. Be prepared to
immediately provide your name, phone
number and location, because not all 911
systems are capable of receiving this
information electronically.
During an emergency call, the system
transmits vehicle data to the emergency
service. See Data Recording (page 10). EMERGENCY CALL
REQUIREMENTS WARNING: Do not wait for 911 Assist
to make an emergency call if you can do
it yourself. Dial emergency services
immediately to avoid delayed response
time which could increase the risk of
serious injury or death after a crash. If you
do not hear 911 Assist within five seconds
of the crash, the system or phone may be
damaged or non-functional. WARNING: Always place your phone
in a secure location in your vehicle so it
does not become a projectile or get
damaged in a crash. Failure to do so may
cause serious injury to someone or
damage the phone which could prevent
911 Assist from working properly. WARNING: Unless the 911 Assist
setting is set on before a crash, the system
will not dial for help which could delay
response time, potentially increasing the
risk of serious injury or death after a crash.
55
MKZ (CC9) Canada/United States of America, enUSA, Edition date: 201905, Second-Printing 911 Assist
Page 61 of 561
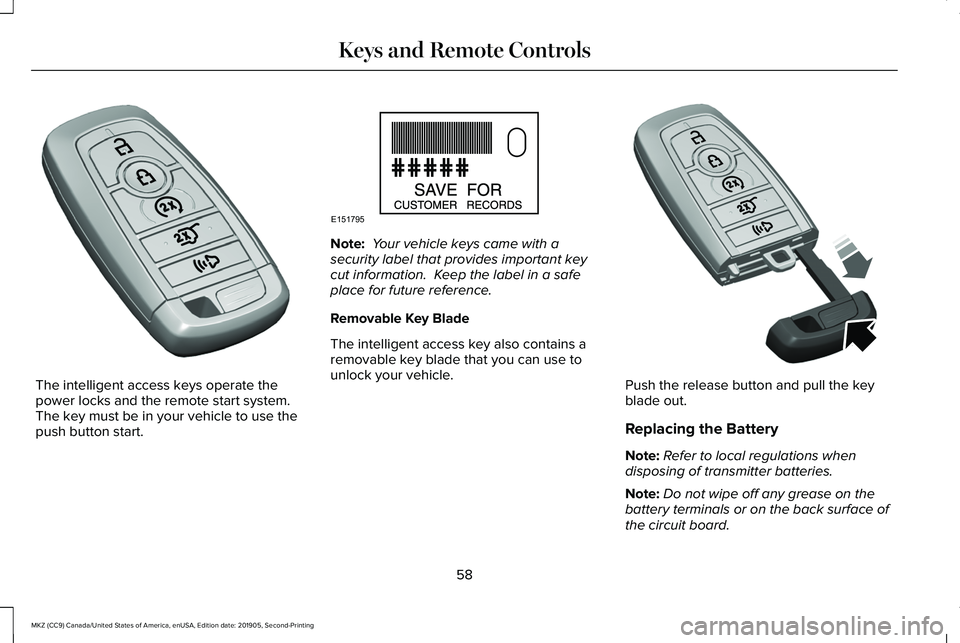
The intelligent access keys operate the
power locks and the remote start system.
The key must be in your vehicle to use the
push button start. Note:
Your vehicle keys came with a
security label that provides important key
cut information. Keep the label in a safe
place for future reference.
Removable Key Blade
The intelligent access key also contains a
removable key blade that you can use to
unlock your vehicle. Push the release button and pull the key
blade out.
Replacing the Battery
Note:
Refer to local regulations when
disposing of transmitter batteries.
Note: Do not wipe off any grease on the
battery terminals or on the back surface of
the circuit board.
58
MKZ (CC9) Canada/United States of America, enUSA, Edition date: 201905, Second-Printing Keys and Remote ControlsE305198 E151795 E305199
Page 76 of 561
Note:
Before driving your vehicle, check the
instrument cluster for a trunk ajar or door
ajar message or warning indicator. Failure
to do this could result in unintentionally
leaving the decklid open while driving.
The decklid will stop and three chimes will
sound if it detects an obstacle while opening.
Remove the obstacle to operate the decklid.
Resetting the Power Decklid
The decklid may not operate correctly and
you may need to reset it if:
• The vehicle battery charge is low.
• You disconnect the battery.
• You manually close the decklid and leave
it unlatched.
To reset the power decklid:
1. Disconnect the battery for 20 seconds then reconnect the battery.
2. Manually close the decklid making sure it is fully closed.
3. Power open the decklid using the remote
control or instrument panel button. KEYLESS ENTRY
SECURICODE™ KEYLESS ENTRY
KEYPAD
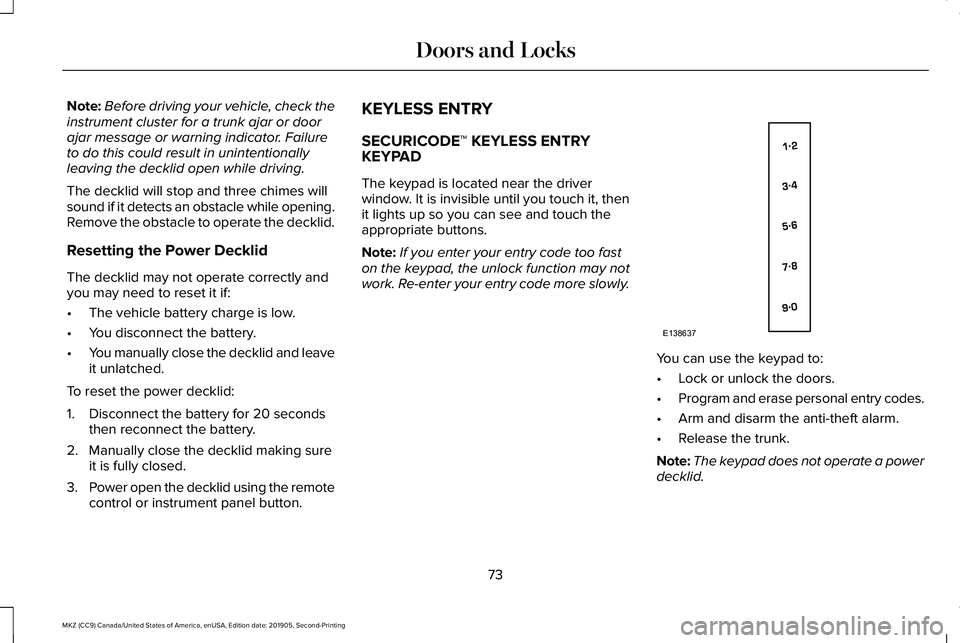
The keypad is located near the driver
window. It is invisible until you touch it, then
it lights up so you can see and touch the
appropriate buttons.
Note:
If you enter your entry code too fast
on the keypad, the unlock function may not
work. Re-enter your entry code more slowly. You can use the keypad to:
•
Lock or unlock the doors.
• Program and erase personal entry codes.
• Arm and disarm the anti-theft alarm.
• Release the trunk.
Note: The keypad does not operate a power
decklid.
73
MKZ (CC9) Canada/United States of America, enUSA, Edition date: 201905, Second-Printing Doors and LocksE138637
Page 77 of 561
You can operate the keypad with the
factory-set 5-digit entry code. The code is
located on the owner’
s wallet card in the
glove box and is available from an authorized
dealer. You can also create up to five of your
own 5-digit personal entry codes.
Programming a Personal Entry Code
To create your own personal entry code:
1. Enter the factory-set code.
2. Press 1·2 on the keypad within five
seconds.
3. Enter your personal 5-digit code. You must enter each number within five
seconds of each other.
4. Press 1·2 on the keypad to save personal
code 1.
The doors lock then unlock to confirm that
programming was successful.
To program additional personal entry codes,
repeat Steps 1-3, then for Step 4:
• Press
3·4 to save personal code 2
• Press
5·6 to save personal code 3 •
Press
7·8 to save personal code 4
• Press
9·0 to save personal code 5.
You may also program a personal entry code
using the touchscreen.
See Settings (page
451).
Tips:
• Do not set a code that uses five of the
same number.
• Do not use five numbers in sequential
order.
• The factory-set code works even if you
have set your own personal code.
Erasing a Personal Code
1. Enter the factory-set 5-digit code.
2. Press and release
1·2 on the keypad
within five seconds.
3. Press and hold
1·2 for two seconds. You
must do this within five seconds of
completing Step 2.
If you complete this successfully, you have
erased all personal codes and only the
factory-set 5-digit code works. Anti-Scan Feature
The keypad goes into an anti-scan mode if
you enter the wrong code seven times (35
consecutive button presses). This mode
disables the keypad for one minute and the
keypad lamp flashes.
The anti-scan feature turns off after:
•
One minute of keypad inactivity.
• Pressing the unlock button on the remote
control.
• Switching the ignition on.
• Unlocking your vehicle using intelligent
access.
Unlocking and Locking the Doors
To Unlock the Driver Door
Enter the factory-set 5-digit code or your
personal code. You must press each number
within five seconds of each other. The
interior lamps illuminate.
Note: All doors unlock if you enable the all
door unlocking mode.
See Locking and
Unlocking (page 67).
74
MKZ (CC9) Canada/United States of America, enUSA, Edition date: 201905, Second-Printing Doors and Locks
Page 80 of 561
PASSIVE ANTI-THEFT SYSTEM
Note:
The system is not compatible with
non-Ford aftermarket remote start systems.
Use of these systems may result in vehicle
starting problems and a loss of security
protection.
Note: Metallic objects, electronic devices
or a second coded key on the same key
chain may cause vehicle starting problems
if they are too close to the key when starting
your vehicle. Prevent these objects from
touching the coded key while starting your
vehicle. Switch the ignition off, move all
objects on the key chain away from the
coded key and restart your vehicle if a
problem occurs.
Note: Do not leave a duplicate coded key
in your vehicle. Always take your keys and
lock all doors when leaving your vehicle. SecuriLock
The system helps prevent your vehicle from
starting unless you use a coded key
programmed to your vehicle. Using the
wrong key may prevent your vehicle from
starting. A message may appear in the
information display.
If you are unable to start your vehicle with a
correctly coded key, it is not operating
properly. A message may appear in the
information display.
Automatic Arming
Your vehicle arms immediately after
switching the ignition off.
Automatic Disarming
Switching the ignition on with a coded key
disarms your vehicle.
Replacement Keys
Note:
Your vehicle comes equipped with two
intelligent access keys. The intelligent access key functions as a
programmed key that operates the driver
door lock and activates the intelligent access
with push button start system, as well as a
remote control.
If your programmed transmitters are lost or
stolen and you do not have an extra coded
key, have your vehicle towed to an
authorized dealer. You need to erase the
key codes from your vehicle and program
new coded keys.
Store an extra programmed key away from
your vehicle in a safe place to help prevent
any inconveniences. See your authorized
dealer to purchase additional spare or
replacement keys.
Programming a Spare Intelligent Access
Key
Note:
You can program a maximum of four
intelligent access keys to your vehicle.
77
MKZ (CC9) Canada/United States of America, enUSA, Edition date: 201905, Second-Printing Security
Page 81 of 561
You must have two previously programmed
intelligent access keys inside your vehicle
and the new unprogrammed intelligent
access keys readily accessible. See an
authorized dealer to have the spare key
programmed if two previously programmed
keys are not available.
Make sure that your vehicle is off before
beginning this procedure. Make sure that
you close all the doors before beginning and
that they remain closed throughout the
procedure. Perform all steps within 30
seconds of starting the sequence. Stop and
wait for at least one minute before starting
again if you perform any steps out of
sequence.
Read and understand the entire procedure
before you begin.
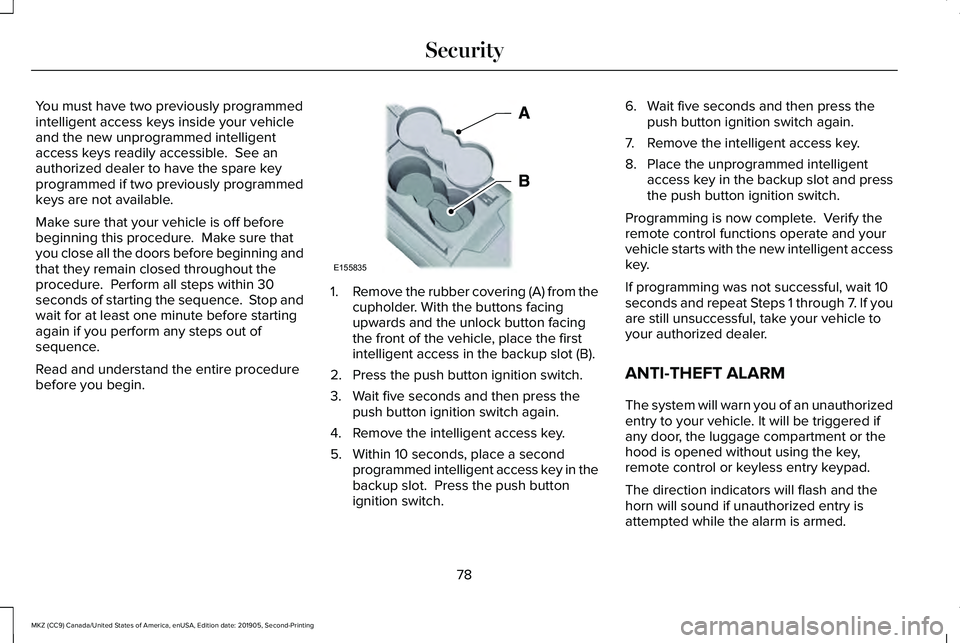
1.
Remove the rubber covering (A) from the
cupholder. With the buttons facing
upwards and the unlock button facing
the front of the vehicle, place the first
intelligent access in the backup slot (B).
2. Press the push button ignition switch.
3. Wait five seconds and then press the push button ignition switch again.
4. Remove the intelligent access key.
5. Within 10 seconds, place a second programmed intelligent access key in the
backup slot. Press the push button
ignition switch. 6. Wait five seconds and then press the
push button ignition switch again.
7. Remove the intelligent access key.
8. Place the unprogrammed intelligent access key in the backup slot and press
the push button ignition switch.
Programming is now complete. Verify the
remote control functions operate and your
vehicle starts with the new intelligent access
key.
If programming was not successful, wait 10
seconds and repeat Steps 1 through 7. If you
are still unsuccessful, take your vehicle to
your authorized dealer.
ANTI-THEFT ALARM
The system will warn you of an unauthorized
entry to your vehicle. It will be triggered if
any door, the luggage compartment or the
hood is opened without using the key,
remote control or keyless entry keypad.
The direction indicators will flash and the
horn will sound if unauthorized entry is
attempted while the alarm is armed.
78
MKZ (CC9) Canada/United States of America, enUSA, Edition date: 201905, Second-Printing SecurityE155835
Page 82 of 561
Take all remote controls to an authorized
dealer if there is any potential alarm problem
with your vehicle.
Arming the Alarm
The alarm is ready to arm when there is not
a key in your vehicle. Electronically lock your
vehicle to arm the alarm.
Disarming the Alarm
Disarm the alarm by any of the following
actions:
•
Unlock the doors or luggage
compartment with the remote control or
keyless entry keypad.
• Switch your vehicle on or start your
vehicle.
• Use a key in the driver door to unlock
your vehicle, then switch your vehicle on
within 12 seconds.
Note: Pressing the panic button on the
remote control will stop the horn and signal
indicators, but will not disarm the system.
79
MKZ (CC9) Canada/United States of America, enUSA, Edition date: 201905, Second-Printing Security
Page 125 of 561
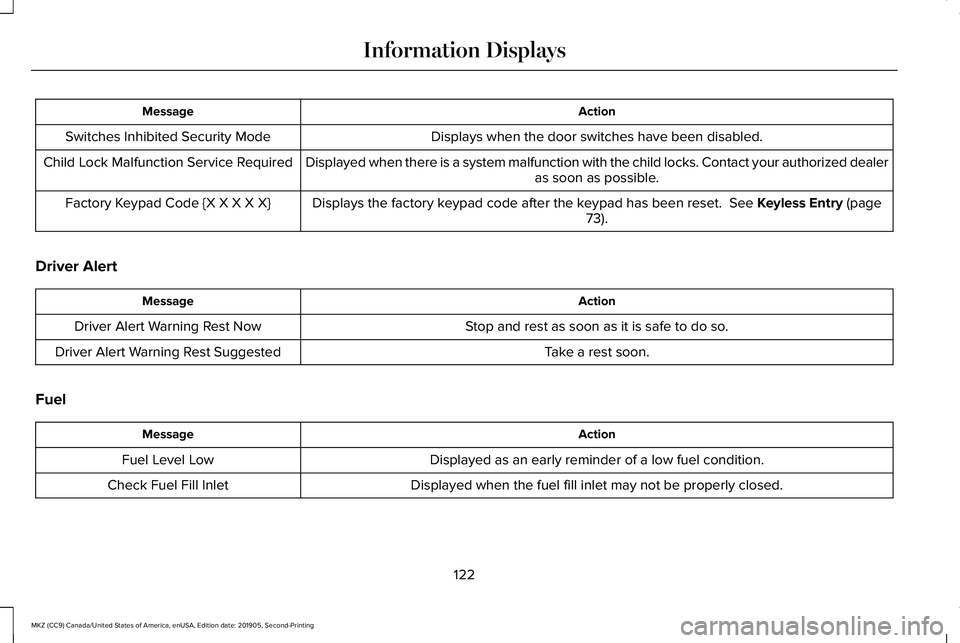
Action
Message
Displays when the door switches have been disabled.
Switches Inhibited Security Mode
Displayed when there is a system malfunction with the child locks. Conta\
ct your authorized dealeras soon as possible.
Child Lock Malfunction Service Required
Displays the factory keypad code after the keypad has been reset. See Keyless Entry (page
73).
Factory Keypad Code {X X X X X}
Driver Alert Action
Message
Stop and rest as soon as it is safe to do so.
Driver Alert Warning Rest Now
Take a rest soon.
Driver Alert Warning Rest Suggested
Fuel Action
Message
Displayed as an early reminder of a low fuel condition.
Fuel Level Low
Displayed when the fuel fill inlet may not be properly closed.
Check Fuel Fill Inlet
122
MKZ (CC9) Canada/United States of America, enUSA, Edition date: 201905, Second-Printing Information Displays
Page 136 of 561
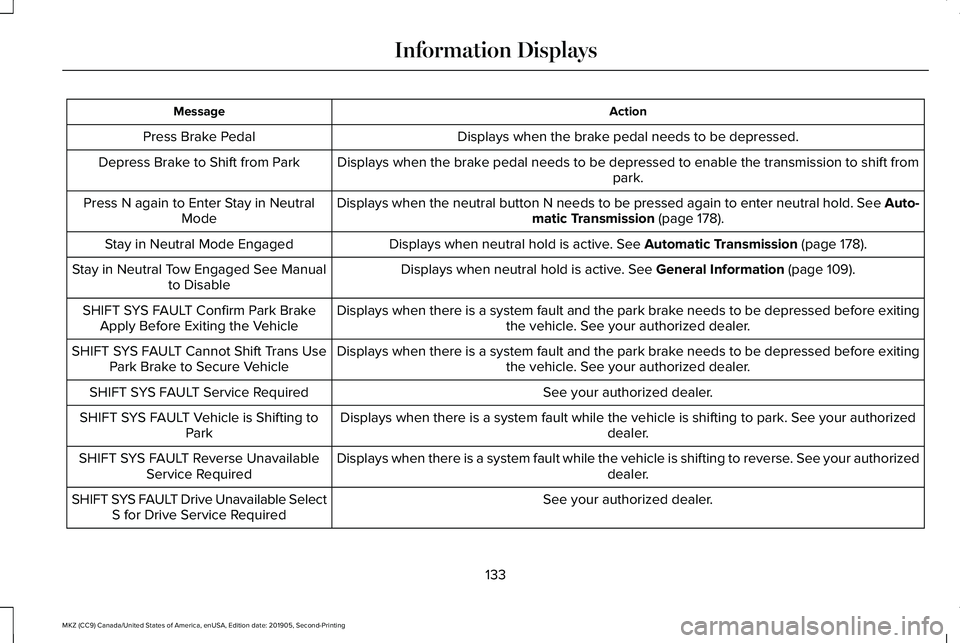
Action
Message
Displays when the brake pedal needs to be depressed.
Press Brake Pedal
Displays when the brake pedal needs to be depressed to enable the transmission to shift from park.
Depress Brake to Shift from Park
Displays when the neutral button N needs to be pressed again to enter ne\
utral hold. See Auto-matic Transmission (page 178).
Press N again to Enter Stay in Neutral
Mode
Displays when neutral hold is active.
See Automatic Transmission (page 178).
Stay in Neutral Mode Engaged
Displays when neutral hold is active.
See General Information (page 109).
Stay in Neutral Tow Engaged See Manual
to Disable
Displays when there is a system fault and the park brake needs to be depressed before exiting the vehicle. See your authorized dealer.
SHIFT SYS FAULT Confirm Park Brake
Apply Before Exiting the Vehicle
Displays when there is a system fault and the park brake needs to be depressed before exitingthe vehicle. See your authorized dealer.
SHIFT SYS FAULT Cannot Shift Trans Use
Park Brake to Secure Vehicle
See your authorized dealer.
SHIFT SYS FAULT Service Required
Displays when there is a system fault while the vehicle is shifting to p\
ark. See your authorized dealer.
SHIFT SYS FAULT Vehicle is Shifting to
Park
Displays when there is a system fault while the vehicle is shifting to r\
everse. See your authorized dealer.
SHIFT SYS FAULT Reverse Unavailable
Service Required
See your authorized dealer.
SHIFT SYS FAULT Drive Unavailable Select
S for Drive Service Required
133
MKZ (CC9) Canada/United States of America, enUSA, Edition date: 201905, Second-Printing Information Displays