lock LINCOLN MKZ 2020 Service Manual
[x] Cancel search | Manufacturer: LINCOLN, Model Year: 2020, Model line: MKZ, Model: LINCOLN MKZ 2020Pages: 561, PDF Size: 5.7 MB
Page 124 of 561
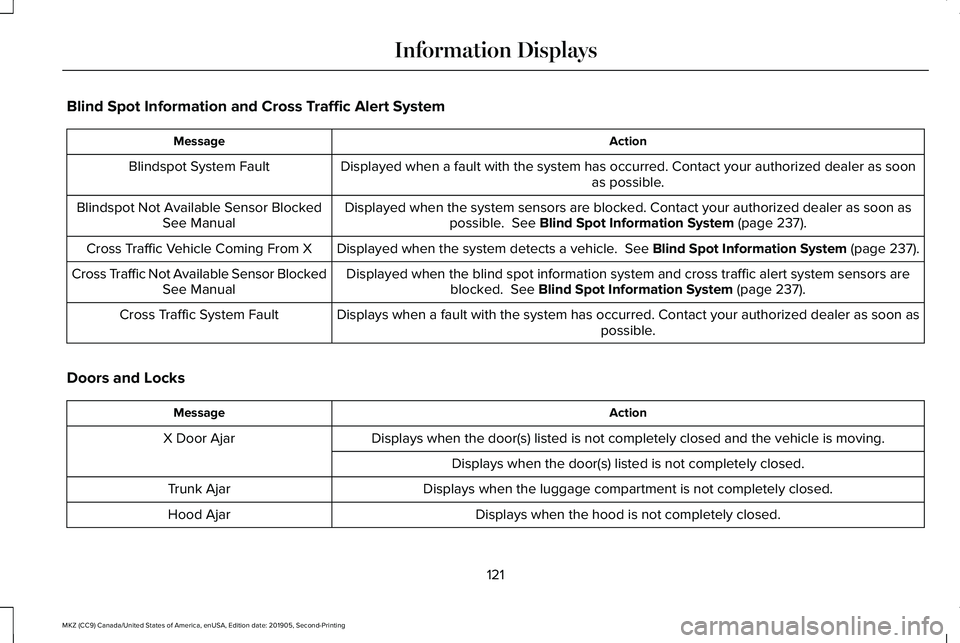
Blind Spot Information and Cross Traffic Alert System
Action
Message
Displayed when a fault with the system has occurred. Contact your author\
ized dealer as soon as possible.
Blindspot System Fault
Displayed when the system sensors are blocked. Contact your authorized dealer as soon aspossible. See Blind Spot Information System (page 237).
Blindspot Not Available Sensor Blocked
See Manual
Displayed when the system detects a vehicle. See Blind Spot Information System (page 237).
Cross Traffic Vehicle Coming From X
Displayed when the blind spot information system and cross traffic alert\
system sensors areblocked.
See Blind Spot Information System (page 237).
Cross Traffic Not Available Sensor Blocked
See Manual
Displays when a fault with the system has occurred. Contact your authori\
zed dealer as soon as possible.
Cross Traffic System Fault
Doors and Locks Action
Message
Displays when the door(s) listed is not completely closed and the vehi\
cle is moving.
X Door Ajar
Displays when the door(s) listed is not completely closed.
Displays when the luggage compartment is not completely closed.
Trunk Ajar
Displays when the hood is not completely closed.
Hood Ajar
121
MKZ (CC9) Canada/United States of America, enUSA, Edition date: 201905, Second-Printing Information Displays
Page 125 of 561
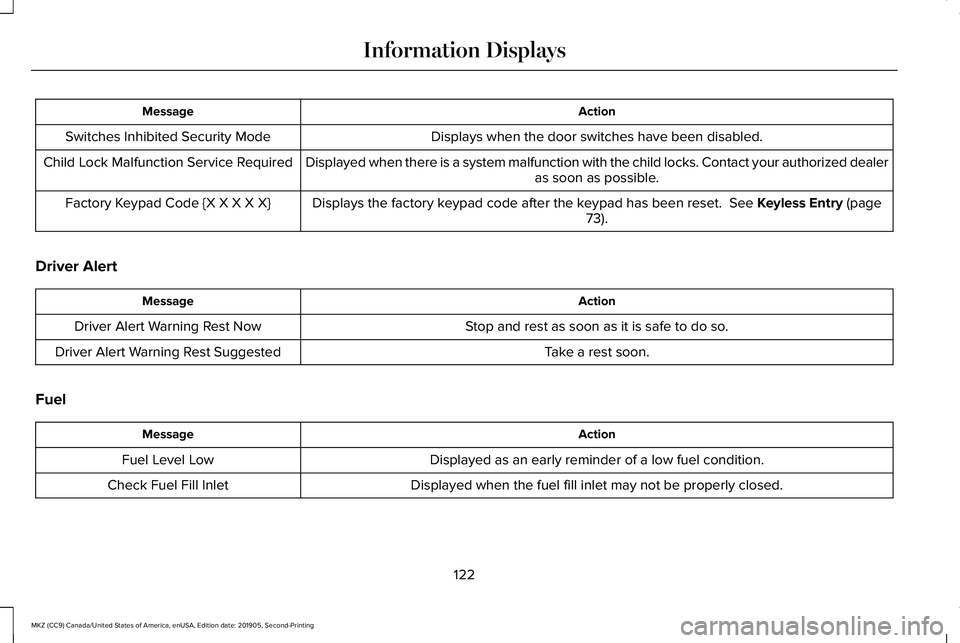
Action
Message
Displays when the door switches have been disabled.
Switches Inhibited Security Mode
Displayed when there is a system malfunction with the child locks. Conta\
ct your authorized dealeras soon as possible.
Child Lock Malfunction Service Required
Displays the factory keypad code after the keypad has been reset. See Keyless Entry (page
73).
Factory Keypad Code {X X X X X}
Driver Alert Action
Message
Stop and rest as soon as it is safe to do so.
Driver Alert Warning Rest Now
Take a rest soon.
Driver Alert Warning Rest Suggested
Fuel Action
Message
Displayed as an early reminder of a low fuel condition.
Fuel Level Low
Displayed when the fuel fill inlet may not be properly closed.
Check Fuel Fill Inlet
122
MKZ (CC9) Canada/United States of America, enUSA, Edition date: 201905, Second-Printing Information Displays
Page 132 of 561
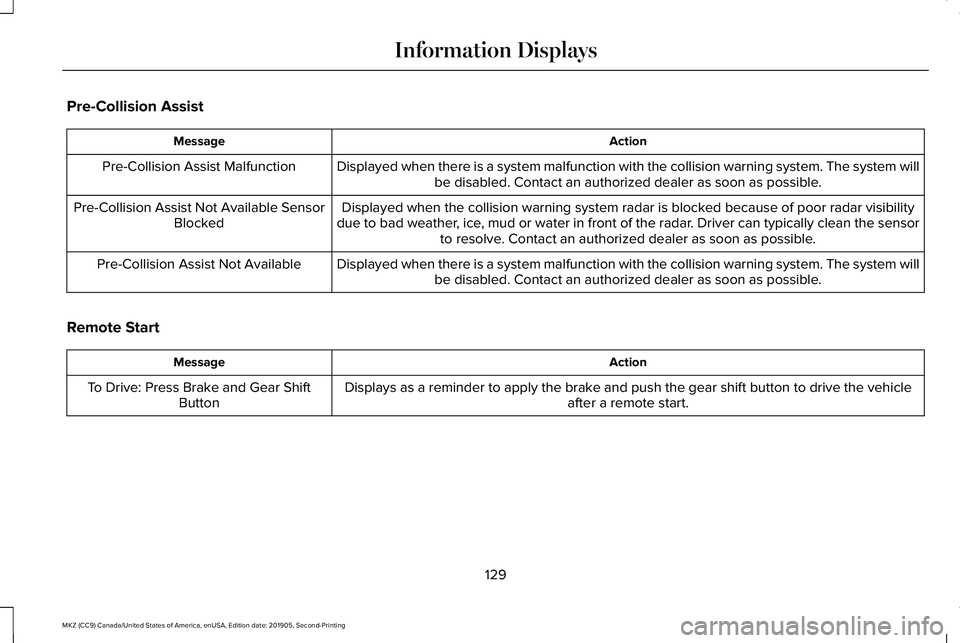
Pre-Collision Assist
Action
Message
Displayed when there is a system malfunction with the collision warning \
system. The system willbe disabled. Contact an authorized dealer as soon as possible.
Pre-Collision Assist Malfunction
Displayed when the collision warning system radar is blocked because of poor radar visibility
due to bad weather, ice, mud or water in front of the radar. Driver can typically clean the sensor to resolve. Contact an authorized dealer as soon as possible.
Pre-Collision Assist Not Available Sensor
Blocked
Displayed when there is a system malfunction with the collision warning \
system. The system willbe disabled. Contact an authorized dealer as soon as possible.
Pre-Collision Assist Not Available
Remote Start Action
Message
Displays as a reminder to apply the brake and push the gear shift button to drive the vehicle after a remote start.
To Drive: Press Brake and Gear Shift
Button
129
MKZ (CC9) Canada/United States of America, enUSA, Edition date: 201905, Second-Printing Information Displays
Page 135 of 561
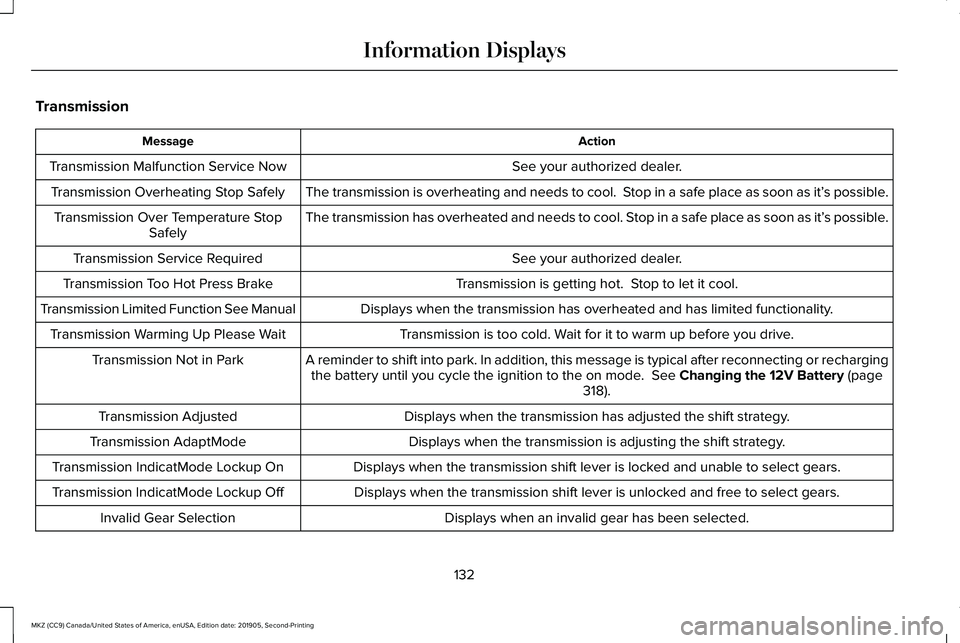
Transmission
Action
Message
See your authorized dealer.
Transmission Malfunction Service Now
The transmission is overheating and needs to cool. Stop in a safe place as soon as it’ s possible.
Transmission Overheating Stop Safely
The transmission has overheated and needs to cool. Stop in a safe place as soon as it’ s possible.
Transmission Over Temperature Stop
Safely
See your authorized dealer.
Transmission Service Required
Transmission is getting hot. Stop to let it cool.
Transmission Too Hot Press Brake
Displays when the transmission has overheated and has limited functional\
ity.
Transmission Limited Function See Manual
Transmission is too cold. Wait for it to warm up before you drive.
Transmission Warming Up Please Wait
A reminder to shift into park. In addition, this message is typical afte\
r reconnecting or rechargingthe battery until you cycle the ignition to the on mode. See Changing the 12V Battery (page
318).
Transmission Not in Park
Displays when the transmission has adjusted the shift strategy.
Transmission Adjusted
Displays when the transmission is adjusting the shift strategy.
Transmission AdaptMode
Displays when the transmission shift lever is locked and unable to select gears.
Transmission IndicatMode Lockup On
Displays when the transmission shift lever is unlocked and free to select gears.
Transmission IndicatMode Lockup Off
Displays when an invalid gear has been selected.
Invalid Gear Selection
132
MKZ (CC9) Canada/United States of America, enUSA, Edition date: 201905, Second-Printing Information Displays
Page 145 of 561
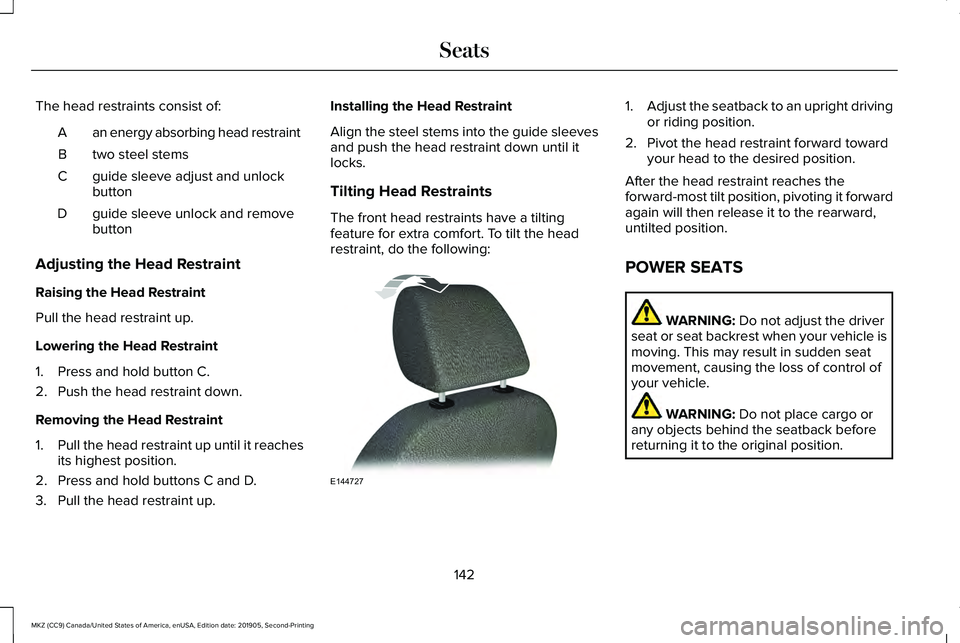
The head restraints consist of:
an energy absorbing head restraint
A
two steel stems
B
guide sleeve adjust and unlock
button
C
guide sleeve unlock and remove
button
D
Adjusting the Head Restraint
Raising the Head Restraint
Pull the head restraint up.
Lowering the Head Restraint
1. Press and hold button C.
2. Push the head restraint down.
Removing the Head Restraint
1. Pull the head restraint up until it reaches
its highest position.
2. Press and hold buttons C and D.
3. Pull the head restraint up. Installing the Head Restraint
Align the steel stems into the guide sleeves
and push the head restraint down until it
locks.
Tilting Head Restraints
The front head restraints have a tilting
feature for extra comfort. To tilt the head
restraint, do the following: 1.
Adjust the seatback to an upright driving
or riding position.
2. Pivot the head restraint forward toward your head to the desired position.
After the head restraint reaches the
forward-most tilt position, pivoting it forward
again will then release it to the rearward,
untilted position.
POWER SEATS WARNING: Do not adjust the driver
seat or seat backrest when your vehicle is
moving. This may result in sudden seat
movement, causing the loss of control of
your vehicle. WARNING:
Do not place cargo or
any objects behind the seatback before
returning it to the original position.
142
MKZ (CC9) Canada/United States of America, enUSA, Edition date: 201905, Second-Printing SeatsE144727
Page 149 of 561
MEMORY FUNCTION
WARNING: Before activating the
memory seat, make sure that the area
immediately surrounding the seat is clear
of obstructions and that all occupants are
clear of moving parts. WARNING:
Do not use the memory
function when your vehicle is moving.
This feature automatically recalls the position
of the following features:
• Driver seat.
• Power mirrors.
• Power steering column.
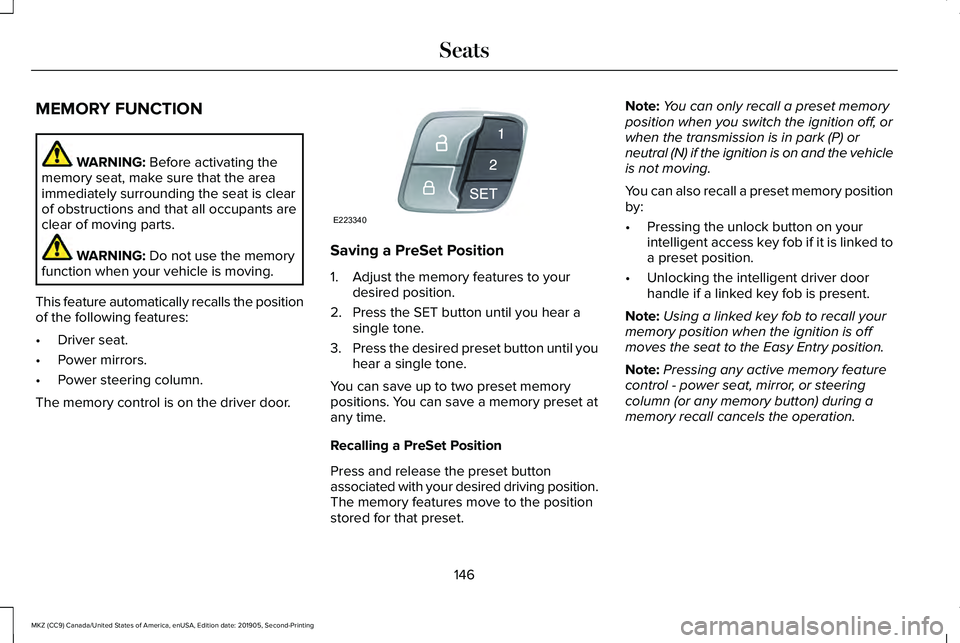
The memory control is on the driver door. Saving a PreSet Position
1. Adjust the memory features to your
desired position.
2. Press the SET button until you hear a single tone.
3. Press the desired preset button until you
hear a single tone.
You can save up to two preset memory
positions. You can save a memory preset at
any time.
Recalling a PreSet Position
Press and release the preset button
associated with your desired driving position.
The memory features move to the position
stored for that preset. Note:
You can only recall a preset memory
position when you switch the ignition off, or
when the transmission is in park (P) or
neutral (N) if the ignition is on and the vehicle
is not moving.
You can also recall a preset memory position
by:
• Pressing the unlock button on your
intelligent access key fob if it is linked to
a preset position.
• Unlocking the intelligent driver door
handle if a linked key fob is present.
Note: Using a linked key fob to recall your
memory position when the ignition is off
moves the seat to the Easy Entry position.
Note: Pressing any active memory feature
control - power seat, mirror, or steering
column (or any memory button) during a
memory recall cancels the operation.
146
MKZ (CC9) Canada/United States of America, enUSA, Edition date: 201905, Second-Printing SeatsE223340
Page 150 of 561

Linking a PreSet Position to your
Remote Control or Intelligent Access
Key Fob
Your vehicle can save the preset memory
positions for up to two remote controls or
intelligent access (IA) keys.
After you have saved your desired memory
preset positions:
1.
Press and hold the desired preset button
for about three seconds until you hear a
single tone.
2. Within three seconds, press the lock button on the remote control you are
linking.
To unlink a remote control, follow the same
procedure – except in step 2, press the
unlock button on the remote control.
Note: If more than one linked remote control
or intelligent access key is in range, the
memory function moves to the settings of
the first key to initiate a memory recall. Easy Entry and Exit Feature
If you enable the easy entry and exit feature,
it automatically moves the driver seat
position rearward up to 2 in (5 cm) when you
switch the ignition off.
The driver seat returns to the previous
position when you switch the ignition on.
You can enable or disable this feature in the
information display.
See General
Information (page 109).
REAR SEATS
Note: Your vehicle may have split seatbacks
that you must fold individually.
Note: Make sure the center safety belt is
unbuckled before folding the seatback.
To lower the seat back(s) from inside the
vehicle, do the following: 1. Pull the handle to release the seatback.
2. Push the seatback forward.
147
MKZ (CC9) Canada/United States of America, enUSA, Edition date: 201905, Second-Printing SeatsE144634
Page 154 of 561
UNIVERSAL GARAGE DOOR
OPENER
HomeLink Wireless Control System
WARNING: Do not use the system
with any garage door opener that does not
have the safety stop and reverse feature
as required by U.S. Federal Safety
Standards (this includes any garage door
opener manufactured before April 1, 1982).
A garage door opener which cannot detect
an object, signaling the door to stop and
reverse, does not meet current federal
safety standards. Using a garage door
opener without these features increases
the risk of serious injury or death.
Note: Make sure that the garage door and
security device are free from obstruction
when you are programming. Do not program
the system with the vehicle in the garage.
Note: Make sure you keep the original
remote control transmitter for use in other
vehicles as well as for future system
programming. Note:
We recommend that upon the sale or
lease termination of your vehicle, you erase
the programmed function buttons for security
reasons. See
Erasing the Function Button
Codes.
Note: You can program a maximum of three
devices. To change or replace any of the
three devices after it has been initially
programmed, you must first erase the current
settings. See
Erasing the Function Button
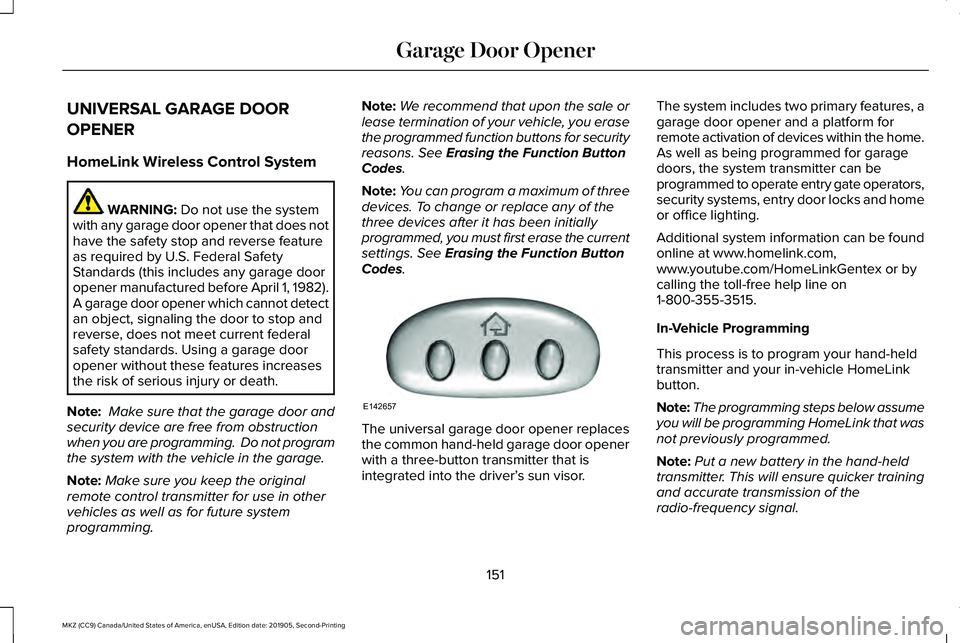
Codes. The universal garage door opener replaces
the common hand-held garage door opener
with a three-button transmitter that is
integrated into the driver’
s sun visor.The system includes two primary features, a
garage door opener and a platform for
remote activation of devices within the home.
As well as being programmed for garage
doors, the system transmitter can be
programmed to operate entry gate operators,
security systems, entry door locks and home
or office lighting.
Additional system information can be found
online at www.homelink.com,
www.youtube.com/HomeLinkGentex or by
calling the toll-free help line on
1-800-355-3515.
In-Vehicle Programming
This process is to program your hand-held
transmitter and your in-vehicle HomeLink
button.
Note:
The programming steps below assume
you will be programming HomeLink that was
not previously programmed.
Note: Put a new battery in the hand-held
transmitter. This will ensure quicker training
and accurate transmission of the
radio-frequency signal.
151
MKZ (CC9) Canada/United States of America, enUSA, Edition date: 201905, Second-Printing Garage Door OpenerE142657
Page 161 of 561
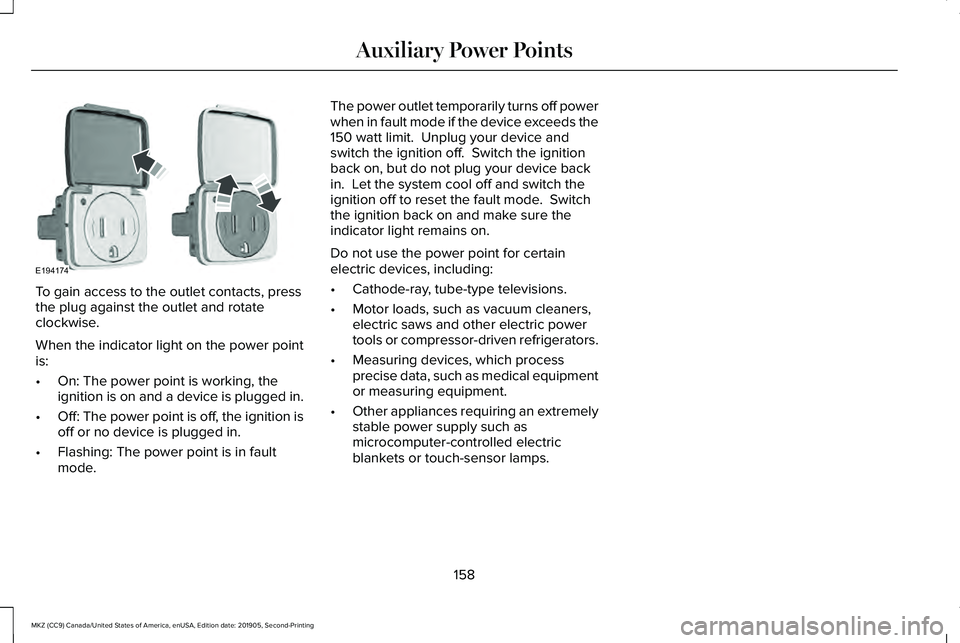
To gain access to the outlet contacts, press
the plug against the outlet and rotate
clockwise.
When the indicator light on the power point
is:
•
On: The power point is working, the
ignition is on and a device is plugged in.
• Off: The power point is off, the ignition is
off or no device is plugged in.
• Flashing: The power point is in fault
mode. The power outlet temporarily turns off power
when in fault mode if the device exceeds the
150 watt limit. Unplug your device and
switch the ignition off. Switch the ignition
back on, but do not plug your device back
in. Let the system cool off and switch the
ignition off to reset the fault mode. Switch
the ignition back on and make sure the
indicator light remains on.
Do not use the power point for certain
electric devices, including:
•
Cathode-ray, tube-type televisions.
• Motor loads, such as vacuum cleaners,
electric saws and other electric power
tools or compressor-driven refrigerators.
• Measuring devices, which process
precise data, such as medical equipment
or measuring equipment.
• Other appliances requiring an extremely
stable power supply such as
microcomputer-controlled electric
blankets or touch-sensor lamps.
158
MKZ (CC9) Canada/United States of America, enUSA, Edition date: 201905, Second-Printing Auxiliary Power PointsE194174
Page 165 of 561
The keyless starting system has three
modes:
•
Off: Turns the ignition off.
• Without applying the brake pedal,
press and release the button once
when the ignition is in the on mode,
or when the vehicle is running but is
not moving.
• On:
All electrical circuits are operational
and the warning lamps and indicators
illuminate.
• Without applying the brake pedal,
press and release the button once.
• Start:
Starts the vehicle. The engine may
not start when the vehicle starts.
• Press the brake pedal, and then press
the button until the vehicle starts. An
indicator light on the button
illuminates when the ignition is on
and when the vehicle starts. STARTING A GASOLINE ENGINE
When you start the engine, the idle speed
increases, this helps to warm up the engine.
If the engine idle speed does not slow down
automatically, have your vehicle checked by
an authorized dealer.
Before starting the engine, check the
following:
•
Make sure all occupants have fastened
their safety belts.
• Make sure the headlamps and electrical
accessories are off.
• Make sure the parking brake is on.
• Put the transmission in
P.
Note: Do not touch the accelerator pedal.
1. Fully press the brake pedal.
2. Press the button.
The system does not function if:
• The key frequencies are jammed.
• The key battery has no charge.
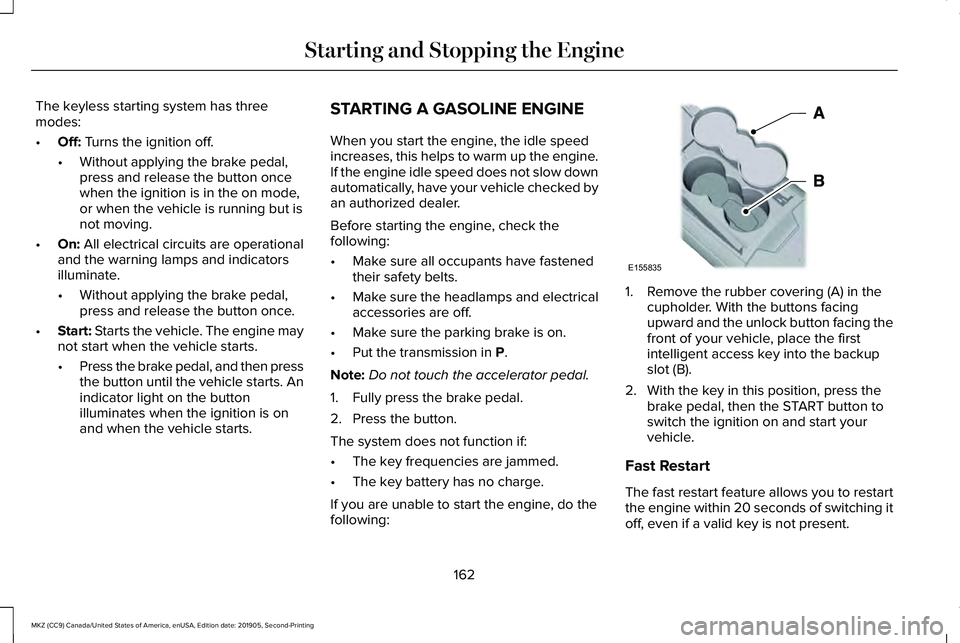
If you are unable to start the engine, do the
following: 1. Remove the rubber covering (A) in the
cupholder. With the buttons facing
upward and the unlock button facing the
front of your vehicle, place the first
intelligent access key into the backup
slot (B).
2. With the key in this position, press the brake pedal, then the START button to
switch the ignition on and start your
vehicle.
Fast Restart
The fast restart feature allows you to restart
the engine within 20 seconds of switching it
off, even if a valid key is not present.
162
MKZ (CC9) Canada/United States of America, enUSA, Edition date: 201905, Second-Printing Starting and Stopping the EngineE155835