open LINCOLN MKZ 2020 Workshop Manual
[x] Cancel search | Manufacturer: LINCOLN, Model Year: 2020, Model line: MKZ, Model: LINCOLN MKZ 2020Pages: 561, PDF Size: 5.7 MB
Page 282 of 561
REPORTING SAFETY DEFECTS
(U.S. ONLY)
If you believe that your vehicle has a
defect which could cause a crash or
could cause injury or death, you should
immediately inform the National
Highway Traffic Safety Administration
(NHTSA) in addition to notifying Ford
Motor Company.
If NHTSA receives similar complaints, it
may open an investigation, and if it finds
that a safety defect exists in a group of
vehicles, it may order a recall and
remedy campaign. However, NHTSA
cannot become involved in individual
problems between you, your dealer, or
Ford Motor Company.
To contact NHTSA, you may call the
Vehicle Safety Hotline toll-free at
1-888-327-4236 (TTY: 1-800-424-9153);
go to http://www .safercar . gov ; or write
to:
Administrator 1200 New Jersey Avenue, Southeast
Washington, D.C. 20590
You can also obtain other information
about motor vehicle safety from
http:// www .safercar . gov .
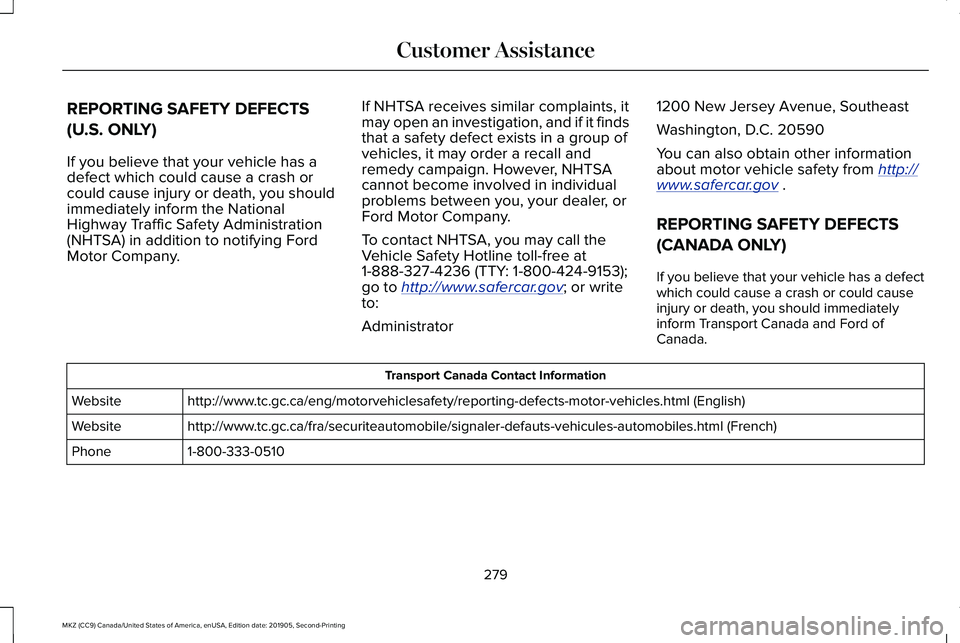
REPORTING SAFETY DEFECTS
(CANADA ONLY)
If you believe that your vehicle has a defect
which could cause a crash or could cause
injury or death, you should immediately
inform Transport Canada and Ford of
Canada. Transport Canada Contact Information
http://www.tc.gc.ca/eng/motorvehiclesafety/reporting-defects-motor-vehicles.html (Englis\
h)
Website
http://www.tc.gc.ca/fra/securiteautomobile/signaler-defauts-vehicules-automobiles.html (\
French)
Website
1-800-333-0510
Phone
279
MKZ (CC9) Canada/United States of America, enUSA, Edition date: 201905, Second-Printing Customer Assistance
Page 295 of 561
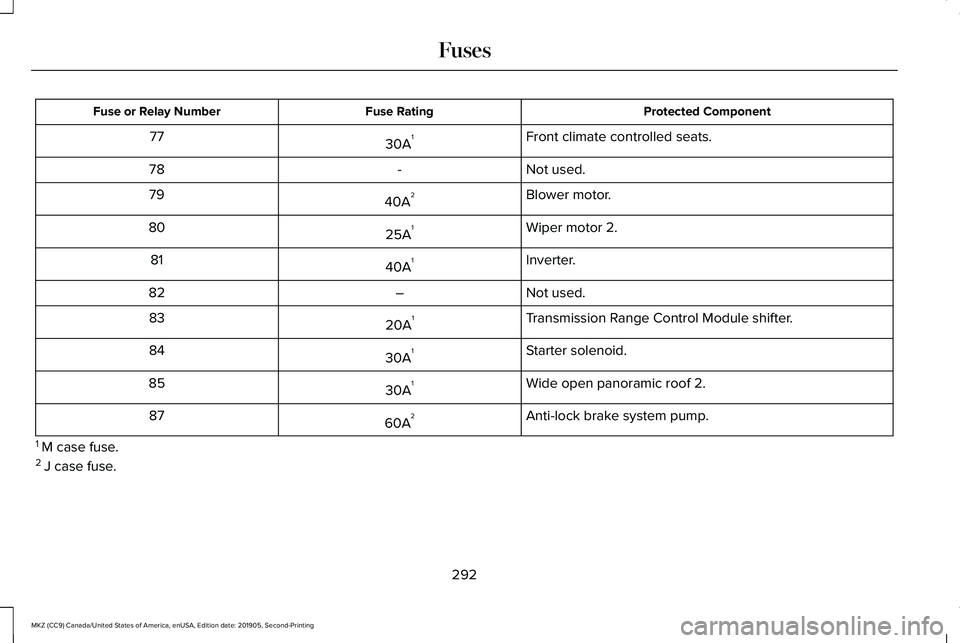
Protected Component
Fuse Rating
Fuse or Relay Number
Front climate controlled seats.
30A 1
77
Not used.
-
78
Blower motor.
40A 2
79
Wiper motor 2.
25A 1
80
Inverter.
40A 1
81
Not used.
–
82
Transmission Range Control Module shifter.
20A 1
83
Starter solenoid.
30A 1
84
Wide open panoramic roof 2.
30A 1
85
Anti-lock brake system pump.
60A 2
87
1 M case fuse.
2 J case fuse.
292
MKZ (CC9) Canada/United States of America, enUSA, Edition date: 201905, Second-Printing Fuses
Page 304 of 561
GENERAL INFORMATION
Have your vehicle serviced regularly to help
maintain its roadworthiness and resale value.
There is a large network of authorized
dealers that are there to help you with their
professional servicing expertise. We believe
that their specially trained technicians are
best qualified to service your vehicle properly
and expertly. They are supported by a wide
range of highly specialized tools developed
specifically for servicing your vehicle.
If your vehicle requires professional service,
an authorized dealer can provide the
necessary parts and service. Check your
warranty information to find out which parts
and services are covered.
Use only recommended fuels, lubricants,
fluids and service parts conforming to
specifications. Motorcraft® parts are
designed and built to provide the best
performance in your vehicle.
Precautions
•
Do not work on a hot engine.
• Make sure that nothing gets caught in
moving parts.
• Do not work on a vehicle with the engine
running in an enclosed space, unless you
are sure you have enough ventilation.
• Keep all open flames and other burning
material (such as cigarettes) away from
the battery and all fuel related parts.
Working with the Engine Off
1. Set the parking brake and shift the transmission to park (P).
2. Switch off the engine.
3. Block the wheels.
Working with the Engine On WARNING: To reduce the risk of
vehicle damage and personal burn injuries,
do not start your engine with the air
cleaner removed and do not remove it
while the engine is running. 1. Set the parking brake and shift the
transmission to park (P).
2. Block the wheels.
OPENING AND CLOSING THE
HOOD
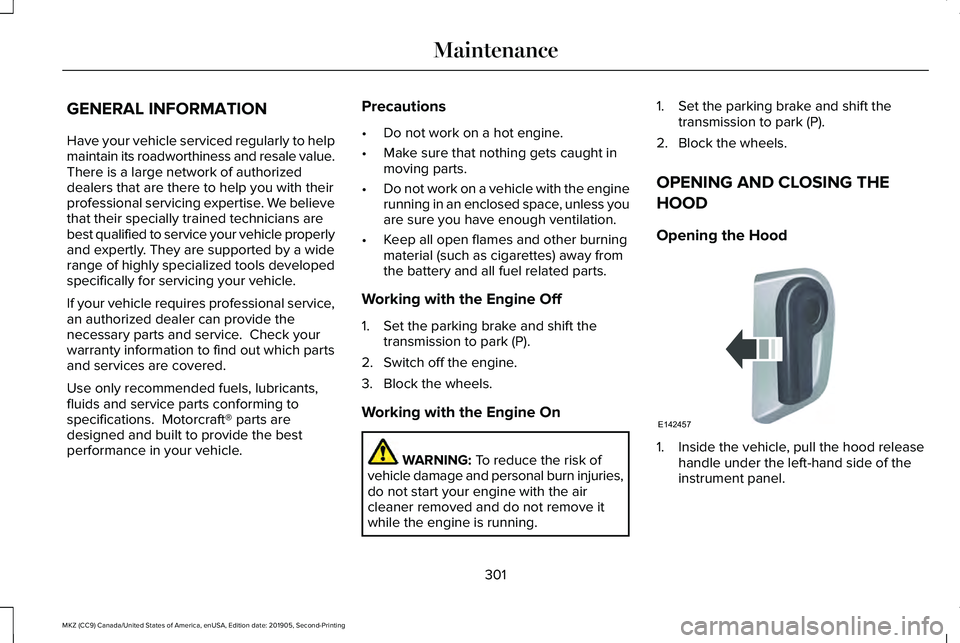
Opening the Hood 1. Inside the vehicle, pull the hood release
handle under the left-hand side of the
instrument panel.
301
MKZ (CC9) Canada/United States of America, enUSA, Edition date: 201905, Second-Printing MaintenanceE142457
Page 305 of 561
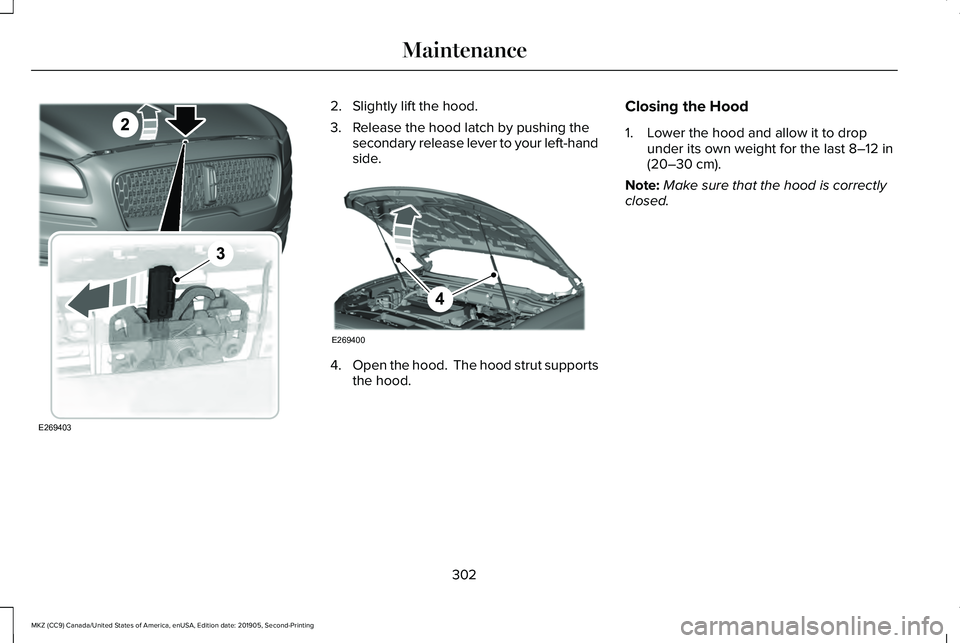
2. Slightly lift the hood.
3. Release the hood latch by pushing the
secondary release lever to your left-hand
side. 4.
Open the hood. The hood strut supports
the hood. Closing the Hood
1. Lower the hood and allow it to drop
under its own weight for the last 8–12 in
(20–30 cm).
Note: Make sure that the hood is correctly
closed.
302
MKZ (CC9) Canada/United States of America, enUSA, Edition date: 201905, Second-Printing MaintenanceE269403 E269400
Page 310 of 561
5. Open the hood. See Opening and
Closing the Hood (page 301).
6. Remove the dipstick and wipe it with a clean, lint-free cloth.
See Under Hood
Overview (page 303).
7. Reinstall the dipstick and remove it again
to check the oil level. See Under Hood
Overview
(page 303).
8. Make sure that the oil level is between the maximum and minimum marks. If the
oil level is at the minimum mark, add oil
immediately.
See Capacities and
Specifications (page 372).
9. If the oil level is correct, replace the dipstick and make sure it is fully seated.
Note: Do not remove the dipstick when the
engine is running.
Note: If the oil level is between the
maximum and minimum marks, the oil level
is acceptable. Do not add oil.
Note: The oil consumption of new engines
reaches its normal level after approximately
3,000 mi (5,000 km)
. Adding Engine Oil WARNING:
Do not remove the filler
cap when the engine is running.
Do not use supplemental engine oil additives
because they are unnecessary and could
lead to engine damage that may not be
covered by the vehicle Warranty. Only use oils certified for gasoline engines
by the American Petroleum Institute (API).
An oil with this trademark symbol conforms
to the current engine and emission system
protection standards and fuel economy
requirements of the International Lubricants
Specification Advisory Committee (ILSAC).
To top up the engine oil level do the
following:
1. Clean the area surrounding the engine
oil filler cap before you remove it.
2. Remove the engine oil filler cap.
See
Under Hood Overview (page 303). Turn
it counterclockwise and remove it.
3. Add engine oil that meets our specifications.
See Capacities and
Specifications (page 372). You may have
to use a funnel to pour the engine oil into
the opening.
4. Recheck the oil level.
5. If the oil level is correct, replace the dipstick and make sure it is fully seated.
6. Replace the engine oil filler cap. Turn it clockwise until you feel a strong
resistance.
307
MKZ (CC9) Canada/United States of America, enUSA, Edition date: 201905, Second-Printing MaintenanceE142732
Page 324 of 561
1. Pull the wiper blade and arm away from
the glass. Press the locking buttons
together.
2. Slightly rotate the wiper blade.
3. Remove the wiper blade.
4. Install in the reverse order.
Note: Make sure that the wiper blade locks
into place.
ADJUSTING THE HEADLAMPS
Vertical Aim Adjustment
The headlamps on your vehicle are properly
aimed at the assembly plant. If your vehicle
has been in an accident, the alignment of
your headlamps should be checked by your
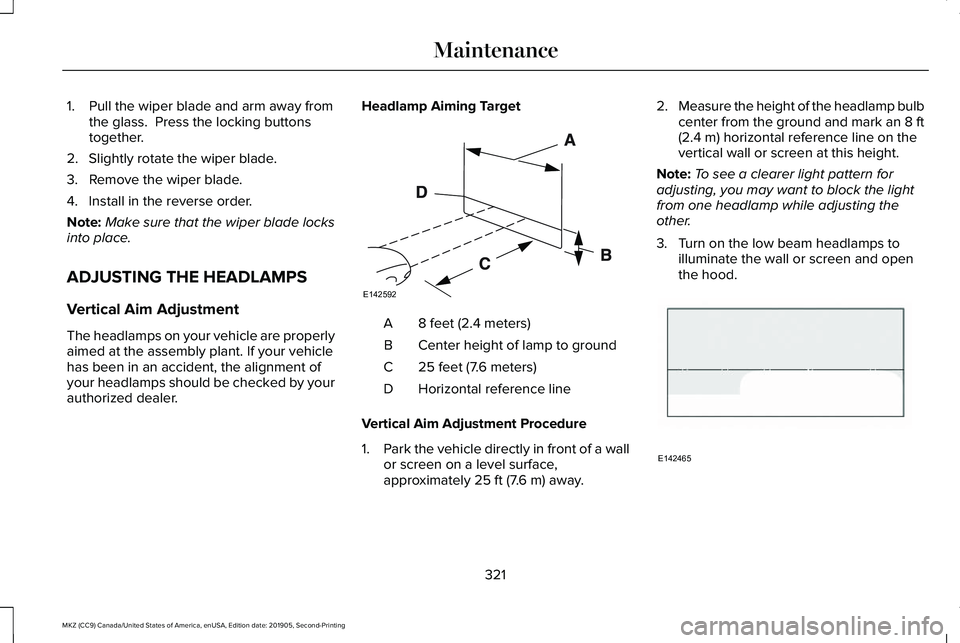
authorized dealer. Headlamp Aiming Target
8 feet (2.4 meters)
A
Center height of lamp to ground
B
25 feet (7.6 meters)
C
Horizontal reference line
D
Vertical Aim Adjustment Procedure
1. Park the vehicle directly in front of a wall
or screen on a level surface,
approximately 25 ft (7.6 m) away. 2.
Measure the height of the headlamp bulb
center from the ground and mark an 8 ft
(2.4 m)
horizontal reference line on the
vertical wall or screen at this height.
Note: To see a clearer light pattern for
adjusting, you may want to block the light
from one headlamp while adjusting the
other.
3. Turn on the low beam headlamps to illuminate the wall or screen and open
the hood. 321
MKZ (CC9) Canada/United States of America, enUSA, Edition date: 201905, Second-Printing MaintenanceE142592 E142465
Page 365 of 561
2.
Place the wheel in the spare tire well with
the valve stem facing down.
3. Install the shorter jack retainer bolt to the
jack bolt-down bracket through the
center of the wheel. Finally, wind the
wheel retainer down to secure the wheel
in place.
4. Place the jack and tools back into the spare tire compartment.
5. Replace the carpeted wheel cover.
Stowing the Flat Tire Using the
Retainer Strap (If Equipped)
You can temporarily stow the full-size road
wheel in the spare tire compartment.
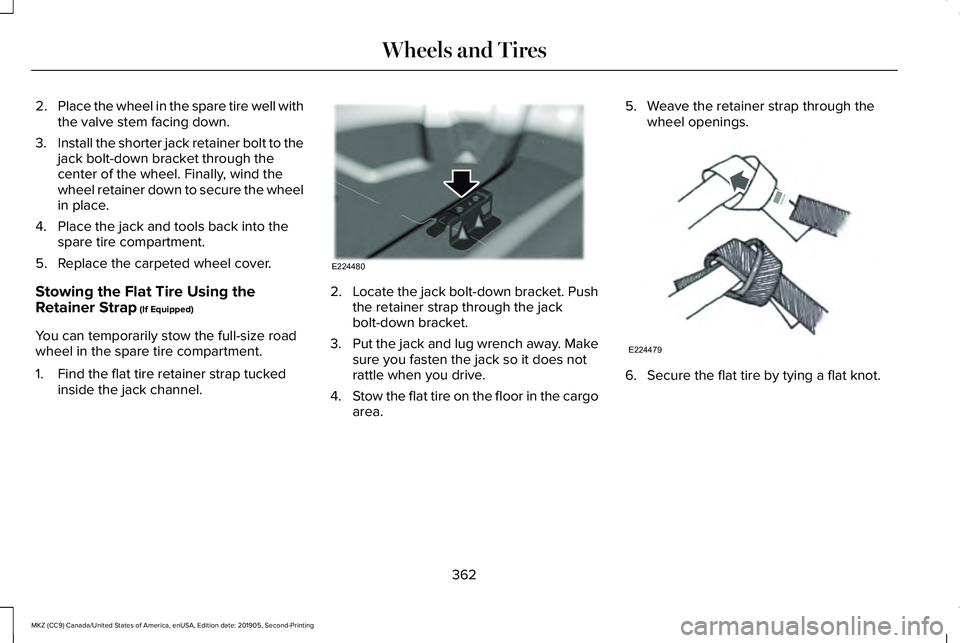
1. Find the flat tire retainer strap tucked inside the jack channel. 2.
Locate the jack bolt-down bracket. Push
the retainer strap through the jack
bolt-down bracket.
3. Put the jack and lug wrench away. Make
sure you fasten the jack so it does not
rattle when you drive.
4. Stow the flat tire on the floor in the cargo
area. 5. Weave the retainer strap through the
wheel openings. 6. Secure the flat tire by tying a flat knot.
362
MKZ (CC9) Canada/United States of America, enUSA, Edition date: 201905, Second-Printing Wheels and TiresE224480 E224479
Page 375 of 561
CAPACITIES AND SPECIFICATIONS
- 2.0L
Use oil and fluid that meets the defined
specification and viscosity grade.
If you do not use oil and fluid that meets the
defined specification and viscosity grade, it
could result in:
•
Component damage that your vehicle
warranty does not cover.
• Longer engine cranking periods.
• Increased emission levels.
• Reduced engine performance.
• Reduced fuel economy.
• Reduced brake performance. Air Conditioning System WARNING: The air conditioning
refrigerant system contains refrigerant
under high pressure. Only qualified
personnel should service the air
conditioning refrigerant system. Opening
the air conditioning refrigerant system can
cause personal injury.
Capacities Refrigerant Oil
Refrigerant
Variant
5.24 fl oz (155 ml)
22 oz (0.62 kg)
All.
372
MKZ (CC9) Canada/United States of America, enUSA, Edition date: 201905, Second-Printing Capacities and Specifications
Page 385 of 561
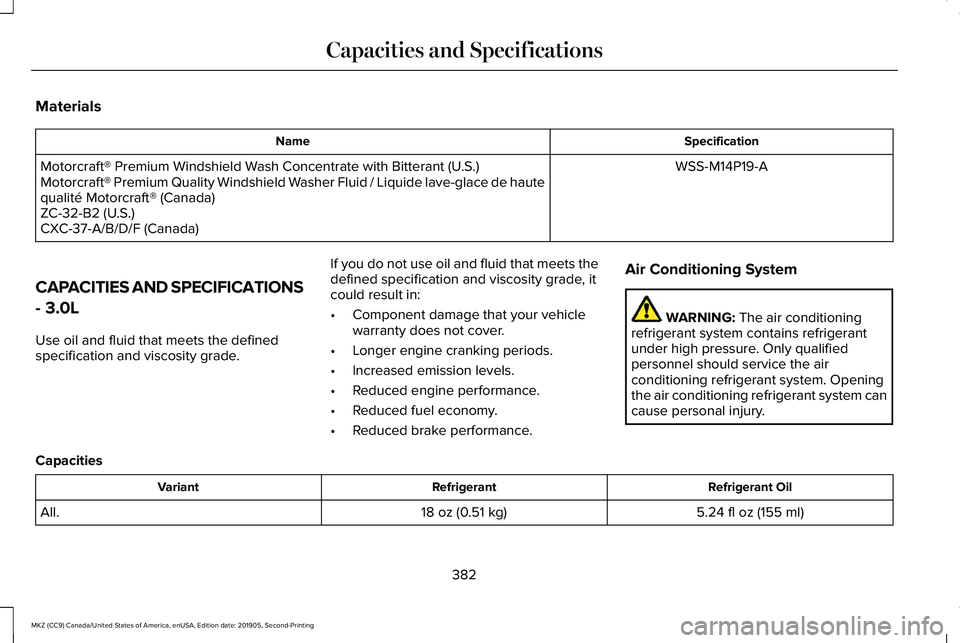
Materials
Specification
Name
WSS-M14P19-A
Motorcraft® Premium Windshield Wash Concentrate with Bitterant (U.S.)
Motorcraft® Premium Quality Windshield Washer Fluid / Liquide lave-glace de haute
qualité Motorcraft® (Canada)
ZC-32-B2 (U.S.)
CXC-37-A/B/D/F (Canada)
CAPACITIES AND SPECIFICATIONS
- 3.0L
Use oil and fluid that meets the defined
specification and viscosity grade. If you do not use oil and fluid that meets the
defined specification and viscosity grade, it
could result in:
•
Component damage that your vehicle
warranty does not cover.
• Longer engine cranking periods.
• Increased emission levels.
• Reduced engine performance.
• Reduced fuel economy.
• Reduced brake performance. Air Conditioning System WARNING: The air conditioning
refrigerant system contains refrigerant
under high pressure. Only qualified
personnel should service the air
conditioning refrigerant system. Opening
the air conditioning refrigerant system can
cause personal injury.
Capacities Refrigerant Oil
Refrigerant
Variant
5.24 fl oz (155 ml)
18 oz (0.51 kg)
All.
382
MKZ (CC9) Canada/United States of America, enUSA, Edition date: 201905, Second-Printing Capacities and Specifications
Page 398 of 561
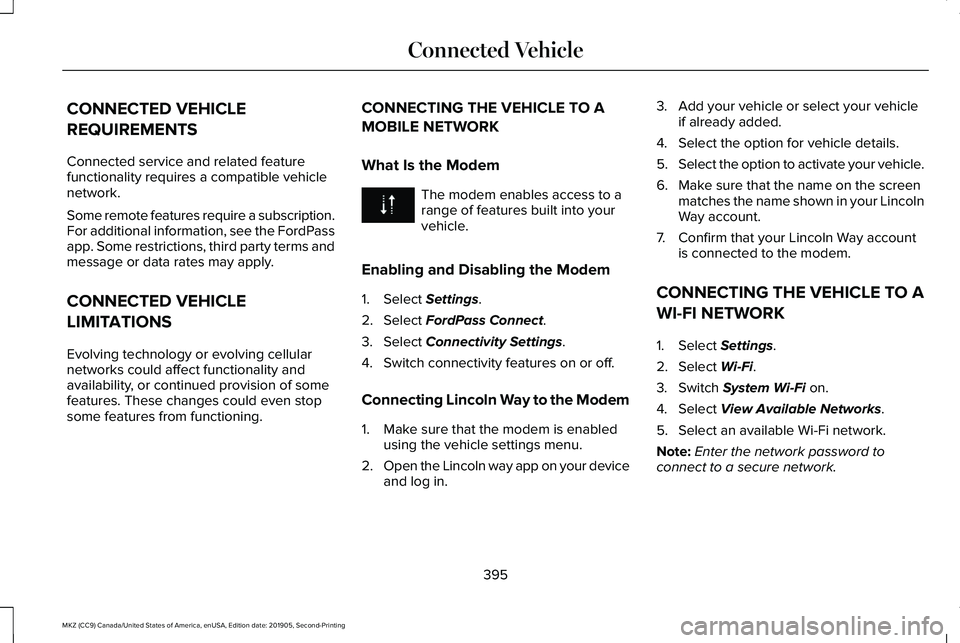
CONNECTED VEHICLE
REQUIREMENTS
Connected service and related feature
functionality requires a compatible vehicle
network.
Some remote features require a subscription.
For additional information, see the FordPass
app. Some restrictions, third party terms and
message or data rates may apply.
CONNECTED VEHICLE
LIMITATIONS
Evolving technology or evolving cellular
networks could affect functionality and
availability, or continued provision of some
features. These changes could even stop
some features from functioning.
CONNECTING THE VEHICLE TO A
MOBILE NETWORK
What Is the Modem The modem enables access to a
range of features built into your
vehicle.
Enabling and Disabling the Modem
1. Select Settings.
2. Select
FordPass Connect.
3. Select
Connectivity Settings.
4. Switch connectivity features on or off.
Connecting Lincoln Way to the Modem
1. Make sure that the modem is enabled using the vehicle settings menu.
2. Open the Lincoln way app on your device
and log in. 3. Add your vehicle or select your vehicle
if already added.
4. Select the option for vehicle details.
5. Select the option to activate your vehicle.
6. Make sure that the name on the screen matches the name shown in your Lincoln
Way account.
7. Confirm that your Lincoln Way account is connected to the modem.
CONNECTING THE VEHICLE TO A
WI-FI NETWORK
1. Select Settings.
2. Select
Wi-Fi.
3. Switch
System Wi-Fi on.
4. Select
View Available Networks.
5. Select an available Wi-Fi network.
Note: Enter the network password to
connect to a secure network.
395
MKZ (CC9) Canada/United States of America, enUSA, Edition date: 201905, Second-Printing Connected Vehicle