engine LINCOLN NAUTILUS 2020 Manual Online
[x] Cancel search | Manufacturer: LINCOLN, Model Year: 2020, Model line: NAUTILUS, Model: LINCOLN NAUTILUS 2020Pages: 596, PDF Size: 5.88 MB
Page 295 of 596
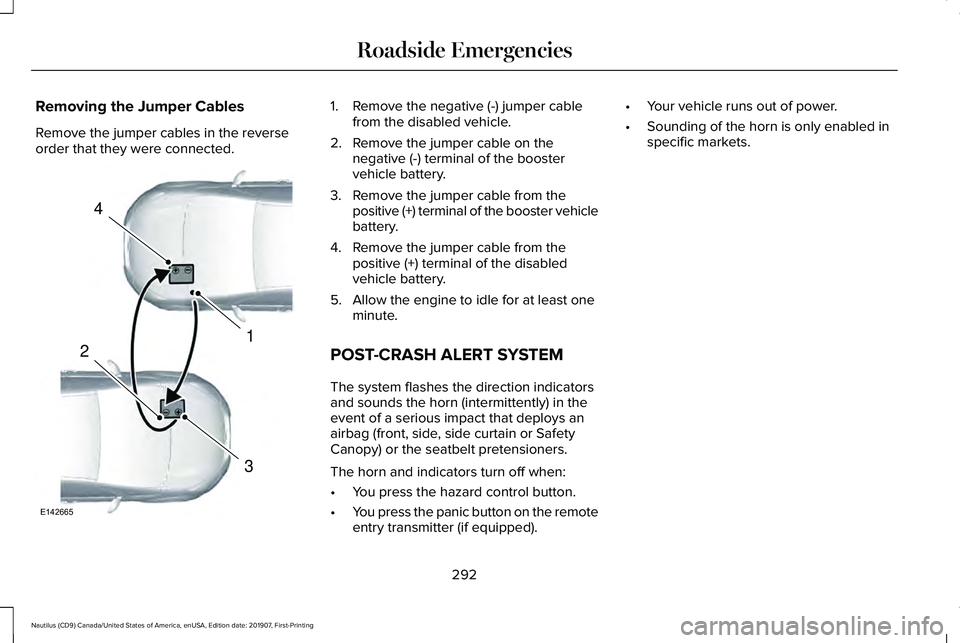
Removing the Jumper Cables
Remove the jumper cables in the reverse
order that they were connected. 1. Remove the negative (-) jumper cable
from the disabled vehicle.
2. Remove the jumper cable on the negative (-) terminal of the booster
vehicle battery.
3. Remove the jumper cable from the positive (+) terminal of the booster vehicle
battery.
4. Remove the jumper cable from the positive (+) terminal of the disabled
vehicle battery.
5. Allow the engine to idle for at least one minute.
POST-CRASH ALERT SYSTEM
The system flashes the direction indicators
and sounds the horn (intermittently) in the
event of a serious impact that deploys an
airbag (front, side, side curtain or Safety
Canopy) or the seatbelt pretensioners.
The horn and indicators turn off when:
• You press the hazard control button.
• You press the panic button on the remote
entry transmitter (if equipped). •
Your vehicle runs out of power.
• Sounding of the horn is only enabled in
specific markets.
292
Nautilus (CD9) Canada/United States of America, enUSA, Edition date: 201907, First-Printing Roadside Emergencies4
1
3
2
E142665
Page 301 of 596
In the CAMVAP program, impartial third-party
arbitrators conduct hearings at mutually
convenient times and places in an informal
environment. These impartial arbitrators
review the positions of the parties, make
decisions and, when appropriate, render
awards to resolve disputes. CAMVAP
decisions are fast, fair, and final as the
arbitrator’
s award is binding on both you and
Ford of Canada.
CAMVAP services are available in all
Canadian territories and provinces. For more
information, without charge or obligation, call
your CAMVAP Provincial Administrator
directly at 1-800-207-0685 or visit
www.camvap.ca. GETTING ASSISTANCE OUTSIDE
THE U.S. AND CANADA
Before exporting your vehicle to a foreign
country, contact the appropriate foreign
embassy or consulate. These officials can
inform you of local vehicle registration
regulations and where to find unleaded fuel
or petrol/gas engines or the proper sulfur
fuel for diesel engines.
If you cannot find the proper fuel
recommended for your vehicle, contact our
Customer Relationship Center.
The use of improper fuels in your vehicle
without proper conversion may damage the
effectiveness of your emission control system
and may cause engine knocking or serious
engine damage. Ford Motor Company or
Ford of Canada is not responsible for any
damage caused by use of improper fuel.
Using improper fuels may also result in
difficulty importing your vehicle back into the
United States.
If your vehicle must be serviced while you
are traveling or living in Asia-Pacific Region,
Sub-Saharan Africa, U.S. Virgin Islands and/or
Puerto Rico, Central America, the Caribbean,
and Israel and the Middle East, contact the
nearest authorized dealer. If the authorized
dealer cannot help you, contact the
corresponding Ford Customer Assistance
Center:
FORD MOTOR COMPANY
Customer Relationship Centers in:
298
Nautilus (CD9) Canada/United States of America, enUSA, Edition date: 201907, First-Printing Customer Assistance
Page 306 of 596
FUSE SPECIFICATION CHART
Power Distribution Box
WARNING: Always disconnect the
battery before servicing high current fuses. WARNING:
To reduce risk of
electrical shock, always replace the cover
to the power distribution box before
reconnecting the battery or refilling fluid
reservoirs. The power distribution box is in the engine
compartment. It has high-current fuses that
protect your vehicle's main electrical systems
from overloads.
If you disconnect or reconnect the battery,
some features need to be reset.
See
Changing the 12V Battery (page 335).
303
Nautilus (CD9) Canada/United States of America, enUSA, Edition date: 201907, First-Printing Fuses
Page 313 of 596
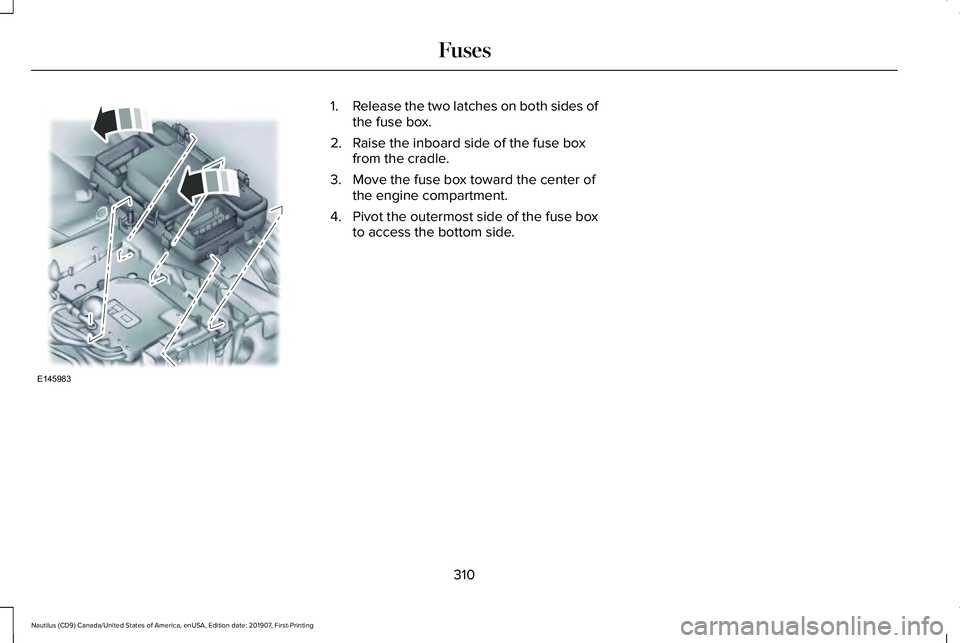
1.
Release the two latches on both sides of
the fuse box.
2. Raise the inboard side of the fuse box from the cradle.
3. Move the fuse box toward the center of the engine compartment.
4. Pivot the outermost side of the fuse box to access the bottom side.
310
Nautilus (CD9) Canada/United States of America, enUSA, Edition date: 201907, First-Printing FusesE145983
Page 325 of 596
GENERAL INFORMATION
Have your vehicle serviced regularly to help
maintain its roadworthiness and resale value.
There is a large network of authorized
dealers that are there to help you with their
professional servicing expertise. We believe
that their specially trained technicians are
best qualified to service your vehicle properly
and expertly. They are supported by a wide
range of highly specialized tools developed
specifically for servicing your vehicle.
If your vehicle requires professional service,
an authorized dealer can provide the
necessary parts and service. Check your
warranty information to find out which parts
and services are covered.
Use only recommended fuels, lubricants,
fluids and service parts conforming to
specifications. Motorcraft® parts are
designed and built to provide the best
performance in your vehicle.
Precautions
•
Do not work on a hot engine.
• Make sure that nothing gets caught in
moving parts.
• Do not work on a vehicle with the engine
running in an enclosed space, unless you
are sure you have enough ventilation.
• Keep all open flames and other burning
material (such as cigarettes) away from
the battery and all fuel related parts.
Working with the Engine Off
1. Set the parking brake and shift the transmission to park (P).
2. Switch off the engine.
3. Block the wheels.
Working with the Engine On WARNING: To reduce the risk of
vehicle damage and personal burn injuries,
do not start your engine with the air
cleaner removed and do not remove it
while the engine is running. 1. Set the parking brake and shift the
transmission to park (P).
2. Block the wheels.
OPENING AND CLOSING THE
HOOD
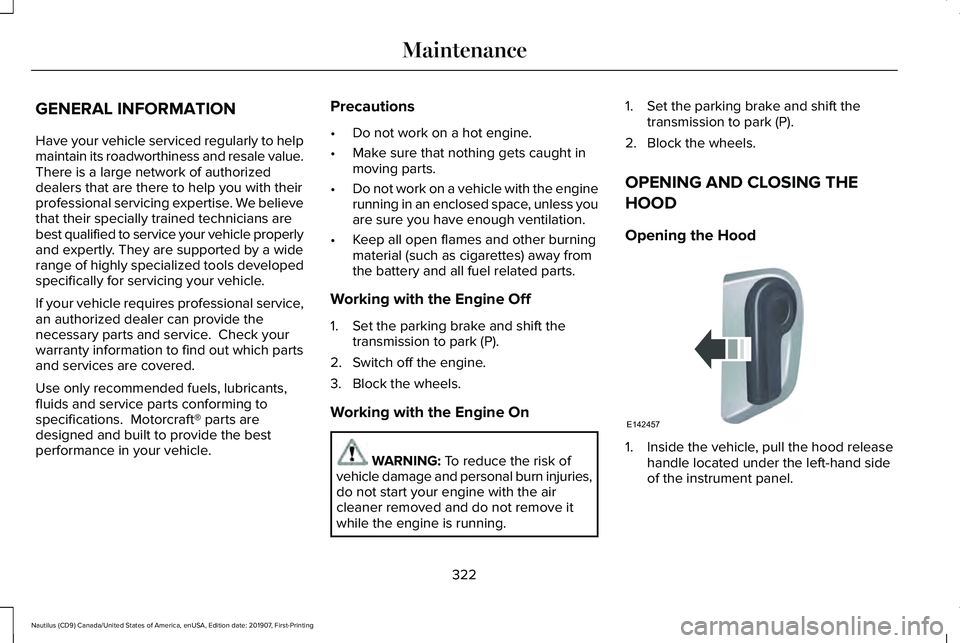
Opening the Hood 1. Inside the vehicle, pull the hood release
handle located under the left-hand side
of the instrument panel.
322
Nautilus (CD9) Canada/United States of America, enUSA, Edition date: 201907, First-Printing MaintenanceE142457
Page 327 of 596
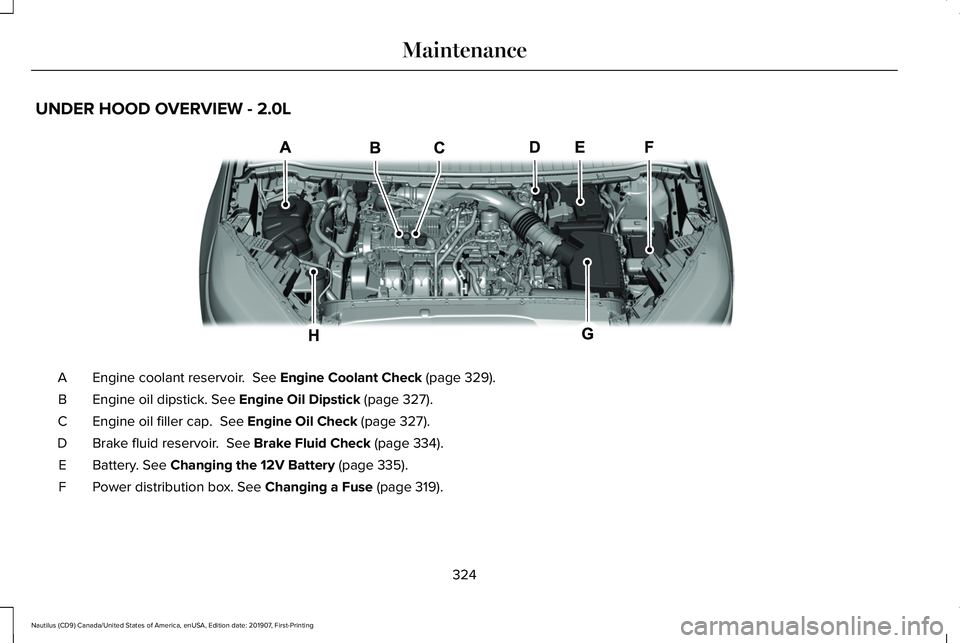
UNDER HOOD OVERVIEW - 2.0L
Engine coolant reservoir. See Engine Coolant Check (page 329).
A
Engine oil dipstick.
See Engine Oil Dipstick (page 327).
B
Engine oil filler cap.
See Engine Oil Check (page 327).
C
Brake fluid reservoir.
See Brake Fluid Check (page 334).
D
Battery.
See Changing the 12V Battery (page 335).
E
Power distribution box.
See Changing a Fuse (page 319).
F
324
Nautilus (CD9) Canada/United States of America, enUSA, Edition date: 201907, First-Printing MaintenanceE294775
Page 328 of 596

Air filter. See Changing the Engine Air Filter (page 340).
G
Windshield washer fluid reservoir.
See Washer Fluid Check (page 335).
H
UNDER HOOD OVERVIEW - 2.7L 325
Nautilus (CD9) Canada/United States of America, enUSA, Edition date: 201907, First-Printing MaintenanceE273095
Page 329 of 596

Engine coolant reservoir. See Engine Coolant Check (page 329).
A
Brake fluid reservoir.
See Brake Fluid Check (page 334).
B
Battery.
See Changing the 12V Battery (page 335).
C
Power distribution box.
See Fuses (page 303).
D
Air filter assembly.
See Changing the Engine Air Filter (page 340).
E
Engine oil dipstick.
See Engine Oil Dipstick (page 327).
F
Engine oil filler cap.
See Engine Oil Check (page 327).
G
Windshield washer fluid reservoir.
See Washer Fluid Check (page 335).
H
326
Nautilus (CD9) Canada/United States of America, enUSA, Edition date: 201907, First-Printing Maintenance
Page 330 of 596
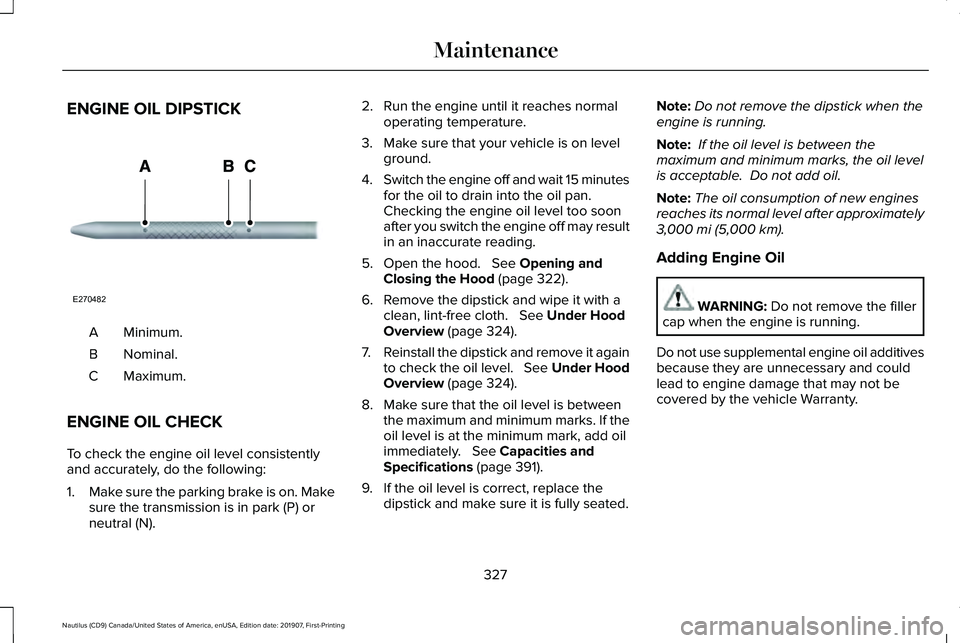
ENGINE OIL DIPSTICK
Minimum.
A
Nominal.
B
Maximum.
C
ENGINE OIL CHECK
To check the engine oil level consistently
and accurately, do the following:
1. Make sure the parking brake is on. Make
sure the transmission is in park (P) or
neutral (N). 2. Run the engine until it reaches normal
operating temperature.
3. Make sure that your vehicle is on level ground.
4. Switch the engine off and wait 15 minutes
for the oil to drain into the oil pan.
Checking the engine oil level too soon
after you switch the engine off may result
in an inaccurate reading.
5. Open the hood. See Opening and
Closing the Hood (page 322).
6. Remove the dipstick and wipe it with a clean, lint-free cloth.
See Under Hood
Overview (page 324).
7. Reinstall the dipstick and remove it again
to check the oil level. See Under Hood
Overview
(page 324).
8. Make sure that the oil level is between the maximum and minimum marks. If the
oil level is at the minimum mark, add oil
immediately.
See Capacities and
Specifications (page 391).
9. If the oil level is correct, replace the dipstick and make sure it is fully seated. Note:
Do not remove the dipstick when the
engine is running.
Note: If the oil level is between the
maximum and minimum marks, the oil level
is acceptable. Do not add oil.
Note: The oil consumption of new engines
reaches its normal level after approximately
3,000 mi (5,000 km)
.
Adding Engine Oil WARNING:
Do not remove the filler
cap when the engine is running.
Do not use supplemental engine oil additives
because they are unnecessary and could
lead to engine damage that may not be
covered by the vehicle Warranty.
327
Nautilus (CD9) Canada/United States of America, enUSA, Edition date: 201907, First-Printing MaintenanceE270482
Page 331 of 596
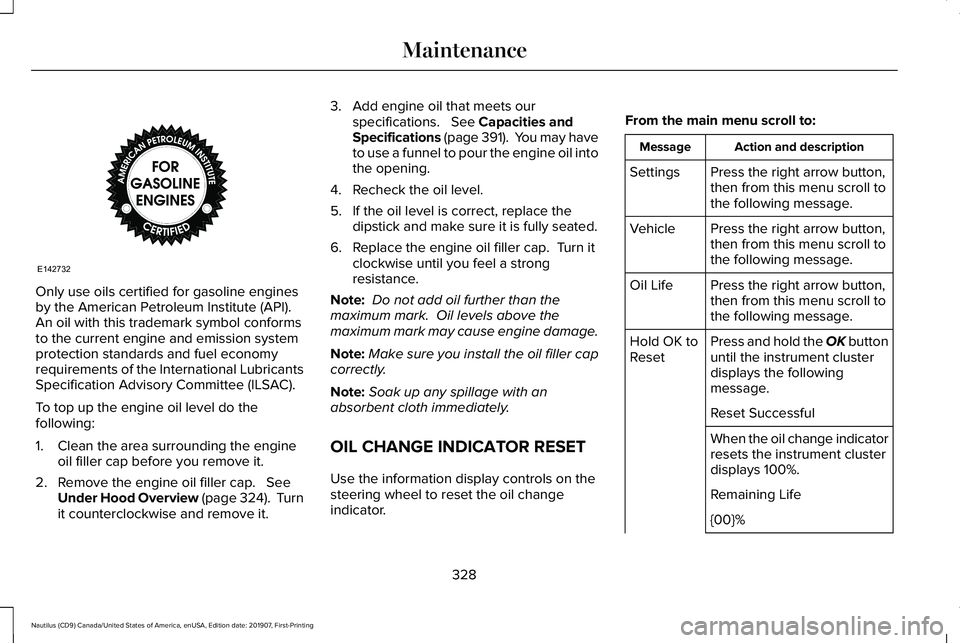
Only use oils certified for gasoline engines
by the American Petroleum Institute (API).
An oil with this trademark symbol conforms
to the current engine and emission system
protection standards and fuel economy
requirements of the International Lubricants
Specification Advisory Committee (ILSAC).
To top up the engine oil level do the
following:
1. Clean the area surrounding the engine
oil filler cap before you remove it.
2. Remove the engine oil filler cap. See
Under Hood Overview (page 324). Turn
it counterclockwise and remove it. 3. Add engine oil that meets our
specifications.
See Capacities and
Specifications (page 391). You may have
to use a funnel to pour the engine oil into
the opening.
4. Recheck the oil level.
5. If the oil level is correct, replace the dipstick and make sure it is fully seated.
6. Replace the engine oil filler cap. Turn it clockwise until you feel a strong
resistance.
Note: Do not add oil further than the
maximum mark. Oil levels above the
maximum mark may cause engine damage.
Note: Make sure you install the oil filler cap
correctly.
Note: Soak up any spillage with an
absorbent cloth immediately.
OIL CHANGE INDICATOR RESET
Use the information display controls on the
steering wheel to reset the oil change
indicator. From the main menu scroll to: Action and description
Message
Press the right arrow button,
then from this menu scroll to
the following message.
Settings
Press the right arrow button,
then from this menu scroll to
the following message.
Vehicle
Press the right arrow button,
then from this menu scroll to
the following message.
Oil Life
Press and hold the OK button
until the instrument cluster
displays the following
message.
Hold OK to
Reset
Reset Successful
When the oil change indicator
resets the instrument cluster
displays 100%.
Remaining Life
{00}%
328
Nautilus (CD9) Canada/United States of America, enUSA, Edition date: 201907, First-Printing MaintenanceE142732