buttons LINCOLN NAUTILUS 2020 Owners Manual
[x] Cancel search | Manufacturer: LINCOLN, Model Year: 2020, Model line: NAUTILUS, Model: LINCOLN NAUTILUS 2020Pages: 596, PDF Size: 5.88 MB
Page 73 of 596
LOCKING AND UNLOCKING
You can use the power door lock control or
the remote control to lock and unlock your
vehicle.
Power Door Locks
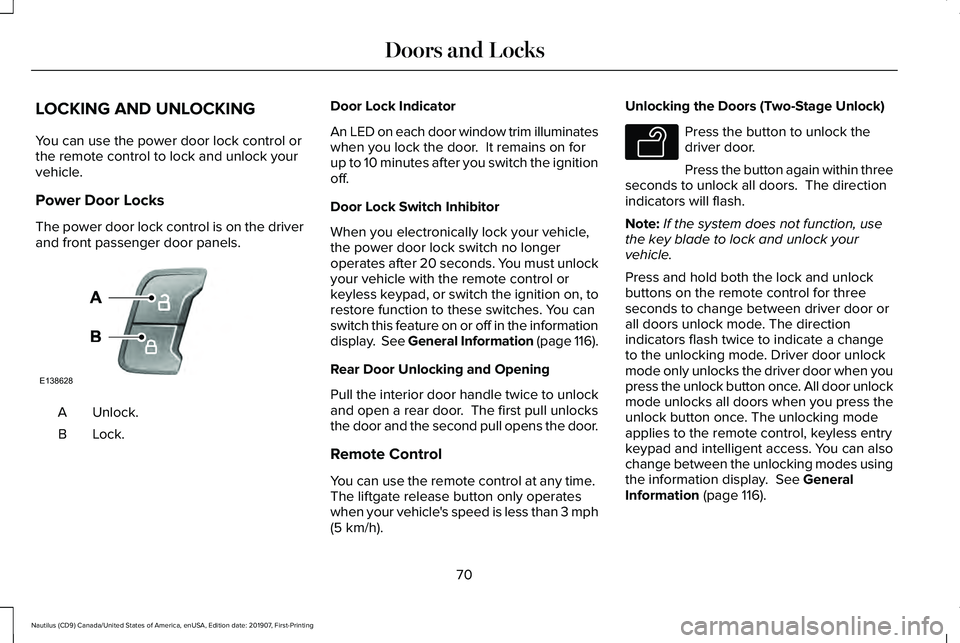
The power door lock control is on the driver
and front passenger door panels.
Unlock.
A
Lock.B Door Lock Indicator
An LED on each door window trim illuminates
when you lock the door. It remains on for
up to 10 minutes after you switch the ignition
off.
Door Lock Switch Inhibitor
When you electronically lock your vehicle,
the power door lock switch no longer
operates after 20 seconds. You must unlock
your vehicle with the remote control or
keyless keypad, or switch the ignition on, to
restore function to these switches. You can
switch this feature on or off in the information
display. See General Information (page 116).
Rear Door Unlocking and Opening
Pull the interior door handle twice to unlock
and open a rear door. The first pull unlocks
the door and the second pull opens the door.
Remote Control
You can use the remote control at any time.
The liftgate release button only operates
when your vehicle's speed is less than 3 mph
(5 km/h). Unlocking the Doors (Two-Stage Unlock) Press the button to unlock the
driver door.
Press the button again within three
seconds to unlock all doors. The direction
indicators will flash.
Note: If the system does not function, use
the key blade to lock and unlock your
vehicle.
Press and hold both the lock and unlock
buttons on the remote control for three
seconds to change between driver door or
all doors unlock mode. The direction
indicators flash twice to indicate a change
to the unlocking mode. Driver door unlock
mode only unlocks the driver door when you
press the unlock button once. All door unlock
mode unlocks all doors when you press the
unlock button once. The unlocking mode
applies to the remote control, keyless entry
keypad and intelligent access. You can also
change between the unlocking modes using
the information display.
See General
Information (page 116).
70
Nautilus (CD9) Canada/United States of America, enUSA, Edition date: 201907, First-Printing Doors and LocksE138628 E138629
Page 74 of 596
Reprogramming the Unlocking Function
Note:
When you press the unlock button,
either all the doors are unlocked or only the
driver door is unlocked. Pressing the unlock
button again unlocks all the doors.
Press and hold the unlock and lock buttons
on the remote control simultaneously for at
least four seconds with the ignition off. The
direction indicators flash twice to confirm the
change.
To return to the original unlocking function,
repeat the process.
Locking the Doors Press the button to lock all doors.
The direction indicators will flash.
Press the button again within three
seconds to confirm that all the doors are
closed. The doors will lock again, a tone
sounds and the direction indicators will flash
if all the doors and the liftgate are closed.
Note: If the system does not function, use
the key blade to lock and unlock your
vehicle. Mislock
If any door or the liftgate is open, or if the
hood is open on vehicles with an anti-theft
alarm or remote start, a tone sounds and the
direction indicators do not flash. You can
switch this feature on or off in the information
display. See General Information (page 116).
Opening the Liftgate
Press twice within three seconds
to open the liftgate.
Locking and Unlocking the Doors with
the Key Blade
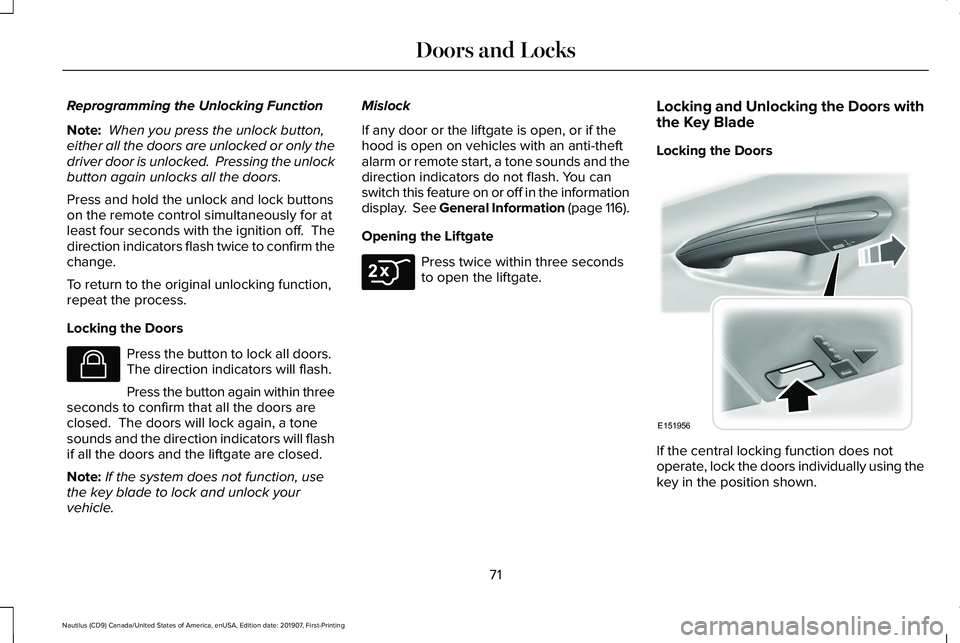
Locking the Doors
If the central locking function does not
operate, lock the doors individually using the
key in the position shown.
71
Nautilus (CD9) Canada/United States of America, enUSA, Edition date: 201907, First-Printing Doors and LocksE138623 E306276 E151956
Page 79 of 596
Anti-Scan Feature
The keypad goes into an anti-scan mode if
you enter the wrong code seven times. This
mode turns off the keypad for one minute
and the keypad lamp flashes.
The anti-scan feature turns off after:
•
One minute of keypad inactivity.
• You press the unlock button on the
remote control.
• You switch the ignition on.
• You unlock your vehicle using intelligent
access.
Locking and Unlocking the Doors
Locking All Doors
Press and hold 7·8 and 9·0 simultaneously
with the driver door closed. You do not need
to enter the keypad code first.
Unlocking the Driver Door
Enter the factory-set or your personal
five-digit code. You must press each number
within five seconds of each other. The
interior lamps illuminate. Note:
All doors unlock if you switch on the
all-door unlocking mode.
See Locking and
Unlocking (page 70).
Unlocking All Doors
Enter the factory-set or your personal
five-digit code, then press
3·4 within five
seconds.
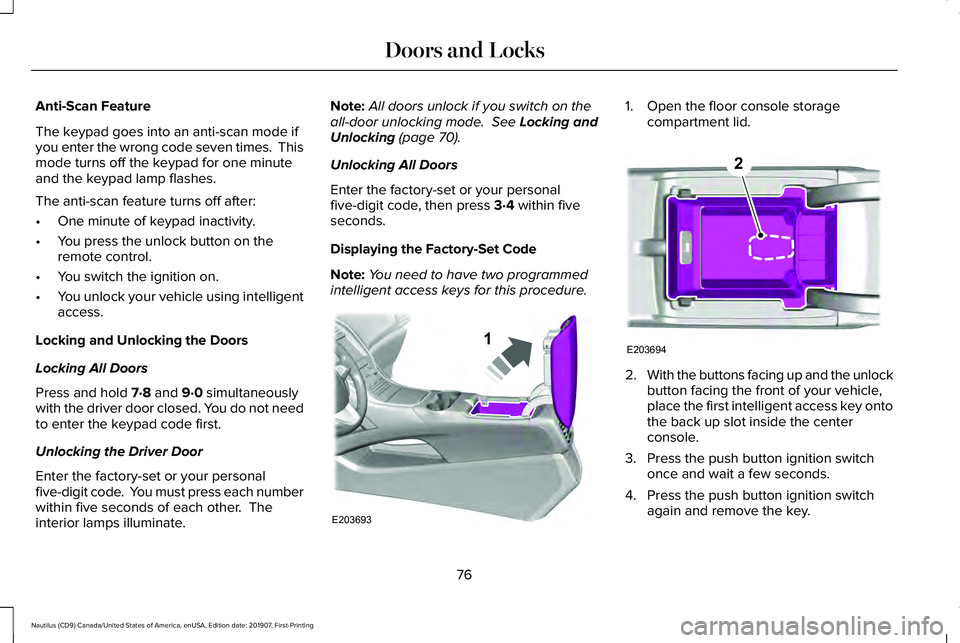
Displaying the Factory-Set Code
Note: You need to have two programmed
intelligent access keys for this procedure. 1. Open the floor console storage
compartment lid. 2.
With the buttons facing up and the unlock
button facing the front of your vehicle,
place the first intelligent access key onto
the back up slot inside the center
console.
3. Press the push button ignition switch once and wait a few seconds.
4. Press the push button ignition switch again and remove the key.
76
Nautilus (CD9) Canada/United States of America, enUSA, Edition date: 201907, First-Printing Doors and LocksE203693
1 E203694
2
Page 86 of 596
Make sure that the ignition is switched off
before beginning this procedure. Make sure
that you close all the doors before beginning
and that they remain closed throughout the
procedure. Carry out all steps within 30
seconds of starting the sequence. Stop and
wait for at least one minute before starting
again if you carry out any steps out of
sequence.
Read and understand the entire procedure
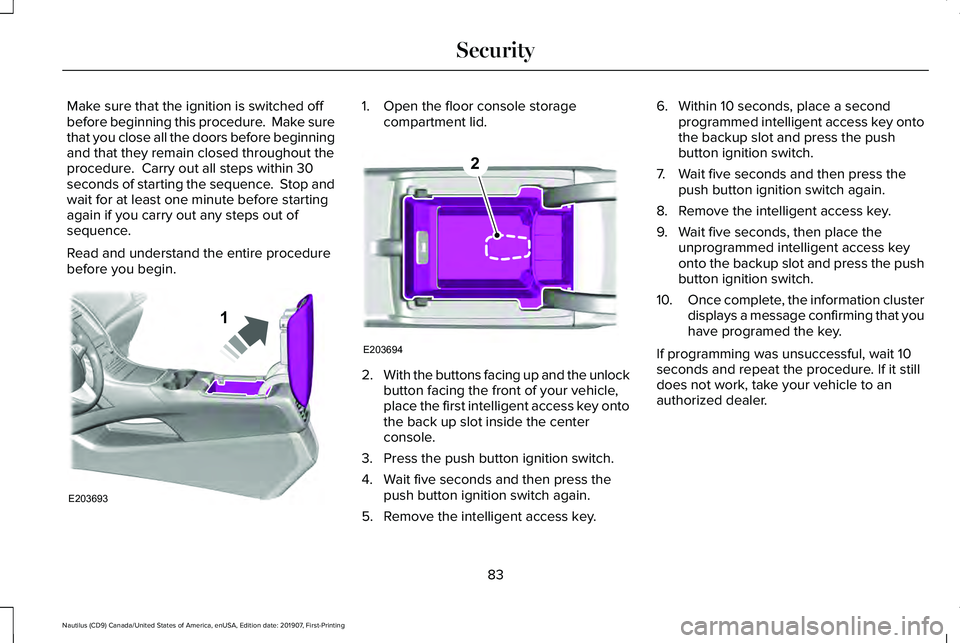
before you begin. 1. Open the floor console storage
compartment lid. 2.
With the buttons facing up and the unlock
button facing the front of your vehicle,
place the first intelligent access key onto
the back up slot inside the center
console.
3. Press the push button ignition switch.
4. Wait five seconds and then press the push button ignition switch again.
5. Remove the intelligent access key. 6. Within 10 seconds, place a second
programmed intelligent access key onto
the backup slot and press the push
button ignition switch.
7. Wait five seconds and then press the push button ignition switch again.
8. Remove the intelligent access key.
9. Wait five seconds, then place the unprogrammed intelligent access key
onto the backup slot and press the push
button ignition switch.
10. Once complete, the information cluster
displays a message confirming that you
have programed the key.
If programming was unsuccessful, wait 10
seconds and repeat the procedure. If it still
does not work, take your vehicle to an
authorized dealer.
83
Nautilus (CD9) Canada/United States of America, enUSA, Edition date: 201907, First-Printing SecurityE203693
1 E203694
2
Page 99 of 596
Note:
If you switch the autolamps and the
autowipers on, the headlamps turn on when
the windshield wipers continuously operate.
INSTRUMENT LIGHTING DIMMER
The instrument lighting dimmer buttons are
on the lighting control. Repeatedly press one of the
buttons to adjust the brightness.
HEADLAMP EXIT DELAY
After you switch the ignition off, you can
switch the headlamps on by pulling the
direction indicator lever toward you. You will
hear a short tone. The headlamps will switch
off automatically after three minutes with any
door open or 30 seconds after the last door
has been closed. You can cancel this feature
by pulling the direction indicator toward you
again or switching the ignition on. DAYTIME RUNNING LAMPS -
VEHICLES WITH: DAYTIME
RUNNING LAMPS (DRL) WARNING: The daytime running
lamps system does not activate the rear
lamps and may not provide adequate
lighting during low visibility driving
conditions. Make sure you switch the
headlamps on, as appropriate, during all
low visibility conditions. Failure to do so
may result in a crash.
The system turns the lamps on in daylight
conditions.
To switch the system on, switch the lighting
control to any position except headlamps. DAYTIME RUNNING LAMPS -
VEHICLES WITH: CONFIGURABLE
DAYTIME RUNNING LAMPS WARNING: The daytime running
lamps system does not activate the rear
lamps and may not provide adequate
lighting during low visibility driving
conditions. Make sure you switch the
headlamps on, as appropriate, during all
low visibility conditions. Failure to do so
may result in a crash.
Switch the daytime running lamps on or off
using the information display.
See General
Information (page 116).
The daytime running lamps turn on when:
1. The lamps are on in the information display.
2. You switch the ignition on.
3. The transmission is not in park (P) for vehicles with automatic transmissions or
you release the parking brake for
vehicles with manual transmissions.
96
Nautilus (CD9) Canada/United States of America, enUSA, Edition date: 201907, First-Printing LightingE291299 E291298
Page 119 of 596
GENERAL INFORMATION
WARNING: Driving while distracted
can result in loss of vehicle control, crash
and injury. We strongly recommend that
you use extreme caution when using any
device that may take your focus off the
road. Your primary responsibility is the safe
operation of your vehicle. We recommend
against the use of any hand-held device
while driving and encourage the use of
voice-operated systems when possible.
Make sure you are aware of all applicable
local laws that may affect the use of
electronic devices while driving.
You can control various systems on your
vehicle using the quick action menu (QAM)
buttons on the right-hand side of the steering
wheel. The information display provides the
corresponding information.
Note: Some options may appear slightly
different or not at all if the items are optional. Note:
Some MyKey menu options only
appear if MyKey is enabled and at least one
MyKey is programmed. This icon gives you the ability to
switch a feature on or off. A check
in the box indicates the feature is
on, and unchecked indicates the feature is
off.
116
Nautilus (CD9) Canada/United States of America, enUSA, Edition date: 201907, First-Printing Information DisplaysE204495
Page 120 of 596
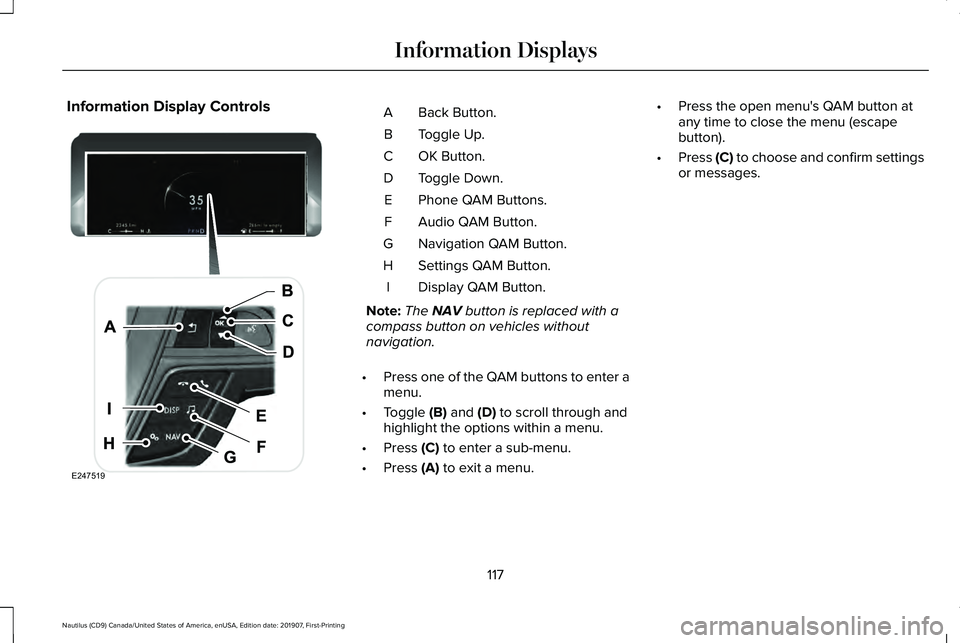
Information Display Controls
Back Button.
A
Toggle Up.
B
OK Button.
C
Toggle Down.
D
Phone QAM Buttons.
E
Audio QAM Button.
F
Navigation QAM Button.
G
Settings QAM Button.
H
Display QAM Button.
I
Note: The NAV button is replaced with a
compass button on vehicles without
navigation.
• Press one of the QAM buttons to enter a
menu.
• Toggle
(B) and (D) to scroll through and
highlight the options within a menu.
• Press
(C) to enter a sub-menu.
• Press
(A) to exit a menu. •
Press the open menu's QAM button at
any time to close the menu (escape
button).
• Press
(C) to choose and confirm settings
or messages.
117
Nautilus (CD9) Canada/United States of America, enUSA, Edition date: 201907, First-Printing Information DisplaysE247519
Page 151 of 596
HEAD RESTRAINTS
WARNING: Fully adjust the head
restraint before you sit in or operate your
vehicle. This will help minimize the risk of
neck injury in the event of a crash. Do not
adjust the head restraint when your vehicle
is moving. WARNING:
The head restraint is a
safety device. Whenever possible it should
be installed and properly adjusted when
the seat is occupied. Failure to adjust the
head restraint properly could reduce its
effectiveness during certain impacts.
Note: Adjust the seat backrest to an upright
driving position before adjusting the head
restraint. Adjust the head restraint so that
the top of it is level with the top of your head
and as far forward as possible. Make sure
that you remain comfortable. If you are
extremely tall, adjust the head restraint to
its highest position. Front Seat Manual Head Restraints
(If
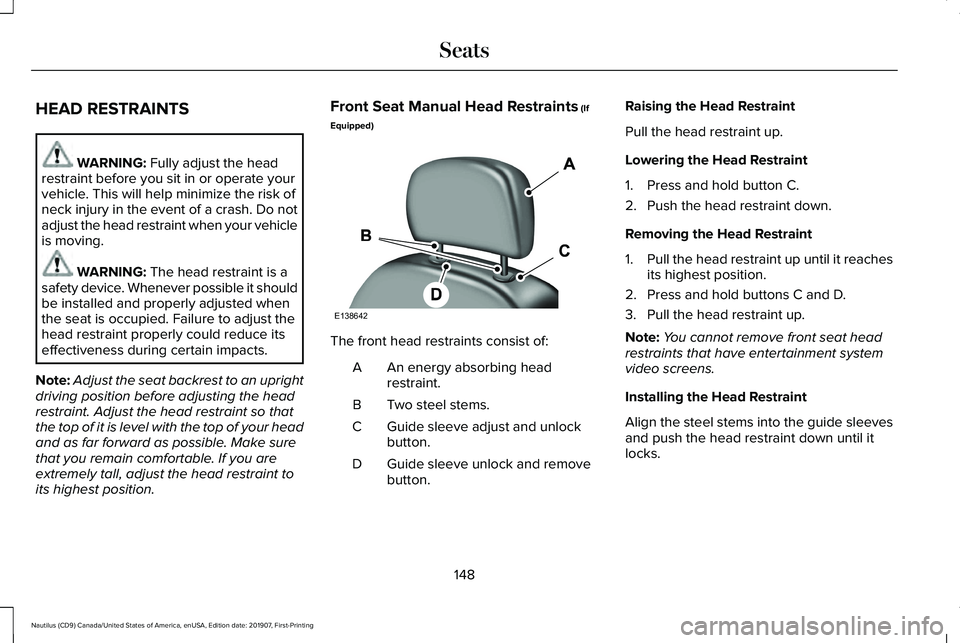
Equipped) The front head restraints consist of:
An energy absorbing head
restraint.
A
Two steel stems.
B
Guide sleeve adjust and unlock
button.
C
Guide sleeve unlock and remove
button.
D Raising the Head Restraint
Pull the head restraint up.
Lowering the Head Restraint
1. Press and hold button C.
2. Push the head restraint down.
Removing the Head Restraint
1.
Pull the head restraint up until it reaches
its highest position.
2. Press and hold buttons C and D.
3. Pull the head restraint up.
Note: You cannot remove front seat head
restraints that have entertainment system
video screens.
Installing the Head Restraint
Align the steel stems into the guide sleeves
and push the head restraint down until it
locks.
148
Nautilus (CD9) Canada/United States of America, enUSA, Edition date: 201907, First-Printing SeatsE138642
Page 152 of 596
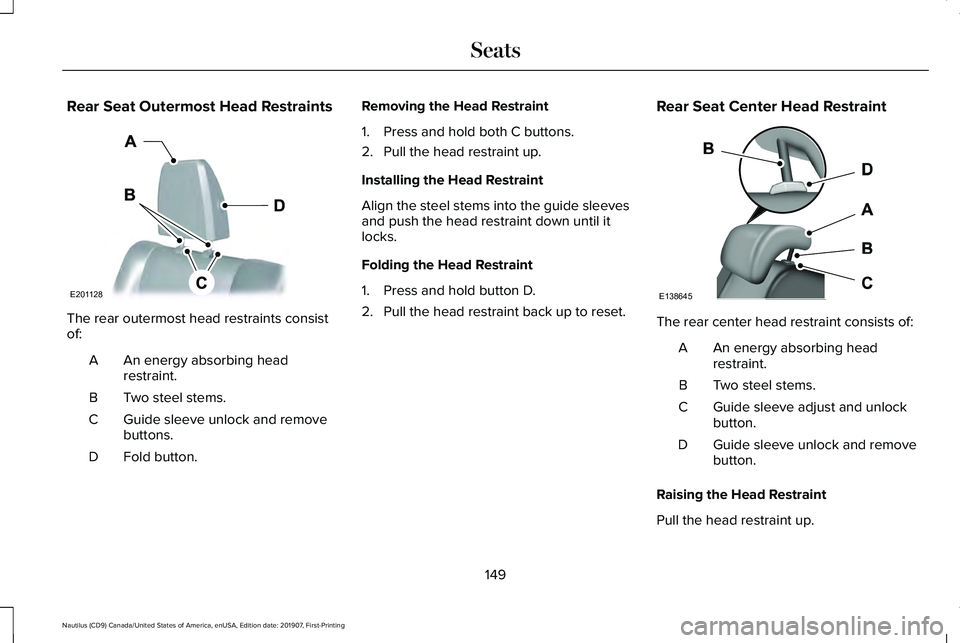
Rear Seat Outermost Head Restraints
The rear outermost head restraints consist
of:
An energy absorbing head
restraint.
A
Two steel stems.
B
Guide sleeve unlock and remove
buttons.
C
Fold button.
D Removing the Head Restraint
1. Press and hold both C buttons.
2. Pull the head restraint up.
Installing the Head Restraint
Align the steel stems into the guide sleeves
and push the head restraint down until it
locks.
Folding the Head Restraint
1. Press and hold button D.
2. Pull the head restraint back up to reset.
Rear Seat Center Head Restraint The rear center head restraint consists of:
An energy absorbing head
restraint.
A
Two steel stems.
B
Guide sleeve adjust and unlock
button.
C
Guide sleeve unlock and remove
button.
D
Raising the Head Restraint
Pull the head restraint up.
149
Nautilus (CD9) Canada/United States of America, enUSA, Edition date: 201907, First-Printing SeatsE201128 E138645
Page 153 of 596
Lowering the Head Restraint
1. Press and hold button C.
2. Push the head restraint down.
Removing the Head Restraint
1.
Pull the head restraint up until it reaches
its highest position.
2. Press and hold buttons C and D.
3. Pull the head restraint up.
Installing the Head Restraint
Align the steel stems into the guide sleeves
and push the head restraint down until it
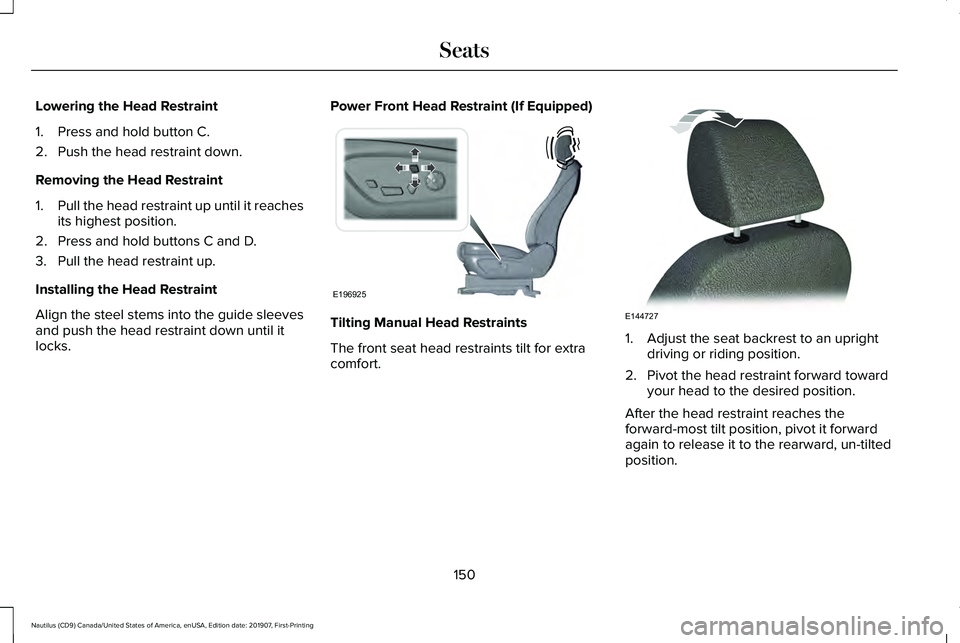
locks. Power Front Head Restraint (If Equipped) Tilting Manual Head Restraints
The front seat head restraints tilt for extra
comfort.
1. Adjust the seat backrest to an upright
driving or riding position.
2. Pivot the head restraint forward toward your head to the desired position.
After the head restraint reaches the
forward-most tilt position, pivot it forward
again to release it to the rearward, un-tilted
position.
150
Nautilus (CD9) Canada/United States of America, enUSA, Edition date: 201907, First-Printing SeatsE196925 E144727