overheating LINCOLN NAUTILUS 2021 Owners Manual
[x] Cancel search | Manufacturer: LINCOLN, Model Year: 2021, Model line: NAUTILUS, Model: LINCOLN NAUTILUS 2021Pages: 579, PDF Size: 6.9 MB
Page 138 of 579
Note:
If you fold and unfold the mirrors
several times within one minute, the power
fold function may turn off to protect the
motors from overheating.
Switching Auto-fold On and Off
1. Press Settings on the touchscreen.
2. Press
Vehicle Settings.
3. Press
Mirrors.
4. Switch
Autofold on or off.
Loose Mirror
If you manually fold the power-folding
mirrors, they may not work properly even
after you re-position them. You need to reset
them if:
• The mirrors vibrate when you drive.
• The mirrors feel loose.
• The mirrors do not stay in the folded or
unfolded position.
• One of the mirrors is not in its normal
driving position. To reset the power-fold feature, use the
power-folding mirror control to fold and
unfold the mirrors. You may hear a loud noise
as you reset the power-folding mirrors. This
sound is normal. Repeat this process as
needed each time you manually fold the
mirrors.
AUTO-DIMMING EXTERIOR MIRROR
What Is the Auto-Dimming Exterior
Mirror
The driver exterior mirror dims when the
interior auto-dimming mirror turns on.
Memory Mirrors
(If Equipped)
You can save and recall the mirror positions
through the memory function. See Memory
Function
(page 171).
Heated Exterior Mirrors
See
Switching the Heated Mirrors On and
Off (page 155). Signal Indicator Mirrors
(If Equipped)
The outer portion of the appropriate mirror
housing blinks when you switch on the turn
signal.
Lincoln Welcome Mat
Projection lights, on the bottom of the mirror
housings, project an image onto the ground
a short distance from the vehicle.
Blind Spot Monitor
See
What Is Blind Spot Information System
(page 273).
134
2021 Nautilus (CD9) Canada/United States of America, enUSA, Edition date: 202011, First-Printing Exterior Mirrors
Page 178 of 579
Note:
We recommend that upon the sale or
lease termination of your vehicle, you erase
the programmed function buttons for security
reasons. See Clearing the Garage Door
Opener (page 176).
GARAGE DOOR OPENER
LIMITATIONS
Canadian radio-frequency laws require
transmitter signals to time-out (or quit) after
several seconds – which may not be long
enough for HomeLink to pick up the signal.
U.S. gate operators time-out in the same
manner.
Note: If programming a garage door opener
or gate operator, it is advised to unplug the
device during the “cycling” process to
prevent possible overheating. PROGRAMMING THE GARAGE
DOOR OPENER TO YOUR HAND-
HELD TRANSMITTER
This process is to program your in-vehicle
HomeLink function button with your
hand-held transmitter.
Note:
The programming steps below assume
you will be programming HomeLink that was
not previously programmed. If your
HomeLink was previously programmed, you
may need to erase your HomeLink buttons.
See
Clearing the Garage Door Opener
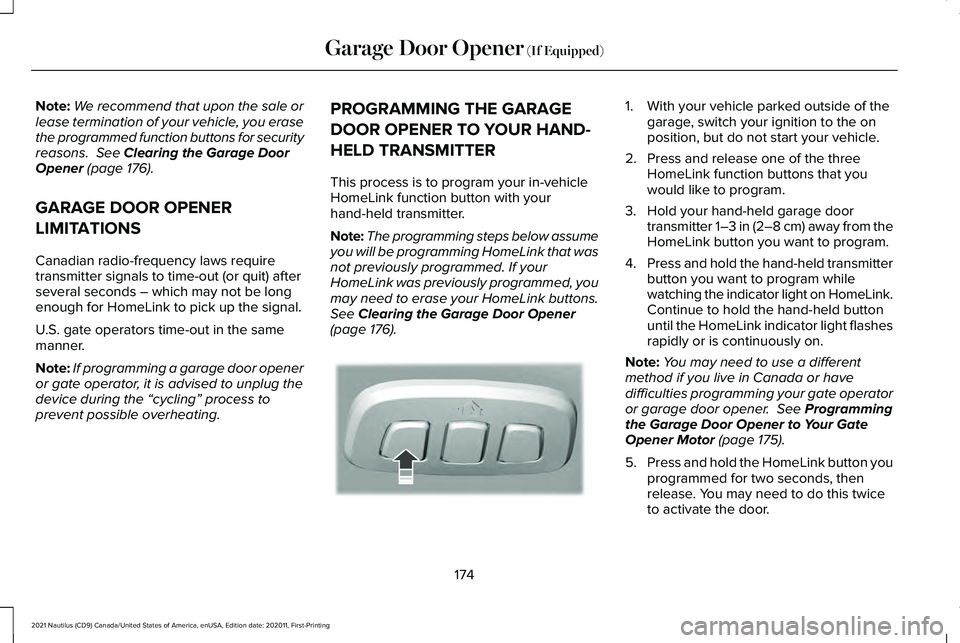
(page 176). 1. With your vehicle parked outside of the
garage, switch your ignition to the on
position, but do not start your vehicle.
2. Press and release one of the three HomeLink function buttons that you
would like to program.
3. Hold your hand-held garage door transmitter 1–3 in (2–8 cm) away from the
HomeLink button you want to program.
4. Press and hold the hand-held transmitter
button you want to program while
watching the indicator light on HomeLink.
Continue to hold the hand-held button
until the HomeLink indicator light flashes
rapidly or is continuously on.
Note: You may need to use a different
method if you live in Canada or have
difficulties programming your gate operator
or garage door opener.
See Programming
the Garage Door Opener to Your Gate
Opener Motor
(page 175).
5. Press and hold the HomeLink button you
programmed for two seconds, then
release. You may need to do this twice
to activate the door.
174
2021 Nautilus (CD9) Canada/United States of America, enUSA, Edition date: 202011, First-Printing Garage Door Opener
(If Equipped)E188212
Page 179 of 579
Note:
If the indicator light stays on, the
programming is complete.
Note: If the HomeLink indicator flashes
rapidly, repeat step 5.
Note: If your device still does not operate,
you must program your garage door. See
Programming the Garage Door Opener to
Your Garage Door Opener Motor (page 175).
6. To program additional buttons, repeat Steps 1 – 4.
PROGRAMMING THE GARAGE
DOOR OPENER TO YOUR GARAGE
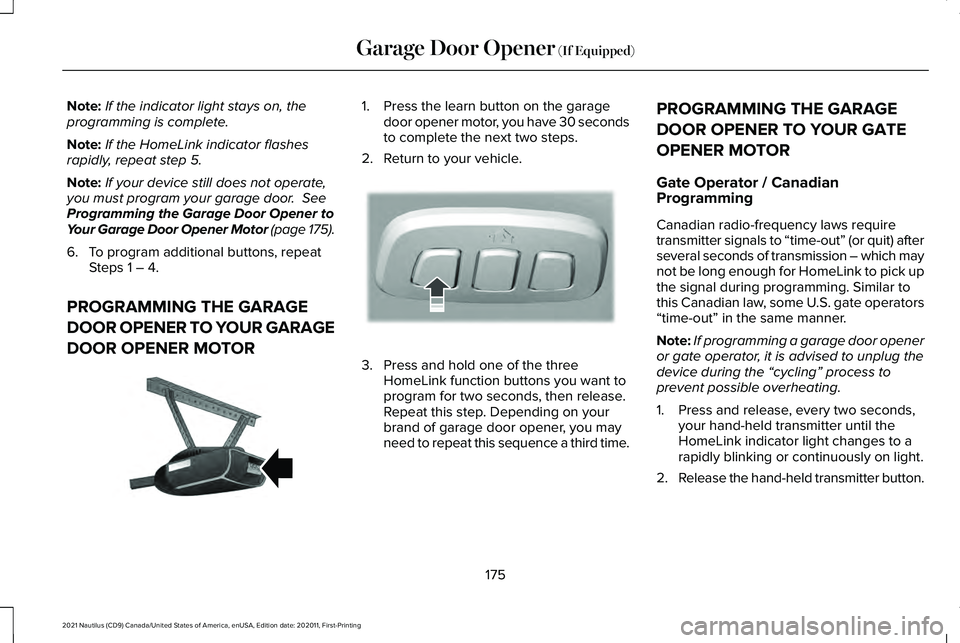
DOOR OPENER MOTOR 1. Press the learn button on the garage
door opener motor, you have 30 seconds
to complete the next two steps.
2. Return to your vehicle. 3. Press and hold one of the three
HomeLink function buttons you want to
program for two seconds, then release.
Repeat this step. Depending on your
brand of garage door opener, you may
need to repeat this sequence a third time. PROGRAMMING THE GARAGE
DOOR OPENER TO YOUR GATE
OPENER MOTOR
Gate Operator / Canadian
Programming
Canadian radio-frequency laws require
transmitter signals to “time-out” (or quit) after
several seconds of transmission – which may
not be long enough for HomeLink to pick up
the signal during programming. Similar to
this Canadian law, some U.S. gate operators
“time-out” in the same manner.
Note:
If programming a garage door opener
or gate operator, it is advised to unplug the
device during the “cycling” process to
prevent possible overheating.
1. Press and release, every two seconds, your hand-held transmitter until the
HomeLink indicator light changes to a
rapidly blinking or continuously on light.
2. Release the hand-held transmitter button.
175
2021 Nautilus (CD9) Canada/United States of America, enUSA, Edition date: 202011, First-Printing Garage Door Opener
(If Equipped)E142659 E188212
Page 216 of 579
6.
With your foot fully applied on the brake
pedal, start your vehicle. Confirm that
your vehicle is in the park (P) position and
that the instrument cluster indicates park
(P).
7. If the instrument cluster is not displaying
the park (P) position or there is a
message stating Park Not Available,
Transmission Not In Park or Shift System
Fault, apply the parking brake before
exiting your vehicle. Have the system
checked.
AUTOMATIC TRANSMISSION
AUDIBLE WARNINGS
Transmission Not In Park (P) Audible
Warning
Sounds if you open the driver door before
shifting into park (P).
Park (P) Selection Audible Warning
Sounds when you shift into park (P). AUTOMATIC TRANSMISSION –
TROUBLESHOOTING
Automatic Transmission – Information
Messages You switched the
engine off and shift
select lever is in any position other than park (P).
Shift to Park
Transmission is toocold. Wait for it to
warm up before you drive.
Transmission
Warming Up Please Wait
The transmission isoverheating and
needs to cool. Stop in a safe place as
soon as it’ s possible.
Transmission Over
Temperature Stop Safely
Have system
checked as soon as possible.
Transmission
Service Required The transmission is
overheating and
needs to cool. Stop in a safe place as
soon as it’ s possible.
Transmission Too
Hot Press Brake
The transmission has
limited functionality. Have system
checked as soon as possible.
Transmission Limited
Function See Manual
A reminder to shift
into park. In addition, this message is
typical after recon- necting or rechar-
ging the battery until you cycle the igni-
tion to the on mode. See Changing the
12V Battery (page
345).
Transmission Not in
Park
212
2021 Nautilus (CD9) Canada/United States of America, enUSA, Edition date: 202011, First-Printing Automatic Transmission
Page 221 of 579
Make sure that you allow sufficient distance
between your vehicle and other vehicles for
stopping. On ice and snow, you should drive
more slowly than usual. In emergency
stopping situations, steadily apply the brake.
Your vehicle has a four wheel anti-lock brake
system, do not pump the brake pedal. See
Anti-Lock Braking System Limitations (page
218
).
Note: If your vehicle gets stuck driving on
snow and ice, it may be rocked out by
shifting between forward and reverse gears,
stopping between shifts in a steady pattern.
Press lightly on the accelerator in each gear. Note:
Do not rock your vehicle if the engine
is not at normal operating temperature, as
damage to the transmission may occur.
Note: Do not rock your vehicle for more than
a minute, as damage to the transmission
and tires may occur or the engine may
overheat.
ALL-WHEEL DRIVE – TROUBLESHOOTING
All-Wheel Drive – Information Messages Action
Message
The all-wheel drive system temporarily turns off to protect itself from \
overheating.
AWD Temporarily Disabled
The all-wheel drive system will resume normal function and clear this me\
ssage after driving ashort distance with the road tire re-installed or after the system cools\
.
AWD Restored
The all-wheel drive system temporarily turns off to protect itself from \
overheating or if you are using the temporary spare tire.
AWD OFF
The all-wheel drive system is not operating properly. If the warning stays on or continues tocome on, contact an authorized dealer.
AWD Malfunction Service Required
217
2021 Nautilus (CD9) Canada/United States of America, enUSA, Edition date: 202011, First-Printing All-Wheel Drive
(If Equipped)
Page 236 of 579
ELECTRIC POWER STEERING
Electric Power Steering Precautions
WARNING: The electric power
steering system has diagnostic checks that
continuously monitor the system. If a fault
is detected, a message displays in the
information display. Stop your vehicle as
soon as it is safe to do so. Switch the vehicle off. After at least 10 seconds, switch
the vehicle on and watch the information
display for a steering system warning
message. If a steering system warning
message returns, have the system checked
as soon as possible.
WARNING:
If the system detects an
error, you may not feel a difference in the
steering, however a serious condition may
exist. Have your vehicle checked as soon
as possible. Failure to do so may result in
loss of steering control. Adapt your speed and driving behavior
according to reduced steering assist.
Extreme continuous steering may increase
the effort to steer. This occurs to prevent
internal overheating and damage to the
steering system. If this occurs, you will not
lose the ability to steer your vehicle manually
nor will it cause damage to the system.
Normal steering and driving allows the
system to cool down and steering assist
returns to normal.
Note:
There is no fluid reservoir to check or
fill.
232
2021 Nautilus (CD9) Canada/United States of America, enUSA, Edition date: 202011, First-Printing Steering
Page 309 of 579
REDUCED ENGINE PERFORMANCE
WARNING: If you continue to drive
your vehicle when the engine is
overheating, the engine could stop without
warning. Failure to follow this instruction
could result in the loss of control of your
vehicle.
If the engine coolant temperature gauge
needle moves to the upper limit position, the
engine is overheating.
See What Is the
Engine Coolant Temperature Gauge (page
139).
You must only drive your vehicle for a short
distance if the engine overheats. The
distance you can travel depends on ambient
temperature, vehicle load and terrain. The
engine continues to operate with limited
power for a short period of time.
If the engine temperature continues to rise,
the fuel supply to the engine reduces. The
air conditioning switches off and the engine
cooling fan operates continually. 1. Gradually reduce your speed and stop
your vehicle as soon as it is safe to do
so.
2. Immediately switch the engine off to prevent severe engine damage.
3. Wait for the engine to cool down.
4. Check the coolant level.
See Checking
the Coolant (page 340).
5. Have your vehicle checked as soon as possible.
COLD WEATHER PRECAUTIONS
The functional operation of some
components and systems can be affected at
temperatures below approximately
-13°F
(-25°C).
BREAKING-IN
You need to break in new tires for
approximately
300 mi (480 km). During this
time, your vehicle may exhibit some unusual
driving characteristics. DRIVING THROUGH WATER WARNING:
Do not drive through
flowing or deep water as you may lose
control of your vehicle.
Note: Driving through standing water can
cause vehicle damage.
Note: Engine damage can occur if water
enters the air filter.
Before driving through standing water, check
the depth. Never drive through water that is
higher than the bottom of the front rocker
area of your vehicle.
305
2021 Nautilus (CD9) Canada/United States of America, enUSA, Edition date: 202011, First-Printing Driving Hints
Page 345 of 579
To top up the coolant level do the following:
1. Unscrew the cap slowly. Any pressure
escapes as you unscrew the cap.
2. Add enough prediluted coolant to reach
the correct level.
Note: We do not recommend the use of
recycled coolant.
3. Replace the coolant reservoir cap. Turn the cap clockwise until it contacts the
hard stop.
4. Check the coolant level in the coolant reservoir the next few times you drive
your vehicle. If necessary, repeat step 2.
If you have to add more than 1.1 qt (1 L) of
engine coolant per month, have your vehicle
checked as soon as possible. Operating an
engine with a low level of coolant can result
in engine overheating and possible engine
damage.
In case of emergency, you can add a large
amount of water without engine coolant in
order to reach a vehicle service location.
Service your vehicle as soon as possible. Water alone, without engine coolant, can
cause engine damage from corrosion,
overheating or freezing.
Do not use the following as a coolant
substitute, as they can cause engine damage
from overheating or freezing:
•
Alcohol.
• Methanol.
• Brine.
• Any coolant mixed with alcohol or
methanol antifreeze.
Do not add extra inhibitors or additives to
the coolant. These can be harmful and
compromise the corrosion protection of the
coolant.
Severe Climates
If you drive in extremely cold climates, you
may need to increase the coolant
concentration above 50%. Note:
A coolant concentration of 60%
provides improved freeze point protection.
Coolant concentrations above 60% decrease
the overheat protection characteristics of
the coolant and could cause engine
damage.
If you drive in extremely hot climates, you
may need to decrease the coolant
concentration to 40%.
Note: Coolant concentrations below 40%
decrease the freeze and corrosion protection
characteristics of the coolant and could
cause engine damage.
Coolant Change
Change the coolant at specific mileage
intervals. Refer to the scheduled
maintenance information.
See Normal
Scheduled Maintenance (page 463).
Note: Dispose of used coolant in the
appropriate manner.
Follow your community's regulations and
standards for recycling and disposing of
automotive fluids.
341
2021 Nautilus (CD9) Canada/United States of America, enUSA, Edition date: 202011, First-Printing Maintenance
Page 347 of 579
3. If this is not possible, wait for a short
period of time for the engine to cool.
4. Check the coolant level. If the coolant level is at or below the minimum mark,
add prediluted coolant immediately.
5. When the engine temperature cools, you
can re-start the engine. Have your vehicle
checked as soon as possible to minimize
engine damage.
Note: Driving your vehicle without repair
increases the chance of engine damage.
Engine Coolant Temperature
Management (If Equipped) WARNING:
To reduce the risk of
crash and injury, be prepared that the
vehicle speed may reduce and the vehicle
may not be able to accelerate with full
power until the coolant temperature
reduces. If you tow a trailer with your vehicle, the
engine may temporarily reach a higher
temperature during severe operating
conditions, for example ascending a long or
steep grade in high ambient temperatures.
At this time, you may notice the coolant
temperature gauge moves toward the red
zone and a message may appear in the
information display.
You may notice a reduction in vehicle speed
caused by reduced engine power in order
to manage the engine coolant temperature.
Your vehicle may enter this mode if certain
high-temperature and high-load conditions
take place. The amount of speed reduction
depends on vehicle loading, grade and
ambient temperature. If this occurs, there is
no need to stop your vehicle. You can
continue to drive.
The air conditioning may automatically turn
on and off during severe operating
conditions to protect the engine from
overheating. When the coolant temperature
decreases to the normal operating
temperature, the air conditioning turns on. If the coolant temperature gauge moves fully
into the red zone, or if the coolant
temperature warning or service engine soon
messages appear in your information display,
do the following:
1.
Stop your vehicle as soon as it is safe to
do so. Fully apply the parking brake, shift
into park (P) or neutral (N).
2. Leave the engine running until the coolant temperature gauge needle
returns to the normal position. If the
temperature does not drop after several
minutes, follow the remaining steps.
3. Switch the engine off and wait for it to cool. Check the coolant level.
4. If the coolant level is at or below the minimum mark, add prediluted coolant
immediately.
5. If the coolant level is normal, restart the engine and continue.
343
2021 Nautilus (CD9) Canada/United States of America, enUSA, Edition date: 202011, First-Printing Maintenance
Page 383 of 579
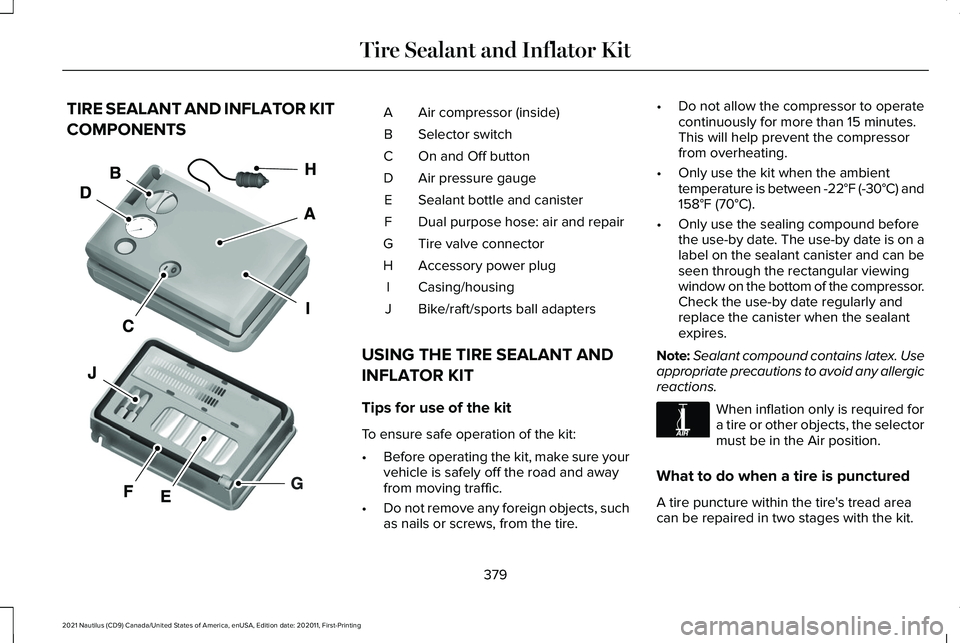
TIRE SEALANT AND INFLATOR KIT
COMPONENTS
Air compressor (inside)
A
Selector switch
B
On and Off button
C
Air pressure gauge
D
Sealant bottle and canister
E
Dual purpose hose: air and repair
F
Tire valve connector
G
Accessory power plug
H
Casing/housing
I
Bike/raft/sports ball adapters
J
USING THE TIRE SEALANT AND
INFLATOR KIT
Tips for use of the kit
To ensure safe operation of the kit:
• Before operating the kit, make sure your
vehicle is safely off the road and away
from moving traffic.
• Do not remove any foreign objects, such
as nails or screws, from the tire. •
Do not allow the compressor to operate
continuously for more than 15 minutes.
This will help prevent the compressor
from overheating.
• Only use the kit when the ambient
temperature is between -22°F (-30°C) and
158°F (70°C).
• Only use the sealing compound before
the use-by date. The use-by date is on a
label on the sealant canister and can be
seen through the rectangular viewing
window on the bottom of the compressor.
Check the use-by date regularly and
replace the canister when the sealant
expires.
Note: Sealant compound contains latex. Use
appropriate precautions to avoid any allergic
reactions. When inflation only is required for
a tire or other objects, the selector
must be in the Air position.
What to do when a tire is punctured
A tire puncture within the tire's tread area
can be repaired in two stages with the kit.
379
2021 Nautilus (CD9) Canada/United States of America, enUSA, Edition date: 202011, First-Printing Tire Sealant and Inflator KitE175977 E175978