clock LINCOLN NAUTILUS 2022 User Guide
[x] Cancel search | Manufacturer: LINCOLN, Model Year: 2022, Model line: NAUTILUS, Model: LINCOLN NAUTILUS 2022Pages: 586, PDF Size: 13.97 MB
Page 392 of 586
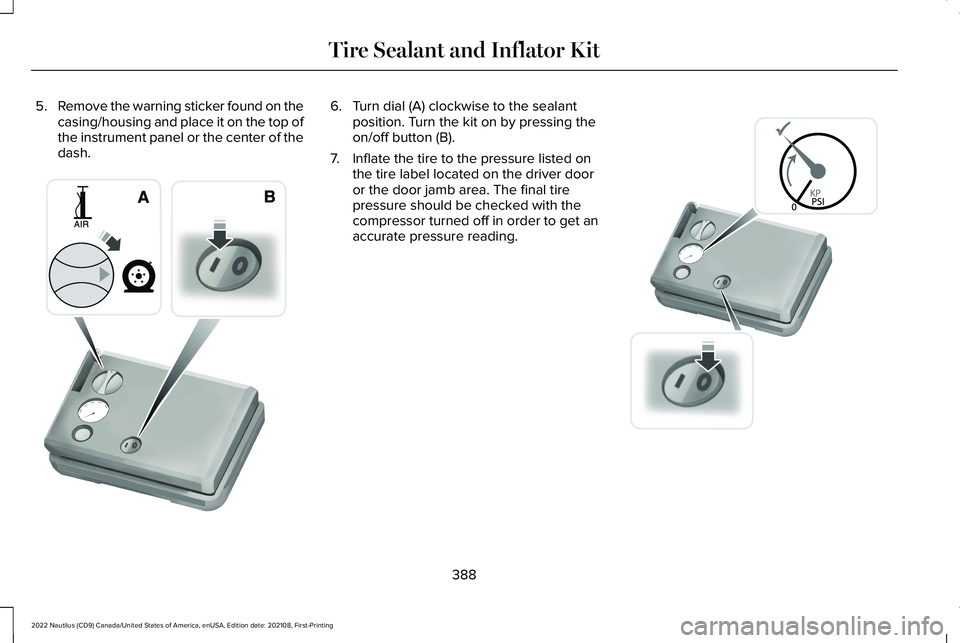
5.Remove the warning sticker found on thecasing/housing and place it on the top ofthe instrument panel or the center of thedash.
6.Turn dial (A) clockwise to the sealantposition. Turn the kit on by pressing theon/off button (B).
7.Inflate the tire to the pressure listed onthe tire label located on the driver dooror the door jamb area. The final tirepressure should be checked with thecompressor turned off in order to get anaccurate pressure reading.
388
2022 Nautilus (CD9) Canada/United States of America, enUSA, Edition date: 202108, First-PrintingTire Sealant and Inflator KitE175981 E175982
Page 393 of 586
8.When the recommended tire pressure isreached, turn off the kit, unplug thepower cable, and disconnect the hosefrom the tire valve. Re-install the valvecap on the tire valve and return the kit tothe rear of the vehicle.
9.Drive the vehicle 4 mi (6 km) to distributethe sealant evenly inside the tire.
Note:If you experience any unusualvibration, ride disturbance or noise whiledriving, reduce your speed until you cansafely pull off to the side of the road to callfor roadside assistance. Do not proceed tothe second stage of this operation.
Second Stage: Checking the tirepressure with the inflator kit
WARNING: If the tire does not inflateto the recommended tire pressure within15 minutes, stop and call roadsideassistance.
WARNING: The power plug may gethot after use and should be handledcarefully when unplugging.
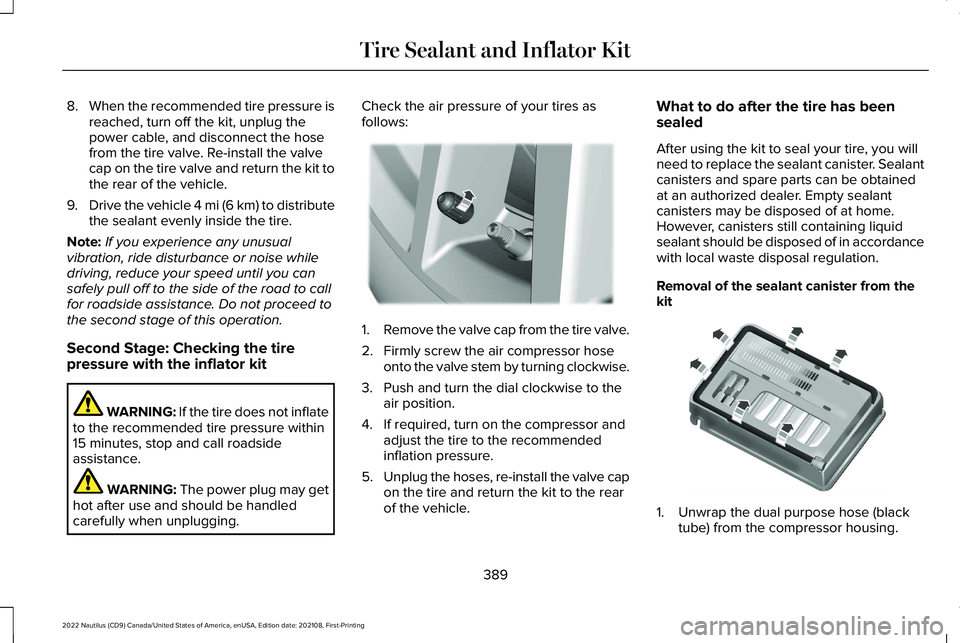
Check the air pressure of your tires asfollows:
1.Remove the valve cap from the tire valve.
2.Firmly screw the air compressor hoseonto the valve stem by turning clockwise.
3.Push and turn the dial clockwise to theair position.
4.If required, turn on the compressor andadjust the tire to the recommendedinflation pressure.
5.Unplug the hoses, re-install the valve capon the tire and return the kit to the rearof the vehicle.
What to do after the tire has beensealed
After using the kit to seal your tire, you willneed to replace the sealant canister. Sealantcanisters and spare parts can be obtainedat an authorized dealer. Empty sealantcanisters may be disposed of at home.However, canisters still containing liquidsealant should be disposed of in accordancewith local waste disposal regulation.
Removal of the sealant canister from thekit
1.Unwrap the dual purpose hose (blacktube) from the compressor housing.
389
2022 Nautilus (CD9) Canada/United States of America, enUSA, Edition date: 202108, First-PrintingTire Sealant and Inflator KitE175983 E175984
Page 404 of 586
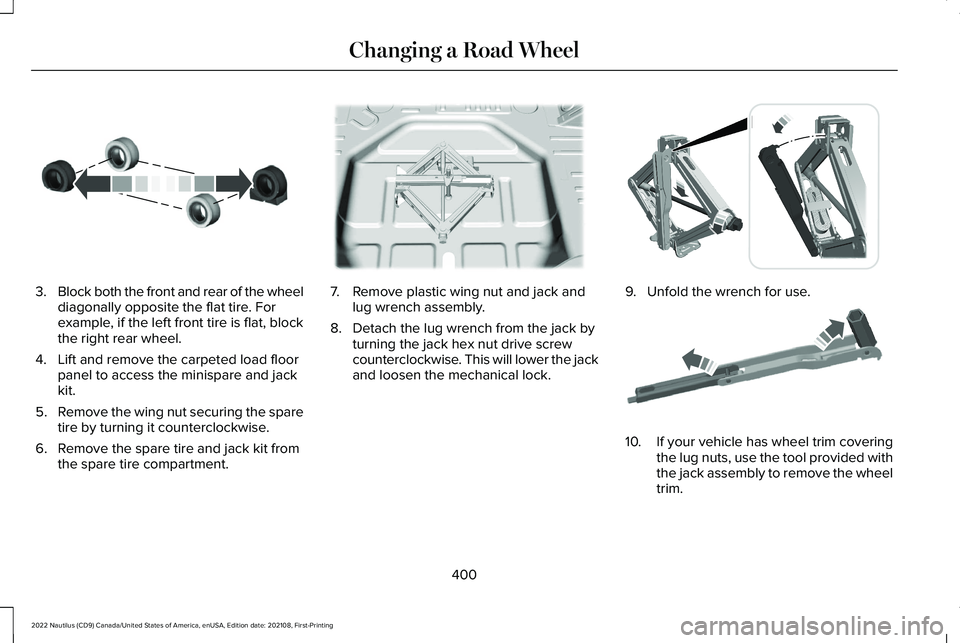
3.Block both the front and rear of the wheeldiagonally opposite the flat tire. Forexample, if the left front tire is flat, blockthe right rear wheel.
4.Lift and remove the carpeted load floorpanel to access the minispare and jackkit.
5.Remove the wing nut securing the sparetire by turning it counterclockwise.
6.Remove the spare tire and jack kit fromthe spare tire compartment.
7.Remove plastic wing nut and jack andlug wrench assembly.
8.Detach the lug wrench from the jack byturning the jack hex nut drive screwcounterclockwise. This will lower the jackand loosen the mechanical lock.
9.Unfold the wrench for use.
10.If your vehicle has wheel trim coveringthe lug nuts, use the tool provided withthe jack assembly to remove the wheeltrim.
400
2022 Nautilus (CD9) Canada/United States of America, enUSA, Edition date: 202108, First-PrintingChanging a Road WheelE175447 E178186 E294117 E181744
Page 405 of 586
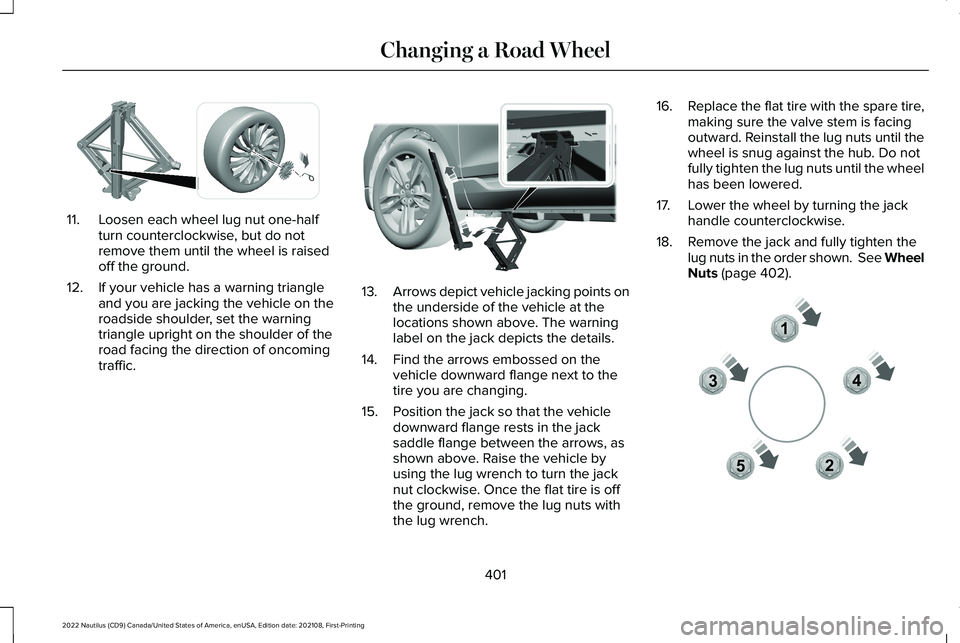
11.Loosen each wheel lug nut one-halfturn counterclockwise, but do notremove them until the wheel is raisedoff the ground.
12.If your vehicle has a warning triangleand you are jacking the vehicle on theroadside shoulder, set the warningtriangle upright on the shoulder of theroad facing the direction of oncomingtraffic.
13.Arrows depict vehicle jacking points onthe underside of the vehicle at thelocations shown above. The warninglabel on the jack depicts the details.
14.Find the arrows embossed on thevehicle downward flange next to thetire you are changing.
15.Position the jack so that the vehicledownward flange rests in the jacksaddle flange between the arrows, asshown above. Raise the vehicle byusing the lug wrench to turn the jacknut clockwise. Once the flat tire is offthe ground, remove the lug nuts withthe lug wrench.
16.Replace the flat tire with the spare tire,making sure the valve stem is facingoutward. Reinstall the lug nuts until thewheel is snug against the hub. Do notfully tighten the lug nuts until the wheelhas been lowered.
17.Lower the wheel by turning the jackhandle counterclockwise.
18.Remove the jack and fully tighten thelug nuts in the order shown. See WheelNuts (page 402).
401
2022 Nautilus (CD9) Canada/United States of America, enUSA, Edition date: 202108, First-PrintingChanging a Road WheelE294584 E336095 12345E306781
Page 406 of 586
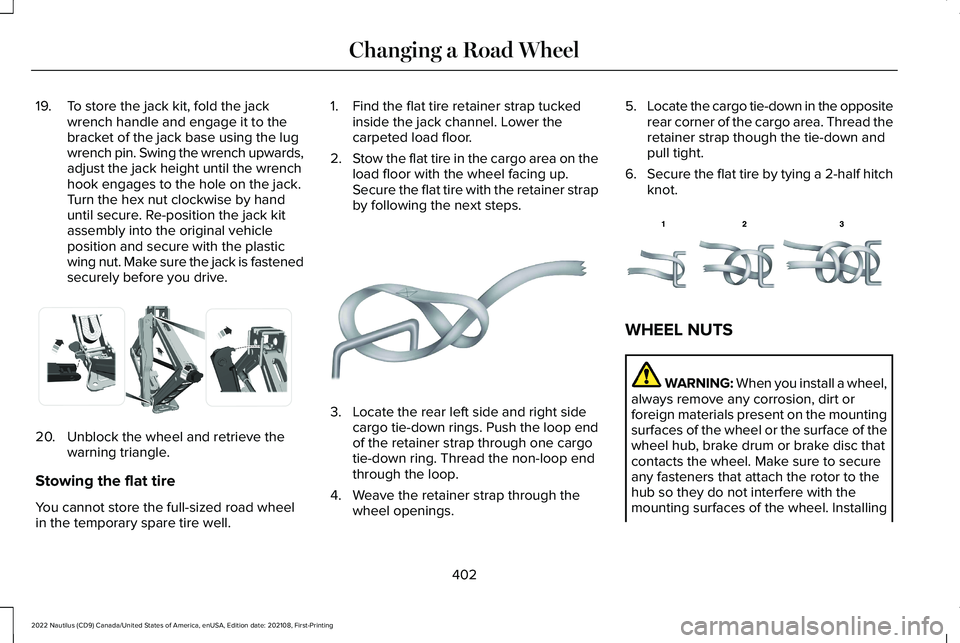
19.To store the jack kit, fold the jackwrench handle and engage it to thebracket of the jack base using the lugwrench pin. Swing the wrench upwards,adjust the jack height until the wrenchhook engages to the hole on the jack.Turn the hex nut clockwise by handuntil secure. Re-position the jack kitassembly into the original vehicleposition and secure with the plasticwing nut. Make sure the jack is fastenedsecurely before you drive.
20.Unblock the wheel and retrieve thewarning triangle.
Stowing the flat tire
You cannot store the full-sized road wheelin the temporary spare tire well.
1.Find the flat tire retainer strap tuckedinside the jack channel. Lower thecarpeted load floor.
2.Stow the flat tire in the cargo area on theload floor with the wheel facing up.Secure the flat tire with the retainer strapby following the next steps.
3.Locate the rear left side and right sidecargo tie-down rings. Push the loop endof the retainer strap through one cargotie-down ring. Thread the non-loop endthrough the loop.
4.Weave the retainer strap through thewheel openings.
5.Locate the cargo tie-down in the oppositerear corner of the cargo area. Thread theretainer strap though the tie-down andpull tight.
6.Secure the flat tire by tying a 2-half hitchknot.
WHEEL NUTS
WARNING: When you install a wheel,always remove any corrosion, dirt orforeign materials present on the mountingsurfaces of the wheel or the surface of thewheel hub, brake drum or brake disc thatcontacts the wheel. Make sure to secureany fasteners that attach the rotor to thehub so they do not interfere with themounting surfaces of the wheel. Installing
402
2022 Nautilus (CD9) Canada/United States of America, enUSA, Edition date: 202108, First-PrintingChanging a Road WheelE294121 E142906 E143746
Page 435 of 586
3.Press Tone Settings.
4.Press the arrows or slider bar to adjustthe settings.
Speed Compensated Volume
1.Press Settings on the touchscreen.
2.Press Sound Settings.
3.Press Speed Compensated Volume.
4.Press a setting.
Occupancy Mode (If Equipped)
1.Press Settings on the touchscreen.
2.Press Sound Settings.
3.Press Occupancy Mode.
4.Press a setting.
Sound Mode (If Equipped)
1.Press Settings on the touchscreen.
2.Press Sound Settings.
3.Press Sound Mode.
4.Press a setting.
SETTING THE CLOCK AND DATE
1.Press Settings on the touchscreen.
2.Press Clock Settings.
3.Set the time.
Note:The AM and PM options are notavailable if 24-hour mode is on.
Switching Automatic Time Updates Onand Off
1.Press Settings on the touchscreen.
2.Press Clock Settings.
3.Switch Automatic time zone update onor off.
AM/FM RADIO
AM/FM RADIO LIMITATIONS
The further you travel from an AM or FMstation, the weaker the signal and the weakerthe reception.
Hills, mountains, tall buildings, bridges,tunnels, freeway overpasses, parkinggarages, dense tree foliage andthunderstorms can interfere with thereception.
When you pass a ground-based broadcastrepeating tower, a stronger signal mayovertake a weaker one and result in theaudio system muting.
431
2022 Nautilus (CD9) Canada/United States of America, enUSA, Edition date: 202108, First-PrintingAudio System
Page 580 of 586
Setting a Destination Using a SavedDestination......................................................455Setting a Destination Using the MapScreen..............................................................455Setting a Destination Using the Text EntryScreen...............................................................454
Setting a Memory Preset............................430Settings Data...................................................24Setting the Adaptive Cruise ControlGap.................................................................261Setting the Adaptive Cruise ControlSpeed...........................................................260Setting the Blower Motor Speed...............157Setting the Clock and Date.........................431Setting the Cruise Control Speed............254Setting the Liftgate Opening Height........104Setting the Temperature..............................157Setting the Wake Word...............................440Shifting Your Vehicle Into Gear...................211Side Parking Aid...........................................239Locating the Side Parking Aid Sensors........240Side Parking Aid Audible Warnings..............240Side Parking Aid Limitations............................239What is the Side Parking Aid...........................239
Sitting in the Correct Position.....................161Sounding the Panic Alarm............................77Special Operating Conditions ScheduledMaintenance................................................471
Speed ControlSee: Cruise Control............................................254
Speedometer.................................................140Stability Control Indicator...........................232Stability Control.............................................231Stability Control – Troubleshooting...............233
Stability Control – Troubleshooting.........233Stability Control – InformationMessages.........................................................233
Starting and Stopping the Engine –Precautions..................................................190Starting and Stopping the Engine.............190Automatic Engine Stop......................................193Engine Block Heater..........................................192Starting and Stopping the Engine –Troubleshooting..............................................195Starting the Engine..............................................191Stopping the Engine...........................................193
Starting and Stopping the Engine –Troubleshooting..........................................195Starting and Stopping the Engine – FrequentlyAsked Questions.............................................197Starting and Stopping the Engine –Information Messages...................................196Starting and Stopping the Engine – WarningLamps................................................................195
Starting the Engine........................................191Restarting the Engine After Stopping it..........191
Starting a Gasoline Engine................................191
Status Bar........................................................437Steering...........................................................234Electric Power Steering....................................234Steering – Troubleshooting.............................235
Steering – Troubleshooting.......................235Steering – Information Messages..................235
Steering Wheel................................................27Stopping the Engine.....................................198Stopping the Engine When Your Vehicle isMoving...............................................................193Stopping the Engine When Your Vehicle isStationary..........................................................193
Stopping the Liftgate Movement...............107Storage............................................................188Cup Holders..........................................................188Glasses Holder.....................................................189Under Floor Storage...........................................188
Storing Your Vehicle....................................369SunroofSee: Moonroof......................................................137
Switching Active Park Assist On andOff..................................................................249Switching Adaptive Cruise Control On andOff..................................................................259Switching Air Conditioning On andOff...................................................................156
576
2022 Nautilus (CD9) Canada/United States of America, enUSA, Edition date: 202108, First-PrintingIndex