clock LINCOLN NAUTILUS 2022 Owners Manual
[x] Cancel search | Manufacturer: LINCOLN, Model Year: 2022, Model line: NAUTILUS, Model: LINCOLN NAUTILUS 2022Pages: 586, PDF Size: 13.97 MB
Page 17 of 586
Identifying the Audio Unit.........................429
Switching the Audio Unit On and Off.....429
Selecting the Audio Source.....................429
Playing or Pausing the Audio Source.....429
Adjusting the Volume.................................430
Switching Shuffle Mode On and Off......430
Switching Repeat Mode On and Off......430
Setting a Memory Preset..........................430
Muting the Audio.........................................430
Adjusting the Sound Settings..................430
Setting the Clock and Date.......................431
AM/FM Radio.................................................431
Switching the Display On and Off...........432
Digital Radio.................................................432
Satellite Radio..............................................434
Center Display Overview
Center Display Precautions......................437
Center Display Limitations........................437
Status Bar......................................................437
Feature Bar...................................................438
Information On Demand Screen.............438
Voice Interaction
What is Voice Interaction..........................440
Setting the Wake Word..............................440
Beginning a Voice Interaction.................440
Voice Interaction Examples......................440
Phone
Phone Precautions......................................442
Connecting Your Phone............................442
Phone Menu.................................................442
Making and Receiving a Phone Call.......444
Sending and Receiving a Text Message......................................................................446
Switching Text Message Notification Onand Off.......................................................447
Bluetooth®
Connecting a Bluetooth® Device............448
Playing Media Using Bluetooth®.............448
Apps
App Precautions..........................................449
App Requirements......................................449
Accessing Apps...........................................449
Enabling Apps on an iOS Device............449
Enabling Apps on an Android Device......................................................................449
Switching Apple CarPlay On and Off......450
Switching Android Auto On and Off......450
Personal Profiles
How Do Personal Profiles Work..............452
Enabling or Disabling Personal Profiles......................................................................452
Creating a Personal Profile.......................452
Linking or Unlinking a Personal Profile toa Remote Control....................................453
Linking or Unlinking a Personal Profile toa Device....................................................453
Navigation
Accessing Navigation................................454
Navigation Map Updates..........................454
Adjusting the Map.......................................454
Live Traffic.....................................................454
Setting a Destination..................................454
Waypoints......................................................455
13
2022 Nautilus (CD9) Canada/United States of America, enUSA, Edition date: 202108, First-PrintingTable of Contents
Page 49 of 586

4.Insert the belt tongue into the properbuckle (the buckle closest to the directionthe tongue is coming from) for thatseating position until you hear a snap andfeel the latch engage. Make sure thetongue is latched securely by pulling onit.
5.To put the retractor in the automaticlocking mode, grasp the shoulder portionof the belt and pull downward until youpull all of the belt out.
Note:The automatic locking mode isavailable on the front passenger and rearseats.
6.Allow the belt to retract to remove slack.The belt clicks as it retracts to indicate itis in the automatic locking mode.
7.Try to pull the belt out of the retractor tomake sure the retractor is in theautomatic locking mode. You should notbe able to pull more belt out. If theretractor did not lock, unbuckle the beltand repeat Steps 5 and 6.
8.Remove remaining slack from the belt.Force the seat down with extra weight,for example, by pressing down orkneeling on the child restraint whilepulling up on the shoulder belt in orderto force slack from the belt. This isnecessary to remove the remaining slackthat exists once you add the extra weight
45
2022 Nautilus (CD9) Canada/United States of America, enUSA, Edition date: 202108, First-PrintingChild SafetyE142531 E142875 E142533
Page 56 of 586
If the booster seat slides on the vehicle seatupon which it is being used, placing arubberized mesh sold as shelf or carpet linerunder the booster seat may improve thiscondition. Do not use any item thicker thanthis under the booster seat. Check with thebooster seat manufacturer's instructions.
CHILD SAFETY LOCKS
WARNING: You cannot open the reardoors from inside if you have put the childsafety locks on.
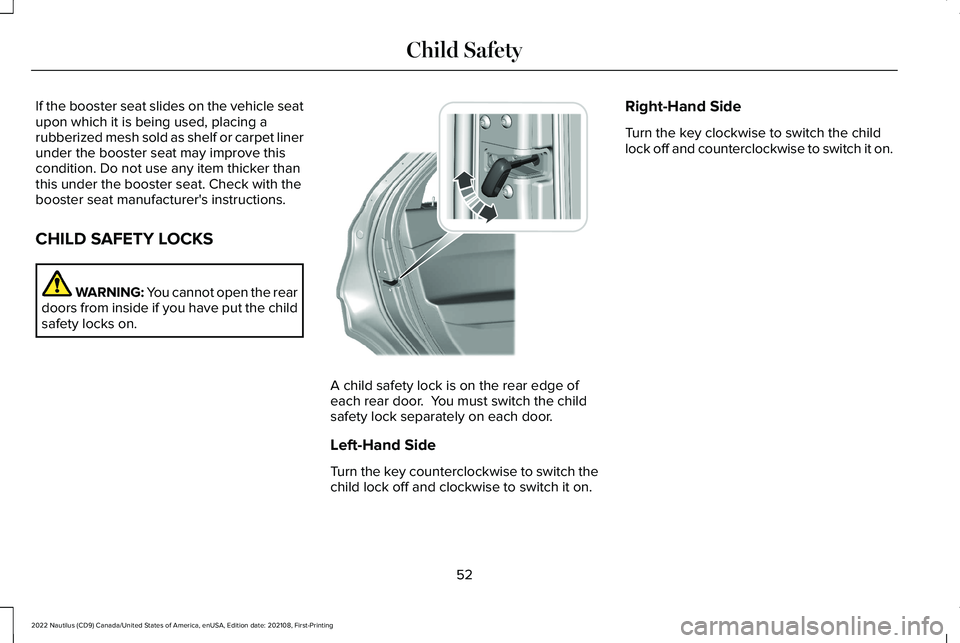
A child safety lock is on the rear edge ofeach rear door. You must switch the childsafety lock separately on each door.
Left-Hand Side
Turn the key counterclockwise to switch thechild lock off and clockwise to switch it on.
Right-Hand Side
Turn the key clockwise to switch the childlock off and counterclockwise to switch it on.
52
2022 Nautilus (CD9) Canada/United States of America, enUSA, Edition date: 202108, First-PrintingChild Safety E287259
Page 94 of 586
OPERATING THE DOORS FROM
OUTSIDE YOUR VEHICLE
UNLOCKING AND LOCKING THEDOORS USING THE REMOTECONTROL
You can only use the remote control whenyour vehicle is stationary.
Unlocking the Doors
Press the button to unlock alldoors.
Locking the Doors
Press the button to lock all doors. One short flash of the turn signallamps confirms that your vehiclehas locked.
UNLOCKING AND LOCKING THEDOORS USING THE KEY BLADE
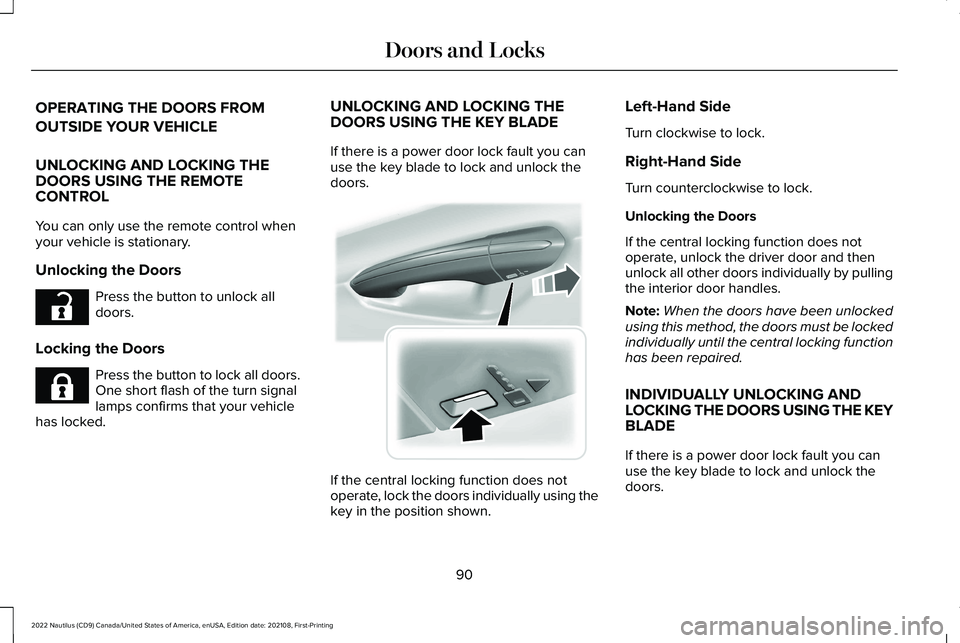
If there is a power door lock fault you canuse the key blade to lock and unlock thedoors.
If the central locking function does notoperate, lock the doors individually using thekey in the position shown.
Left-Hand Side
Turn clockwise to lock.
Right-Hand Side
Turn counterclockwise to lock.
Unlocking the Doors
If the central locking function does notoperate, unlock the driver door and thenunlock all other doors individually by pullingthe interior door handles.
Note:When the doors have been unlockedusing this method, the doors must be lockedindividually until the central locking functionhas been repaired.
INDIVIDUALLY UNLOCKING ANDLOCKING THE DOORS USING THE KEYBLADE
If there is a power door lock fault you canuse the key blade to lock and unlock thedoors.
90
2022 Nautilus (CD9) Canada/United States of America, enUSA, Edition date: 202108, First-PrintingDoors and LocksE267112 E267111 E151956
Page 350 of 586
ADDING ENGINE OIL
WARNING: Do not remove the fillercap when the engine is running.
WARNING: Do not add engine oilwhen the engine is hot. Failure to followthis instruction could result in personalinjury.
Do not use supplemental engine oil additivesbecause they are unnecessary and couldlead to engine damage that the vehiclewarranty may not cover.
1.Clean the area surrounding the engineoil filler cap before you remove it.
2.Remove the engine oil filler cap.
3.Add engine oil that meets ourspecifications. See Capacities andSpecifications (page 404).
4.Reinstall the engine oil filler cap. Turn itclockwise until you feel a strongresistance.
Note: Do not add oil further than themaximum mark. Oil levels above themaximum mark may cause engine damage.
Note:Immediately soak up any oil spillagewith an absorbent cloth.
RESETTING THE ENGINE OIL CHANGEREMINDER
Use the information display controls on thesteering wheel to reset the oil changeindicator.
From the main menu scroll to:
Action and descriptionMessage
Press the right arrow button,then from this menu scroll tothe following message.
Settings
Press the right arrow button,then from this menu scroll tothe following message.
Vehicle
Press the right arrow button,then from this menu scroll tothe following message.
Oil Life
Action and descriptionMessage
Press and hold the OK buttonuntil the instrument clusterdisplays the followingmessage.
Hold OK toReset
Reset Successful
When the oil change indicatorresets the instrument clusterdisplays 100%.
Remaining Life
{00}%
If the instrument clusterdisplays one of the followingmessages, repeat theprocess.
Not Reset
Reset Cancelled
346
2022 Nautilus (CD9) Canada/United States of America, enUSA, Edition date: 202108, First-PrintingMaintenance
Page 352 of 586
It is very important to use prediluted coolantapproved to the correct specification in orderto avoid plugging the small passageways inthe engine cooling system. See Capacitiesand Specifications (page 404). Do not mixdifferent colors or types of coolant in yourvehicle. Mixing of engine coolants or usingan incorrect coolant may harm the engine orcooling system components and could voidthe vehicle Warranty.
Note:If prediluted coolant is not available,use the approved concentrated coolantdiluting it to 50/50 with deionized or distilledwater. See Capacities and Specifications(page 404). Using water that has not beendeionized may contribute to depositformation, corrosion and plugging of thesmall cooling system passageways.
To top up the coolant level do the following:
1.Unscrew the cap slowly. Any pressureescapes as you unscrew the cap.
2.Add enough prediluted coolant to reachthe correct level.
Note:We do not recommend the use ofrecycled coolant.
3.Replace the coolant reservoir cap. Turnthe cap clockwise until it contacts thehard stop.
4.Check the coolant level in the coolantreservoir the next few times you driveyour vehicle. If necessary, repeat step 2.
If you have to add more than 1.1 qt (1 L) ofengine coolant per month, have your vehiclechecked as soon as possible. Operating anengine with a low level of coolant can resultin engine overheating and possible enginedamage.
In case of emergency, you can add a largeamount of water without engine coolant inorder to reach a vehicle service location.Service your vehicle as soon as possible.
Water alone, without engine coolant, cancause engine damage from corrosion,overheating or freezing.
Do not use the following as a coolantsubstitute, as they can cause engine damagefrom overheating or freezing:
•Alcohol.
•Methanol.
•Brine.
•Any coolant mixed with alcohol ormethanol antifreeze.
Do not add extra inhibitors or additives tothe coolant. These can be harmful andcompromise the corrosion protection of thecoolant.
Severe Climates
If you drive in extremely cold climates, youmay need to increase the coolantconcentration above 50%.
Note:A coolant concentration of 60%provides improved freeze point protection.Coolant concentrations above 60% decreasethe overheat protection characteristics ofthe coolant and could cause enginedamage.
If you drive in extremely hot climates, youmay need to decrease the coolantconcentration to 40%.
348
2022 Nautilus (CD9) Canada/United States of America, enUSA, Edition date: 202108, First-PrintingMaintenance
Page 358 of 586
We recommend that you disconnect thenegative battery cable terminal from thebattery if you plan to store your vehicle foran extended period.
Note:If you only disconnect the negativebattery cable terminal, make sure it isisolated or placed away from the batteryterminal to avoid unintended connection orarcing.
To maintain correct operation of the batterymanagement system, if you add anyelectrical devices to your vehicle, do notconnect the ground connection directly tothe negative battery terminal. A connectionat the negative battery terminal can causeinaccurate measurements of the batterycondition and potential incorrect systemoperation.
Note:If you add electrical accessories orcomponents to your vehicle this mayadversely affect battery performance,durability and the performance of otherelectrical systems on your vehicle.
If you replace the battery make sure itmatches the electrical requirements of yourvehicle.
If you disconnect or replace the battery andyour vehicle has an automatic transmission,it must relearn its adaptive strategy. Becauseof this, the transmission may shift firmly whenfirst driven. This is normal operation whilethe transmission fully updates its operationto optimum shift feel.
Remove and Reinstall the Battery
To disconnect or remove the battery, do thefollowing:
1.Apply the parking brake and switch theignition off.
2.Switch all electrical equipment off, forexample lights and radio.
3.Wait a minimum of two minutes beforedisconnecting the battery.
Note:The engine management system hasa power hold function and remains poweredfor a period of time after you switch theignition off. This is to allow diagnostic andadaptive tables to be stored. Disconnectingthe battery without waiting can causedamage not covered by the vehicleWarranty.
4.Disconnect the negative battery cableterminal.
5.Disconnect the positive battery cableterminal.
6.Remove the battery securing clamp.
7.Remove the battery.
8.To install, reverse the removal procedure.
Note:Before reconnecting the battery, makesure the ignition remains switched off.
Note:Make sure the battery cable terminalsare fully tightened.
Note:After cleaning or replacing the battery,make sure you reinstall the battery cover orshield.
If you disconnect or replace the vehiclebattery, you must reset the followingfeatures:
•Window bounce-back. See Windows(page 131).
•Clock Settings.
•Pre-set radio stations.
•Steering Angle Sensor.
354
2022 Nautilus (CD9) Canada/United States of America, enUSA, Edition date: 202108, First-PrintingMaintenance
Page 361 of 586
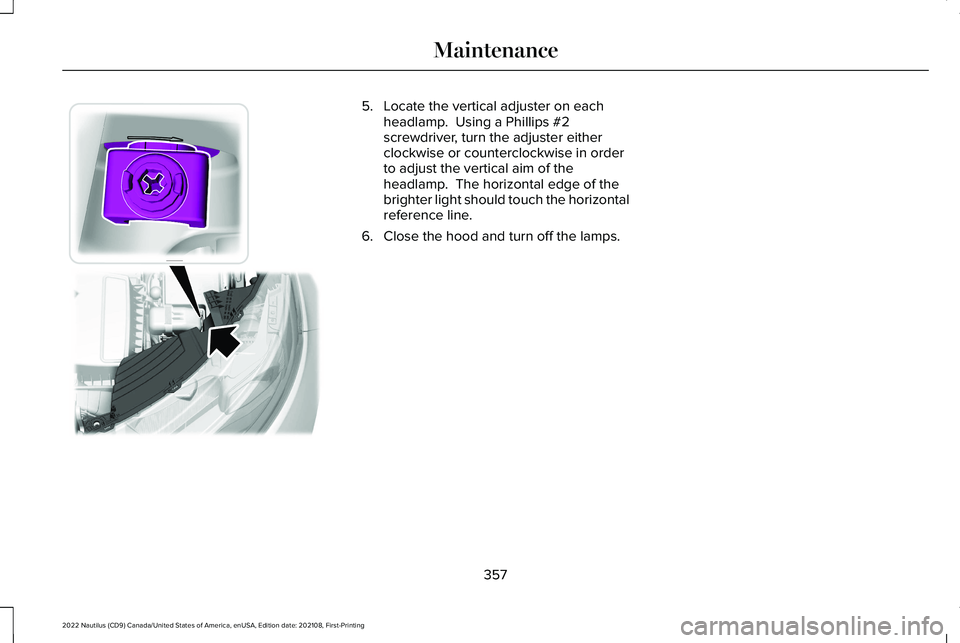
5.Locate the vertical adjuster on eachheadlamp. Using a Phillips #2screwdriver, turn the adjuster eitherclockwise or counterclockwise in orderto adjust the vertical aim of theheadlamp. The horizontal edge of thebrighter light should touch the horizontalreference line.
6.Close the hood and turn off the lamps.
357
2022 Nautilus (CD9) Canada/United States of America, enUSA, Edition date: 202108, First-PrintingMaintenance E194757
Page 365 of 586
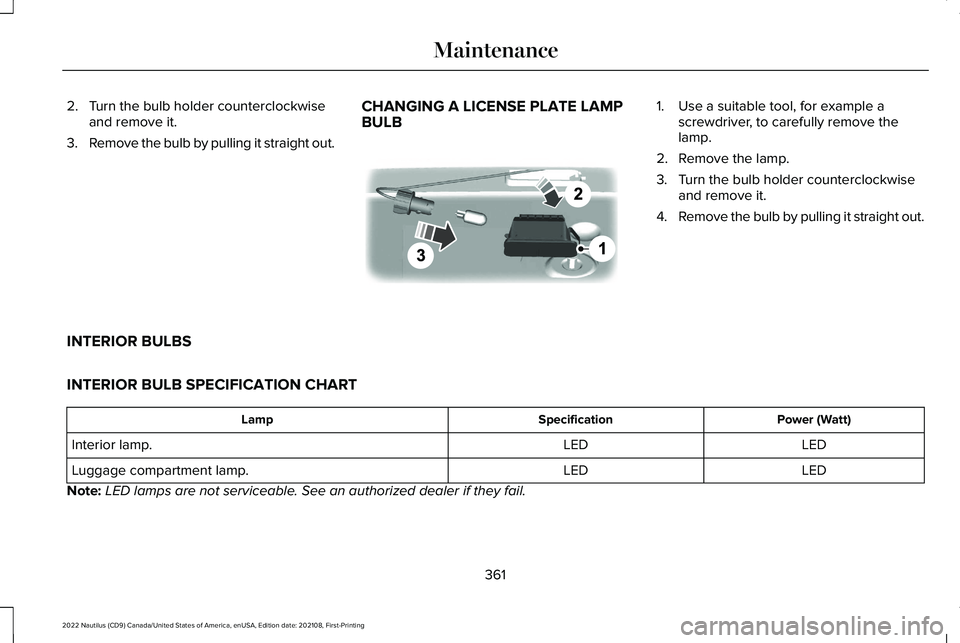
2.Turn the bulb holder counterclockwiseand remove it.
3.Remove the bulb by pulling it straight out.
CHANGING A LICENSE PLATE LAMPBULB
1.Use a suitable tool, for example ascrewdriver, to carefully remove thelamp.
2.Remove the lamp.
3.Turn the bulb holder counterclockwiseand remove it.
4.Remove the bulb by pulling it straight out.
INTERIOR BULBS
INTERIOR BULB SPECIFICATION CHART
Power (Watt)SpecificationLamp
LEDLEDInterior lamp.
LEDLEDLuggage compartment lamp.
Note:LED lamps are not serviceable. See an authorized dealer if they fail.
361
2022 Nautilus (CD9) Canada/United States of America, enUSA, Edition date: 202108, First-PrintingMaintenance E72789
Page 391 of 586
•In the first stage, the tire will be reinflatedwith a sealing compound and air. Afterthe tire has been inflated, you will needto drive the vehicle a short distanceapproximately 4 mi (6 km) to distributethe sealant in the tire.
•In the second stage, you will need tocheck the tire pressure and adjust, ifnecessary, to the vehicle's specified tireinflation pressure.
First Stage: Reinflating the Tire withsealing compound and air
WARNING: Do not stand directly overthe kit while inflating the tire. If you noticeany unusual bulges or deformations in thetire's sidewall during inflation, stop and callroadside assistance.
WARNING: If the tire does not inflateto the recommended tire pressure within15 minutes, stop and call roadsideassistance.
Park the vehicle in a safe, level and securearea, away from moving traffic.
Turn the hazard lights on. Apply the parkingbrake and power off the vehicle. Inspect theflat tire for visible damage.
If a puncture is located in the tire sidewall,stop and call roadside assistance.
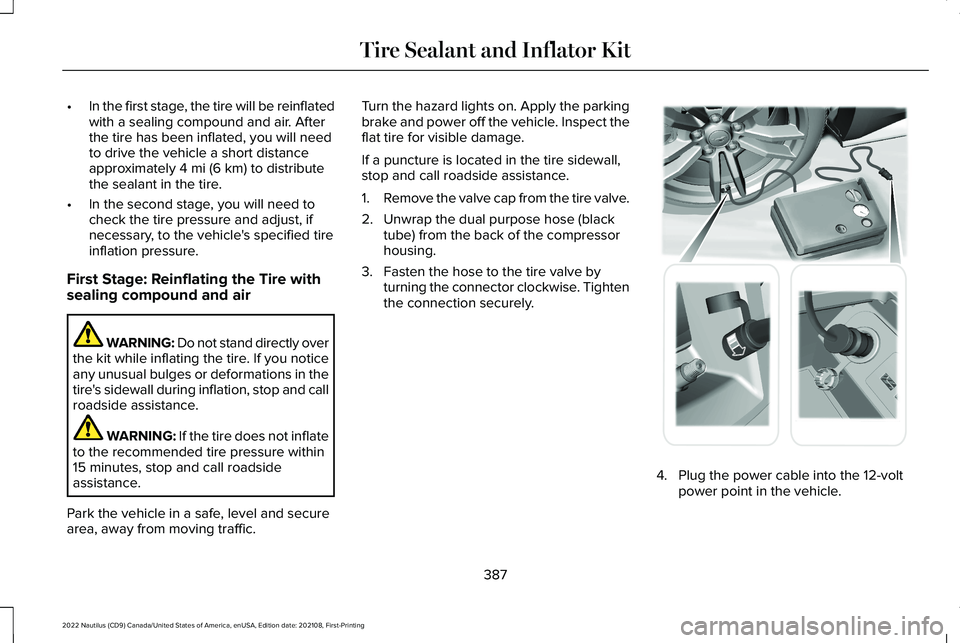
1.Remove the valve cap from the tire valve.
2.Unwrap the dual purpose hose (blacktube) from the back of the compressorhousing.
3.Fasten the hose to the tire valve byturning the connector clockwise. Tightenthe connection securely.
4.Plug the power cable into the 12-voltpower point in the vehicle.
387
2022 Nautilus (CD9) Canada/United States of America, enUSA, Edition date: 202108, First-PrintingTire Sealant and Inflator Kit E175979