headlamp LINCOLN NAUTILUS 2022 User Guide
[x] Cancel search | Manufacturer: LINCOLN, Model Year: 2022, Model line: NAUTILUS, Model: LINCOLN NAUTILUS 2022Pages: 586, PDF Size: 13.97 MB
Page 148 of 586
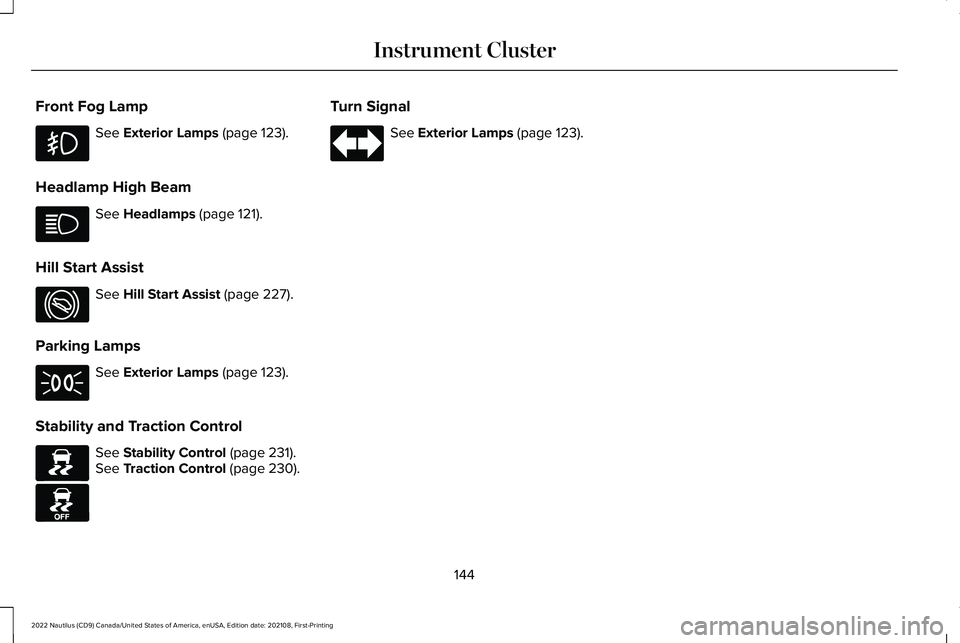
Front Fog Lamp
See Exterior Lamps (page 123).
Headlamp High Beam
See Headlamps (page 121).
Hill Start Assist
See Hill Start Assist (page 227).
Parking Lamps
See Exterior Lamps (page 123).
Stability and Traction Control
See Stability Control (page 231).See Traction Control (page 230).
Turn Signal
See Exterior Lamps (page 123).
144
2022 Nautilus (CD9) Canada/United States of America, enUSA, Edition date: 202108, First-PrintingInstrument Cluster E274708 E138639 E130458
Page 195 of 586
Note:Your vehicle has a battery saverfeature that shuts your vehicle off when itdetects a certain amount of battery drain, orafter approximately 30 minutes of inactivityin accessory mode.
Starting the Engine
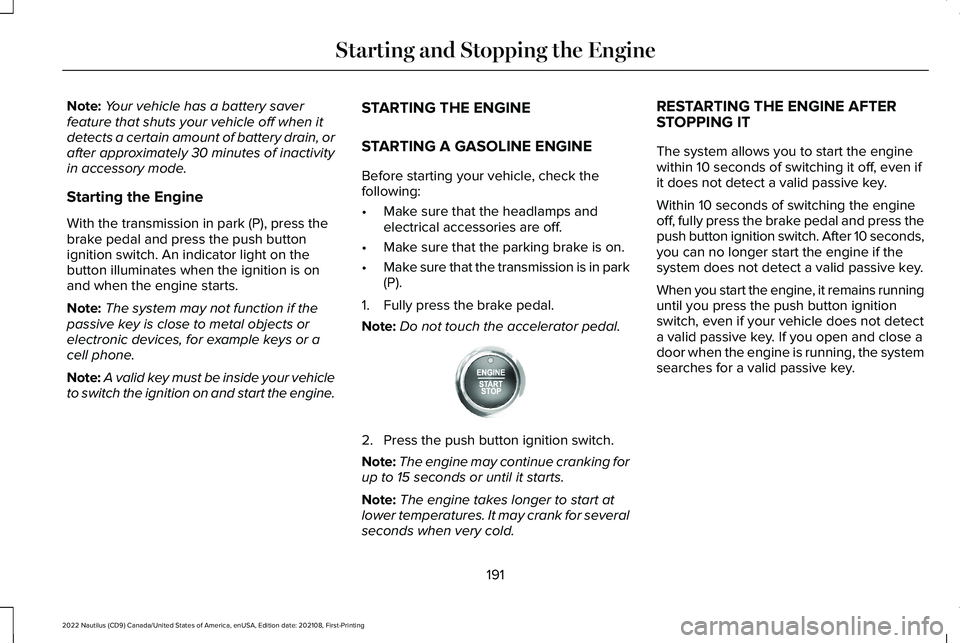
With the transmission in park (P), press thebrake pedal and press the push buttonignition switch. An indicator light on thebutton illuminates when the ignition is onand when the engine starts.
Note:The system may not function if thepassive key is close to metal objects orelectronic devices, for example keys or acell phone.
Note:A valid key must be inside your vehicleto switch the ignition on and start the engine.
STARTING THE ENGINE
STARTING A GASOLINE ENGINE
Before starting your vehicle, check thefollowing:
•Make sure that the headlamps andelectrical accessories are off.
•Make sure that the parking brake is on.
•Make sure that the transmission is in park(P).
1.Fully press the brake pedal.
Note:Do not touch the accelerator pedal.
2.Press the push button ignition switch.
Note:The engine may continue cranking forup to 15 seconds or until it starts.
Note:The engine takes longer to start atlower temperatures. It may crank for severalseconds when very cold.
RESTARTING THE ENGINE AFTERSTOPPING IT
The system allows you to start the enginewithin 10 seconds of switching it off, even ifit does not detect a valid passive key.
Within 10 seconds of switching the engineoff, fully press the brake pedal and press thepush button ignition switch. After 10 seconds,you can no longer start the engine if thesystem does not detect a valid passive key.
When you start the engine, it remains runninguntil you press the push button ignitionswitch, even if your vehicle does not detecta valid passive key. If you open and close adoor when the engine is running, the systemsearches for a valid passive key.
191
2022 Nautilus (CD9) Canada/United States of America, enUSA, Edition date: 202108, First-PrintingStarting and Stopping the EngineE321258
Page 322 of 586
2.Connect the other end of the positive (+)jumper cable to the positive (+) terminalof the booster vehicle battery.
3.Connect the negative (-) jumper cable tothe negative (-) terminal of the boostervehicle battery.
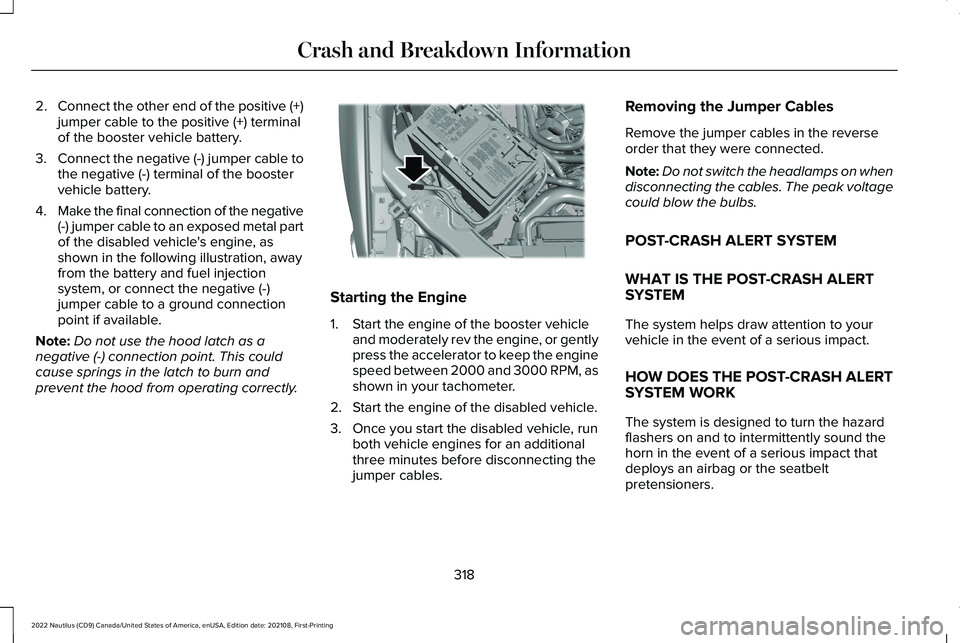
4.Make the final connection of the negative(-) jumper cable to an exposed metal partof the disabled vehicle's engine, asshown in the following illustration, awayfrom the battery and fuel injectionsystem, or connect the negative (-)jumper cable to a ground connectionpoint if available.
Note:Do not use the hood latch as anegative (-) connection point. This couldcause springs in the latch to burn andprevent the hood from operating correctly.
Starting the Engine
1.Start the engine of the booster vehicleand moderately rev the engine, or gentlypress the accelerator to keep the enginespeed between 2000 and 3000 RPM, asshown in your tachometer.
2.Start the engine of the disabled vehicle.
3.Once you start the disabled vehicle, runboth vehicle engines for an additionalthree minutes before disconnecting thejumper cables.
Removing the Jumper Cables
Remove the jumper cables in the reverseorder that they were connected.
Note:Do not switch the headlamps on whendisconnecting the cables. The peak voltagecould blow the bulbs.
POST-CRASH ALERT SYSTEM
WHAT IS THE POST-CRASH ALERTSYSTEM
The system helps draw attention to yourvehicle in the event of a serious impact.
HOW DOES THE POST-CRASH ALERTSYSTEM WORK
The system is designed to turn the hazardflashers on and to intermittently sound thehorn in the event of a serious impact thatdeploys an airbag or the seatbeltpretensioners.
318
2022 Nautilus (CD9) Canada/United States of America, enUSA, Edition date: 202108, First-PrintingCrash and Breakdown InformationE309115
Page 340 of 586
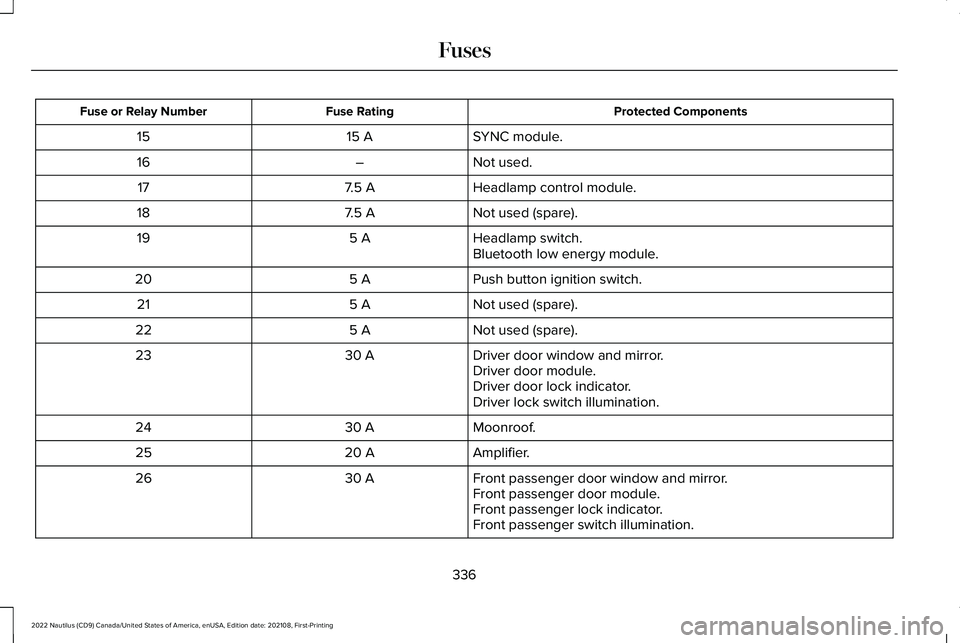
Protected ComponentsFuse RatingFuse or Relay Number
SYNC module.15 A15
Not used.–16
Headlamp control module.7.5 A17
Not used (spare).7.5 A18
Headlamp switch.5 A19Bluetooth low energy module.
Push button ignition switch.5 A20
Not used (spare).5 A21
Not used (spare).5 A22
Driver door window and mirror.30 A23Driver door module.Driver door lock indicator.Driver lock switch illumination.
Moonroof.30 A24
Amplifier.20 A25
Front passenger door window and mirror.30 A26Front passenger door module.Front passenger lock indicator.Front passenger switch illumination.
336
2022 Nautilus (CD9) Canada/United States of America, enUSA, Edition date: 202108, First-PrintingFuses
Page 359 of 586
Note:To calibrate the steering angle sensor,drive the vehicle above 30 mph (50 km/h)for a minimum of 1.2 mi (2 km). Make sure todrive straight ahead for a minimum of 30seconds. Several vehicle functions aredisabled and a warning light could appearuntil the sensor is calibrated.
Note:The battery sensor must be reset whena new battery is installed. Install only abattery approved by Ford for use in thevehicle. Use the following procedure toperform the battery sensor reset:
1.1. Turn ignition to on and leave engineoff. Steps 2 and 3 must be completedwithin 10 seconds.
2.2. Flash the high beams 5 times, endingwith the high beams off.
3.3. Press and release the brake pedal 3times.
The battery warning light on the cluster willflash 3 times to confirm that the reset wassuccessful.
Battery Management System
The battery management system monitorsbattery conditions and takes actions toextend battery life. If excessive battery drainis detected, the system temporarily disablessome of the following features:
•Heated rear window.
•Heated seats.
•Climate control.
•Heated steering wheel.
•Audio unit.
•Navigation system.
A message may appear in the informationdisplay to alert you that battery protectionactions are active.
After battery replacement, or in some casesafter charging the battery with an externalcharger, the battery management systemrequires eight hours of vehicle sleep time torelearn the battery state of charge. Duringthis time your vehicle must remain fullylocked with the ignition off.
Note:If you add electrical accessories orcomponents to the vehicle, it may adverselyaffect battery performance and durability.This may also affect the performance ofother electrical systems in the vehicle.
Battery Disposal
Make sure that you dispose of oldbatteries in an environmentallyfriendly way. Seek advice fromyour local authority about recycling oldbatteries.
ADJUSTING THE HEADLAMPS
Vertical Aim Adjustment
The headlamps on your vehicle are properlyaimed at the assembly plant. If your vehiclehas been involved in a crash, have the aimof the headlamp beam checked by anauthorized dealer.
355
2022 Nautilus (CD9) Canada/United States of America, enUSA, Edition date: 202108, First-PrintingMaintenanceE107998
Page 360 of 586
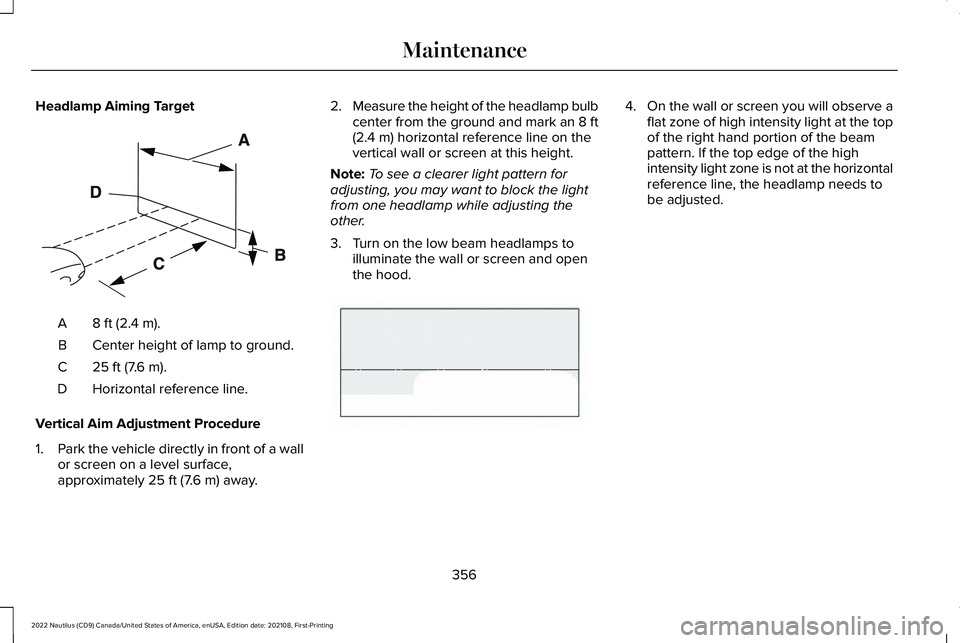
Headlamp Aiming Target
8 ft (2.4 m).A
Center height of lamp to ground.B
25 ft (7.6 m).C
Horizontal reference line.D
Vertical Aim Adjustment Procedure
1.Park the vehicle directly in front of a wallor screen on a level surface,approximately 25 ft (7.6 m) away.
2.Measure the height of the headlamp bulbcenter from the ground and mark an 8 ft(2.4 m) horizontal reference line on thevertical wall or screen at this height.
Note:To see a clearer light pattern foradjusting, you may want to block the lightfrom one headlamp while adjusting theother.
3.Turn on the low beam headlamps toilluminate the wall or screen and openthe hood.
4.On the wall or screen you will observe aflat zone of high intensity light at the topof the right hand portion of the beampattern. If the top edge of the highintensity light zone is not at the horizontalreference line, the headlamp needs tobe adjusted.
356
2022 Nautilus (CD9) Canada/United States of America, enUSA, Edition date: 202108, First-PrintingMaintenanceE142592 E142465
Page 361 of 586
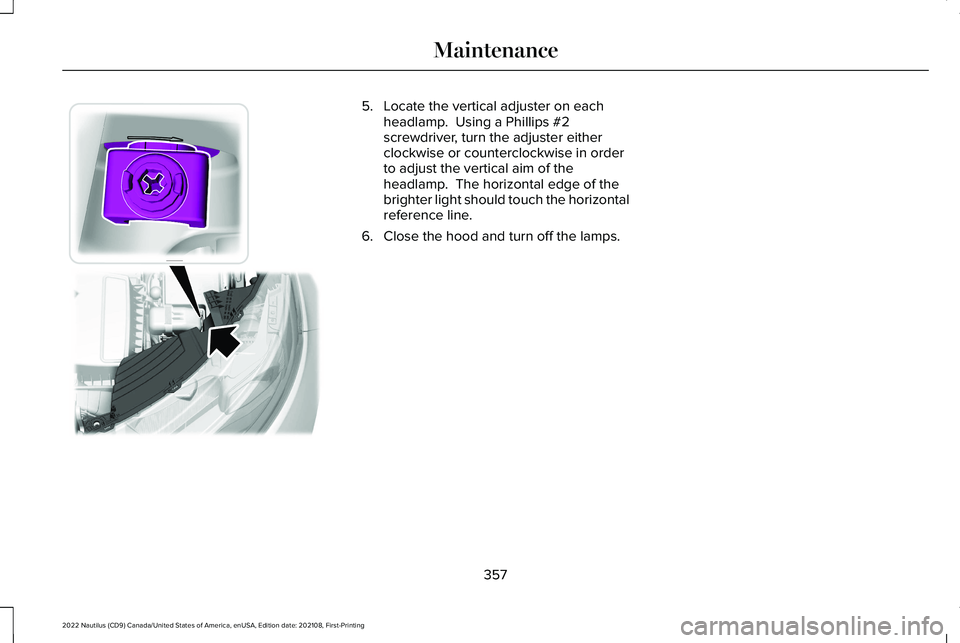
5.Locate the vertical adjuster on eachheadlamp. Using a Phillips #2screwdriver, turn the adjuster eitherclockwise or counterclockwise in orderto adjust the vertical aim of theheadlamp. The horizontal edge of thebrighter light should touch the horizontalreference line.
6.Close the hood and turn off the lamps.
357
2022 Nautilus (CD9) Canada/United States of America, enUSA, Edition date: 202108, First-PrintingMaintenance E194757
Page 362 of 586
EXTERIOR BULBS
EXTERIOR BULB SPECIFICATION CHART
Power (Watt)SpecificationLamp
LEDLEDBrake and rear lamp.
LEDLEDCentral high mounted brake lamp.
PWM/LEDH15/LEDDaytime running lamps.
LEDLEDFront fog lamp.
21WY21WFront turn signal lamp.
LEDLEDFront side marker lamp.
LEDLEDFront signature lamp.
LEDLEDHeadlamp high beam.
LEDLEDHeadlamp low beam.
LEDLEDHigh-intensity discharge headlamps.
5W5WLicense plate lamp.
LEDLEDRear turn signal lamp.
LEDLEDRear side marker lamp.
358
2022 Nautilus (CD9) Canada/United States of America, enUSA, Edition date: 202108, First-PrintingMaintenance
Page 364 of 586
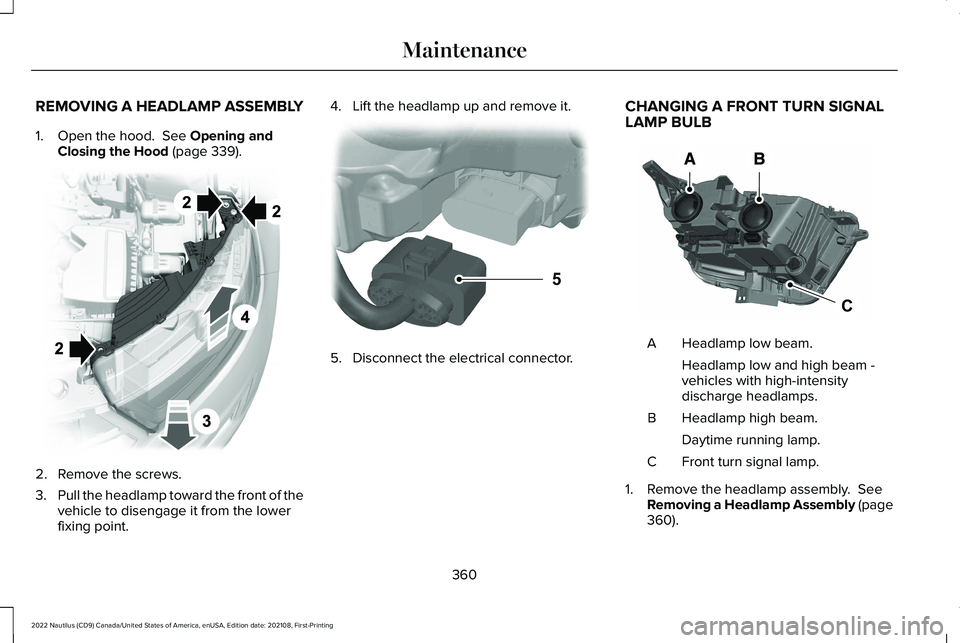
REMOVING A HEADLAMP ASSEMBLY
1.Open the hood. See Opening andClosing the Hood (page 339).
2.Remove the screws.
3.Pull the headlamp toward the front of thevehicle to disengage it from the lowerfixing point.
4.Lift the headlamp up and remove it.
5.Disconnect the electrical connector.
CHANGING A FRONT TURN SIGNALLAMP BULB
Headlamp low beam.A
Headlamp low and high beam -vehicles with high-intensitydischarge headlamps.
Headlamp high beam.B
Daytime running lamp.
Front turn signal lamp.C
1.Remove the headlamp assembly. SeeRemoving a Headlamp Assembly (page360).
360
2022 Nautilus (CD9) Canada/United States of America, enUSA, Edition date: 202108, First-PrintingMaintenance E194758 5E133750 CE188959
Page 367 of 586
SpecificationName
Motorcraft® Spot and Stain Remover, ZC-14 (U.S.)
ESR-M14P5-AMotorcraft® Ultra-Clear Spray Glass Cleaner, ZC-23 (U.S.)
Motorcraft® Wheel and Tire Cleaner, ZC-37-A (U.S. & Canada)
CLEANING THE EXTERIOR
CLEANING HEADLAMPS AND REARLAMPS
We recommend that you only use cold orlukewarm water containing car shampoo toclean the headlamps and the rear lamps.
Do not scrape the lamps.
Do not wipe lamps when they are dry.
CLEANING WINDOWS AND WIPERBLADES
To clean the windshield and wiper blades:
•Clean the windshield with a non-abrasiveglass cleaner.
Note:When cleaning the interior of thewindshield, avoid getting any glass cleaneron the instrument panel or door panels. Wipeany glass cleaner off these surfacesimmediately.
•Clean the wiper blades with washer fluidor water applied with a soft sponge orcloth.
Note: Do not use razor blades or othersharp objects to clean or remove decals fromthe inside of the heated rear window. Thiscan cause damage not covered by thevehicle Warranty.
CLEANING CHROME, ALUMINIUM ORSTAINLESS STEEL
We recommend that you only use a carshampoo, a soft cloth and water on bumpersand other chrome, aluminium or stainlesssteel parts.
Note:For additional information andassistance, we recommend that you contactan authorized dealer.
Note:Rinse the area well after cleaning.
Note:Do not use abrasive materials, forexample steel wool or plastic pads, as theycan scratch these surfaces.
Note:Do not use chrome cleaner, metalcleaner or polish on wheels or wheel covers.
363
2022 Nautilus (CD9) Canada/United States of America, enUSA, Edition date: 202108, First-PrintingVehicle Care