child lock LINCOLN NAVIGATOR 2007 Owners Manual
[x] Cancel search | Manufacturer: LINCOLN, Model Year: 2007, Model line: NAVIGATOR, Model: LINCOLN NAVIGATOR 2007Pages: 312, PDF Size: 2.74 MB
Page 8 of 312
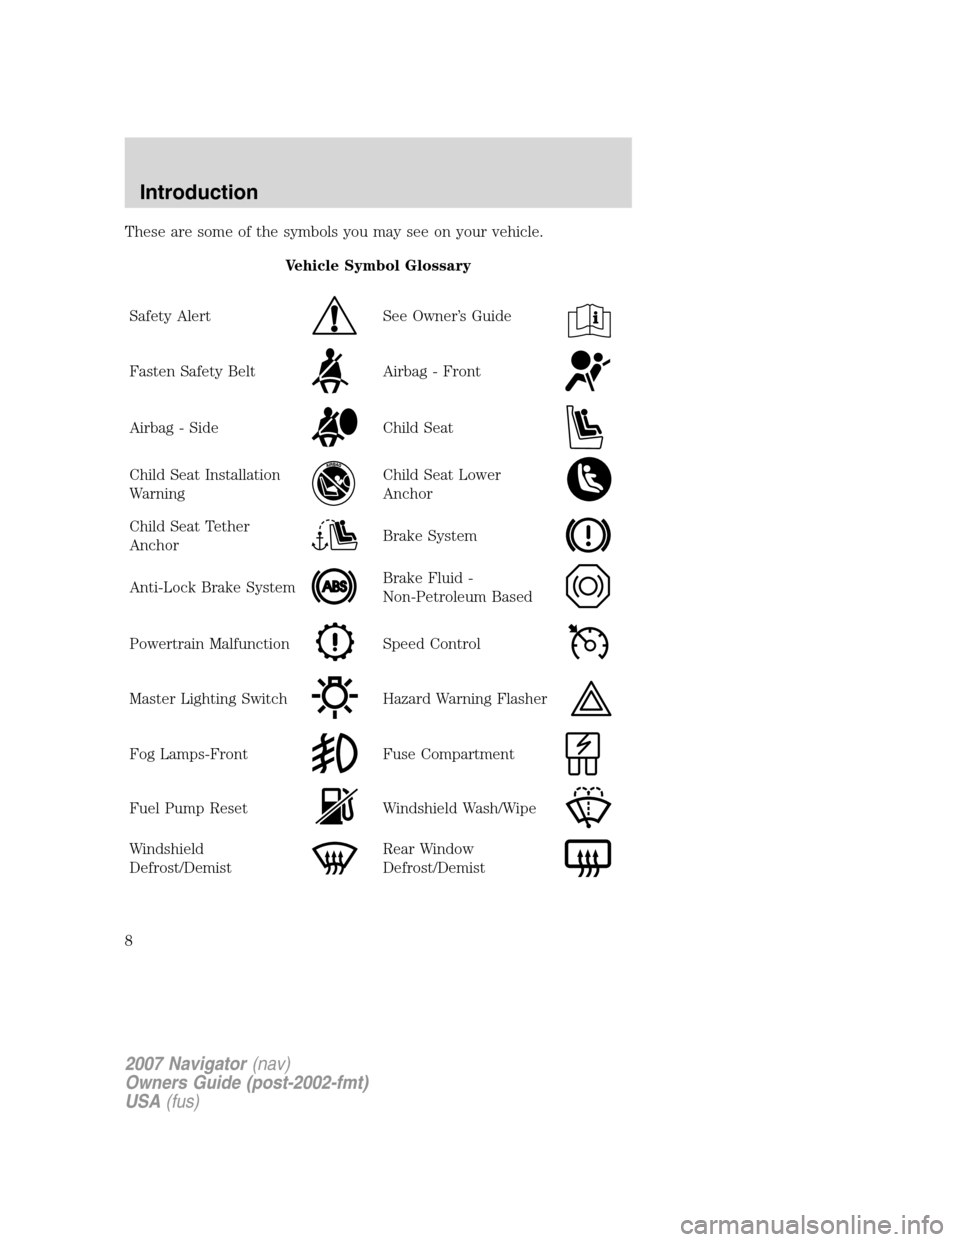
These are some of the symbols you may see on your vehicle.
Vehicle Symbol Glossary
Safety Alert
See Owner’s Guide
Fasten Safety BeltAirbag - Front
Airbag - SideChild Seat
Child Seat Installation
WarningChild Seat Lower
Anchor
Child Seat Tether
AnchorBrake System
Anti-Lock Brake SystemBrake Fluid -
Non-Petroleum Based
Powertrain MalfunctionSpeed Control
Master Lighting SwitchHazard Warning Flasher
Fog Lamps-FrontFuse Compartment
Fuel Pump ResetWindshield Wash/Wipe
Windshield
Defrost/DemistRear Window
Defrost/Demist
2007 Navigator(nav)
Owners Guide (post-2002-fmt)
USA(fus)
Introduction
8
Page 9 of 312
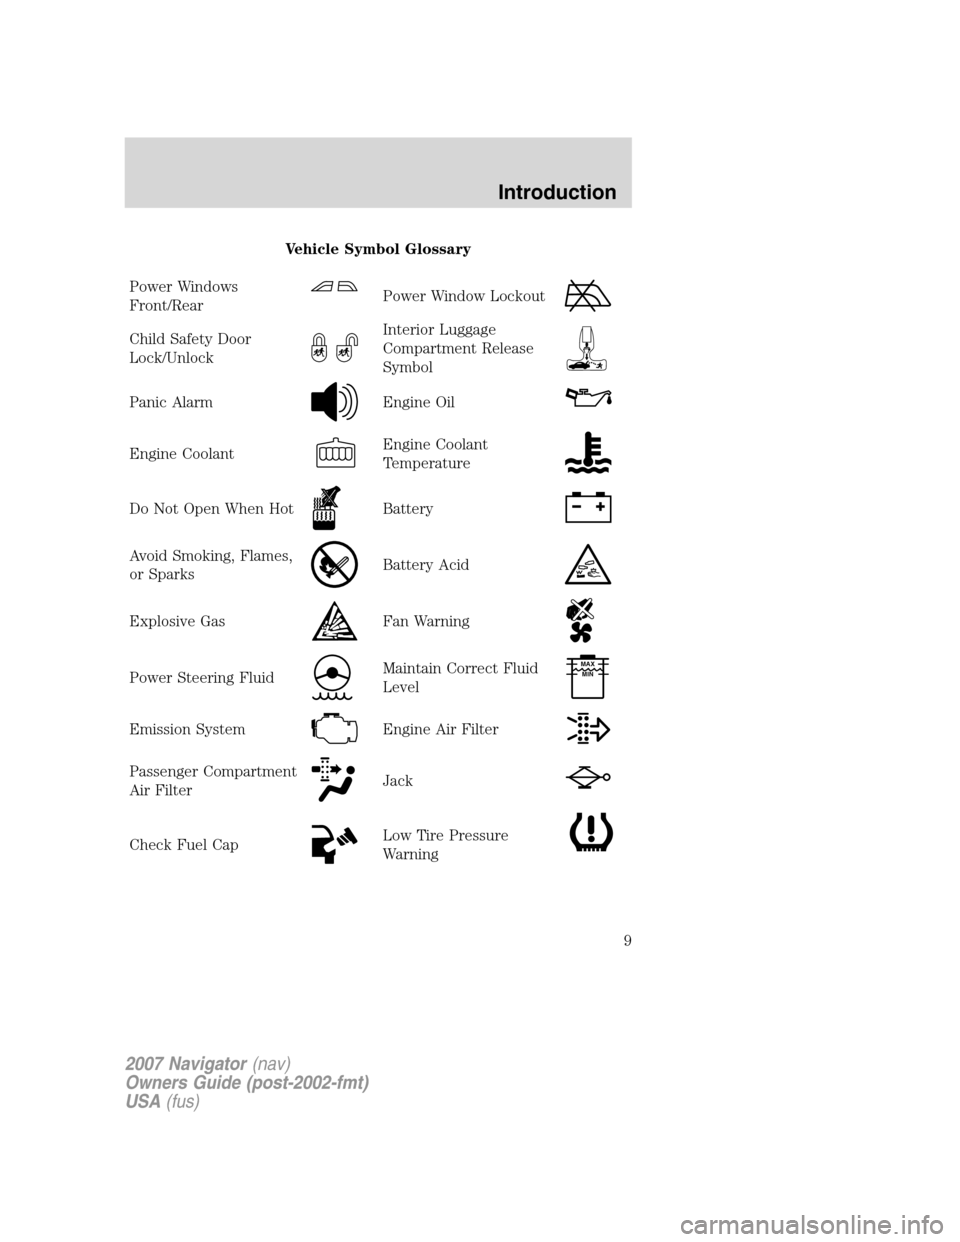
Vehicle Symbol Glossary
Power Windows
Front/Rear
Power Window Lockout
Child Safety Door
Lock/UnlockInterior Luggage
Compartment Release
Symbol
Panic AlarmEngine Oil
Engine CoolantEngine Coolant
Temperature
Do Not Open When HotBattery
Avoid Smoking, Flames,
or SparksBattery Acid
Explosive GasFan Warning
Power Steering FluidMaintain Correct Fluid
LevelMAX
MIN
Emission SystemEngine Air Filter
Passenger Compartment
Air FilterJack
Check Fuel CapLow Tire Pressure
Warning
2007 Navigator(nav)
Owners Guide (post-2002-fmt)
USA(fus)
Introduction
9
Page 84 of 312
Note:The liftgate can be reversed with a second press on a control
button or key fob and can be manually closed at any time.
The liftgate will only operate with the vehicle in P (Park). The chime will
beep once if conditions are not correct to start an operation. These
conditions include:
•the vehicle speed is at or above 3 mph (5 kph)
•or the ignition is in Run and the transmission is not in Park
•or the Battery Voltage is below the minimum operating voltage
WARNING: Make sure all persons are clear of the power liftgate
area before using the power liftgate control.
Keep keys out of reach of children. Do not allow children to play
near an open or moving power liftgate.
Do not open the liftgate in a garage or other enclosed area with a low
ceiling. If the liftgate is raised the liftgate could be damaged against a
low ceiling.
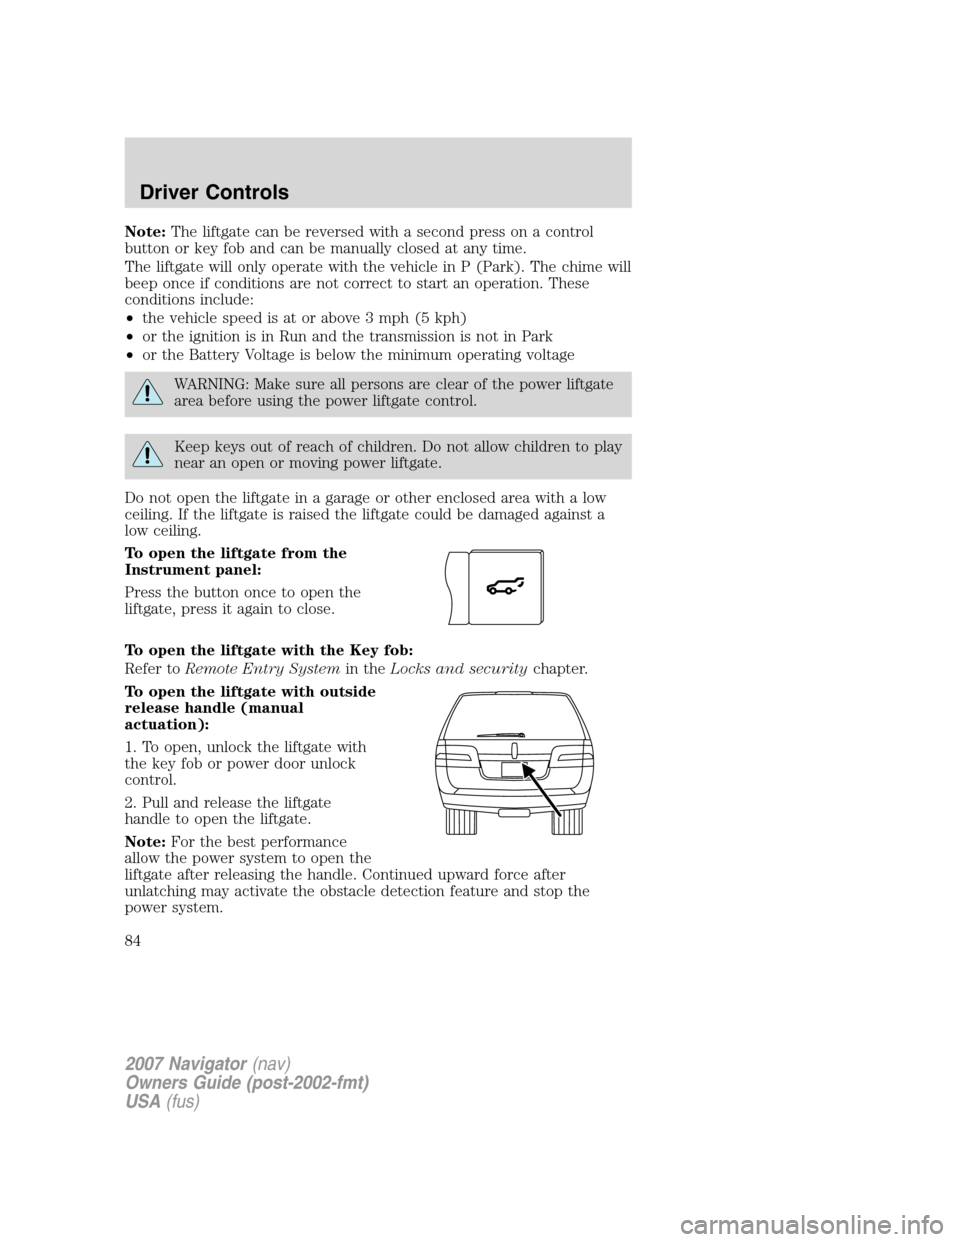
To open the liftgate from the
Instrument panel:
Press the button once to open the
liftgate, press it again to close.
To open the liftgate with the Key fob:
Refer toRemote Entry Systemin theLocks and securitychapter.
To open the liftgate with outside
release handle (manual
actuation):
1. To open, unlock the liftgate with
the key fob or power door unlock
control.
2. Pull and release the liftgate
handle to open the liftgate.
Note:For the best performance
allow the power system to open the
liftgate after releasing the handle. Continued upward force after
unlatching may activate the obstacle detection feature and stop the
power system.
2007 Navigator(nav)
Owners Guide (post-2002-fmt)
USA(fus)
Driver Controls
84
Page 93 of 312
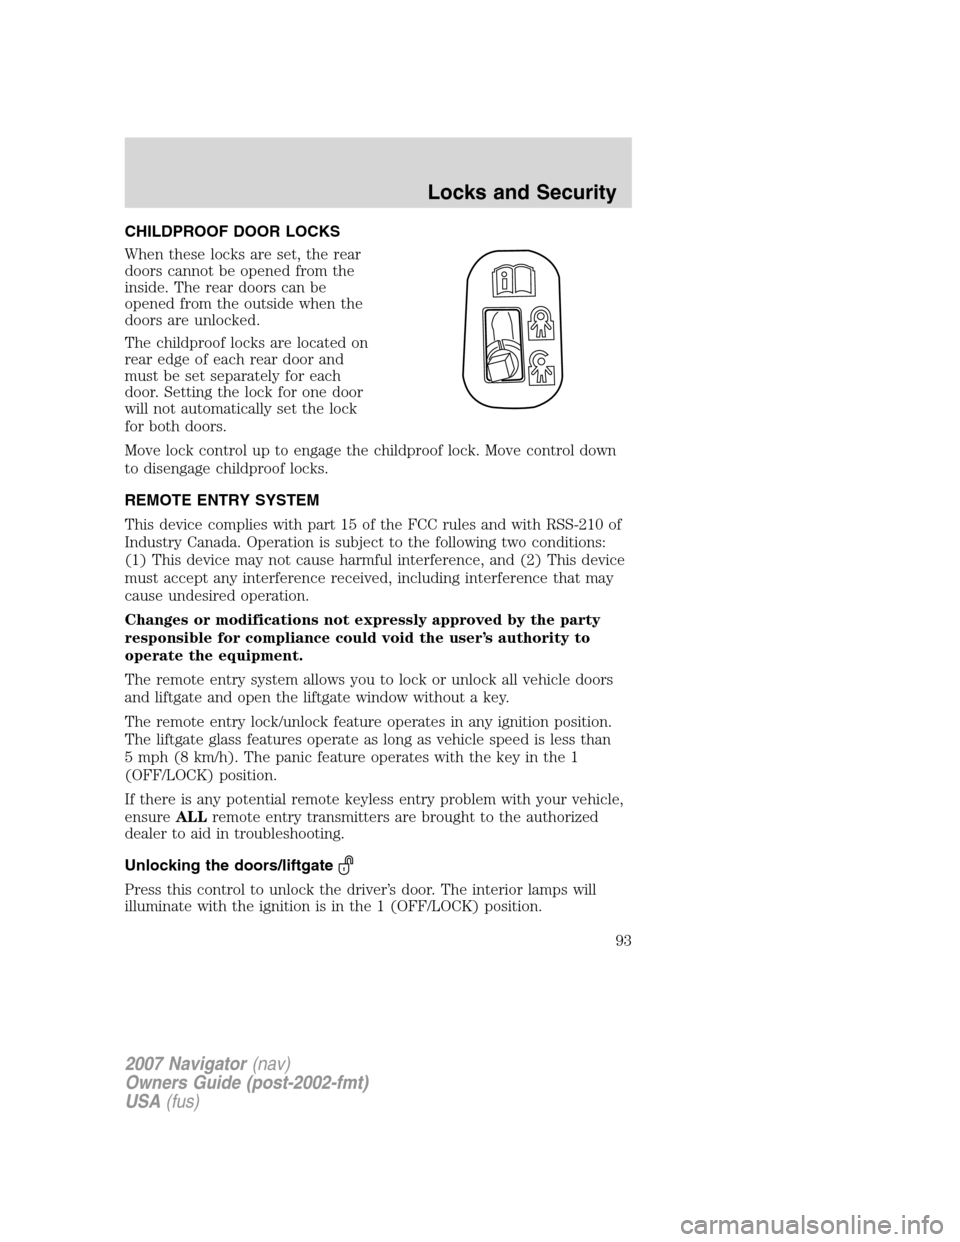
CHILDPROOF DOOR LOCKS
When these locks are set, the rear
doors cannot be opened from the
inside. The rear doors can be
opened from the outside when the
doors are unlocked.
The childproof locks are located on
rear edge of each rear door and
must be set separately for each
door. Setting the lock for one door
will not automatically set the lock
for both doors.
Move lock control up to engage the childproof lock. Move control down
to disengage childproof locks.
REMOTE ENTRY SYSTEM
This device complies with part 15 of the FCC rules and with RSS-210 of
Industry Canada. Operation is subject to the following two conditions:
(1) This device may not cause harmful interference, and (2) This device
must accept any interference received, including interference that may
cause undesired operation.
Changes or modifications not expressly approved by the party
responsible for compliance could void the user’s authority to
operate the equipment.
The remote entry system allows you to lock or unlock all vehicle doors
and liftgate and open the liftgate window without a key.
The remote entry lock/unlock feature operates in any ignition position.
The liftgate glass features operate as long as vehicle speed is less than
5 mph (8 km/h). The panic feature operates with the key in the 1
(OFF/LOCK) position.
If there is any potential remote keyless entry problem with your vehicle,
ensureALLremote entry transmitters are brought to the authorized
dealer to aid in troubleshooting.
Unlocking the doors/liftgate
Press this control to unlock the driver’s door. The interior lamps will
illuminate with the ignition is in the 1 (OFF/LOCK) position.
2007 Navigator(nav)
Owners Guide (post-2002-fmt)
USA(fus)
Locks and Security
93
Page 125 of 312
When to use the automatic locking mode
•Anytimea child safety seat (except a booster) is installed in the
vehicle. Children 12 years old and under should be properly restrained
in the rear seat whenever possible. Refer toSafety restraints for
childrenorSafety seats for childrenlater in this chapter.
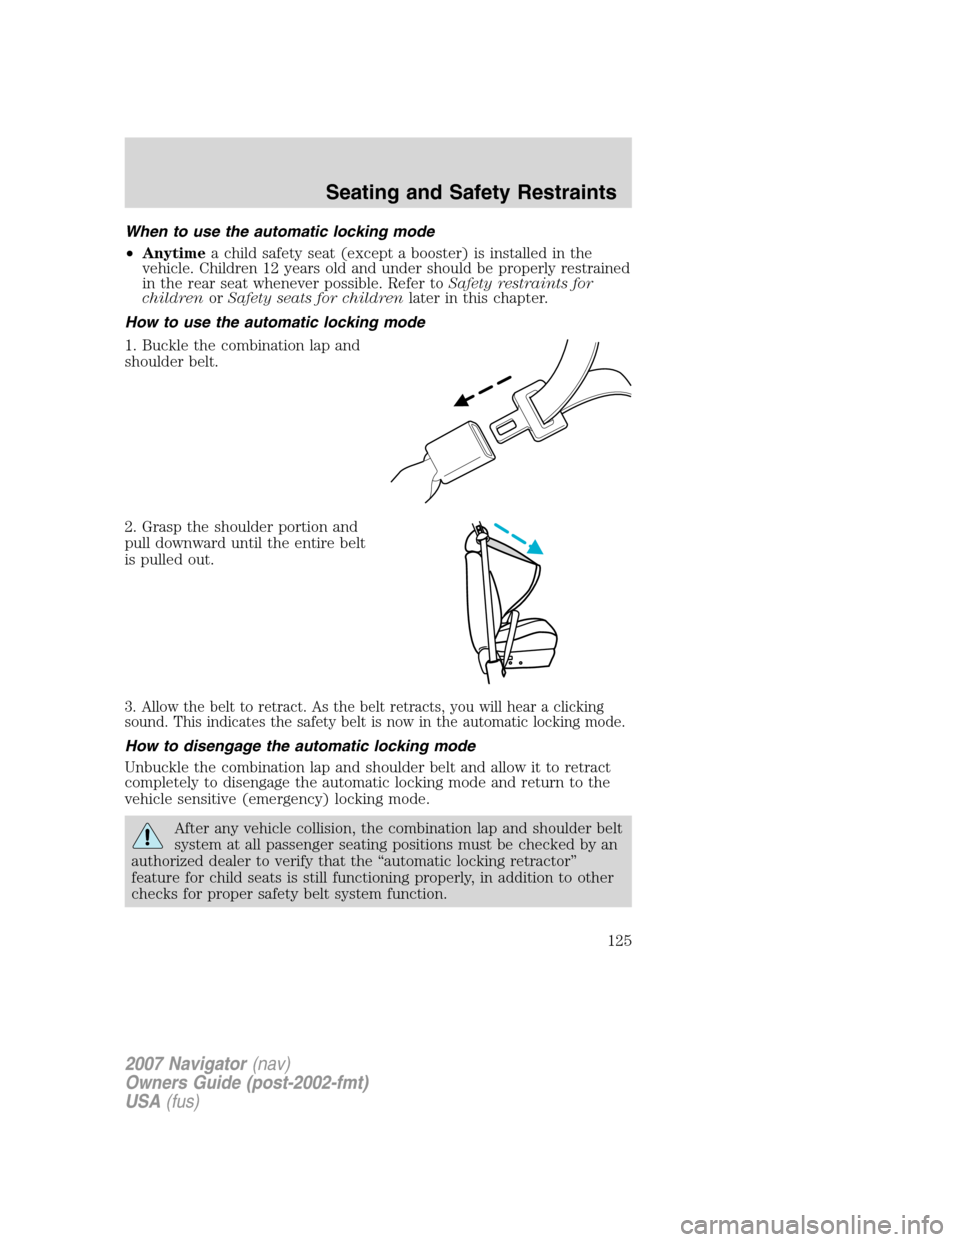
How to use the automatic locking mode
1. Buckle the combination lap and
shoulder belt.
2. Grasp the shoulder portion and
pull downward until the entire belt
is pulled out.
3. Allow the belt to retract. As the belt retracts, you will hear a clicking
sound. This indicates the safety belt is now in the automatic locking mode.
How to disengage the automatic locking mode
Unbuckle the combination lap and shoulder belt and allow it to retract
completely to disengage the automatic locking mode and return to the
vehicle sensitive (emergency) locking mode.
After any vehicle collision, the combination lap and shoulder belt
system at all passenger seating positions must be checked by an
authorized dealer to verify that the “automatic locking retractor”
feature for child seats is still functioning properly, in addition to other
checks for proper safety belt system function.
2007 Navigator(nav)
Owners Guide (post-2002-fmt)
USA(fus)
Seating and Safety Restraints
125
Page 147 of 312
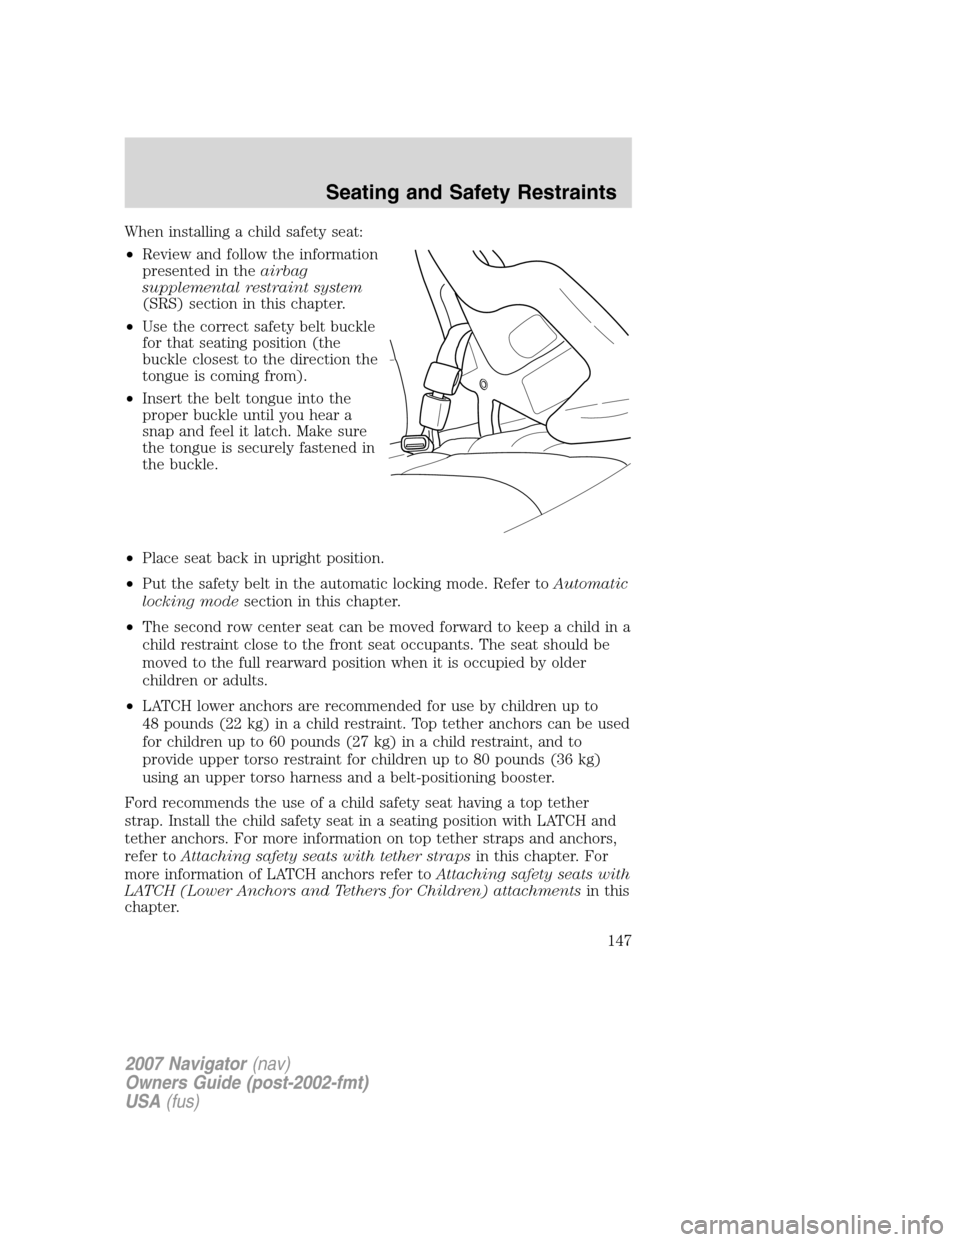
When installing a child safety seat:
•Review and follow the information
presented in theairbag
supplemental restraint system
(SRS) section in this chapter.
•Use the correct safety belt buckle
for that seating position (the
buckle closest to the direction the
tongue is coming from).
•Insert the belt tongue into the
proper buckle until you hear a
snap and feel it latch. Make sure
the tongue is securely fastened in
the buckle.
•Place seat back in upright position.
•Put the safety belt in the automatic locking mode. Refer toAutomatic
locking modesection in this chapter.
•The second row center seat can be moved forward to keep a child in a
child restraint close to the front seat occupants. The seat should be
moved to the full rearward position when it is occupied by older
children or adults.
•LATCH lower anchors are recommended for use by children up to
48 pounds (22 kg) in a child restraint. Top tether anchors can be used
for children up to 60 pounds (27 kg) in a child restraint, and to
provide upper torso restraint for children up to 80 pounds (36 kg)
using an upper torso harness and a belt-positioning booster.
Ford recommends the use of a child safety seat having a top tether
strap. Install the child safety seat in a seating position with LATCH and
tether anchors. For more information on top tether straps and anchors,
refer toAttaching safety seats with tether strapsin this chapter. For
more information of LATCH anchors refer toAttaching safety seats with
LATCH (Lower Anchors and Tethers for Children) attachmentsin this
chapter.
2007 Navigator(nav)
Owners Guide (post-2002-fmt)
USA(fus)
Seating and Safety Restraints
147
Page 149 of 312
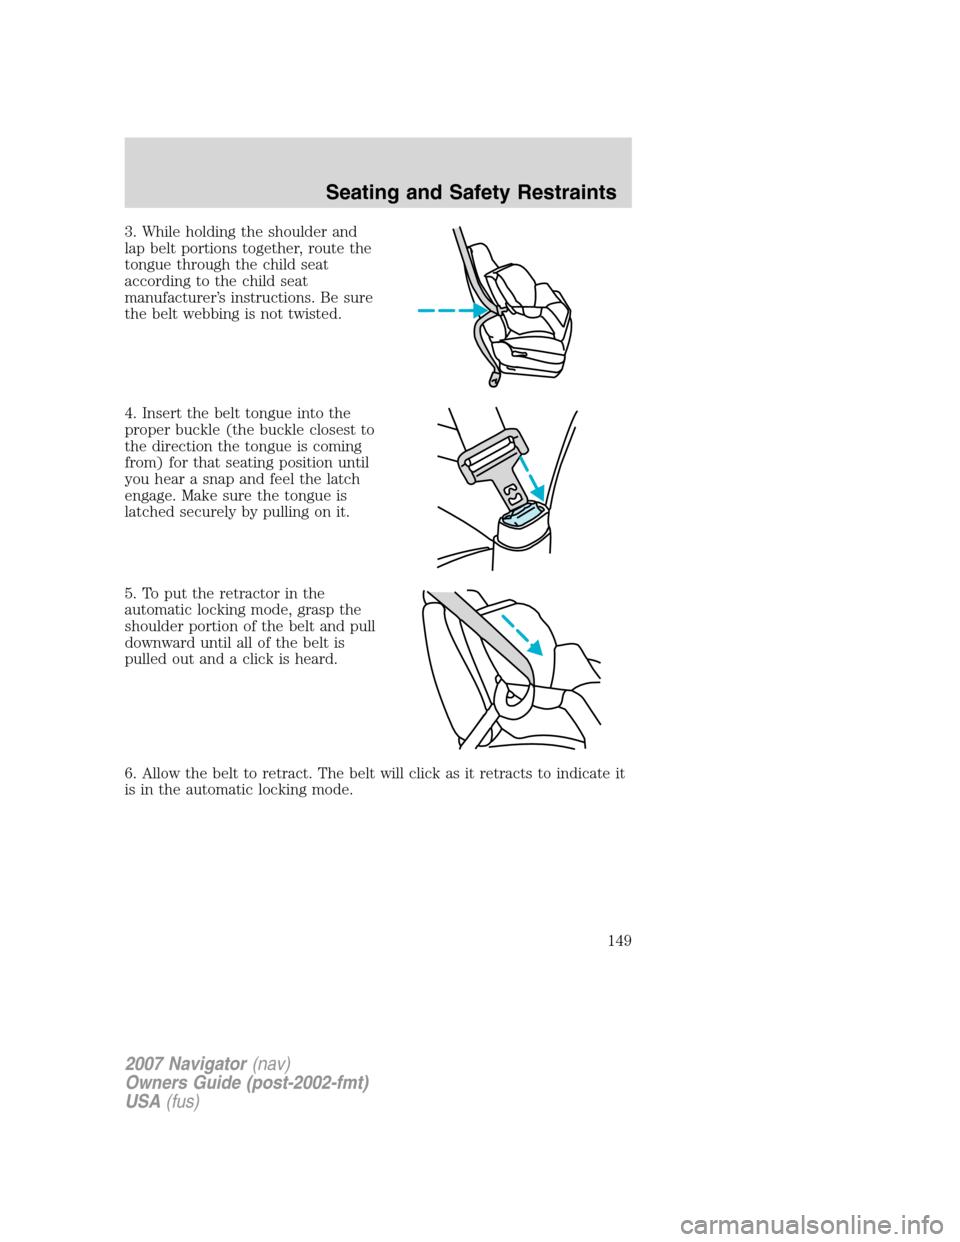
3. While holding the shoulder and
lap belt portions together, route the
tongue through the child seat
according to the child seat
manufacturer’s instructions. Be sure
the belt webbing is not twisted.
4. Insert the belt tongue into the
proper buckle (the buckle closest to
the direction the tongue is coming
from) for that seating position until
you hear a snap and feel the latch
engage. Make sure the tongue is
latched securely by pulling on it.
5. To put the retractor in the
automatic locking mode, grasp the
shoulder portion of the belt and pull
downward until all of the belt is
pulled out and a click is heard.
6. Allow the belt to retract. The belt will click as it retracts to indicate it
is in the automatic locking mode.
2007 Navigator(nav)
Owners Guide (post-2002-fmt)
USA(fus)
Seating and Safety Restraints
149
Page 150 of 312
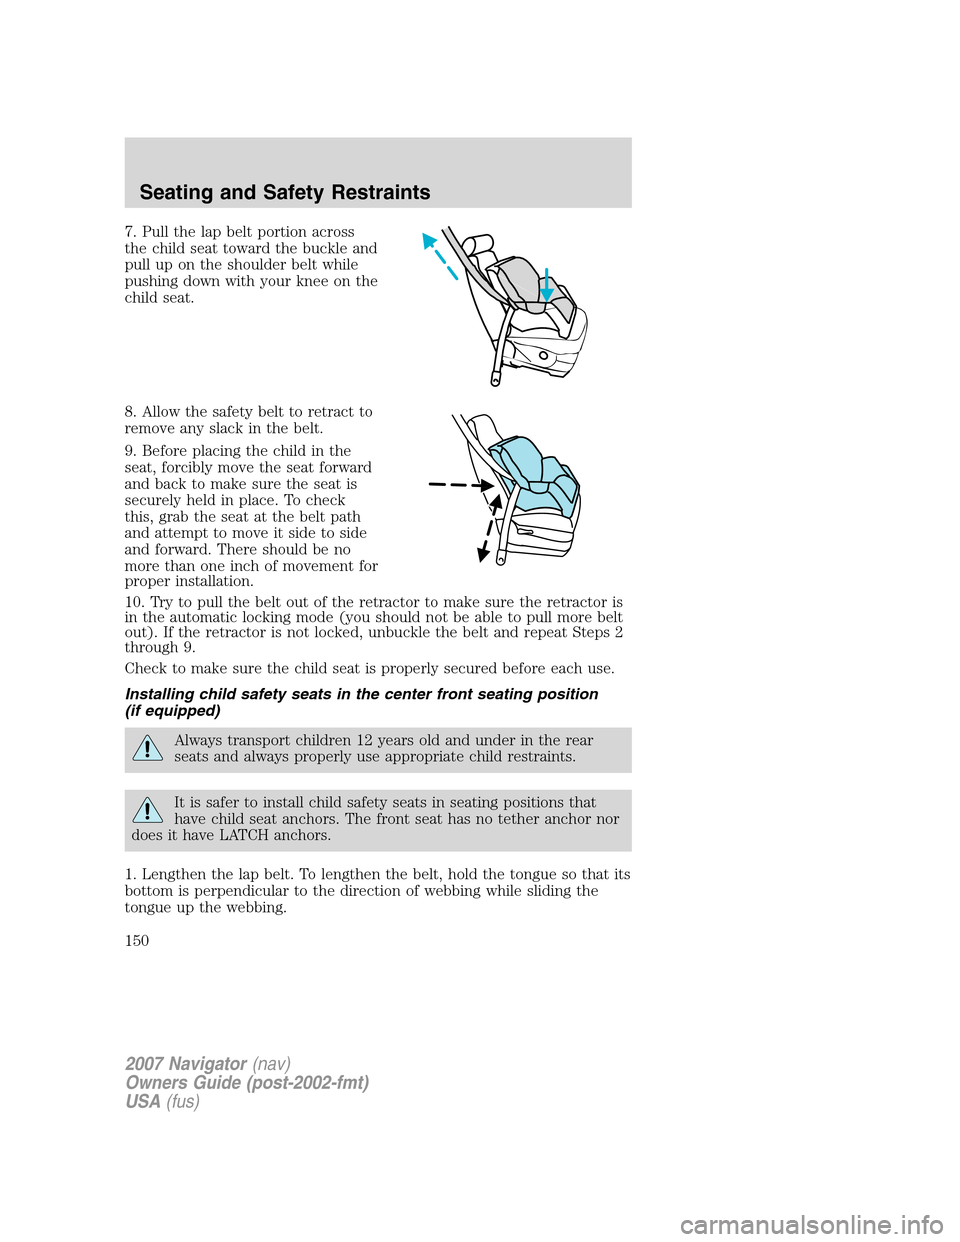
7. Pull the lap belt portion across
the child seat toward the buckle and
pull up on the shoulder belt while
pushing down with your knee on the
child seat.
8. Allow the safety belt to retract to
remove any slack in the belt.
9. Before placing the child in the
seat, forcibly move the seat forward
and back to make sure the seat is
securely held in place. To check
this, grab the seat at the belt path
and attempt to move it side to side
and forward. There should be no
more than one inch of movement for
proper installation.
10. Try to pull the belt out of the retractor to make sure the retractor is
in the automatic locking mode (you should not be able to pull more belt
out). If the retractor is not locked, unbuckle the belt and repeat Steps 2
through 9.
Check to make sure the child seat is properly secured before each use.
Installing child safety seats in the center front seating position
(if equipped)
Always transport children 12 years old and under in the rear
seats and always properly use appropriate child restraints.
It is safer to install child safety seats in seating positions that
have child seat anchors. The front seat has no tether anchor nor
does it have LATCH anchors.
1. Lengthen the lap belt. To lengthen the belt, hold the tongue so that its
bottom is perpendicular to the direction of webbing while sliding the
tongue up the webbing.
2007 Navigator(nav)
Owners Guide (post-2002-fmt)
USA(fus)
Seating and Safety Restraints
150
Page 274 of 312
Keep batteries out of reach of children. Batteries contain sulfuric
acid. Avoid contact with skin, eyes or clothing. Shield your eyes
when working near the battery to protect against possible splashing of
acid solution. In case of acid contact with skin or eyes, flush
immediately with water for a minimum of 15 minutes and get prompt
medical attention. If acid is swallowed, call a physician immediately.
Battery posts, terminals and related accessories contain lead and
lead compounds.Wash hands after handling.
For information on transmission operation after the battery has been
disconnected, refer toShift strategyin theDrivingchapter.
Because your vehicle’s engine is electronically controlled by a computer,
some control conditions are maintained by power from the battery. When
the battery is disconnected or a new battery is installed, the engine must
relearn its idle and fuel trim strategy for optimum driveability and
performance. To begin this process:
1. With the vehicle at a complete stop, set the parking brake.
2. Put the gearshift in P (Park), turn off all accessories and start the
engine.
3. Run the engine until it reaches normal operating temperature.
4. Allow the engine to idle for at least one minute.
5. Turn the A/C on and allow the engine to idle for at least one minute.
6. Release the parking brake. With your foot on the brake pedal and with
the A/C on, put the vehicle in D (Drive) and allow the engine to idle for
at least one minute.
7. Drive the vehicle to complete the relearning process.
•The vehicle may need to be driven 10 miles (16 km) or more to
relearn the idle and fuel trim strategy.
•If you do not allow the engine to relearn its idle trim, the idle
quality of your vehicle may be adversely affected until the idle
trim is eventually relearned.
If the battery has been disconnected or a new battery has been installed,
the clock and radio settings must be reset once the battery is
reconnected.
2007 Navigator(nav)
Owners Guide (post-2002-fmt)
USA(fus)
Maintenance and Specifications
274
Page 283 of 312
Refueling
Fuel vapor burns violently and a fuel fire can cause severe
injuries. To help avoid injuries to you and others:
•Read and follow all the instructions on the pump island;
•Turn off your engine when you are refueling;
•Do not smoke if you are near fuel or refueling your vehicle;
•Keep sparks, flames and smoking materials away from fuel;
•Stay outside your vehicle and do not leave the fuel pump unattended
when refueling your vehicle — this is against the law in some places;
•Keep children away from the fuel pump; never let children pump fuel.
Use the following guidelines to avoid electrostatic charge build-up when
filling an ungrounded fuel container:
•Place approved fuel container on the ground.
•DO NOT fill a fuel container while it is in the vehicle (including the
cargo area).
•Keep the fuel pump nozzle in contact with the fuel container while
filling.
•DO NOT use a device that would hold the fuel pump handle in the fill
position.
Fuel Filler Cap
Your fuel tank filler cap has an indexed design with a 1/4 turn on/off
feature.
When fueling your vehicle:
1. Turn the engine off.
2. Carefully turn the filler cap counterclockwise 1/4 turn until it stops.
3. Pull to remove the cap from the fuel filler pipe.
4. To install the cap, align the tabs on the cap with the notches on the
filler pipe.
5. Turn the filler cap clockwise 1/4 of a turn until at least a few clicks are
heard.
If the
symbol comes on and stays on after you start the engine, the
fuel filler cap may not be properly installed. Turn off the engine, remove
the fuel filler cap, align the cap properly and reinstall it.
2007 Navigator(nav)
Owners Guide (post-2002-fmt)
USA(fus)
Maintenance and Specifications
283