tow LINCOLN NAVIGATOR 2012 Navigation Manual
[x] Cancel search | Manufacturer: LINCOLN, Model Year: 2012, Model line: NAVIGATOR, Model: LINCOLN NAVIGATOR 2012Pages: 381, PDF Size: 2.53 MB
Page 268 of 381
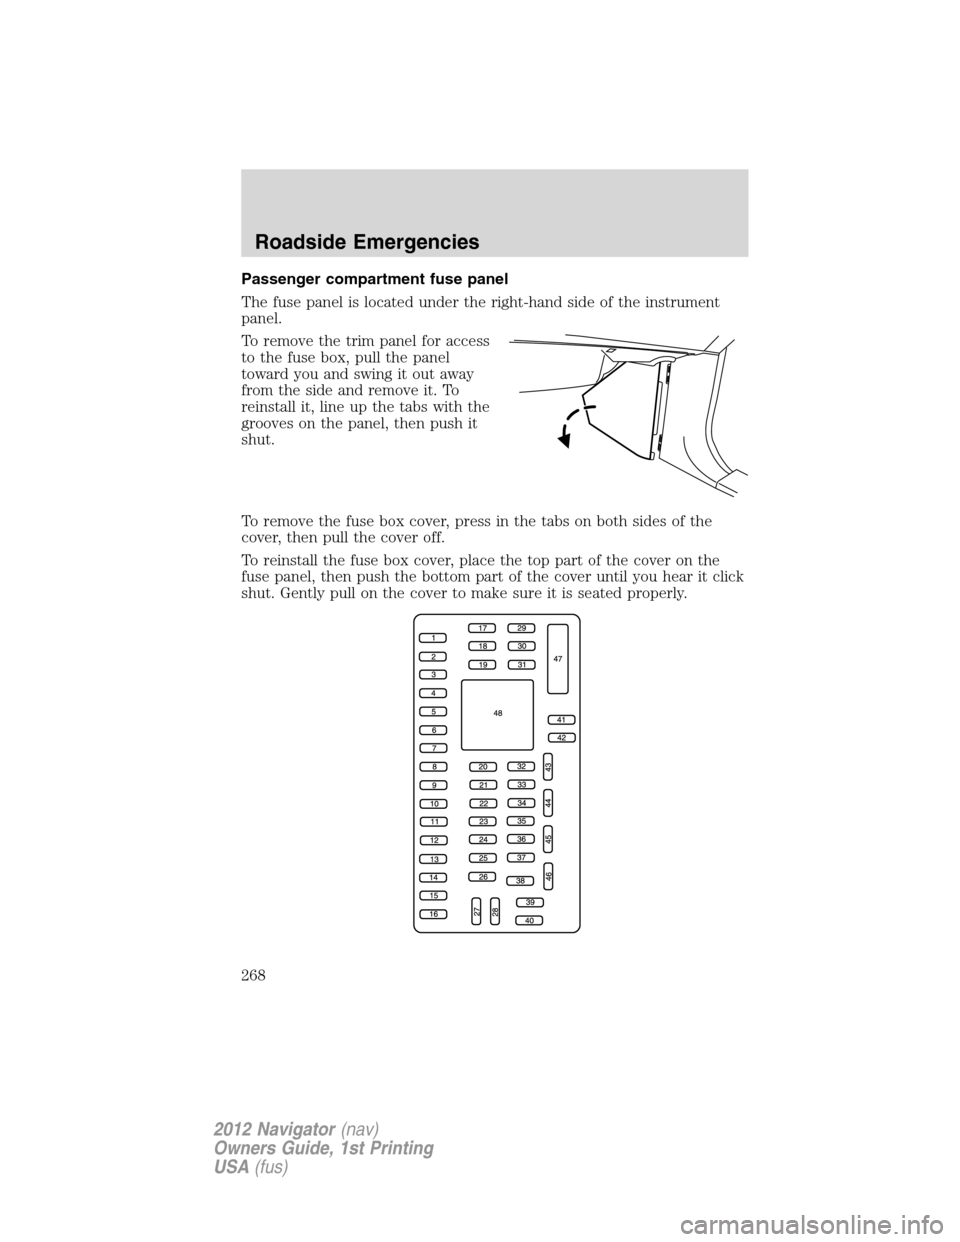
Passenger compartment fuse panel
The fuse panel is located under the right-hand side of the instrument
panel.
To remove the trim panel for access
to the fuse box, pull the panel
toward you and swing it out away
from the side and remove it. To
reinstall it, line up the tabs with the
grooves on the panel, then push it
shut.
To remove the fuse box cover, press in the tabs on both sides of the
cover, then pull the cover off.
To reinstall the fuse box cover, place the top part of the cover on the
fuse panel, then push the bottom part of the cover until you hear it click
shut. Gently pull on the cover to make sure it is seated properly.
Roadside Emergencies
268
2012 Navigator(nav)
Owners Guide, 1st Printing
USA(fus)
Page 270 of 381
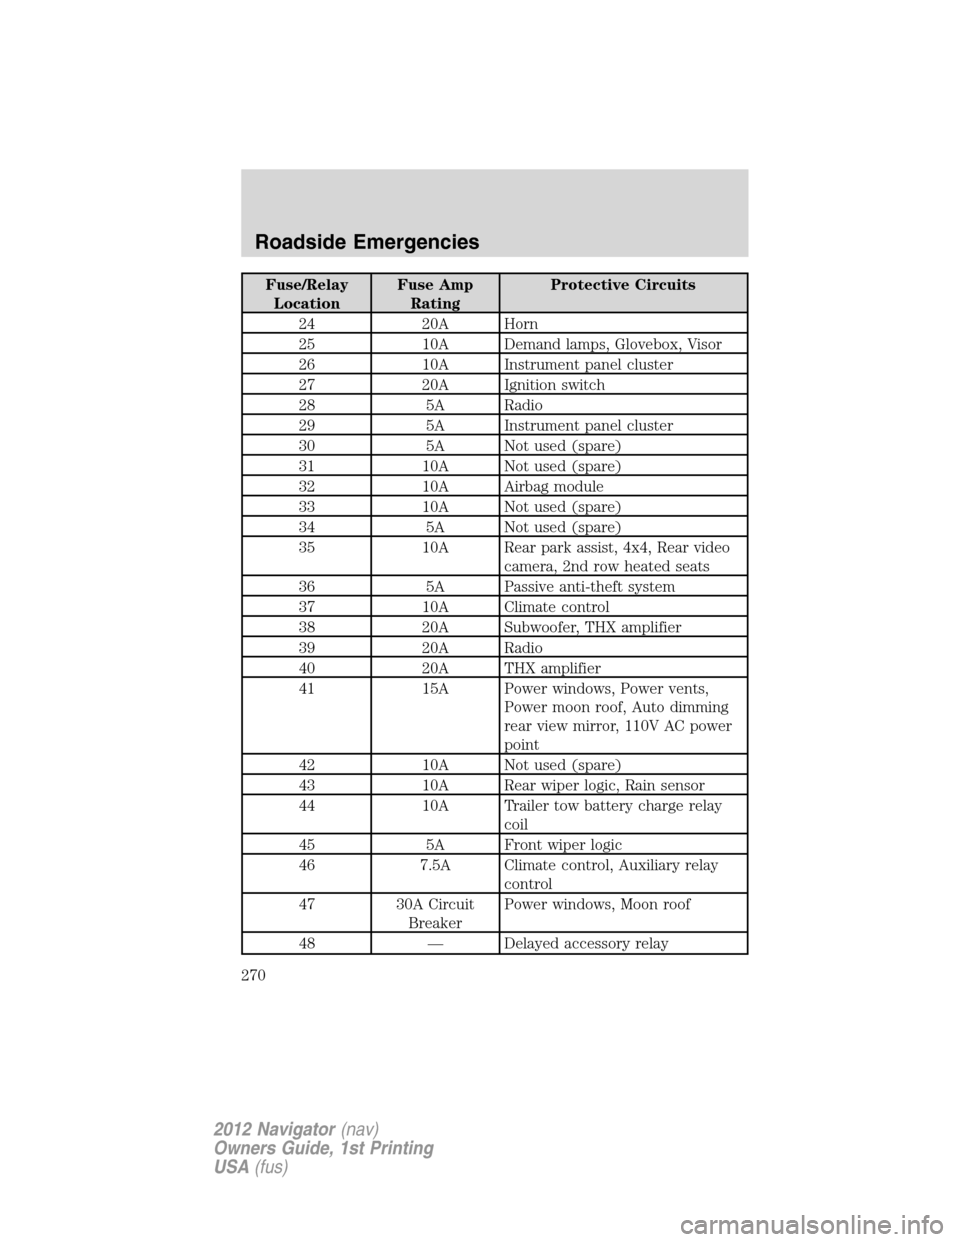
Fuse/Relay
LocationFuse Amp
RatingProtective Circuits
24 20A Horn
25 10A Demand lamps, Glovebox, Visor
26 10A Instrument panel cluster
27 20A Ignition switch
28 5A Radio
29 5A Instrument panel cluster
30 5A Not used (spare)
31 10A Not used (spare)
32 10A Airbag module
33 10A Not used (spare)
34 5A Not used (spare)
35 10A Rear park assist, 4x4, Rear video
camera, 2nd row heated seats
36 5A Passive anti-theft system
37 10A Climate control
38 20A Subwoofer, THX amplifier
39 20A Radio
40 20A THX amplifier
41 15A Power windows, Power vents,
Power moon roof, Auto dimming
rear view mirror, 110V AC power
point
42 10A Not used (spare)
43 10A Rear wiper logic, Rain sensor
44 10A Trailer tow battery charge relay
coil
45 5A Front wiper logic
46 7.5A Climate control, Auxiliary relay
control
47 30A Circuit
BreakerPower windows, Moon roof
48 — Delayed accessory relay
Roadside Emergencies
270
2012 Navigator(nav)
Owners Guide, 1st Printing
USA(fus)
Page 272 of 381
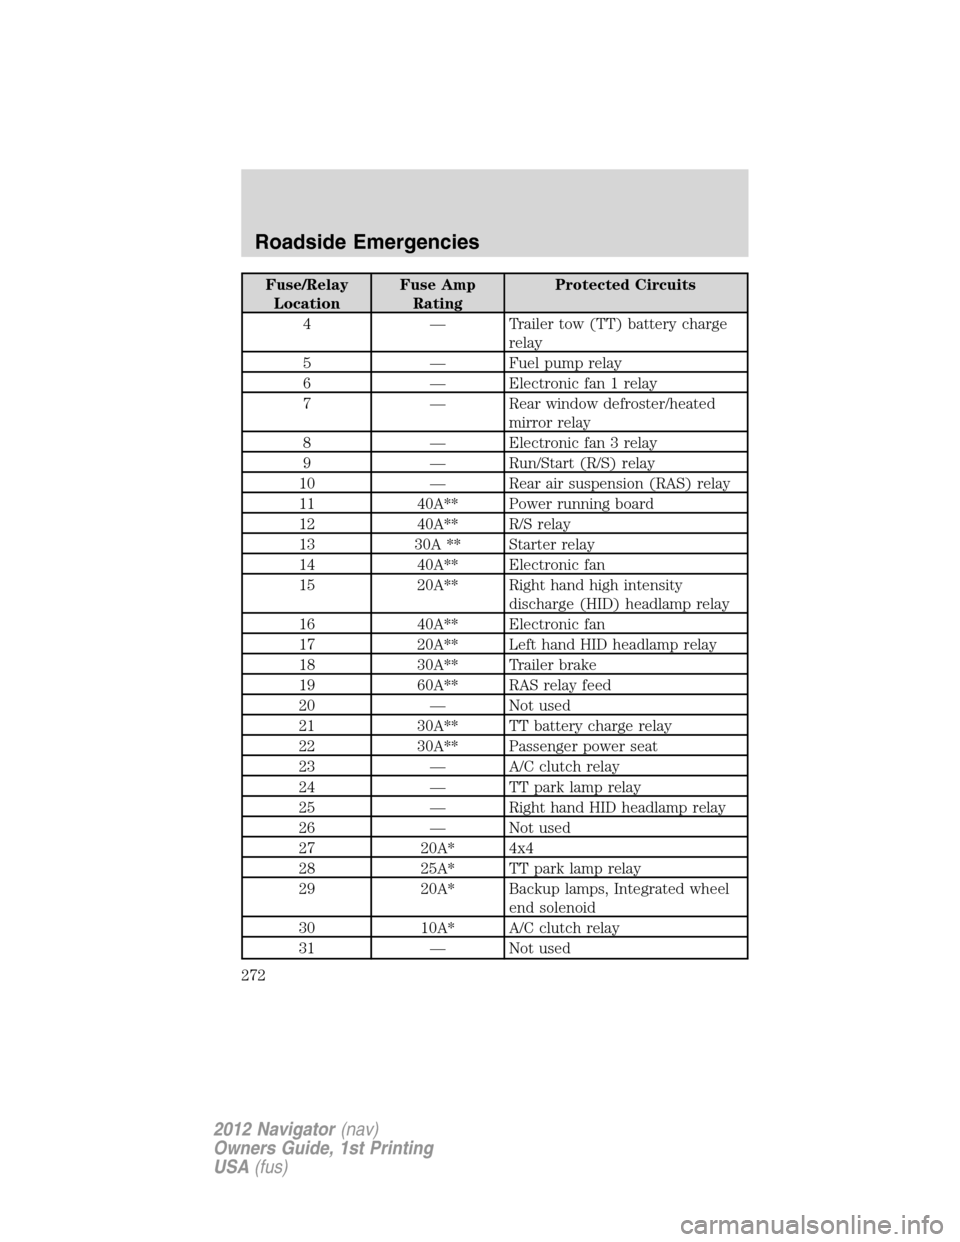
Fuse/Relay
LocationFuse Amp
RatingProtected Circuits
4 — Trailer tow (TT) battery charge
relay
5 — Fuel pump relay
6 — Electronic fan 1 relay
7 — Rear window defroster/heated
mirror relay
8 — Electronic fan 3 relay
9 — Run/Start (R/S) relay
10 — Rear air suspension (RAS) relay
11 40A** Power running board
12 40A** R/S relay
13 30A ** Starter relay
14 40A** Electronic fan
15 20A** Right hand high intensity
discharge (HID) headlamp relay
16 40A** Electronic fan
17 20A** Left hand HID headlamp relay
18 30A** Trailer brake
19 60A** RAS relay feed
20 — Not used
21 30A** TT battery charge relay
22 30A** Passenger power seat
23 — A/C clutch relay
24 — TT park lamp relay
25 — Right hand HID headlamp relay
26 — Not used
27 20A* 4x4
28 25A* TT park lamp relay
29 20A* Backup lamps, Integrated wheel
end solenoid
30 10A* A/C clutch relay
31 — Not used
Roadside Emergencies
272
2012 Navigator(nav)
Owners Guide, 1st Printing
USA(fus)
Page 276 of 381
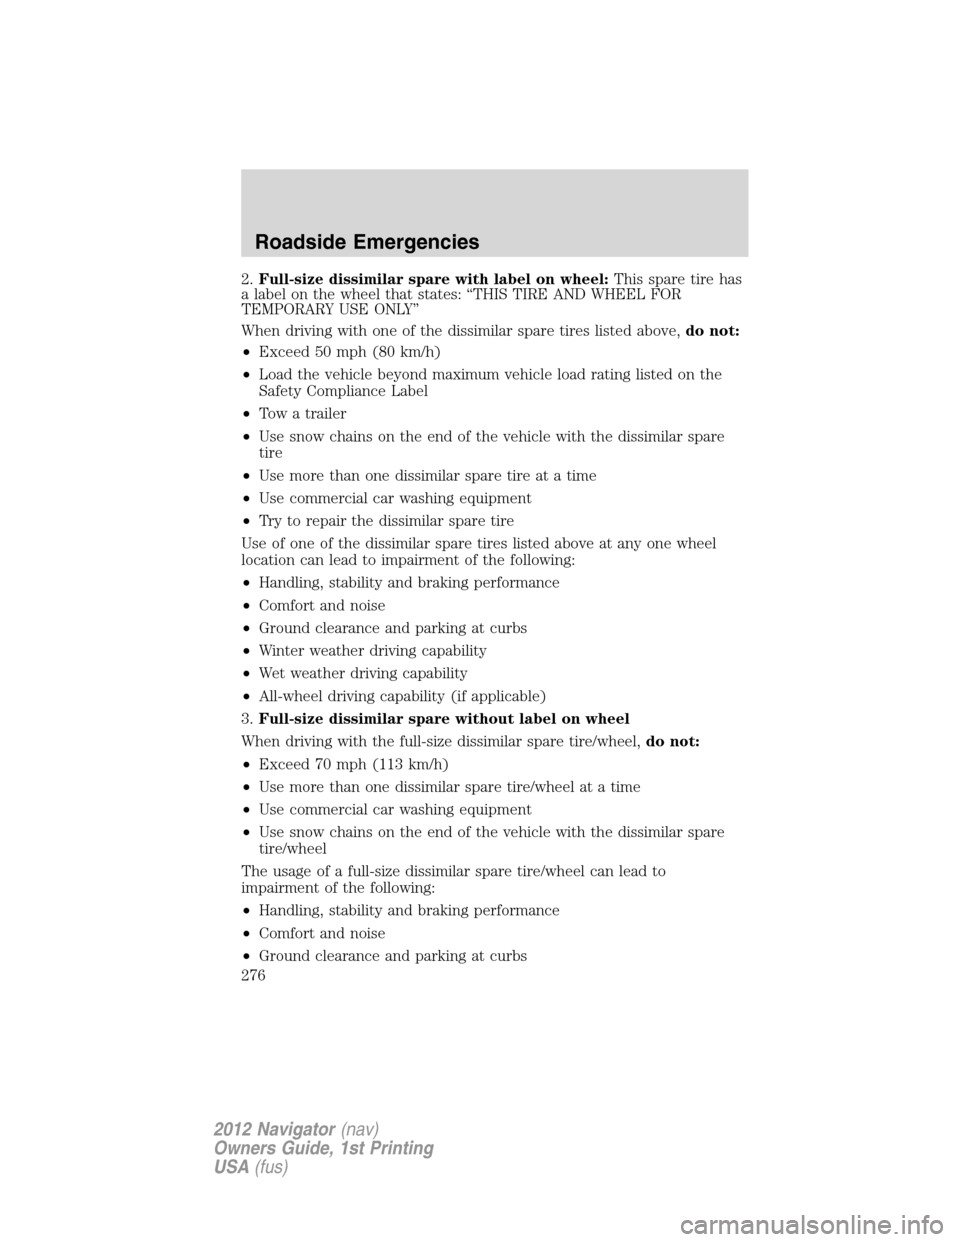
2.Full-size dissimilar spare with label on wheel:This spare tire has
a label on the wheel that states: “THIS TIRE AND WHEEL FOR
TEMPORARY USE ONLY”
When driving with one of the dissimilar spare tires listed above,do not:
•Exceed 50 mph (80 km/h)
•Load the vehicle beyond maximum vehicle load rating listed on the
Safety Compliance Label
•Tow a trailer
•Use snow chains on the end of the vehicle with the dissimilar spare
tire
•Use more than one dissimilar spare tire at a time
•Use commercial car washing equipment
•Try to repair the dissimilar spare tire
Use of one of the dissimilar spare tires listed above at any one wheel
location can lead to impairment of the following:
•Handling, stability and braking performance
•Comfort and noise
•Ground clearance and parking at curbs
•Winter weather driving capability
•Wet weather driving capability
•All-wheel driving capability (if applicable)
3.Full-size dissimilar spare without label on wheel
When driving with the full-size dissimilar spare tire/wheel,do not:
•Exceed 70 mph (113 km/h)
•Use more than one dissimilar spare tire/wheel at a time
•Use commercial car washing equipment
•Use snow chains on the end of the vehicle with the dissimilar spare
tire/wheel
The usage of a full-size dissimilar spare tire/wheel can lead to
impairment of the following:
•Handling, stability and braking performance
•Comfort and noise
•Ground clearance and parking at curbs
Roadside Emergencies
276
2012 Navigator(nav)
Owners Guide, 1st Printing
USA(fus)
Page 277 of 381
•Winter weather driving capability
•Wet weather driving capability
•All-wheel driving capability (if applicable)
•Load leveling adjustment (if applicable)
When driving with the full-size dissimilar spare tire/wheel additional
caution should be given to:
•Towing a trailer
•Driving vehicles equipped with a camper body
•Driving vehicles with a load on the cargo rack
Drive cautiously when using a full-size dissimilar spare tire/wheel and
seek service as soon as possible.
Stopping and securing the vehicle
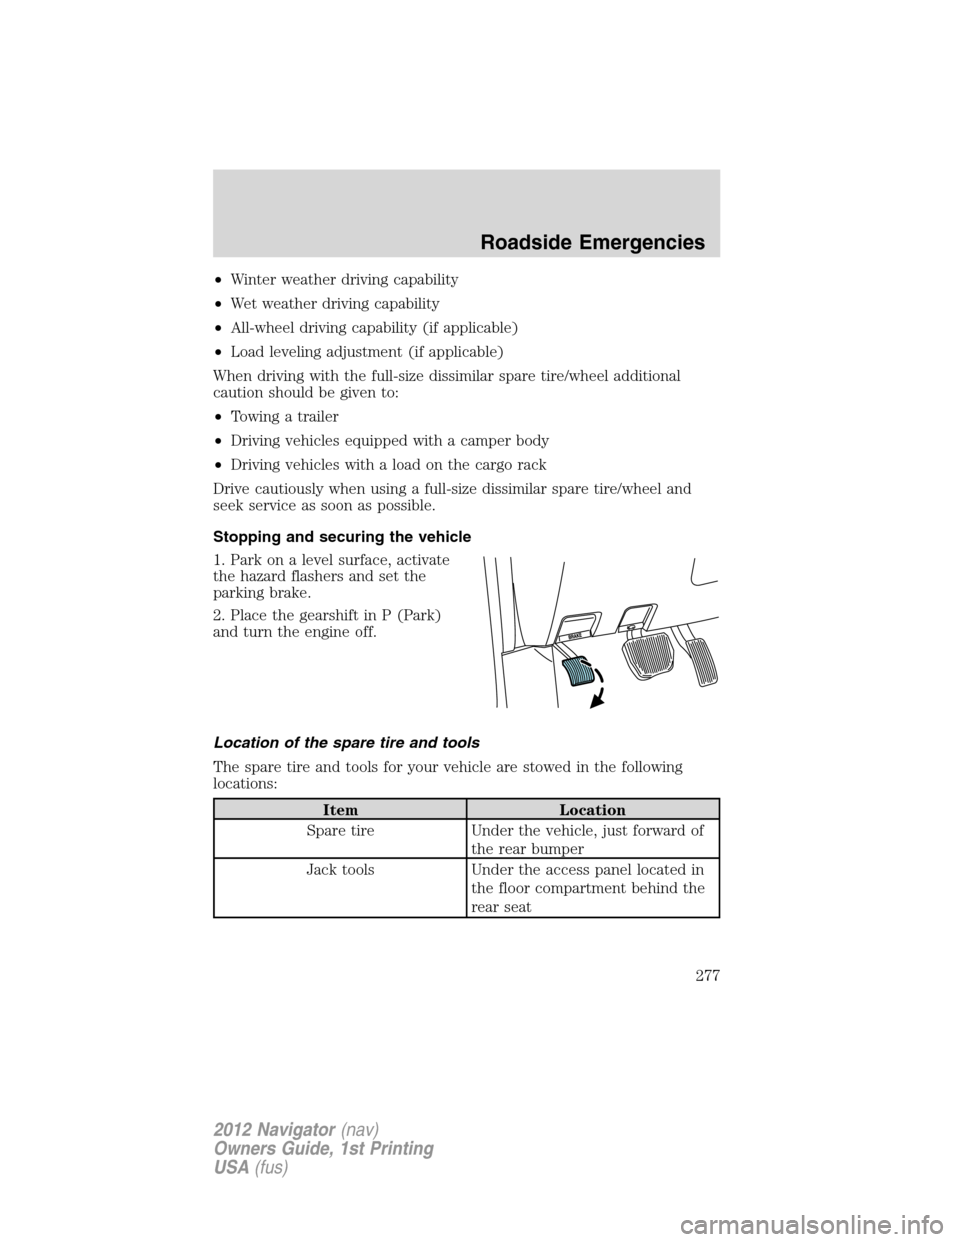
1. Park on a level surface, activate
the hazard flashers and set the
parking brake.
2. Place the gearshift in P (Park)
and turn the engine off.
Location of the spare tire and tools
The spare tire and tools for your vehicle are stowed in the following
locations:
Item Location
Spare tire Under the vehicle, just forward of
the rear bumper
Jack tools Under the access panel located in
the floor compartment behind the
rear seat
Roadside Emergencies
277
2012 Navigator(nav)
Owners Guide, 1st Printing
USA(fus)
Page 279 of 381
Tire change procedure
WARNING:To help prevent the vehicle from moving when you
change a tire, be sure the parking brake is set, then block the
wheels (both front or both rear) on the opposite end of the vehicle
from the wheel being changed. If on a grade, block both opposite
wheels on the downward side of the hill.
WARNING:If the vehicle slips off the jack, you or someone else
could be seriously injured.
WARNING:On vehicles equipped with air suspension, turn off
the air suspension system prior to jacking, hoisting or towing
your vehicle.
WARNING:Turn off the running boards (if equipped) before
jacking or placing any object under the vehicle. Never place your
hand between the extended running board and the vehicle. A moving
running board may cause injury.
WARNING:Do not attempt to change a tire on the side of the
vehicle close to moving traffic. Pull far enough off the road to
avoid the danger of being hit when operating the jack and changing the
wheel.
Note:Passengers should not remain in the vehicle when the vehicle is
being jacked.
If your vehicle is equipped with air suspension, refer toMessage center
in theInstrument Clusterchapter for instructions on turning the air
suspension system off.
Refer to the instruction sheet (located in the rear floor compartment
behind the 3rd row seat with the jack tray tools assembly kit) for
detailed tire change instructions.
Roadside Emergencies
279
2012 Navigator(nav)
Owners Guide, 1st Printing
USA(fus)
Page 283 of 381
Stowing the spare tire
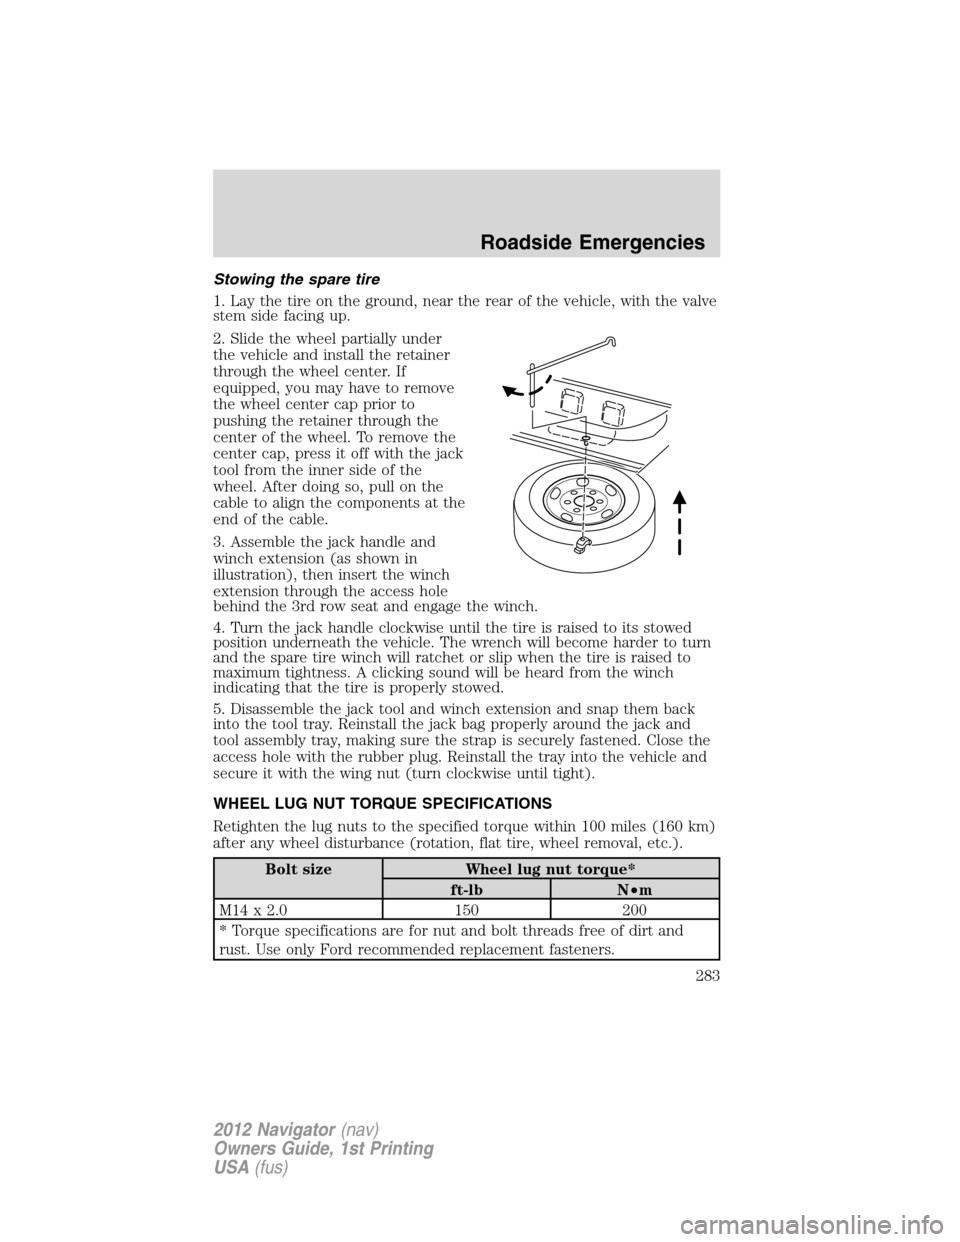
1. Lay the tire on the ground, near the rear of the vehicle, with the valve
stem side facing up.
2. Slide the wheel partially under
the vehicle and install the retainer
through the wheel center. If
equipped, you may have to remove
the wheel center cap prior to
pushing the retainer through the
center of the wheel. To remove the
center cap, press it off with the jack
tool from the inner side of the
wheel. After doing so, pull on the
cable to align the components at the
end of the cable.
3. Assemble the jack handle and
winch extension (as shown in
illustration), then insert the winch
extension through the access hole
behind the 3rd row seat and engage the winch.
4. Turn the jack handle clockwise until the tire is raised to its stowed
position underneath the vehicle. The wrench will become harder to turn
and the spare tire winch will ratchet or slip when the tire is raised to
maximum tightness. A clicking sound will be heard from the winch
indicating that the tire is properly stowed.
5. Disassemble the jack tool and winch extension and snap them back
into the tool tray. Reinstall the jack bag properly around the jack and
tool assembly tray, making sure the strap is securely fastened. Close the
access hole with the rubber plug. Reinstall the tray into the vehicle and
secure it with the wing nut (turn clockwise until tight).
WHEEL LUG NUT TORQUE SPECIFICATIONS
Retighten the lug nuts to the specified torque within 100 miles (160 km)
after any wheel disturbance (rotation, flat tire, wheel removal, etc.).
Bolt size Wheel lug nut torque*
ft-lb N•m
M14 x 2.0 150 200
* Torque specifications are for nut and bolt threads free of dirt and
rust. Use only Ford recommended replacement fasteners.
Roadside Emergencies
283
2012 Navigator(nav)
Owners Guide, 1st Printing
USA(fus)
Page 289 of 381
WRECKER TOWING
If you need to have your vehicle towed, contact a professional towing
service or, if you are a member of a roadside assistance program, your
roadside assistance service provider.
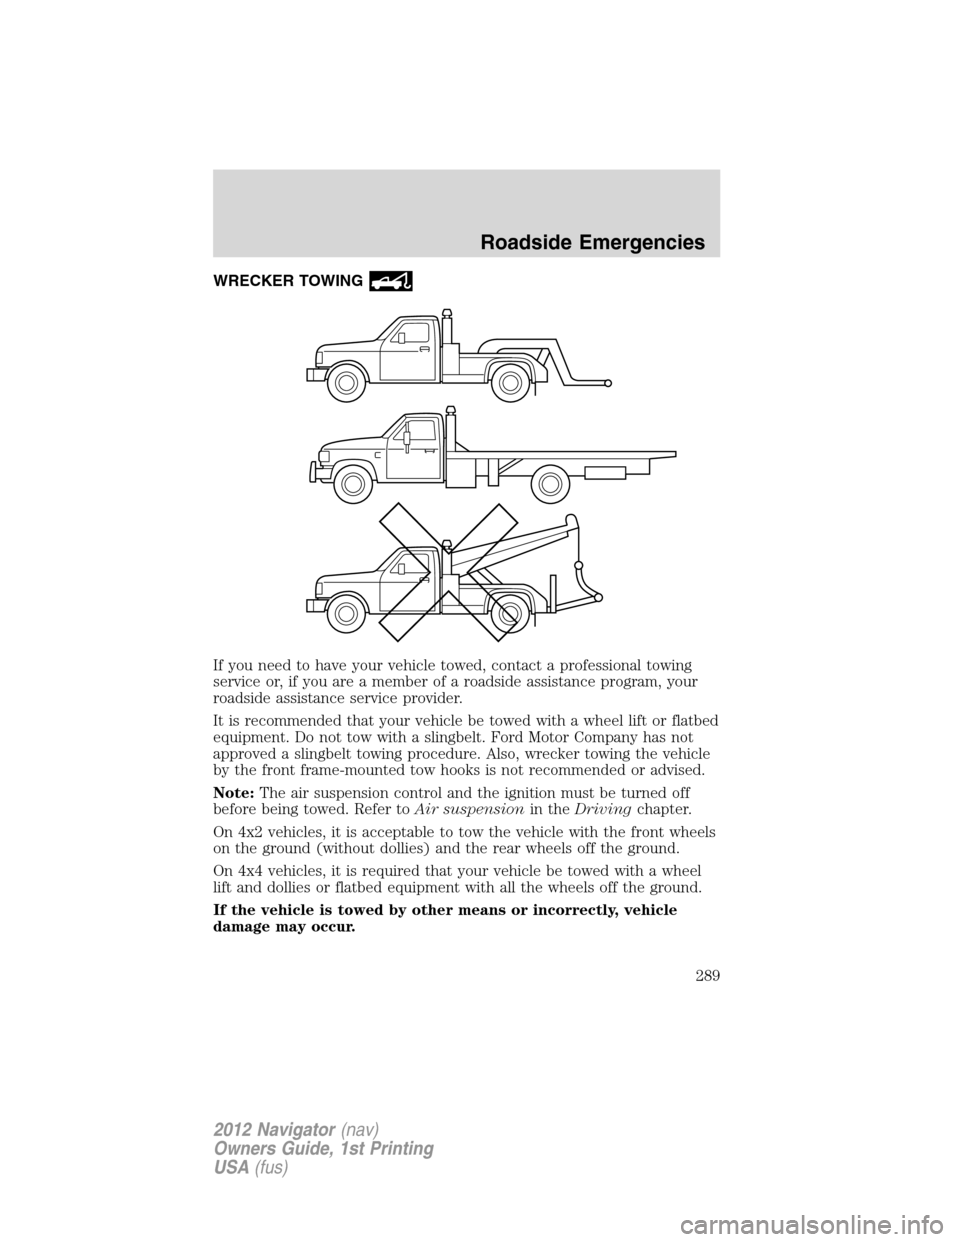
It is recommended that your vehicle be towed with a wheel lift or flatbed
equipment. Do not tow with a slingbelt. Ford Motor Company has not
approved a slingbelt towing procedure. Also, wrecker towing the vehicle
by the front frame-mounted tow hooks is not recommended or advised.
Note:The air suspension control and the ignition must be turned off
before being towed. Refer toAir suspensionin theDrivingchapter.
On 4x2 vehicles, it is acceptable to tow the vehicle with the front wheels
on the ground (without dollies) and the rear wheels off the ground.
On 4x4 vehicles, it is required that your vehicle be towed with a wheel
lift and dollies or flatbed equipment with all the wheels off the ground.
If the vehicle is towed by other means or incorrectly, vehicle
damage may occur.
Roadside Emergencies
289
2012 Navigator(nav)
Owners Guide, 1st Printing
USA(fus)
Page 290 of 381
Ford Motor Company produces a towing manual for all authorized tow
truck operators. Have your tow truck operator refer to this manual for
proper hook-up and towing procedures for your vehicle.
Emergency towing
In case of a roadside emergency with a disabled vehicle (without access
to wheel dollies, car hauling trailer, or flatbed transport vehicle) your
vehicle (regardless of transmission powertrain configuration) can be flat
towed (all wheels on the ground) under the following conditions:
•Vehicle is facing forward so that it is being towed in a forward
direction.
•Place the transmission in N (Neutral). Refer toBrake-shift interlock
in theDrivingchapter for specific instructions if you cannot move the
gear shift lever into N (Neutral).
•Maximum speed is not to exceed 35 mph (56 km/h).
•Maximum distance is 50 miles (80 km).
Roadside Emergencies
290
2012 Navigator(nav)
Owners Guide, 1st Printing
USA(fus)
Page 299 of 381
WASHING THE EXTERIOR
Wash your vehicle regularly with cool or lukewarm water and a neutral
pH shampoo, such as Motorcraft Detail Wash (ZC-3–A), which is
available from your authorized dealer.
•Never use strong household detergents or soap, such as dish washing
or laundry liquid. These products can discolor and spot painted
surfaces.
•Never wash a vehicle that is “hot to the touch” or during exposure to
strong, direct sunlight.
•Always use a clean sponge or car wash mitt with plenty of water for
best results.
•Dry the vehicle with a chamois or soft terry cloth towel in order to
eliminate water spotting.
•It is especially important to wash the vehicle regularly during the
winter months, as dirt and road salt are difficult to remove and cause
damage to the vehicle.
•Immediately remove items such as gasoline, diesel fuel, bird droppings
and insect deposits because they can cause damage to the vehicle’s
paintwork and trim over time. Use Bug and Tar Remover (ZC-42)
which is available from your authorized dealer.
•Remove any exterior accessories, such as antennas, before entering a
car wash.
•Suntan lotions and insect repellents can damage any painted
surface; if these substances come in contact with your vehicle,
wash off as soon as possible.
•If your vehicle is equipped with running boards, do not use
rubber, plastic and vinyl protectant products on the running
board surface, as the area may become slippery.
•If your vehicle is equipped with power deployable running
boards, you may experience noise while deploying the system
due to excessive grit and grime buildup. While the system is
unaffected by this buildup, it is important to wash the area
regularly in order to maintain the system’s optimal operation.
Cleaning
299
2012 Navigator(nav)
Owners Guide, 1st Printing
USA(fus)