light LINCOLN NAVIGATOR 2015 Quick Reference Guide
[x] Cancel search | Manufacturer: LINCOLN, Model Year: 2015, Model line: NAVIGATOR, Model: LINCOLN NAVIGATOR 2015Pages: 12, PDF Size: 1.4 MB
Page 3 of 12
5
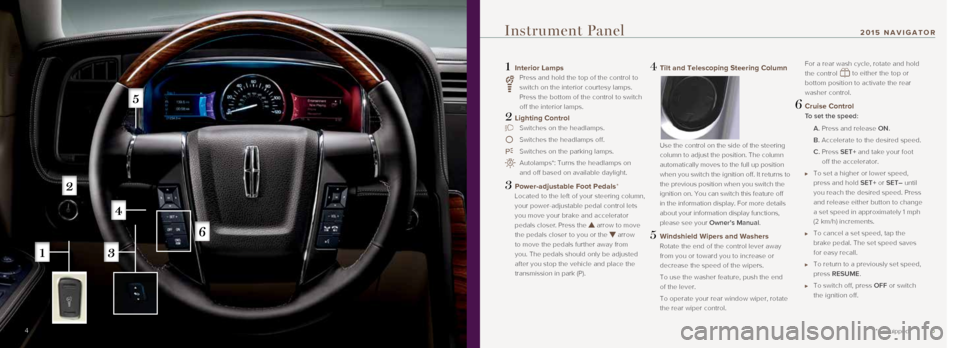
1 Interior Lamps
Press and hold the top of the control to
switch on the interior courtesy lamps.
Press the bottom of the control to switch
off the interior lamps.
2 Lighting Control
Switches on the headlamps.
Switches the headlamps off.
Switches on the parking lamps.
Autolamps*: Turns the headlamps on
and off based on available daylight.
3 Power-adjustable Foot Pedals*
Located to the left of your steering column,
your power-adjustable pedal control lets
you move your brake and accelerator
pedals closer. Press the
arrow to move
the pedals closer to you or the
arrow
to move the pedals further away from
you. The pedals should only be adjusted
after you stop the vehicle and place the
transmission in park (P).
4 Tilt and Telescoping Steering Column
Use the control on the side of the steering
column to adjust the position. The column
automatically moves to the full up position
when you switch the ignition off. It returns to
the previous position when you switch the
ignition on. You can switch this feature off
in the information display. For more details
about your information display functions,
please see your Owner’s Manual.
5 Windshield Wipers and Washers
Rotate the end of the control lever away
from you or toward you to increase or
decrease the speed of the wipers.
To use the washer feature, push the end
of the lever.
To operate your rear window wiper, rotate
the rear wiper control.
For a rear wash cycle, rotate and hold
the control
to either the top or
bottom position to activate the rear
washer control.
6 Cruise Control
To set the speed:
A. Press and release ON.
B. Accelerate to the desired speed.
C. Press SET+ and take your foot
off the accelerator.
To set a higher or lower speed,
press and hold SET+ or SET– until
you reach the desired speed. Press
and release either button to change
a set speed in approximately 1 mph
(2 km/h) increments.
To cancel a set speed, tap the
brake pedal. The set speed saves
for easy recall.
To return to a previously set speed,
press RESUME.
To switch off, press OFF or switch
the ignition off.
Instrument Panel
*if equipped4
201 5 NAVIGATOR
Page 4 of 12
7
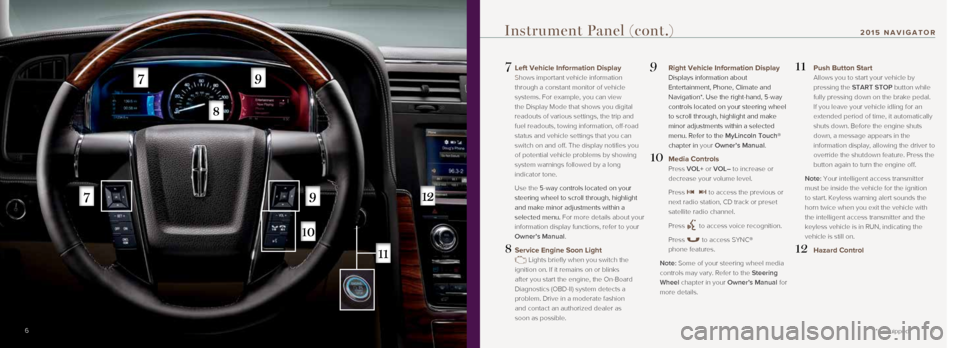
7 Left Vehicle Information Display
Shows important vehicle information
through a constant monitor of vehicle
systems. For example, you can view
the Display Mode that shows you digital
readouts of various settings, the trip and
fuel readouts, towing information, off-road
status and vehicle settings that you can
switch on and off. The display notifies you
of potential vehicle problems by showing
system warnings followed by a long
indicator tone.
Use the 5-way controls located on your
steering wheel to scroll through, highlight
and make minor adjustments within a
selected menu. For more details about your
information display functions, refer to your
Owner’s Manual.
8 Service Engine Soon Light
Lights briefly when you switch the
ignition on. If it remains on or blinks
after you start the engine, the On-Board
Diagnostics (OBD-II) system detects a
problem. Drive in a moderate fashion
and contact an authorized dealer as
soon as possible.
9 Right Vehicle Information Display
Displays information about
Entertainment, Phone, Climate and
Navigation*. Use the right-hand, 5-way
controls located on your steering wheel
to scroll through, highlight and make
minor adjustments within a selected
menu. Refer to the MyLincoln Touch®
chapter in your Owner’s Manual.
10 Media Controls
Press VOL+ or VOL– to increase or
decrease your volume level.
Press
to access the previous or
next radio station, CD track or preset
satellite radio channel.
Press
to access voice recognition.
Press
to access SYNC®
phone features.
Note: Some of your steering wheel media
controls may vary. Refer to the Steering
Wheel chapter in your Owner’s Manual for
more details.
11 Push Button Start
Allows you to start your vehicle by
pressing the START STOP button while
fully pressing down on the brake pedal.
If you leave your vehicle idling for an
extended period of time, it automatically
shuts down. Before the engine shuts
down, a message appears in the
information display, allowing the driver to
override the shutdown feature. Press the
button again to turn the engine off.
Note: Your intelligent access transmitter
must be inside the vehicle for the ignition
to start. Keyless warning alert sounds the
horn twice when you exit the vehicle with
the intelligent access transmitter and the
keyless vehicle is in RUN, indicating the
vehicle is still on.
12 Hazard Control
6
Instrument Panel (cont.)
*if equipped
201 5 NAVIGATOR
Page 6 of 12
1011
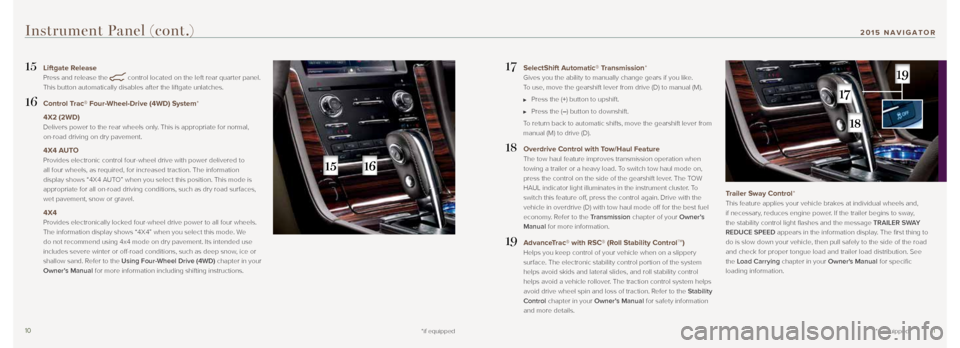
17 SelectShift Automatic® Transmission*
Gives you the ability to manually change gears if you like.
To use, move the gearshift lever from drive (D) to manual (M).
Press the (+) button to upshift.
Press the (–) button to downshift.
To return back to automatic shifts, move the gearshift lever from
manual (M) to drive (D).
18 Overdrive Control with Tow/Haul Feature
The tow haul feature improves transmission operation when
towing a trailer or a heavy load. To switch tow haul mode on,
press the control on the side of the gearshift lever. The TOW
HAUL indicator light illuminates in the instrument cluster. To
switch this feature off, press the control again. Drive with the
vehicle in overdrive (D) with tow haul mode off for the best fuel
economy. Refer to the Transmission chapter of your Owner’s
Manual for more information.
19 AdvanceTrac® with RSC® (Roll Stability ControlTM)
Helps you keep control of your vehicle when on a slippery
surface. The electronic stability control portion of the system
helps avoid skids and lateral slides, and roll stability control
helps avoid a vehicle rollover. The traction control system helps
avoid drive wheel spin and loss of traction. Refer to the Stability
Control chapter in your Owner’s Manual for safety information
and more details.
Trailer Sway Control*
This feature applies your vehicle brakes at individual wheels and,
if necessary, reduces engine power. If the trailer begins to sway,
the stability control light flashes and the message TRAILER SWAY
REDUCE SPEED appears in the information display. The first thing to
do is slow down your vehicle, then pull safely to the side of the road
and check for proper tongue load and trailer load distribution. See
the Load Carrying chapter in your Owner's Manual for specific
loading information.
15 Liftgate Release
Press and release the
control located on the left rear quarter panel.
This button automatically disables after the liftgate unlatches.
16 Control Trac® Four-Wheel-Drive (4WD) System*
4X2 (2WD)
Delivers power to the rear wheels only. This is appropriate for normal,
on-road driving on dry pavement.
4X4 AUTO
Provides electronic control four-wheel drive with power delivered to
all four wheels, as required, for increased traction. The information
display shows “4X4 AUTO” when you select this position. This mode is
appropriate for all on-road driving conditions, such as dry road surface\
s,
wet pavement, snow or gravel.
4X4
Provides electronically locked four-wheel drive power to all four wheels.
The information display shows “4X4” when you select this mode. We
do not recommend using 4x4 mode on dry pavement. Its intended use
includes severe winter or off-road conditions, such as deep snow, ice or
shallow sand. Refer to the Using Four-Wheel Drive (4WD) chapter in your
Owner’s Manual for more information including shifting instructions.
*if equipped
Instrument Panel (cont.)
*if equipped
201 5 NAVIGATOR
Page 10 of 12
1819
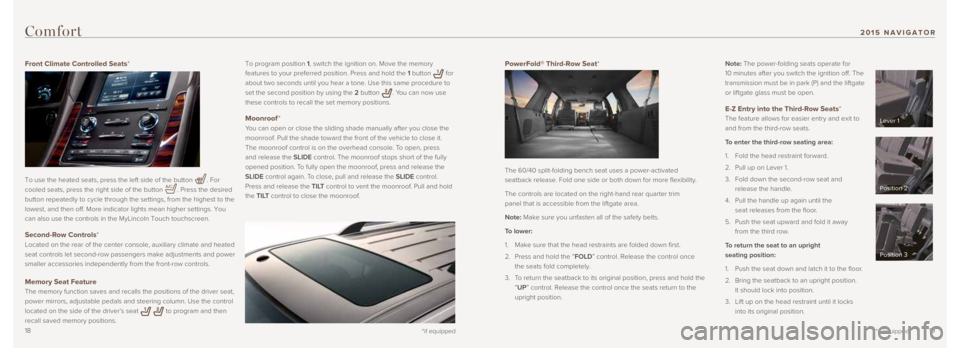
PowerFold® Third-Row Seat*
The 60/40 split-folding bench seat uses a power-activated
seatback release. Fold one side or both down for more flexibility.
The controls are located on the right-hand rear quarter trim
panel that is accessible from the liftgate area.
Note: Make sure you unfasten all of the safety belts.
To lower:
1. Make sure that the head restraints are folded down first.
2. Press and hold the “FOLD” control. Release the control once
the seats fold completely.
3. To return the seatback to its original position, press and hold the
“UP” control. Release the control once the seats return to the
upright position. Note: The power-folding seats operate for
10 minutes after you switch the ignition off. The
transmission must be in park (P) and the liftgate
or liftgate glass must be open.
E-Z Entry into the Third-Row Seats*
The feature allows for easier entry and exit to
and from the third-row seats.
To enter the third-row seating area:
1. Fold the head restraint forward.
2. Pull up on Lever 1.
3. Fold down the second-row seat and
release the handle.
4. Pull the handle up again until the
seat releases from the floor.
5. Push the seat upward and fold it away
from the third row.
To return the seat to an upright
seating position:
1. Push the seat down and latch it to the floor.
2. Bring the seatback to an upright position.
It should lock into position.
3. Lift up on the head restraint until it locks
into its original position.
*if equipped
To program position 1, switch the ignition on. Move the memory
features to your preferred position. Press and hold the 1 button
for
about two seconds until you hear a tone. Use this same procedure to
set the second position by using the 2 button
. You can now use
these controls to recall the set memory positions.
Moonroof *
You can open or close the sliding shade manually after you close the
moonroof. Pull the shade toward the front of the vehicle to close it.
The moonroof control is on the overhead console. To open, press
and release the SLIDE control. The moonroof stops short of the fully
opened position. To fully open the moonroof, press and release the
SLIDE control again. To close, pull and release the SLIDE control.
Press and release the TILT control to vent the moonroof. Pull and hold
the TILT control to close the moonroof.
Comfort
Front Climate Controlled Seats*
To use the heated seats, press the left side of the button
. For
cooled seats, press the right side of the button
. Press the desired
button repeatedly to cycle through the settings, from the highest to the\
lowest, and then off. More indicator lights mean higher settings. You
can also use the controls in the MyLincoln Touch touchscreen.
Second-Row Controls*
Located on the rear of the center console, auxiliary climate and heated \
seat controls let second-row passengers make adjustments and power
smaller accessories independently from the front-row controls.
Memory Seat Feature
The memory function saves and recalls the positions of the driver seat, \
power mirrors, adjustable pedals and steering column. Use the control
located on the side of the driver’s seat
to program and then
recall saved memory positions.
*if equipped
Lever 1
Position 2
Position 3
201 5 NAVIGATOR
Page 11 of 12
2021
Fuel Type and Fuel Tank Capacity
Depending on your vehicle, your fuel tank
has a capacity of either 28 gallons (106L)
or 33.5 gallons (126.8L).
Use only UNLEADED gasoline blended with
a maximum of 15% ethanol and an 87 octane
rating. Do not use E85 (ethanol), diesel,
fuel-methanol, leaded fuel or any other
fuel because it could damage or impair the
emission control system.
BLIS® (Blind Spot Information System)
with Cross Traffic Alert*
BLIS uses radar sensors to help you
determine if a vehicle may be in your blind
spot zone. The cross traffic alert feature alerts
you if a car is coming toward you when you
back out of a parking space. BLIS and cross
traffic alert display a yellow indicator light in
your exterior mirrors. Cross traffic alert also
sounds tones and displays messages to warn
you which direction vehicles are approaching.
See the Driving Aids chapter in your Owner’s
Manual for more information.
Tire Pressure Monitoring System
Your vehicle comes with a Tire Pressure
Monitoring System (TPMS) that displays a
low tire pressure warning light
when one
or more of your tires are significantly under-
inflated. If this happens, stop and check your
tires as soon as possible. Inflate them to the
proper pressure. Refer to the Inflating Your
Tires section in the Wheels and Tires chapter
of your Owner’s Manual for more information.
Location of Spare Tire and Tools
The temporary spare tire is under the vehicle,
just forward of the rear bumper. Use it only
for emergency use and replace it as soon
as possible. The jack and tools are under
the access panel in the floor compartment
behind the rear seat. Make sure you switch
the deployable running boards* off prior to
jacking, hoisting or towing your vehicle. For
complete details on how to change your tire,
refer to the Roadside Emergencies chapter
in your Owner’s Manual.
SOS Post-Crash Alert SystemTM
The system flashes the direction indicator
lamps and sounds the horn (intermittently) in
the event of a serious impact that deploys
an airbag.
The horn and lamps turn off when:
You press the hazard control button in
your vehicle or the panic button*
on your keyless remote transmitter.
Your vehicle runs out of power.
Essential Features
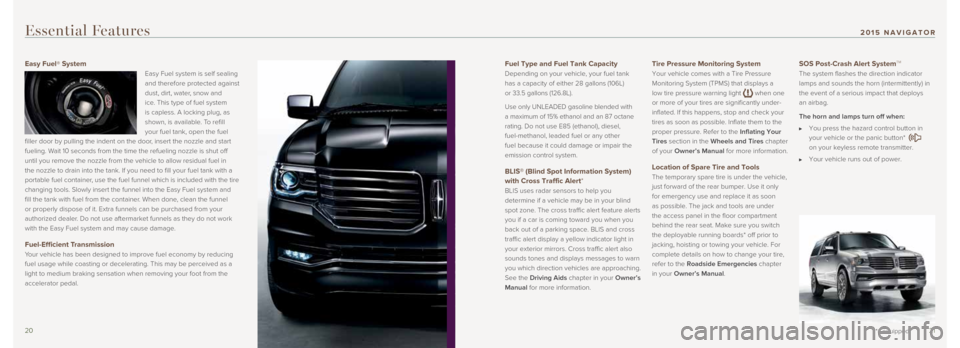
Easy Fuel® System
Easy Fuel system is self sealing
and therefore protected against
dust, dirt, water, snow and
ice. This type of fuel system
is capless. A locking plug, as
shown, is available. To refill
your fuel tank, open the fuel
filler door by pulling the indent on the door, insert the nozzle and start
fueling. Wait 10 seconds from the time the refueling nozzle is shut off
until you remove the nozzle from the vehicle to allow residual fuel in
the nozzle to drain into the tank. If you need to fill your fuel tank wi\
th a
portable fuel container, use the fuel funnel which is included with the tire
changing tools. Slowly insert the funnel into the Easy Fuel system and
fill the tank with fuel from the container. When done, clean the funnel
or properly dispose of it. Extra funnels can be purchased from your
authorized dealer. Do not use aftermarket funnels as they do not work
with the Easy Fuel system and may cause damage.
Fuel-Efficient Transmission
Your vehicle has been designed to improve fuel economy by reducing
fuel usage while coasting or decelerating. This may be perceived as a
light to medium braking sensation when removing your foot from the
accelerator pedal.
*if equipped
201 5 NAVIGATOR
Page 12 of 12
2223
The Lincoln Pledge1
14 *if equipped14
Function
14
Rear View Camera
The rear view camera system is on the liftgate and provides a video imag\
e of the
area behind the vehicle. The display automatically appears whenever the vehicle
is in reverse (R) and uses colored guidelines (green, yellow and red)\
to indicate
distance. Objects in the red zone are the closest to your vehicle while objects \
in
the green zone are further away.
Forward and Reverse Sensing Systems
Your vehicle includes forward and reverse sensing systems which may warn \
you if there is an object in front of or behind the vehicle. The system sounds a
warning tone that increases in frequency as the object gets closer and s\
ounds
continuously when the object is less than 10 inches (25 centimeters) a\
way.
Note: Visibility aids do not replace the need to watch where the vehicle is
moving. Refer to your Owner’s Manual for safety information, more details
and limitations.
Ambient Lighting*
When activated, ambient lighting illuminates key areas of your interior with a
choice of colors. To access and make adjustments:
1. Press the Settings icon > Vehicle > Ambient Lighting.
2. Touch the desired color.
3. Use the scroll bar to increase or decrease the intensity.
To turn the feature on or off, press the power button.
Daytime Running Lamps*
The fog lamps and LED lights automatically turn on when you switch on th\
e
ignition and the headlamp control is in the off
, parking lamps or
autolamps positions.
*if equipped22
The Lincoln Motor company is proud to introduce the Lincoln Pledge.
It's the collective promise of everyone at the Lincoln Motor Company—
from our trusted service advisors to expert technicians to the voice
on the other end of the line should you call—that we'll be there for
you and your Lincoln wherever, whenever, if ever you need us. Here
are some of the ways the Lincoln Pledge comes to life and makes the
journey of owning a Lincoln a rewarding one.
Lincoln Pledge Amenities
Bumper-to-Bumper Warranty
Be assured that everything between the bumpers of your Lincoln is
covered for four years/50,000 miles.
2
Lifetime Roadside Assistance
If ever you need help on the road, the Lincoln Motor Company will be
there for you with 24-hour/seven-days-a-week assistance nationwide.
2
Lincoln Complimentary Maintenance
The luxury of a two-year/24,000-mile maintenance plan including oil
changes and tire rotations, scheduled to accommodate your busy life.
2
Complimentary Car Wash
As an added touch, after each service visit we’re happy to provide
your Lincoln back to you washed and ready for the road ahead.
3
Complimentary Loaner
Should your Lincoln require warranty service, we’ll be there for you \
with a loaner vehicle.
3
Service Parts Warranty
We'll stand behind our service and you with a two-year, unlimited-mile
warranty on both parts and labor.
2
Dedicated Support
Lincoln Client Relationship Center
and Roadside Assistance
1-800-521-4140
TDD for the Hearing Impaired
1-800-232-5952
Digital Links and Assistance
LincolnOwner.com
How-to and informational videos.
Warranty and maintenance information.
Make your payment or schedule service online.
Shop for accessories.
Plus more.
support.Lincoln.com
SYNC® with MyLincoln Touch
TM
Discover More at Lincoln.com or Join us in Conversation
1 Canadian Roadside coverage and benefits may differ from the United State\
s
coverage. Canadian clients should refer to the Lincoln Roadside Assistan\
ce
section of the Warranty Guide, call 1-800-387-9333 or visit the website at
LincolnCanada.com for more details.
2 See dealer for complete details. Lincoln reserves the right to change
program details at any time without obligations.
3 Availability depends on dealership participation.
Our caring agents are empowered
to handle your call and concerns
from beginning to end.
201 5 NAVIGATOR