stop start LINCOLN NAVIGATOR 2016 User Guide
[x] Cancel search | Manufacturer: LINCOLN, Model Year: 2016, Model line: NAVIGATOR, Model: LINCOLN NAVIGATOR 2016Pages: 419, PDF Size: 3.59 MB
Page 161 of 419
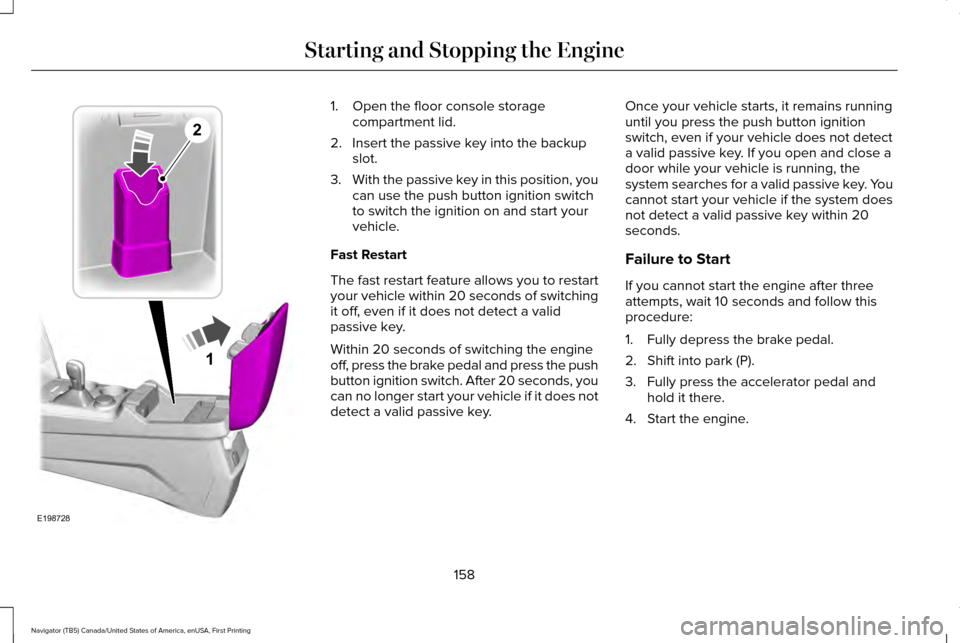
1. Open the floor console storage
compartment lid.
2. Insert the passive key into the backup slot.
3. With the passive key in this position, you
can use the push button ignition switch
to switch the ignition on and start your
vehicle.
Fast Restart
The fast restart feature allows you to restart
your vehicle within 20 seconds of switching
it off, even if it does not detect a valid
passive key.
Within 20 seconds of switching the engine
off, press the brake pedal and press the push
button ignition switch. After 20 seconds, you
can no longer start your vehicle if it does not
detect a valid passive key. Once your vehicle starts, it remains running
until you press the push button ignition
switch, even if your vehicle does not detect
a valid passive key. If you open and close a
door while your vehicle is running, the
system searches for a valid passive key. You
cannot start your vehicle if the system does
not detect a valid passive key within 20
seconds.
Failure to Start
If you cannot start the engine after three
attempts, wait 10 seconds and follow this
procedure:
1. Fully depress the brake pedal.
2. Shift into park (P).
3. Fully press the accelerator pedal and
hold it there.
4. Start the engine.
158
Navigator (TB5) Canada/United States of America, enUSA, First Printing Starting and Stopping the Engine1
E198728
2
Page 162 of 419
Automatic Engine Shutdown
For vehicles with a keyless ignition, this
feature automatically shuts down the engine
if it has been idling for an extended period.
The ignition also turns off to save battery
power. Before your vehicle shuts down, a
message appears in the information display
showing a timer counting down. If you do
not intervene within 30 seconds, your vehicle
shuts down. Another message appears in
the information display to inform you that
your vehicle has shut down to save fuel.
Start your vehicle as normal.
Automatic Engine Shutdown Override
Note:
You cannot permanently switch off
the automatic shutdown. When you switch
it off temporarily, it turns on at the next
ignition cycle. You can stop the shutdown, or reset the
timer, at any point before the 30-second
countdown has expired by doing any of the
following:
•
Interacting with your vehicle, for example
pressing the brake or accelerator pedal.
• You can temporarily switch off the
shutdown feature any time the ignition is
on using the information display. See
Information Displays (page 105). The
feature only remains off for the current
ignition cycle.
• During the 30-second countdown, the
system prompts you to press OK or
RESET to temporarily switch the feature
off for the current ignition cycle only.
Stopping the Engine When Your
Vehicle is Stationary
1. Shift into park (P).
2. Press the push button ignition switch.
3. Apply the parking brake.
Note: The ignition, all electrical circuits and
all warning lamps and indicators will be
turned off. Note:
If the engine is idling for 30 minutes,
the ignition and engine automatically shuts
down.
Stopping the Engine When Your
Vehicle is Moving WARNING
Switching off the engine when the
vehicle is still moving will result in a
loss of brake and steering assistance. The
steering will not lock, but higher effort will
be required. When the ignition is switched
off, some electrical circuits, including air
bags, warning lamps and indicators may also
be off. If the ignition was turned off
accidentally, you can shift into neutral (N) and
re-start the engine. 1. Shift into neutral and use the brakes to
bring your vehicle to a safe stop.
2. When your vehicle has stopped, shift into
park (P).
3. Press and hold the push button ignition switch, or press it three times within two
seconds.
159
Navigator (TB5) Canada/United States of America, enUSA, First Printing Starting and Stopping the Engine
Page 163 of 419

4. Apply the parking brake.
Guarding Against Exhaust Fumes
WARNING
If you smell exhaust fumes inside your
vehicle, have your vehicle checked by
your authorized dealer immediately. Do not
drive your vehicle if you smell exhaust fumes.
Carbon monoxide is present in exhaust
fumes. Take precautions to avoid its
dangerous effects. Important Ventilating Information
If you stop your vehicle and then leave the
engine idling for long periods, we
recommend that you do one of the following:
•
Open the windows at least 1 in (3 cm).
• Set your climate control to outside air. ENGINE BLOCK HEATER
(If Equipped) WARNINGS
Failure to follow engine block heater
instructions could result in property
damage or serious personal injury. Do not use your heater with
ungrounded electrical systems or
two-pronged adapters. There is a risk of
electrical shock. Do not fully close the hood, or allow it
to drop under its own weight when
using the engine block heater. This could
damage the power cable and may cause an
electrical short resulting in fire, injury and
property damage. Note:
The heater is most effective when
outdoor temperatures are below 0°F (-18°C).
The heater acts as a starting aid by warming
the engine coolant. This allows the climate
control system to respond quickly. The
equipment includes a heater element
(installed in the engine block) and a wire
harness. You can connect the system to a
grounded 120-volt AC electrical source. We recommend that you do the following for
a safe and correct operation:
•
Use a 16-gauge outdoor extension cord
that is product certified by Underwriter’ s
Laboratory (UL) or Canadian Standards
Association (CSA). This extension cord
must be suitable for use outdoors, in cold
temperatures, and be clearly marked
Suitable for Use with Outdoor
Appliances. Do not use an indoor
extension cord outdoors. This could
result in an electric shock or become a
fire hazard.
• Use as short an extension cord as
possible.
• Do not use multiple extension cords.
• Make sure that when in operation, the
extension cord plug and heater cord plug
connections are free and clear of water.
This could cause an electric shock or fire.
• Make sure your vehicle is parked in a
clean area, clear of combustibles.
• Make sure the heater, heater cord and
extension cord are firmly connected.
160
Navigator (TB5) Canada/United States of America, enUSA, First Printing Starting and Stopping the Engine
Page 164 of 419
•
Check for heat anywhere in the electrical
hookup once the system has been
operating for approximately 30 minutes.
• Make sure the system is unplugged and
properly stowed before starting and
driving your vehicle. Make sure the
protective cover seals the prongs of the
block heater cord plug when not in use.
• Make sure the heater system is checked
for proper operation before winter.
Using the Engine Block Heater
Make sure the receptacle terminals are clean
and dry prior to use. Clean them with a dry
cloth if necessary.
The heater uses 0.4 to 1.0 kilowatt-hours of
energy per hour of use. The system does not
have a thermostat. It achieves maximum
temperature after approximately three hours
of operation. Using the heater longer than
three hours does not improve system
performance and unnecessarily uses
electricity.
161
Navigator (TB5) Canada/United States of America, enUSA, First Printing Starting and Stopping the Engine
Page 170 of 419
1. Stop your vehicle as soon as safely
possible and shift the transmission into
park (P).
2. Switch the ignition off.
3. Open the fuel filler door and remove any
visible debris from the fuel fill opening.
4. Insert either the fuel fill nozzle or the fuel
fill funnel provided with the vehicle
several times to allow the inlet to close
properly. This will dislodge any debris
preventing the inlet from sealing.
If this action corrects the problem, the
message may not reset immediately. It may
take several driving cycles for the message
to turn off. A driving cycle consists of an
engine start-up (after 4 or more hours with
the engine off ) followed by city or highway
driving. Continuing to drive with the message
on may cause the service engine soon lamp
to turn on as well. FUEL CONSUMPTION
Empty reserve is the amount of fuel
remaining in the tank after the fuel gauge
indicates empty. The amount of usable fuel
in the empty reserve varies and should not
be relied upon to increase driving range.
•
The usable capacity of the fuel tank is
the amount of fuel that can be added into
the tank after the gauge indicates empty
• The advertised capacity is the total fuel
tank size. See Capacities and
Specifications (page 328). It is the
combined usable capacity plus the empty
reserve.
• Due to the empty reserve, you may not
be able to refuel the full amount of the
advertised capacity of the fuel tank even
when the fuel gauge reads empty. Filling the Tank
For consistent results when refueling:
•
Turn the ignition off before fueling; an
inaccurate reading results if the engine
is left running.
• Use the same fill rate (low-medium-high)
each time the tank is filled.
• Allow no more than two automatic
click-offs when filling.
Results are most accurate when the filling
method is consistent.
Calculating Fuel Economy
Do not measure fuel economy during the
first 1,000 mi (1,600 km) of driving (this is your
engine ’s break-in period). A more accurate
measurement is obtained after
2,000 mi
(3,200 km) to 3,000 mi (4,800 km). Also, fuel
expense, frequency of fill ups or fuel gauge
readings are not accurate ways to measure
fuel economy.
1. Fill the fuel tank completely and record the initial odometer reading.
167
Navigator (TB5) Canada/United States of America, enUSA, First Printing Fuel and Refueling
Page 173 of 419
You can correct these temporary
malfunctions by filling the fuel tank with good
quality fuel, properly closing the fuel fill inlet
or letting the electrical system dry out. After
three driving cycles without these or any
other temporary malfunctions present, the
service engine soon indicator should stay off
the next time you start the engine. A driving
cycle consists of a cold engine startup
followed by mixed city/highway driving. No
additional vehicle service is required.
If the service engine soon indicator remains
on, have your vehicle serviced at the first
available opportunity. Although some
malfunctions detected by the OBD-II may not
have symptoms that are apparent, continued
driving with the service engine soon indicator
on can result in increased emissions, lower
fuel economy, reduced engine and
transmission smoothness, and lead to more
costly repairs.
Readiness for Inspection/Maintenance
(I/M) Testing
Some state/provincial and local governments
may have Inspection/Maintenance (I/M)
programs to inspect the emission control
equipment on your vehicle. Failure to pass
this inspection could prevent you from
getting a vehicle registration. If the service engine soon indicator
is on or the bulb does not work,
you may need to have the vehicle
serviced. See On-Board Diagnostics (OBD-II).
Your vehicle may not pass the I/M test if the
service engine soon indicator is on or not
working properly (bulb is burned out), or if
the OBD-II system has determined that some
of the emission control systems have not
been properly checked. In this case, your
vehicle is not ready for I/M testing.
If the vehicle ’s engine or transmission has
just been serviced, or the battery has
recently run down or been replaced, the
OBD-II system may indicate that the vehicle
is not ready for I/M testing. To determine if
the vehicle is ready for I/M testing, turn the ignition key to the on position for 15 seconds
without cranking the engine. If the service
engine soon indicator blinks eight times, it
means that the vehicle is not ready for I/M
testing; if the service engine soon indicator
stays on solid, it means that the vehicle is
ready for I/M testing.
The OBD-II system monitors the emission
control system during normal driving. A
complete check may take several days. If the
vehicle is not ready for I/M testing, you may
need to perform the following driving cycle
consisting of mixed city and highway driving:
Drive on an expressway or highway for a
steady 15 minutes, followed by 20 minutes
of stop-and-go driving with at least four
30-second idle periods.
Allow the vehicle to sit for at least eight hours
without starting the engine. Then, start the
engine and complete the above driving
cycle. The engine must warm up to its normal
operating temperature. Once started, do not
turn off the engine until the above driving
cycle is complete. If the vehicle is still not
ready for I/M testing, you will have to repeat
the above driving cycle.
170
Navigator (TB5) Canada/United States of America, enUSA, First Printing Fuel and Refueling
Page 174 of 419
AUTOMATIC TRANSMISSION
WARNINGS
Always set the parking brake fully and
latch the gearshift in park (P). Turn the
ignition to the off position and remove the
key whenever you leave your vehicle. Do not use the tow/haul feature when
driving in icy or slippery conditions as
the increased engine braking can cause the
rear wheels to slide and your vehicle to
swing around with the possible loss of
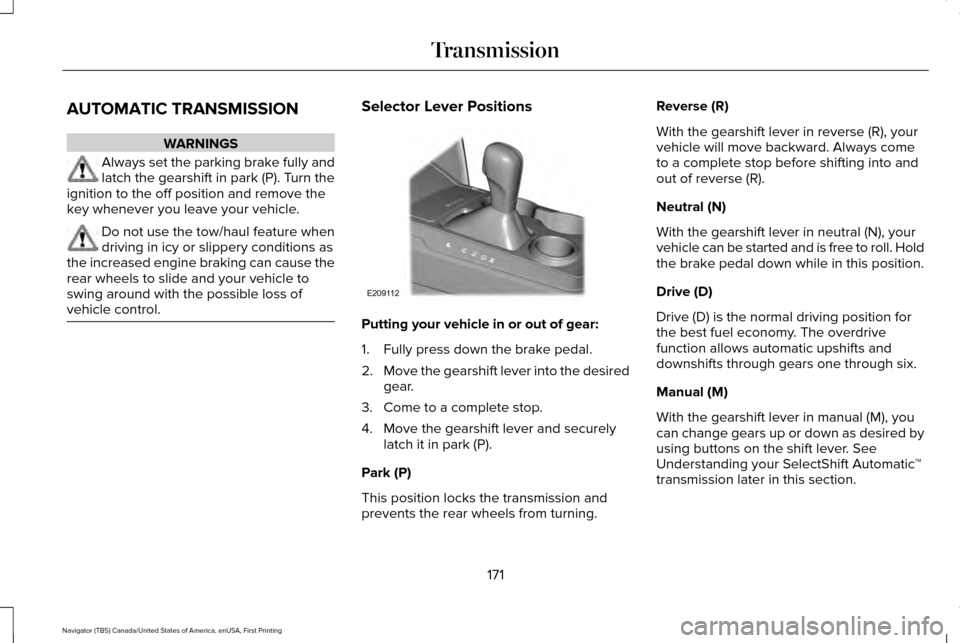
vehicle control. Selector Lever Positions
Putting your vehicle in or out of gear:
1. Fully press down the brake pedal.
2.
Move the gearshift lever into the desired
gear.
3. Come to a complete stop.
4. Move the gearshift lever and securely latch it in park (P).
Park (P)
This position locks the transmission and
prevents the rear wheels from turning. Reverse (R)
With the gearshift lever in reverse (R), your
vehicle will move backward. Always come
to a complete stop before shifting into and
out of reverse (R).
Neutral (N)
With the gearshift lever in neutral (N), your
vehicle can be started and is free to roll. Hold
the brake pedal down while in this position.
Drive (D)
Drive (D) is the normal driving position for
the best fuel economy. The overdrive
function allows automatic upshifts and
downshifts through gears one through six.
Manual (M)
With the gearshift lever in manual (M), you
can change gears up or down as desired by
using buttons on the shift lever. See
Understanding your SelectShift Automatic
™
transmission later in this section.
171
Navigator (TB5) Canada/United States of America, enUSA, First Printing TransmissionE209112
Page 178 of 419
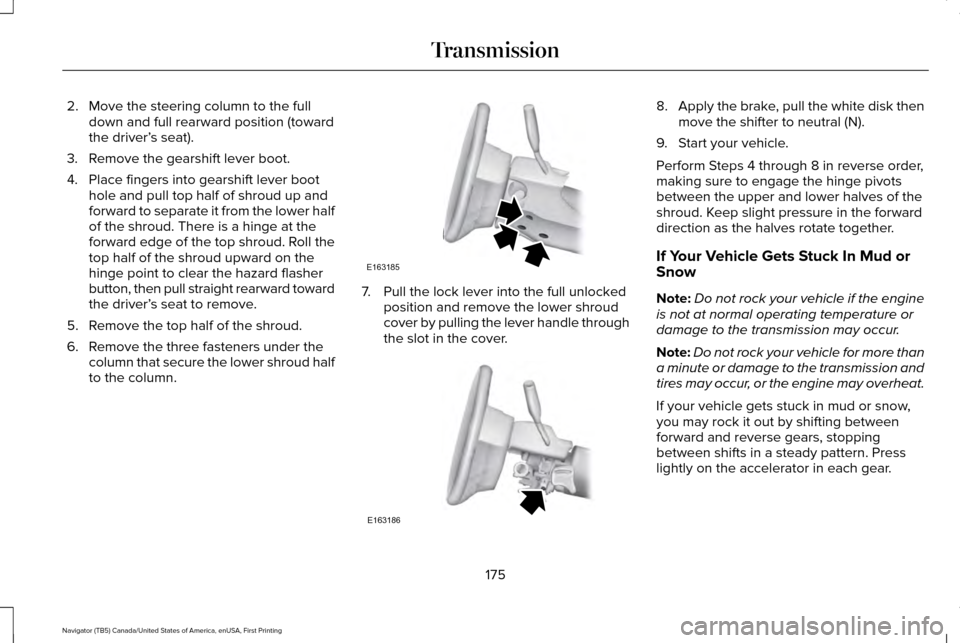
2. Move the steering column to the full
down and full rearward position (toward
the driver’ s seat).
3. Remove the gearshift lever boot.
4. Place fingers into gearshift lever boot hole and pull top half of shroud up and
forward to separate it from the lower half
of the shroud. There is a hinge at the
forward edge of the top shroud. Roll the
top half of the shroud upward on the
hinge point to clear the hazard flasher
button, then pull straight rearward toward
the driver’ s seat to remove.
5. Remove the top half of the shroud.
6. Remove the three fasteners under the column that secure the lower shroud half
to the column. 7. Pull the lock lever into the full unlocked
position and remove the lower shroud
cover by pulling the lever handle through
the slot in the cover. 8.
Apply the brake, pull the white disk then
move the shifter to neutral (N).
9. Start your vehicle.
Perform Steps 4 through 8 in reverse order,
making sure to engage the hinge pivots
between the upper and lower halves of the
shroud. Keep slight pressure in the forward
direction as the halves rotate together.
If Your Vehicle Gets Stuck In Mud or
Snow
Note: Do not rock your vehicle if the engine
is not at normal operating temperature or
damage to the transmission may occur.
Note: Do not rock your vehicle for more than
a minute or damage to the transmission and
tires may occur, or the engine may overheat.
If your vehicle gets stuck in mud or snow,
you may rock it out by shifting between
forward and reverse gears, stopping
between shifts in a steady pattern. Press
lightly on the accelerator in each gear.
175
Navigator (TB5) Canada/United States of America, enUSA, First Printing TransmissionE163185 E163186
Page 184 of 419
“Tread Lightly” is an educational program
designed to increase public awareness of
land-use regulations and responsibilities in
our nations wilderness areas. Ford Motor
Company joins the U.S. Forest Service and
the Bureau of Land Management in
encouraging you to help preserve our
national forest and other public and private
lands by “treading lightly”
.
Driving on Hilly or Sloping Terrain
Note: Avoid driving crosswise or turning on
steep slopes or hills.
Note: Avoid turning on steep slopes or hills.
A danger lies in losing traction, slipping
sideways and possible vehicle roll over.
Whenever driving on a hill, determine
beforehand the route you will use. Do not
drive over the crest of a hill without seeing
what conditions are on the other side. Do
not drive in reverse over a hill without the
aid of an observer.
Although natural obstacles may make it
necessary to travel diagonally up or down a
hill or steep incline, you should always try to
drive straight up or straight down. When climbing a steep slope or hill, start in
a lower gear rather than downshifting to a
lower gear from a higher gear once the
ascent has started. This reduces strain on
the engine and the possibility of stalling.
If your vehicle stalls, do not try to turn around
because this could cause vehicle roll over.
It is better to reverse back to a safe location.
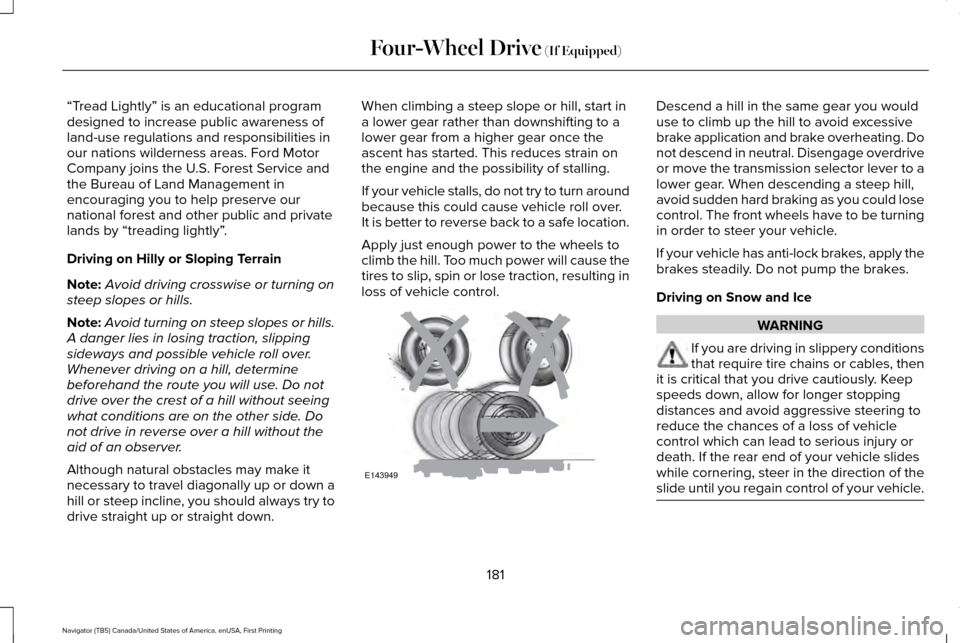
Apply just enough power to the wheels to
climb the hill. Too much power will cause the
tires to slip, spin or lose traction, resulting in
loss of vehicle control. Descend a hill in the same gear you would
use to climb up the hill to avoid excessive
brake application and brake overheating. Do
not descend in neutral. Disengage overdrive
or move the transmission selector lever to a
lower gear. When descending a steep hill,
avoid sudden hard braking as you could lose
control. The front wheels have to be turning
in order to steer your vehicle.
If your vehicle has anti-lock brakes, apply the
brakes steadily. Do not pump the brakes.
Driving on Snow and Ice
WARNING
If you are driving in slippery conditions
that require tire chains or cables, then
it is critical that you drive cautiously. Keep
speeds down, allow for longer stopping
distances and avoid aggressive steering to
reduce the chances of a loss of vehicle
control which can lead to serious injury or
death. If the rear end of your vehicle slides
while cornering, steer in the direction of the
slide until you regain control of your vehicle. 181
Navigator (TB5) Canada/United States of America, enUSA, First Printing Four-Wheel Drive (If Equipped)E143949
Page 185 of 419
Note:
Excessive tire slippage can cause
transmission damage.
Four-wheel drive vehicles have advantages
over two-wheel drive vehicles in snow and
ice but can skid like any other vehicle.
Should you start to slide while driving on
snowy or icy roads, turn the steering wheel
in the direction of the slide until you regain
control.
Avoid sudden applications of power and
quick changes of direction on snow and ice.
Apply the accelerator slowly and steadily
when starting from a full stop.
Avoid sudden braking. Although a four-wheel
drive vehicle may accelerate better than a
two-wheel drive vehicle in snow and ice, it
will not stop any faster as braking occurs at
all four wheels. Do not become
overconfident as to road conditions.
Make sure you allow sufficient distance
between you and other vehicles for stopping.
Drive slower than usual and consider using
one of the lower gears. In emergency
stopping situations, apply the brake steadily.
Do not pump the brake pedal. See Hints on
Driving With Anti-Lock Brakes (page 184). Maintenance and Modifications
The suspension and steering systems on
your vehicle have been designed and tested
to provide predictable performance whether
loaded or empty. For this reason, we strongly
recommend that you do not make
modifications such as adding or removing
parts (i.e. lift kits or stabilizer bars) or by using
replacement parts not equivalent to the
original factory equipment.
We recommend that you use caution when
your vehicle has either a high load or device
(i.e. ladder or luggage racks). Any
modifications to your vehicle that raise the
center of gravity may cause your vehicle to
roll over when there is a loss of vehicle
control.
Failure to maintain your vehicle correctly may
void the warranty, increase your repair cost,
reduce vehicle performance and operational
capabilities and adversely affect you and
your passenger's safety. We recommend you
frequently inspect your vehicle's chassis
components when your vehicle is subject to
off road usage.
182
Navigator (TB5) Canada/United States of America, enUSA, First Printing Four-Wheel Drive
(If Equipped)