headlamp LINCOLN NAVIGATOR 2018 User Guide
[x] Cancel search | Manufacturer: LINCOLN, Model Year: 2018, Model line: NAVIGATOR, Model: LINCOLN NAVIGATOR 2018Pages: 649, PDF Size: 4.96 MB
Page 119 of 649
Note:Do not resume your journey if itilluminates despite the level being correct.Have the system checked by your authorizeddealer immediately.
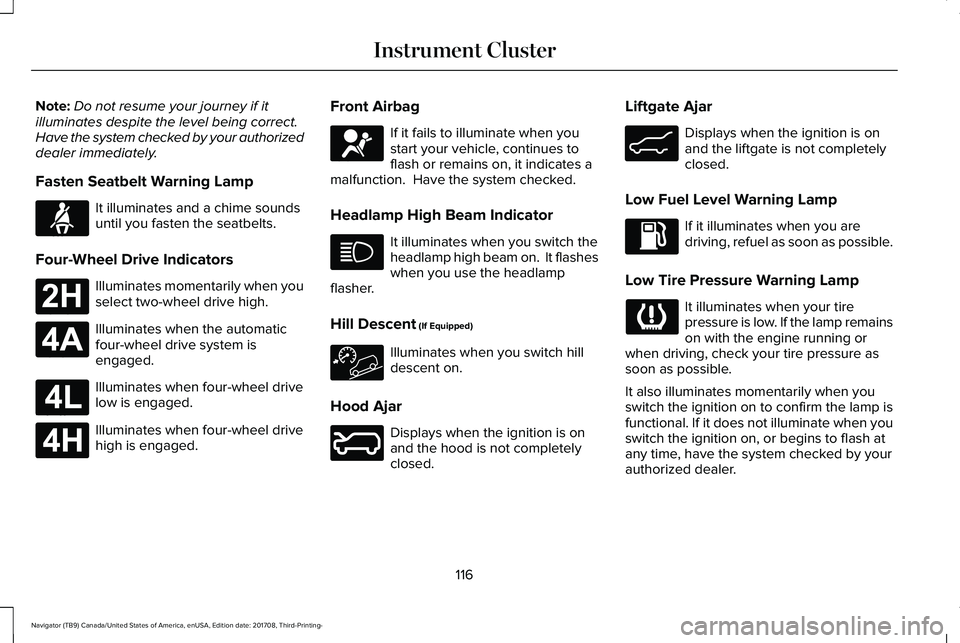
Fasten Seatbelt Warning Lamp
It illuminates and a chime soundsuntil you fasten the seatbelts.
Four-Wheel Drive Indicators
Illuminates momentarily when youselect two-wheel drive high.
Illuminates when the automaticfour-wheel drive system isengaged.
Illuminates when four-wheel drivelow is engaged.
Illuminates when four-wheel drivehigh is engaged.
Front Airbag
If it fails to illuminate when youstart your vehicle, continues toflash or remains on, it indicates amalfunction. Have the system checked.
Headlamp High Beam Indicator
It illuminates when you switch theheadlamp high beam on. It flasheswhen you use the headlampflasher.
Hill Descent (If Equipped)
Illuminates when you switch hilldescent on.
Hood Ajar
Displays when the ignition is onand the hood is not completelyclosed.
Liftgate Ajar
Displays when the ignition is onand the liftgate is not completelyclosed.
Low Fuel Level Warning Lamp
If it illuminates when you aredriving, refuel as soon as possible.
Low Tire Pressure Warning Lamp
It illuminates when your tirepressure is low. If the lamp remainson with the engine running orwhen driving, check your tire pressure assoon as possible.
It also illuminates momentarily when youswitch the ignition on to confirm the lamp isfunctional. If it does not illuminate when youswitch the ignition on, or begins to flash atany time, have the system checked by yourauthorized dealer.
116
Navigator (TB9) Canada/United States of America, enUSA, Edition date: 201708, Third-Printing-
Instrument ClusterE71880 E181778 E181781 E181780 E181779 E67017 E246598 E162453
Page 120 of 649

Low Beam Malfunction Warning Lamp
It illuminates when there is amalfunction with the low beamheadlamp bulb.
Low Washer Fluid Level Warning Lamp
It illuminates when the washer fluidis low.
Parking Lamps
Illuminates when you switch theparking lamps on.
Powertrain Fault
Illuminates when a powertrain oran 4WD fault has been detected. Contact an authorized dealer.
Service Engine Soon
If it illuminates when the engine isrunning this indicates amalfunction. The On BoardDiagnostics system has detected amalfunction of the vehicle emission controlsystem.
If it flashes, engine misfire may be occurring.Increased exhaust gas temperatures coulddamage the catalytic converter or othervehicle components. Drive in a moderatefashion (avoid heavy acceleration anddeceleration) and have your vehicleimmediately serviced.
It illuminates when you switch the ignitionon prior to engine start to check the bulb andto indicate whether your vehicle is ready forInspection and Maintenance (I/M) testing.
Normally, it illuminates until the engine iscranked and automatically turns off if nomalfunctions are present. However, if after15 seconds it flashes eight times, thisindicates that your vehicle is not ready forInspection and Maintenance (I/M) testing.
See Catalytic Converter (page 207).
Stability Control and Traction ControlIndicator
Flashes during operation.
If it does not illuminate when youswitch the ignition on, or remainson when the engine is running, this indicatesa malfunction. Have your vehicle checkedas soon as possible.
See Using Stability Control (page 234).
Stability Control and Traction ControlOff Warning Lamp
It illuminates when you switch thesystem off.
Tow Haul Indicator (If Equipped)
It illuminates when you switch thesystem on.
117
Navigator (TB9) Canada/United States of America, enUSA, Edition date: 201708, Third-Printing-
Instrument ClusterE181350 E132353 E138639 E130458 E246592
Page 121 of 649
AUDIBLE WARNINGS AND
INDICATORS
Key in Ignition Warning Chime
Sounds when you open the driver's door andyou have left the key in the ignition.
Keyless Warning Alert (If Equipped)
Sounds the horn twice when you exit yourvehicle with the intelligent access key, afterthe last door is closed and your keylessvehicle is in RUN, indicating your vehicle isstill on.
Headlamps On Warning Chime
Sounds when you remove the key from theignition and open the driver's door and youhave left the headlamps or parking lampson.
Parking Brake On Warning Chime
Sounds when you have left the parking brakeon and drive your vehicle. If the warningchime remains on after you have releasedthe parking brake, have the system checkedby an authorized dealer immediately.
118
Navigator (TB9) Canada/United States of America, enUSA, Edition date: 201708, Third-Printing-
Instrument Cluster
Page 129 of 649
Adaptive Headlamps
ActionMessage
Displays when a fault with the system has occurred. Contact an authorized dealer as soon aspossible.Check Headlamp System See Manual
Alarm
ActionMessage
The alarm has been triggered due to unauthorized entry. See Anti-Theft Alarm (page 86).Vehicle Alarm To Stop Alarm, Start Vehicle.
Automatic Engine Shutdown
ActionMessage
The engine is getting ready to shut off.Vehicle Shuts Off In {seconds:#0} Seconds
The engine has shut off to help increase fuel economy.Vehicle Shut Off to Save Energy
The engine is getting ready to shut off. You can press OK on the left steering wheel button tooverride the shut down.Vehicle Shuts Off in {seconds:#0} SecondsPress Ok to Override
126
Navigator (TB9) Canada/United States of America, enUSA, Edition date: 201708, Third-Printing-
Information Displays
Page 153 of 649
Maintaining Your Head Up Display
•Do not place objects onto the transparentcover, as they may block you from seeingportions of the image. These objectscould also damage the cover and affectthe quality of the projected image.
•The system uses a special windshielddesigned to provide the optimum imagequality. You must replace the windshieldin a vehicle with this system with acertified original equipmentmanufactured (OEM) head up displaywindshield. Replacing this system'swindshield with a non-head up displaywindshield causes a double image ordistorted image. Have an authorizeddealer or authorized repair facility replacethe windshield.
•Light conditions such as oncomingheadlamps, sunrise, sunset or reflectionsoff of wet road surfaces can affect thedriver's ability to see the HUD image.
•Clean the windshield often for optimalHUD performance. See Cleaning theWindows and Wiper Blades (page 385).
150
Navigator (TB9) Canada/United States of America, enUSA, Edition date: 201708, Third-Printing-
Information Displays
Page 195 of 649
Press the push button ignition switch oncewithout your foot on the brake pedal. It is onthe instrument panel near the steering wheel.All electrical circuits and accessories areoperational and the warning lamps andindicators illuminate.
Press the push button ignition switch againwithout your foot on the brake pedal toswitch the ignition off.
STARTING A GASOLINE ENGINE
When you start the engine, the idle speedincreases.
This helps to warm up the engine. If theengine idle speed does not slow downautomatically, have your vehicle checked byan authorized dealer.
Note: You can crank the engine for a totalof 60 seconds without the engine startingbefore the starting system temporarilydisables. The 60 seconds does not have tobe all at once. For example, if you crank theengine three times for 20 seconds each time,without the engine starting, you reached the60-second time limit. You cannot attemptto start the engine for at least 15 minutes. After 15 minutes, you are limited to a15-second engine cranking time. You needto wait 60 minutes before you can crank theengine for 60 seconds again.
Before starting your vehicle, check thefollowing:
•Make sure all occupants have fastenedtheir seatbelts.
•Make sure the headlamps and electricalaccessories are off.
•Make sure the parking brake is on.
•Make sure the transmission is in park (P).
Note:Do not touch the accelerator pedal.
Note:You must have your intelligent accesskey in your vehicle to shift the transmissionout of park (P).
1. Fully depress the brake pedal.
2. Press the push button ignition switch.
The system does not function if:
•The passive key frequencies are jammed.
•The key battery has no charge.
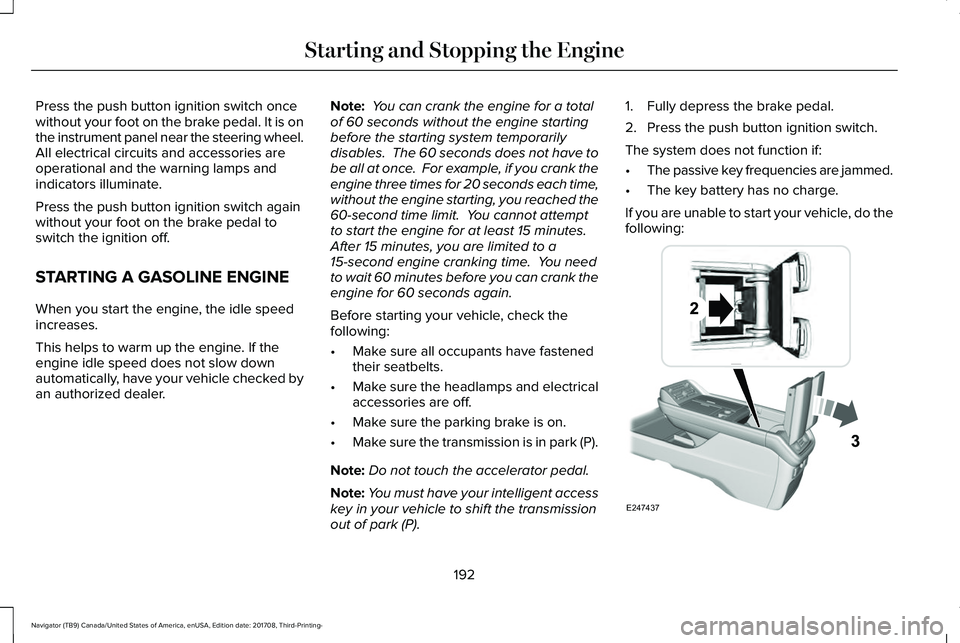
If you are unable to start your vehicle, do thefollowing:
192
Navigator (TB9) Canada/United States of America, enUSA, Edition date: 201708, Third-Printing-
Starting and Stopping the EngineE247437
Page 272 of 649
Intensity: This setting affects the intensity ofthe steering wheel vibration used for the alertand alert and aid modes. This setting doesnot affect the aid mode.
•Low.
•Medium.
•High.
System Display
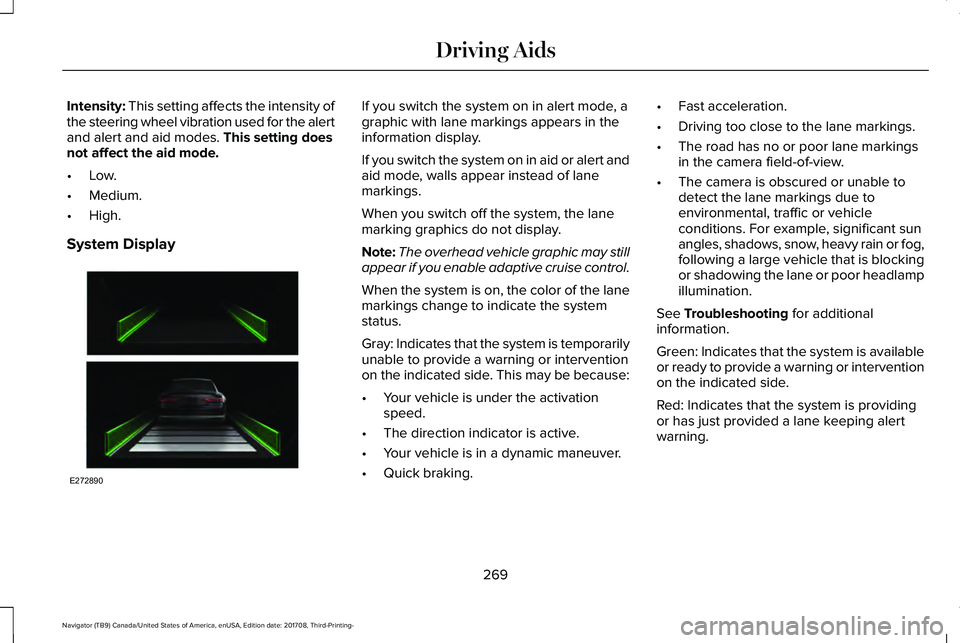
If you switch the system on in alert mode, agraphic with lane markings appears in theinformation display.
If you switch the system on in aid or alert andaid mode, walls appear instead of lanemarkings.
When you switch off the system, the lanemarking graphics do not display.
Note:The overhead vehicle graphic may stillappear if you enable adaptive cruise control.
When the system is on, the color of the lanemarkings change to indicate the systemstatus.
Gray: Indicates that the system is temporarilyunable to provide a warning or interventionon the indicated side. This may be because:
•Your vehicle is under the activationspeed.
•The direction indicator is active.
•Your vehicle is in a dynamic maneuver.
•Quick braking.
•Fast acceleration.
•Driving too close to the lane markings.
•The road has no or poor lane markingsin the camera field-of-view.
•The camera is obscured or unable todetect the lane markings due toenvironmental, traffic or vehicleconditions. For example, significant sunangles, shadows, snow, heavy rain or fog,following a large vehicle that is blockingor shadowing the lane or poor headlampillumination.
See Troubleshooting for additionalinformation.
Green: Indicates that the system is availableor ready to provide a warning or interventionon the indicated side.
Red: Indicates that the system is providingor has just provided a lane keeping alertwarning.
269
Navigator (TB9) Canada/United States of America, enUSA, Edition date: 201708, Third-Printing-
Driving AidsE272890
Page 358 of 649
Protected ComponentFuse RatingFuse or Relay Number
Extended power mode module (EPM).10A214Brake Switch.
Smart datalink connector Power (SDLC).10A215
Liftglass release relay.15A116
Telematics control unit - modem.5A217
Push-button start switch.5A218
Not used (spare).7.5A219
Headlamp control module (HCM).7.5A220
In-car temperature and humidity sensor.5A221
Electrochromic (EC) mirror.5A2222nd row heated seat module.
Moonroof (logic).10A123Inverter (LIN logic).Power window switch.Power mirror switch.DVD player (if equipped).
355
Navigator (TB9) Canada/United States of America, enUSA, Edition date: 201708, Third-Printing-
Fuses
Page 379 of 649
Run the tip of your fingers over the edge ofthe blade to check for roughness.
Clean the wiper blades with washer fluid orwater applied with a soft sponge or cloth.
CHANGING THE WIPER BLADES
Note:Do not hold the wiper blade whenlifting the wiper arm.
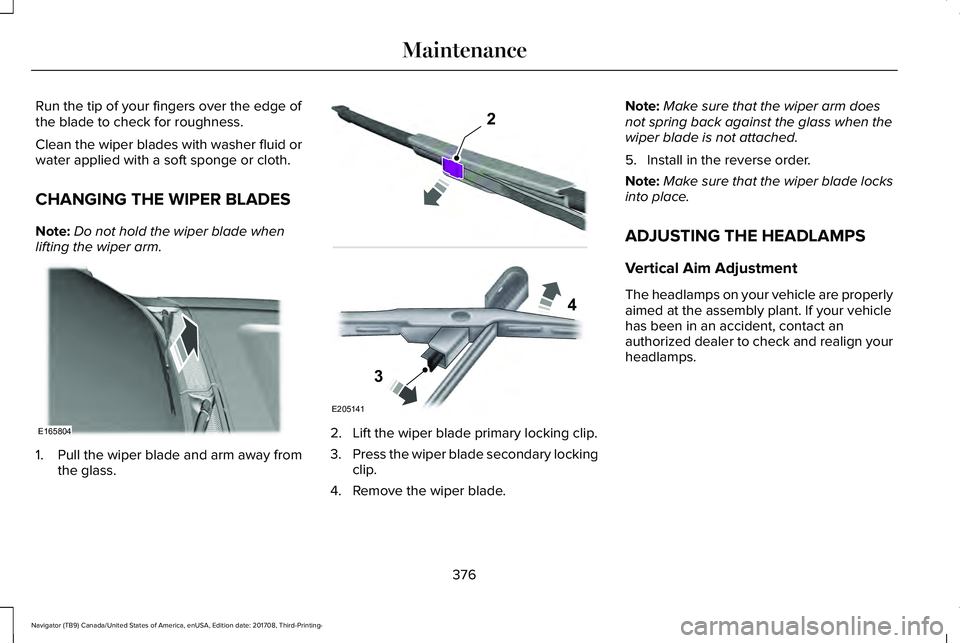
1. Pull the wiper blade and arm away fromthe glass.
2. Lift the wiper blade primary locking clip.
3.Press the wiper blade secondary lockingclip.
4. Remove the wiper blade.
Note:Make sure that the wiper arm doesnot spring back against the glass when thewiper blade is not attached.
5. Install in the reverse order.
Note:Make sure that the wiper blade locksinto place.
ADJUSTING THE HEADLAMPS
Vertical Aim Adjustment
The headlamps on your vehicle are properlyaimed at the assembly plant. If your vehiclehas been in an accident, contact anauthorized dealer to check and realign yourheadlamps.
376
Navigator (TB9) Canada/United States of America, enUSA, Edition date: 201708, Third-Printing-
MaintenanceE165804 E205141
2
3
4
Page 380 of 649
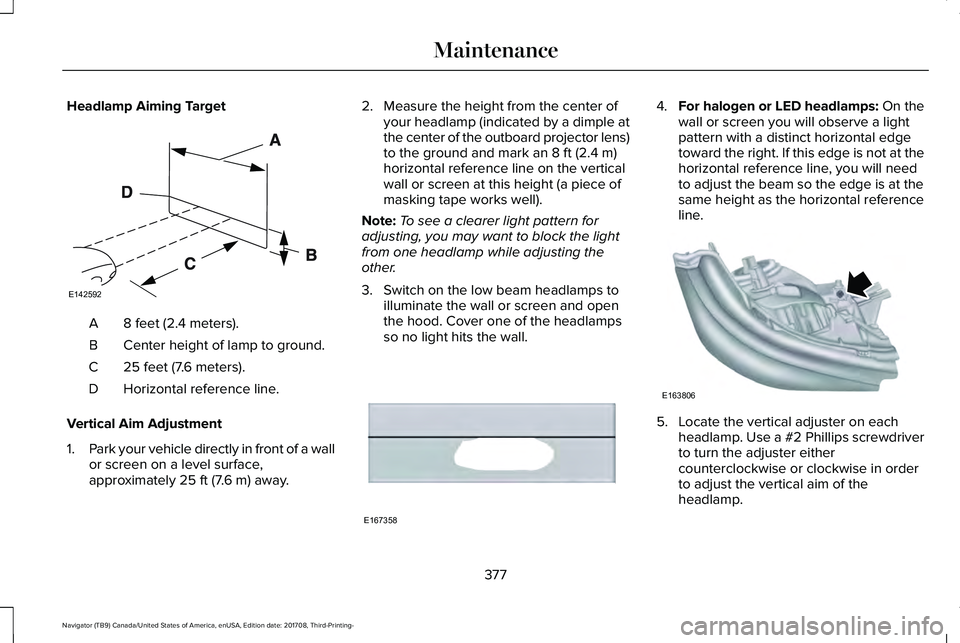
Headlamp Aiming Target
8 feet (2.4 meters).A
Center height of lamp to ground.B
25 feet (7.6 meters).C
Horizontal reference line.D
Vertical Aim Adjustment
1.Park your vehicle directly in front of a wallor screen on a level surface,approximately 25 ft (7.6 m) away.
2. Measure the height from the center ofyour headlamp (indicated by a dimple atthe center of the outboard projector lens)to the ground and mark an 8 ft (2.4 m)horizontal reference line on the verticalwall or screen at this height (a piece ofmasking tape works well).
Note:To see a clearer light pattern foradjusting, you may want to block the lightfrom one headlamp while adjusting theother.
3. Switch on the low beam headlamps toilluminate the wall or screen and openthe hood. Cover one of the headlampsso no light hits the wall.
4.For halogen or LED headlamps: On thewall or screen you will observe a lightpattern with a distinct horizontal edgetoward the right. If this edge is not at thehorizontal reference line, you will needto adjust the beam so the edge is at thesame height as the horizontal referenceline.
5. Locate the vertical adjuster on eachheadlamp. Use a #2 Phillips screwdriverto turn the adjuster eithercounterclockwise or clockwise in orderto adjust the vertical aim of theheadlamp.
377
Navigator (TB9) Canada/United States of America, enUSA, Edition date: 201708, Third-Printing-
MaintenanceE142592 E167358 E163806