brake light LINCOLN NAVIGATOR 2018 Owners Manual
[x] Cancel search | Manufacturer: LINCOLN, Model Year: 2018, Model line: NAVIGATOR, Model: LINCOLN NAVIGATOR 2018Pages: 649, PDF Size: 4.96 MB
Page 12 of 649
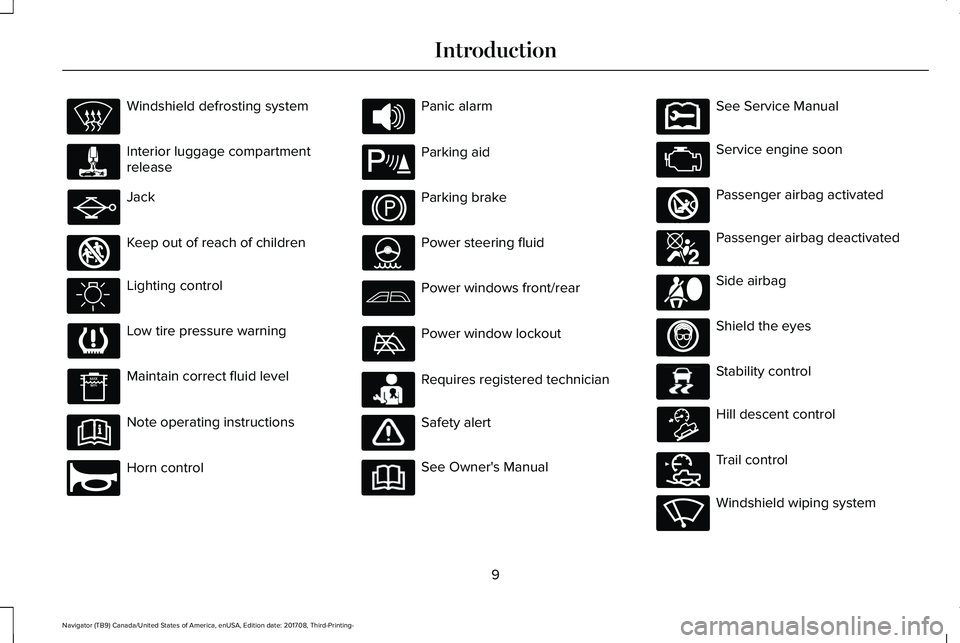
Windshield defrosting system
Interior luggage compartmentrelease
Jack
Keep out of reach of children
Lighting control
Low tire pressure warning
Maintain correct fluid level
Note operating instructions
Horn control
Panic alarm
Parking aid
Parking brake
Power steering fluid
Power windows front/rear
Power window lockout
Requires registered technician
Safety alert
See Owner's Manual
See Service Manual
Service engine soon
Passenger airbag activated
Passenger airbag deactivated
Side airbag
Shield the eyes
Stability control
Hill descent control
Trail control
Windshield wiping system
9
Navigator (TB9) Canada/United States of America, enUSA, Edition date: 201708, Third-Printing-
Introduction E161353 E270945 E139213 E231159 E231158 E270849 E270850 E167012 E138639 E163957 E272858 E270969
Page 52 of 649
Deactivating and Activating the Belt-MinderFeature
WARNING: While the system allowsyou to deactivate it, this system is designedto improve your chances of being safelybelted and surviving an accident. Werecommend you leave the systemactivated for yourself and others who mayuse the vehicle.
Note:The driver and front passengerwarnings switch on and off independently.When you perform this procedure for oneseating position, do not buckle the otherposition as this will terminate the process.
Read Steps 1 - 4 thoroughly beforeproceeding with the programmingprocedure.
Before following the procedure, make surethat:
•The parking brake is set.
•The transmission is in park (P).
•The ignition is off.
•All vehicle doors are closed.
•The driver and front passenger seatbeltsare unbuckled.
1. Switch the ignition on. Do not start theengine.
2.Wait until the seatbelt warning light turnsoff (about one minute). After Step 2, waitan additional 5 seconds beforeproceeding with Step 3. Once you startStep 3, you must complete the procedurewithin 60 seconds.
3.For the seating position you are switchingoff, buckle then unbuckle the seatbeltthree times at a moderate speed, endingin the unbuckled state. After Step 3, theseatbelt warning light turns on.
4. While the seatbelt warning light is on,buckle then unbuckle the seatbelt. AfterStep 4, the seatbelt warning light flashesfor confirmation.
•This will switch the feature off for thatseating position if it is currently on.
•This will switch the feature on for thatseating position if it is currently off.
CHILD RESTRAINT AND SEATBELT
MAINTENANCE
Inspect the vehicle seatbelts and child safetyseat systems periodically to make sure theywork properly and are not damaged. Inspectthe vehicle and child restraint seatbelts tomake sure there are no nicks, tears or cuts.Replace if necessary. All vehicle seatbeltassemblies, including retractors, buckles,front seatbelt buckle assemblies, bucklesupport assemblies (slide bar-if equipped),shoulder belt height adjusters (if equipped),shoulder belt guide on seat backrest (ifequipped), child safety seat LATCH andtether anchors, and attaching hardware,should be inspected after a crash. Read thechild restraint manufacturer's instructions foradditional inspection and maintenanceinformation specific to the child restraint.
49
Navigator (TB9) Canada/United States of America, enUSA, Edition date: 201708, Third-Printing-
Seatbelts
Page 101 of 649
Windshield Wiper Activated Headlamps
When you switch the autolamps on, theheadlamps turn on within 10 seconds ofswitching the wipers on. They turn offapproximately 60 seconds after you switchthe windshield wipers off.
The headlamps do not turn on with thewipers:
•During a single wipe.
•When using the windshield washers.
•If the wipers are in intermittent mode.
Note:If you switch the autolamps and theautowipers on, the headlamps turn on whenthe windshield wipers continuously operate.
INSTRUMENT LIGHTING DIMMER
Note:If you disconnect and connect thebattery, or fully discharge and charge thebattery, the illuminated components switchto the maximum setting.
HEADLAMP EXIT DELAY
After you switch the ignition off, you canswitch the headlamps on by pulling thedirection indicator lever toward you. You willhear a short tone. The headlamps will switchoff automatically after three minutes with anydoor open or 30 seconds after the last doorhas been closed. You can cancel this featureby pulling the direction indicator toward youagain or switching the ignition on.
DAYTIME RUNNING LAMPS
WARNING: The daytime runninglamps system does not activate the rearlamps and may not provide adequatelighting during low visibility drivingconditions. Make sure you switch theheadlamps on, as appropriate, during alllow visibility conditions. Failure to do somay result in a crash.
Type One - Conventional (Non-Configurable)
The daytime running lamps turn on when:
1. Switching the ignition on.
2. The transmission is not in park (P) forvehicles with automatic transmissions, orreleasing the parking brake for vehicleswith manual transmissions.
3. The lighting control is in the off, parkinglamp or autolamps positions.
4. The headlamps are off.
98
Navigator (TB9) Canada/United States of America, enUSA, Edition date: 201708, Third-Printing-
LightingE254204
Page 102 of 649
Type Two - Configurable
Switch the daytime running lamps on or offusing the information display. SeeInformation Displays (page 119).
The daytime running lamps turn on when:
1. The lamps are on in the informationdisplay.
2. Switching the ignition on.
3. The transmission is not in park (P) forvehicles with automatic transmissions, orreleasing the parking brake for vehicleswith manual transmissions.
4. The lighting control is in the autolampsposition.
5. The headlamps are off.
The other lighting control switch positionsdo not turn on the daytime running lamps.
If the daytime running lamps are off in theinformation display, the lamps stay off in allswitch positions.
AUTOMATIC HIGH BEAM
CONTROL (IF EQUIPPED)
WARNING: The system does notrelieve you of your responsibility to drivewith due care and attention. You may needto override the system if it does not turnthe high beams on or off.
The system turns on high beams if it is darkenough and no other traffic is present. If itdetects an approaching vehicle’s headlampsor tail lamps, or street lighting ahead, thesystem turns off high beams before they candistract other road users. Low beams remainon.
Note:The system may not operate properlyif the sensor is blocked. Keep the windshieldfree from obstruction or damage.
Note:The system may not operate properlyin cold or inclement conditions. You canswitch on the high beams by overriding thesystem.
Note:If the system detects a blockage, forexample bird droppings, bug splatter, snowor ice, the system goes into low beam modeuntil you clear the blockage. A message mayappear in the information display if thecamera is blocked.
Note:Using much larger tires or equippingvehicle accessories such as snowplows canmodify your vehicle's ride height anddegrade automatic high beam controlperformance.
A camera sensor, centrally mounted behindthe windshield of your vehicle, continuouslymonitors conditions to turn the high beamson and off.
Once the system is active, the high beamsturn on if:
•The ambient light level is low enough.
•There is no traffic in front of your vehicle.
•The vehicle speed is greater thanapproximately 32 mph (51 km/h).
99
Navigator (TB9) Canada/United States of America, enUSA, Edition date: 201708, Third-Printing-
Lighting
Page 147 of 649
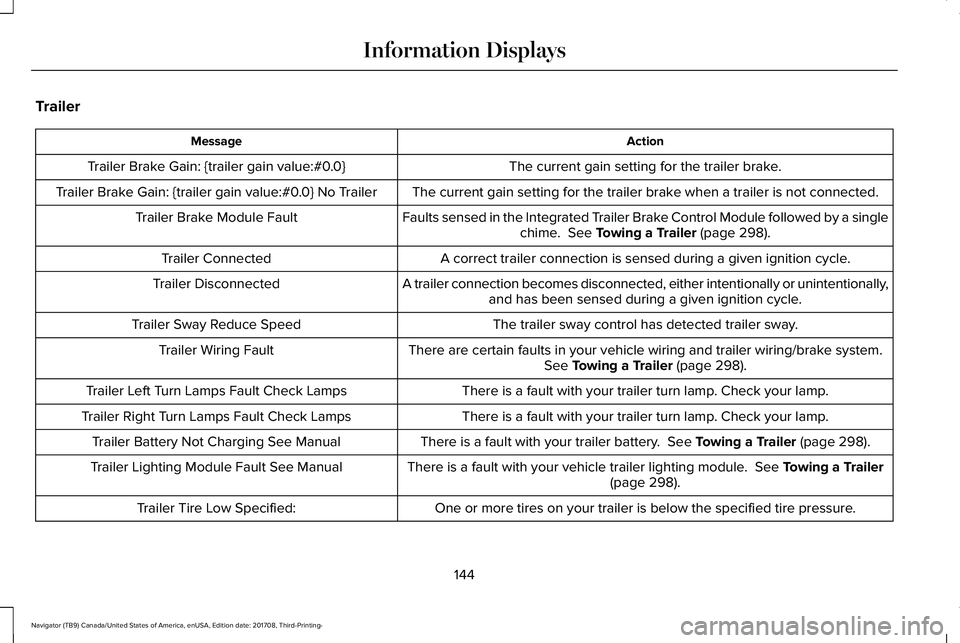
Trailer
ActionMessage
The current gain setting for the trailer brake.Trailer Brake Gain: {trailer gain value:#0.0}
The current gain setting for the trailer brake when a trailer is not connected.Trailer Brake Gain: {trailer gain value:#0.0} No Trailer
Faults sensed in the Integrated Trailer Brake Control Module followed by a singlechime. See Towing a Trailer (page 298).Trailer Brake Module Fault
A correct trailer connection is sensed during a given ignition cycle.Trailer Connected
A trailer connection becomes disconnected, either intentionally or unintentionally,and has been sensed during a given ignition cycle.Trailer Disconnected
The trailer sway control has detected trailer sway.Trailer Sway Reduce Speed
There are certain faults in your vehicle wiring and trailer wiring/brake system.See Towing a Trailer (page 298).Trailer Wiring Fault
There is a fault with your trailer turn lamp. Check your lamp.Trailer Left Turn Lamps Fault Check Lamps
There is a fault with your trailer turn lamp. Check your lamp.Trailer Right Turn Lamps Fault Check Lamps
There is a fault with your trailer battery. See Towing a Trailer (page 298).Trailer Battery Not Charging See Manual
There is a fault with your vehicle trailer lighting module. See Towing a Trailer(page 298).Trailer Lighting Module Fault See Manual
One or more tires on your trailer is below the specified tire pressure.Trailer Tire Low Specified:
144
Navigator (TB9) Canada/United States of America, enUSA, Edition date: 201708, Third-Printing-
Information Displays
Page 192 of 649
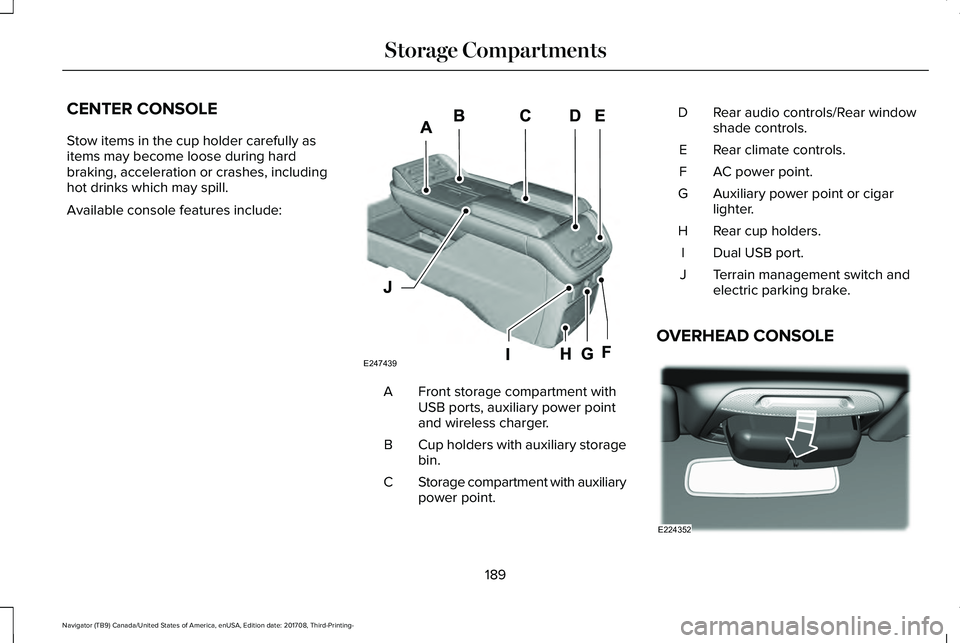
CENTER CONSOLE
Stow items in the cup holder carefully asitems may become loose during hardbraking, acceleration or crashes, includinghot drinks which may spill.
Available console features include:
Front storage compartment withUSB ports, auxiliary power pointand wireless charger.
A
Cup holders with auxiliary storagebin.B
Storage compartment with auxiliarypower point.C
Rear audio controls/Rear windowshade controls.D
Rear climate controls.E
AC power point.F
Auxiliary power point or cigarlighter.G
Rear cup holders.H
Dual USB port.I
Terrain management switch andelectric parking brake.J
OVERHEAD CONSOLE
189
Navigator (TB9) Canada/United States of America, enUSA, Edition date: 201708, Third-Printing-
Storage CompartmentsE247439 E224352
Page 200 of 649
•Elevation is below about 11,000 ft(3,350 m).
•Ambient temperature is moderate.
•If equipped with selectable drive modesand when you select Normal, Conserve,Slippery.
•The trailer is not connected.
•Tow haul mode not engaged.
•You have not selected Manual mode.
The green Auto-Start-Stopindicator light on the instrumentcluster will illuminates to indicatewhen the automatic engine stop occurs.
If the instrument cluster isequipped with a greyAuto-Start-Stop indicator light, itilluminates when automatic engine stop isnot available due to one of the above notedconditions not being met.
Automatic Engine Restart
Any of the following conditions results in anautomatic restart of the engine:
•You have removed your foot from thebrake pedal.
•You press the accelerator pedal.
•You press the accelerator and the brakepedal at the same time.
•The driver seatbelt becomes unfastenedor the driver door is ajar.
•Your vehicle is moving.
•The interior compartment does not meetcustomer comfort when air conditioningor heat is on.
•Fogging of the windows could occur andthe air conditioning is on.
•The battery is not within optimaloperating conditions.
•You have exceeded the maximum engineoff time.
•When you press the Auto-Start-Stopbutton with the engine automaticallystopped.
•The front defroster is turned to the Maxsetting.
•When you shift into park (P) the enginewill restart.
Any of the following conditions may result inan automatic restart of the engine:
•You have increased the blower fan speedor changed the climate controltemperature.
•You have an electrical accessory turnedon or plugged in.
Note:You may notice that the climate seatfan fluctuates during an automatic restart.
197
Navigator (TB9) Canada/United States of America, enUSA, Edition date: 201708, Third-Printing-
Unique Driving Characteristics E146361
Page 201 of 649
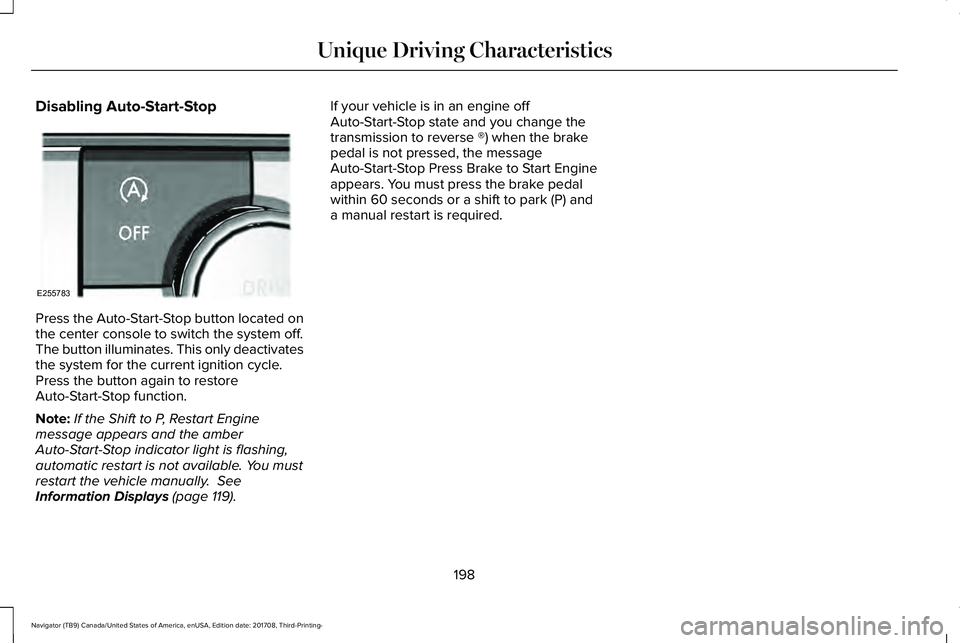
Disabling Auto-Start-Stop
Press the Auto-Start-Stop button located onthe center console to switch the system off.The button illuminates. This only deactivatesthe system for the current ignition cycle.Press the button again to restoreAuto-Start-Stop function.
Note:If the Shift to P, Restart Enginemessage appears and the amberAuto-Start-Stop indicator light is flashing,automatic restart is not available. You mustrestart the vehicle manually. SeeInformation Displays (page 119).
If your vehicle is in an engine offAuto-Start-Stop state and you change thetransmission to reverse ®) when the brakepedal is not pressed, the messageAuto-Start-Stop Press Brake to Start Engineappears. You must press the brake pedalwithin 60 seconds or a shift to park (P) anda manual restart is required.
198
Navigator (TB9) Canada/United States of America, enUSA, Edition date: 201708, Third-Printing-
Unique Driving CharacteristicsE255783
Page 207 of 649
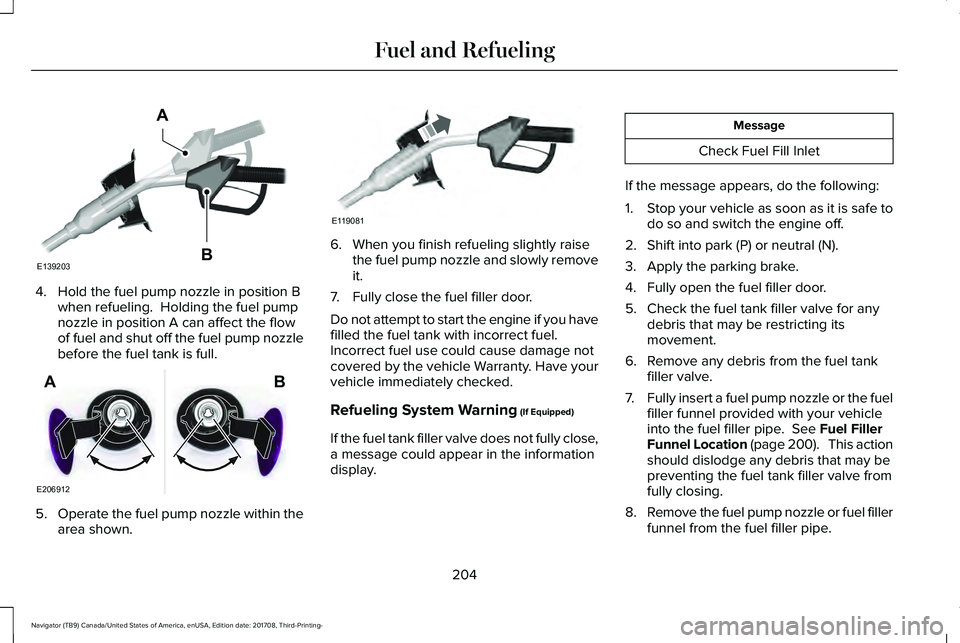
4. Hold the fuel pump nozzle in position Bwhen refueling. Holding the fuel pumpnozzle in position A can affect the flowof fuel and shut off the fuel pump nozzlebefore the fuel tank is full.
5.Operate the fuel pump nozzle within thearea shown.
6. When you finish refueling slightly raisethe fuel pump nozzle and slowly removeit.
7. Fully close the fuel filler door.
Do not attempt to start the engine if you havefilled the fuel tank with incorrect fuel.Incorrect fuel use could cause damage notcovered by the vehicle Warranty. Have yourvehicle immediately checked.
Refueling System Warning (If Equipped)
If the fuel tank filler valve does not fully close,a message could appear in the informationdisplay.
Message
Check Fuel Fill Inlet
If the message appears, do the following:
1.Stop your vehicle as soon as it is safe todo so and switch the engine off.
2. Shift into park (P) or neutral (N).
3. Apply the parking brake.
4. Fully open the fuel filler door.
5. Check the fuel tank filler valve for anydebris that may be restricting itsmovement.
6. Remove any debris from the fuel tankfiller valve.
7.Fully insert a fuel pump nozzle or the fuelfiller funnel provided with your vehicleinto the fuel filler pipe. See Fuel FillerFunnel Location (page 200). This actionshould dislodge any debris that may bepreventing the fuel tank filler valve fromfully closing.
8.Remove the fuel pump nozzle or fuel fillerfunnel from the fuel filler pipe.
204
Navigator (TB9) Canada/United States of America, enUSA, Edition date: 201708, Third-Printing-
Fuel and RefuelingE139203
A
B E206912
AB E119081
Page 215 of 649
Note:This only functions if your 12-voltbattery has power and the starter can spinthe engine. If vehicle battery voltage is notsufficient, an external 12-volt power sourcesuch as jumper cables, battery charger orjump pack may be required for this featureto function.
Note:Once in this mode, sufficient batteryvoltage must be maintained or your vehiclereturns to park.
WARNING: When doing thisprocedure, you need to take thetransmission out of park (P) which meansyour vehicle can roll freely. To avoidunwanted vehicle movement, always fullyapply the parking brake prior to doing thisprocedure. Use wheels chocks ifappropriate.
1. Do not press the brake pedal. Press theSTART/STOP button.
2. Fully press down on the brake pedal.Keep the brakes applied through step 7.
3. Press the accelerator pedal to the floorand hold through step 7.
4. Press the neutral (N) button on thetransmission selector.
5. Press the neutral (N) button again toenter Stay in Neutral mode.
6. Press and release the push to startbutton, the transmission needs aminimum of 2 seconds to exit park.
7. When neutral (N) is displayed, the brakeand accelerator pedals can be released.
To exit Stay in Neutral mode, select adifferent gear.
A message appears in your informationdisplay screen when your vehicle hasentered Stay in Neutral mode.
Drive (D)
Drive (D) is the normal driving position forthe best fuel economy. The overdrivefunction allows automatic upshifts anddownshifts through gears one through ten.
Adaptive Tow/Haul Mode
WARNING: Do not use tow/haulwhen the road surface is slippery. Failureto follow this instruction could result in theloss of control of your vehicle.
Adaptive tow/haul has two modes, automaticthat is enabled by default and off.
To turn adaptive tow/haul off or on, use theinformation display controls. See GeneralInformation (page 119). The indicator lightilluminates in the instrument cluster.
Key adaptive tow/haul features:
•The system remains in the same mode,even after a key cycle.
•Is only available in normal drive modes(Normal 2H and Normal 4A).
The adaptive tow/haul feature improvestransmission operation when towing a traileror a heavy load. All transmission gear rangesare available when using adaptive tow/haul.
For information on towing. See Towing (page298).
212
Navigator (TB9) Canada/United States of America, enUSA, Edition date: 201708, Third-Printing-
Transmission