change key battery LINCOLN NAVIGATOR 2018 Owners Manual
[x] Cancel search | Manufacturer: LINCOLN, Model Year: 2018, Model line: NAVIGATOR, Model: LINCOLN NAVIGATOR 2018Pages: 649, PDF Size: 4.96 MB
Page 65 of 649
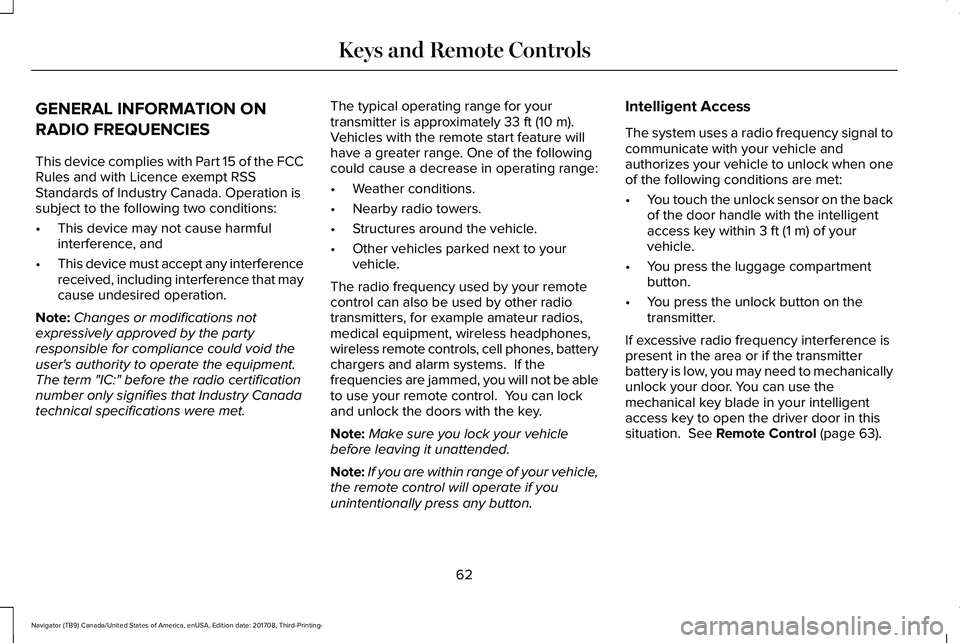
GENERAL INFORMATION ON
RADIO FREQUENCIES
This device complies with Part 15 of the FCCRules and with Licence exempt RSSStandards of Industry Canada. Operation issubject to the following two conditions:
•This device may not cause harmfulinterference, and
•This device must accept any interferencereceived, including interference that maycause undesired operation.
Note:Changes or modifications notexpressively approved by the partyresponsible for compliance could void theuser's authority to operate the equipment.The term "IC:" before the radio certificationnumber only signifies that Industry Canadatechnical specifications were met.
The typical operating range for yourtransmitter is approximately 33 ft (10 m).Vehicles with the remote start feature willhave a greater range. One of the followingcould cause a decrease in operating range:
•Weather conditions.
•Nearby radio towers.
•Structures around the vehicle.
•Other vehicles parked next to yourvehicle.
The radio frequency used by your remotecontrol can also be used by other radiotransmitters, for example amateur radios,medical equipment, wireless headphones,wireless remote controls, cell phones, batterychargers and alarm systems. If thefrequencies are jammed, you will not be ableto use your remote control. You can lockand unlock the doors with the key.
Note:Make sure you lock your vehiclebefore leaving it unattended.
Note:If you are within range of your vehicle,the remote control will operate if youunintentionally press any button.
Intelligent Access
The system uses a radio frequency signal tocommunicate with your vehicle andauthorizes your vehicle to unlock when oneof the following conditions are met:
•You touch the unlock sensor on the backof the door handle with the intelligentaccess key within 3 ft (1 m) of yourvehicle.
•You press the luggage compartmentbutton.
•You press the unlock button on thetransmitter.
If excessive radio frequency interference ispresent in the area or if the transmitterbattery is low, you may need to mechanicallyunlock your door. You can use themechanical key blade in your intelligentaccess key to open the driver door in thissituation. See Remote Control (page 63).
62
Navigator (TB9) Canada/United States of America, enUSA, Edition date: 201708, Third-Printing-
Keys and Remote Controls
Page 76 of 649
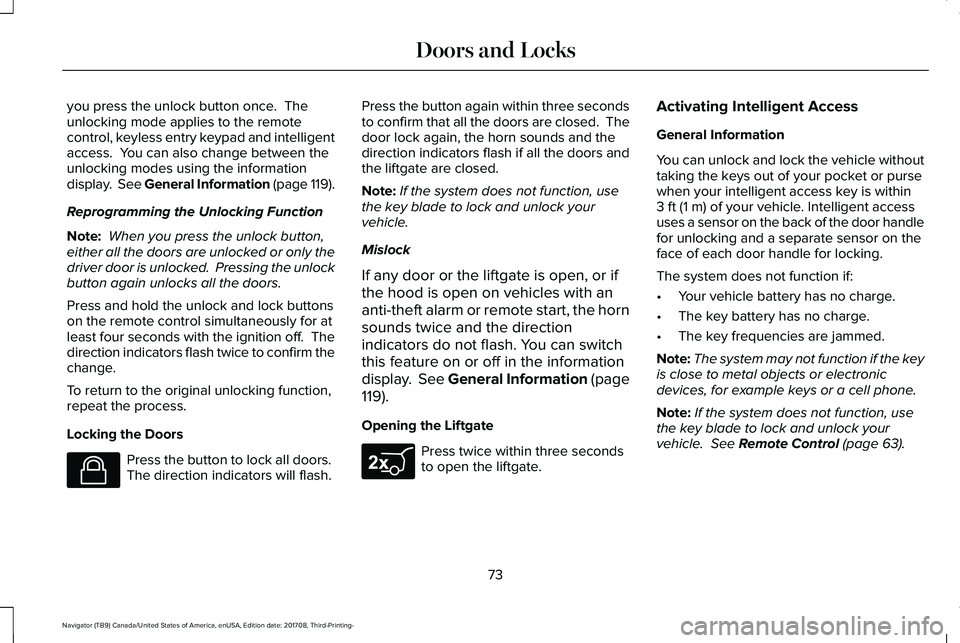
you press the unlock button once. Theunlocking mode applies to the remotecontrol, keyless entry keypad and intelligentaccess. You can also change between theunlocking modes using the informationdisplay. See General Information (page 119).
Reprogramming the Unlocking Function
Note: When you press the unlock button,either all the doors are unlocked or only thedriver door is unlocked. Pressing the unlockbutton again unlocks all the doors.
Press and hold the unlock and lock buttonson the remote control simultaneously for atleast four seconds with the ignition off. Thedirection indicators flash twice to confirm thechange.
To return to the original unlocking function,repeat the process.
Locking the Doors
Press the button to lock all doors. The direction indicators will flash.
Press the button again within three secondsto confirm that all the doors are closed. Thedoor lock again, the horn sounds and thedirection indicators flash if all the doors andthe liftgate are closed.
Note:If the system does not function, usethe key blade to lock and unlock yourvehicle.
Mislock
If any door or the liftgate is open, or if
the hood is open on vehicles with an
anti-theft alarm or remote start, the horn
sounds twice and the direction
indicators do not flash. You can switch
this feature on or off in the information
display. See General Information (page
119).
Opening the Liftgate
Press twice within three secondsto open the liftgate.
Activating Intelligent Access
General Information
You can unlock and lock the vehicle withouttaking the keys out of your pocket or pursewhen your intelligent access key is within3 ft (1 m) of your vehicle. Intelligent accessuses a sensor on the back of the door handlefor unlocking and a separate sensor on theface of each door handle for locking.
The system does not function if:
•Your vehicle battery has no charge.
•The key battery has no charge.
•The key frequencies are jammed.
Note:The system may not function if the keyis close to metal objects or electronicdevices, for example keys or a cell phone.
Note:If the system does not function, usethe key blade to lock and unlock yourvehicle. See Remote Control (page 63).
73
Navigator (TB9) Canada/United States of America, enUSA, Edition date: 201708, Third-Printing-
Doors and LocksE138623 E267940
Page 84 of 649
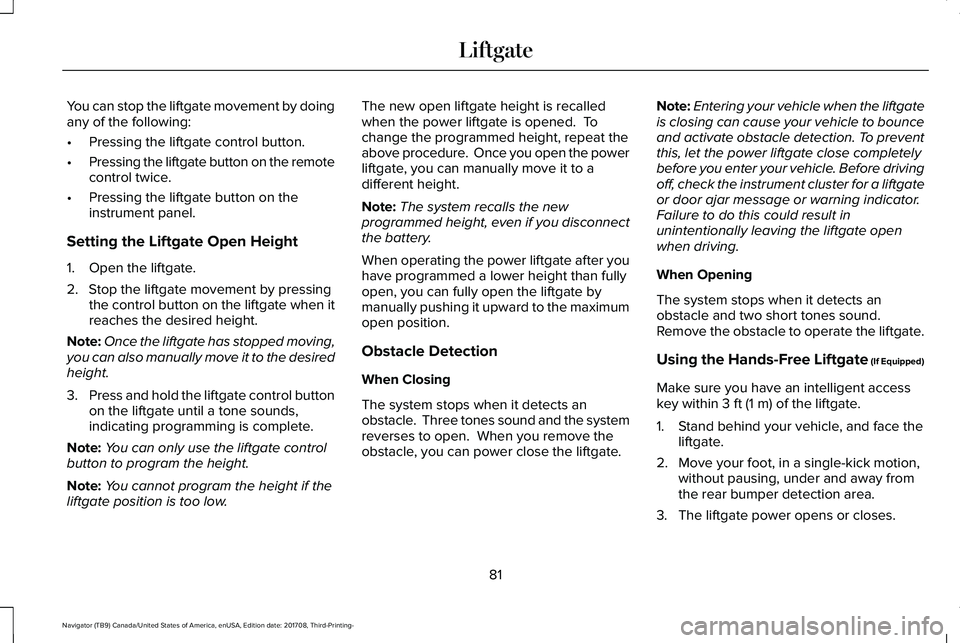
You can stop the liftgate movement by doingany of the following:
•Pressing the liftgate control button.
•Pressing the liftgate button on the remotecontrol twice.
•Pressing the liftgate button on theinstrument panel.
Setting the Liftgate Open Height
1. Open the liftgate.
2. Stop the liftgate movement by pressingthe control button on the liftgate when itreaches the desired height.
Note:Once the liftgate has stopped moving,you can also manually move it to the desiredheight.
3.Press and hold the liftgate control buttonon the liftgate until a tone sounds,indicating programming is complete.
Note:You can only use the liftgate controlbutton to program the height.
Note:You cannot program the height if theliftgate position is too low.
The new open liftgate height is recalledwhen the power liftgate is opened. Tochange the programmed height, repeat theabove procedure. Once you open the powerliftgate, you can manually move it to adifferent height.
Note:The system recalls the newprogrammed height, even if you disconnectthe battery.
When operating the power liftgate after youhave programmed a lower height than fullyopen, you can fully open the liftgate bymanually pushing it upward to the maximumopen position.
Obstacle Detection
When Closing
The system stops when it detects anobstacle. Three tones sound and the systemreverses to open. When you remove theobstacle, you can power close the liftgate.
Note:Entering your vehicle when the liftgateis closing can cause your vehicle to bounceand activate obstacle detection. To preventthis, let the power liftgate close completelybefore you enter your vehicle. Before drivingoff, check the instrument cluster for a liftgateor door ajar message or warning indicator.Failure to do this could result inunintentionally leaving the liftgate openwhen driving.
When Opening
The system stops when it detects anobstacle and two short tones sound. Remove the obstacle to operate the liftgate.
Using the Hands-Free Liftgate (If Equipped)
Make sure you have an intelligent accesskey within 3 ft (1 m) of the liftgate.
1. Stand behind your vehicle, and face theliftgate.
2. Move your foot, in a single-kick motion,without pausing, under and away fromthe rear bumper detection area.
3. The liftgate power opens or closes.
81
Navigator (TB9) Canada/United States of America, enUSA, Edition date: 201708, Third-Printing-
Liftgate
Page 137 of 649
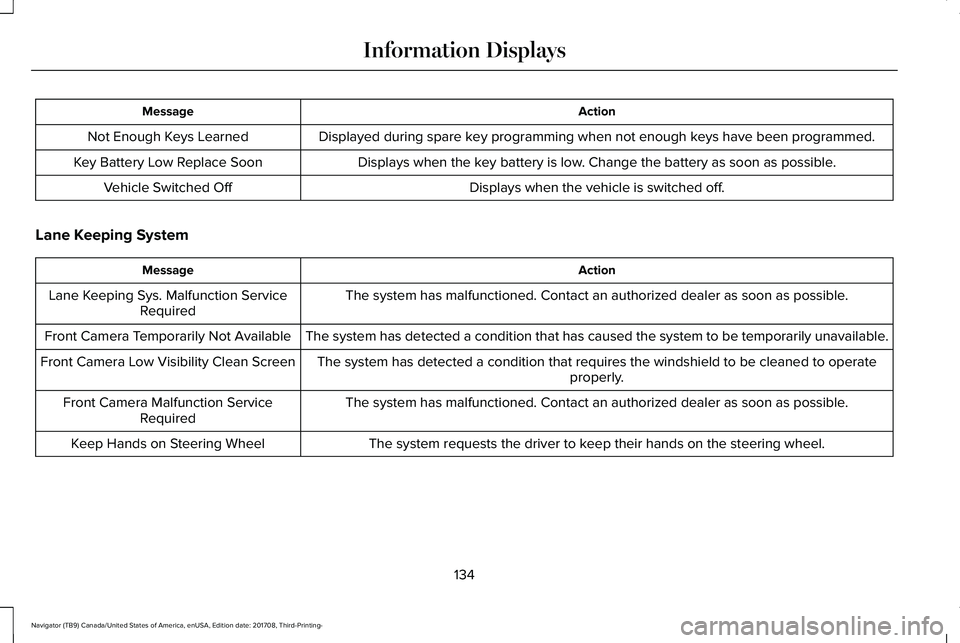
ActionMessage
Displayed during spare key programming when not enough keys have been programmed.Not Enough Keys Learned
Displays when the key battery is low. Change the battery as soon as possible.Key Battery Low Replace Soon
Displays when the vehicle is switched off.Vehicle Switched Off
Lane Keeping System
ActionMessage
The system has malfunctioned. Contact an authorized dealer as soon as possible.Lane Keeping Sys. Malfunction ServiceRequired
The system has detected a condition that has caused the system to be temporarily unavailable.Front Camera Temporarily Not Available
The system has detected a condition that requires the windshield to be cleaned to operateproperly.Front Camera Low Visibility Clean Screen
The system has malfunctioned. Contact an authorized dealer as soon as possible.Front Camera Malfunction ServiceRequired
The system requests the driver to keep their hands on the steering wheel.Keep Hands on Steering Wheel
134
Navigator (TB9) Canada/United States of America, enUSA, Edition date: 201708, Third-Printing-
Information Displays
Page 330 of 649
ROADSIDE ASSISTANCE
Vehicles Sold in the United States:Getting Roadside Assistance
To fully assist you should you have a vehicleconcern, Lincoln Motor Company offers acomplimentary roadside assistance program. This program is separate from the NewVehicle Limited Warranty.
The service is available:
•Throughout the life of the vehicle fororiginal owners.
•For six years or 70,000 mi (110,000 km)(whichever comes first) for subsequentowners.
Roadside Assistance covers:
•A flat tire change with a good spare(except vehicles supplied with a tireinflation kit).
•Battery jump start.
•Lock-out assistance (key replacementcost is the client's responsibility).
•Fuel delivery — independent servicecontractors, if not prohibited by state,local or municipal law shall deliver up to2 gal (8 L) of gasoline or 5 gal (20 L) ofdiesel fuel to a disabled vehicle.Roadside Assistance limits fuel deliveryservice to two no-charge occurrenceswithin a 12-month period.
•Winch out — available within 100 ft (30 m)of a paved or county maintained road,no recoveries.
•Towing — independent servicecontractors, if not prohibited by state,local or municipal law shall tow Lincolneligible vehicles to the client's selling orpreferred dealer within 100 mi (160 km)of the disablement location or to thenearest Lincoln dealer. If a client requestsa tow to a selling or preferred dealer thatis more than 100 mi (160 km) from thedisablement location, the client isresponsible for any mileage costs inexcess of 100 mi (160 km).
•Roadside Assistance includes up to $200for a towed trailer if the disabled eligiblevehicle requires service at the nearestauthorized dealer. If the towing vehicleis operational but the trailer is not, thenthe trailer does not qualify for anyroadside services.
Vehicles Sold in the United States:Using Roadside Assistance
United States clients who require roadsideassistance, call 1-800-521-4140.
327
Navigator (TB9) Canada/United States of America, enUSA, Edition date: 201708, Third-Printing-
Roadside Emergencies
Page 638 of 649
Location of the Spare Tire and Tools.............415Tire Change Procedure.....................................416
Changing the 12V Battery..........................373Battery Management System..........................375
Changing the Engine Air Filter...................381Changing the Wiper Blades.......................376Checking MyKey System Status.................70MyKey Distance.....................................................70Number of Admin Keys.......................................70Number of MyKeys...............................................70
Checking the Wiper Blades.......................375Childminder Mirror........................................108Child Restraint and SeatbeltMaintenance..................................................49Child Restraint Positioning............................37Child Safety.......................................................19General Information..............................................19
Child Safety Locks..........................................39Left-Hand Side.......................................................39Right-Hand Side....................................................39
Cleaning Leather Seats..............................388Cleaning Products........................................382Materials...............................................................382
Cleaning the Engine....................................385Cleaning the Exterior...................................383Cleaning the Headlamps..................................383Exterior Chrome Parts.......................................384Exterior Plastic Parts..........................................384
Stripes or Graphics.............................................384Underbody...........................................................384Under Hood.........................................................384
Cleaning the Instrument Panel andInstrument Cluster Lens...........................388Cleaning the Interior....................................386Cleaning Black Label or PresidentialInterior..............................................................386
Cleaning the Wheels...................................389Cleaning the Windows and WiperBlades...........................................................385Clearing All MyKeys.......................................70Climate Control...............................................151Climate Controlled Seats............................179Ventilated Seats...................................................179
Coolant CheckSee: Engine Coolant Check............................366
Crash Sensors and Airbag Indicator.........60Creating a MyKey...........................................69Programming and Changing ConfigurableSettings...............................................................69
Cross Traffic Alert.........................................276Blocked Sensors.................................................279Switching the System Off and On..................279System Errors......................................................279System Lights, Messages and AudibleAlerts.................................................................279System Limitations.............................................279
Using the Cross Traffic Alert System.............276
Cruise Control.................................................90Principle of Operation.......................................256Type One................................................................90Type Two..................................................................91
Cruise controlSee: Using Cruise Control...............................256
Customer Assistance...................................334
D
Data Recording................................................10Event Data Recording...........................................10Service Data Recording.......................................10
Daytime Running Lamps...............................98Type One - Conventional(Non-Configurable)..........................................98Type Two - Configurable....................................99
Direction Indicators.......................................101Lane Change.........................................................101
Doors and Locks.............................................72Drive Mode Control.....................................285Lincoln Drive Modes..........................................285
Driver Alert.....................................................265Using Driver Alert...............................................266
Driver and Passenger Airbags....................53Children and Airbags...........................................54
635
Navigator (TB9) Canada/United States of America, enUSA, Edition date: 201708, Third-Printing-
Index