sat nav LINCOLN NAVIGATOR 2018 Owners Manual
[x] Cancel search | Manufacturer: LINCOLN, Model Year: 2018, Model line: NAVIGATOR, Model: LINCOLN NAVIGATOR 2018Pages: 649, PDF Size: 4.96 MB
Page 8 of 649
Reporting Safety Defects (U.S. Only)......340
Reporting Safety Defects (Canada Only).......................................................................341
Fuses
Fuse Specification Chart...........................342
Changing a Fuse.........................................358
Maintenance
General Information.....................................361
Opening and Closing the Hood...............361
Under Hood Overview...............................362
Engine Oil Dipstick.....................................364
Engine Oil Check........................................364
Oil Change Indicator Reset......................365
Engine Coolant Check...............................366
Automatic Transmission Fluid Check......371
Transfer Case Fluid Check.........................371
Brake Fluid Check.......................................372
Washer Fluid Check....................................373
Fuel Filter.......................................................373
Changing the 12V Battery.........................373
Checking the Wiper Blades......................375
Changing the Wiper Blades......................376
Adjusting the Headlamps..........................376
Changing a Bulb..........................................378
Bulb Specification Chart............................378
Changing the Engine Air Filter.................381
Vehicle Care
General Information....................................382
Cleaning Products......................................382
Cleaning the Exterior.................................383
Waxing...........................................................384
Cleaning the Engine...................................385
Cleaning the Windows and Wiper Blades......................................................................385
Cleaning the Interior..................................386
Cleaning the Instrument Panel andInstrument Cluster Lens........................388
Cleaning Leather Seats.............................388
Repairing Minor Paint Damage................389
Cleaning the Wheels..................................389
Vehicle Storage...........................................390
Body Styling Kits...........................................391
Wheels and Tires
General Information...................................392
Tire Care........................................................394
Using Snow Chains....................................408
Tire Pressure Monitoring System...........409
Changing a Road Wheel.............................414
Technical Specifications............................420
Capacities and Specifications
Engine Specifications.................................422
Motorcraft Parts...........................................423
Vehicle Identification Number.................424
Vehicle Certification Label........................424
Transmission Code Designation.............425
Capacities and Specifications..................426
Audio System
General Information....................................434
Audio Unit.....................................................436
Satellite Radio..............................................442
USB Port........................................................445
5
Navigator (TB9) Canada/United States of America, enUSA, Edition date: 201708, Third-Printing-
Table of Contents
Page 71 of 649
PRINCIPLE OF OPERATION
MyKey allows you to program keys withrestricted driving modes to promote gooddriving habits. All but one of the keysprogrammed to the vehicle can be activatedwith these restricted modes.
Any keys that have not been programmedare referred to as administrator keys oradmin keys. They can be used to:
•Create a MyKey.
•Program configurable MyKey settings.
•Clear all MyKey features.
When you have programmed a MyKey, youcan access the following information usingthe information display:
•How many admin keys and MyKeys areprogrammed to your vehicle.
•The total distance your vehicle hastraveled using a MyKey.
Note:All MyKeys are programmed to thesame settings. You cannot program themindividually.
Note:For vehicles equipped with apush-button start switch: When both a MyKeyand an admin key are present when youstart your vehicle, the system recognizes theadmin key only.
Non-configurable Settings
The following settings cannot be changedby an admin key user:
•Belt-Minder or safety belt reminder. Youcannot disable this feature. The audiosystem will mute when the front seatoccupants’ safety belts are not fastened.
•Early low fuel. The low fuel warning isactivated earlier, giving the MyKey usermore time to refuel.
•Driver assist features, if equipped on yourvehicle, are forced on: parking aid, blindspot information system (BLIS), crosstraffic alert, lane departure warning andforward collision warning system.
•Satellite radio adult content restrictions(available only in some markets).
Note:When you switch lane departurewarning off temporarily, it turns on at thenext ignition cycle.
Configurable Settings
With an admin key, you can configure certainMyKey settings when you first create aMyKey and before you recycle the key orrestart the vehicle. You can also change thesettings afterward with an admin key:
•A vehicle speed limit can be set.Warnings will be shown in the display,followed by an audible tone when yourvehicle reaches the set speed. Youcannot override the set speed by fullydepressing the accelerator pedal or bysetting cruise control.
WARNING: Do not set MyKeymaximum speed limit to a limit that willprevent the driver from maintaining a safespeed considering posted speed limits andprevailing road conditions. The driver isalways responsible to drive in accordancewith local laws and prevailing conditions.Failure to do so could result in accident orinjury.
68
Navigator (TB9) Canada/United States of America, enUSA, Edition date: 201708, Third-Printing-
MyKey™
Page 72 of 649
•Various vehicle speed reminders so youknow when your vehicle approaches thelimits. Warnings appear in the informationdisplay and an audible warning soundswhen you exceed the limit.
•Audio system maximum volume of 45%.A message will be shown in the displaywhen you attempt to exceed the limitedvolume. Also, the speed-sensitive orcompensated automatic volume controlwill be disabled.
•Always on setting. When this is selected,you will not be able to turn off AdvanceTrac or traction control, 911 Assist orEmergency Assistance, or Do Not Disturb(if your vehicle is equipped with thesefeatures).
CREATING A MYKEY
Use the information display to create aMyKey:
1. Insert the key you want to program intothe ignition. See Starting a GasolineEngine (page 192). If your vehicle isequipped with a push-button start, placethe remote control into the backup slot.See Anti-Theft Alarm (page 86).
2. Switch the ignition on.
3.Access the main menu in the informationdisplay and then scroll through themenus to change the settings of yourMyKey. From the MyKey menu select theoption Create MyKey. See InformationDisplays (page 119).
4.When prompted, hold the OK button untilyou see a message informing you to labelthis key as a MyKey. The programmedrestrictions apply when you key off, openand close the driver door and restart yourvehicle with the programmed key ortransmitter.
MyKey is successfully created. Make sureyou label it so you can distinguish it from theadmin keys.
You can also program configurable settingsfor the key(s). See Programming andChanging Configurable Settings.
Programming and ChangingConfigurable Settings
Use the information display to access yourconfigurable MyKey settings.
1.Switch the ignition on using an admin keyor transmitter you want to program.
2.Access the main menu in the informationdisplay and then scroll through themenus to change the settings of yourMyKey. See Information Displays (page119).
3. Follow the instructions in the display.
Note:You can clear or change your MyKeysettings at any time during the same keycycle as you created the MyKey. Once youhave switched the vehicle off, however, youwill need an admin key to change or clearyour MyKey settings.
69
Navigator (TB9) Canada/United States of America, enUSA, Edition date: 201708, Third-Printing-
MyKey™
Page 82 of 649
POWER LIFTGATE
WARNING: It is extremely dangerousto ride in a cargo area, inside or outside ofa vehicle. In a crash, people riding in theseareas are more likely to be seriouslyinjured or killed. Do not allow people toride in any area of your vehicle that is notequipped with seats and seatbelts. Makesure everyone in your vehicle is in a seatand properly using a seatbelt. Failure tofollow this warning could result in seriouspersonal injury or death.
WARNING: Make sure that you fullyclose the liftgate to prevent exhaust fumesfrom entering your vehicle. If you areunable to fully close the tailgate, open theair vents or the windows to allow fresh airto enter your vehicle. Failure to follow thisinstruction could result in personal injuryor death.
WARNING: Make sure that you fullyclose the liftgate to prevent passengersand cargo from falling out. Failure to followthis instruction could result in personalinjury or death.
WARNING: Keep keys out of reachof children. Do not allow children tooperate or play near an open or movingpower liftgate. You should supervise theoperation of the power liftgate at all times.
Note: Make sure that you close the liftgatebefore operating or moving your vehicle,especially in an enclosure, like a garage ora parking structure. This could damage theliftgate and its components.
Note: Do not hang anything, for example abike rack, from the glass or liftgate. Thiscould damage the liftgate and itscomponents.
The liftgate only operates with thetransmission in park (P).
Three warning tones sound as the liftgatebegins to power close. If there is a problemwith the open or close request, one of thefollowing may occur:
•One tone sounds if the ignition is on andthe transmission is not in park (P).
•Three tones sound if the battery voltageis below the minimum operating voltage.
•One tone sounds if the vehicle speed isat or above 3 mph (5 km/h)
If the liftgate starts to close after it has fullyopened, this indicates there may beexcessive weight on the liftgate or a possiblestrut failure. A repetitive tone sounds andthe liftgate closes under control. Removeany excessive weight from the liftgate. If theliftgate continues to close after opening,have the system checked as soon aspossible.
Opening and Closing the Liftgate
WARNING: Make sure all personsare clear of the power liftgate area beforeusing the power liftgate control.
79
Navigator (TB9) Canada/United States of America, enUSA, Edition date: 201708, Third-Printing-
Liftgate
Page 89 of 649
Disarming the Alarm
Vehicles Without Keyless Entry
Disarm and silence the alarm by unlockingthe doors with the key and switching yourvehicle on with a correctly coded key, or byunlocking the doors with the remote control.
Vehicles with Keyless Entry
Note:A valid remote control must be locatedwithin the detection range of that door forkeyless entry. See Keyless Entry (page 76).
Disarm and silence the alarm by unlockingthe doors and switching your vehicle on, orby unlocking the doors with the remotecontrol.
ANTI-THEFT ALARM - VEHICLES
WITH: ANTI-THEFT ALARM
SYSTEM
The system will warn you of an unauthorizedentry to your vehicle. It will be triggered ifany door, the luggage compartment or thehood is opened without using the key,remote control or keyless entry keypad.
The direction indicators will flash and thehorn will sound if unauthorized entry isattempted while the alarm is armed.
Take all remote controls to an authorizeddealer if there is any potential alarm problemwith your vehicle.
Arming the Alarm
The alarm is ready to arm when there is nota key in your vehicle. Electronically lock yourvehicle to arm the alarm.
Disarming the Alarm
Disarm the alarm by any of the followingactions:
•Unlock the doors or luggagecompartment with the remote control orkeyless entry keypad.
•Switch your vehicle on or start yourvehicle.
•Use a key in the driver door to unlockyour vehicle, then switch your vehicle onwithin 12 seconds.
Note:Pressing the panic button on theremote control will stop the horn and signalindicators, but will not disarm the system.
86
Navigator (TB9) Canada/United States of America, enUSA, Edition date: 201708, Third-Printing-
Security
Page 99 of 649
GENERAL INFORMATION
Condensation in the Exterior FrontLamps and Rear Lamps
Exterior front lamps and rear lamps havevents to accommodate normal changes inair pressure.
Condensation can be a natural by-productof this design. When moist air enters thelamp assembly through the vents, there is apossibility that condensation can occur whenthe temperature is cold. When normalcondensation occurs, a fine mist can form onthe interior of the lens. The fine misteventually clears and exits through the ventsduring normal operation.
Clearing time may take as long as 48 hoursunder dry weather conditions.
Examples of acceptable condensation are:
•The presence of a fine mist (no streaks,drip marks or large droplets).
•A fine mist covers less than 50% of thelens.
Examples of unacceptable condensation are:
•A water puddle inside the lamp.
•Streaks, drip marks or large dropletspresent on the interior of the lens.
If you see any unacceptable condensation,have your vehicle checked by an authorizeddealer.
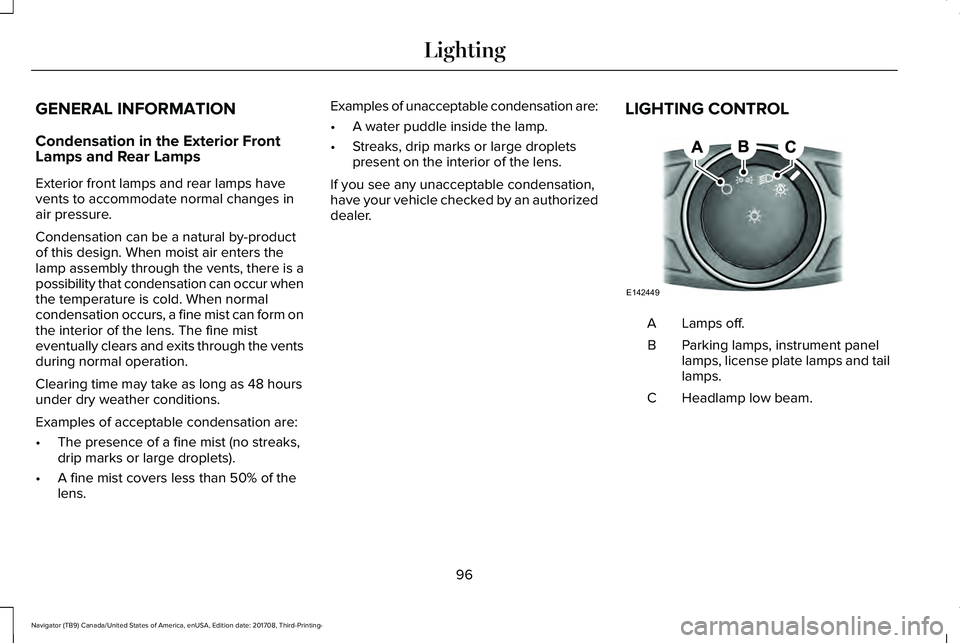
LIGHTING CONTROL
Lamps off.A
Parking lamps, instrument panellamps, license plate lamps and taillamps.
B
Headlamp low beam.C
96
Navigator (TB9) Canada/United States of America, enUSA, Edition date: 201708, Third-Printing-
LightingE142449
Page 187 of 649
2. The indicator light begins to flash after20 seconds. Without releasing thebutton, follow Step 1 in the Programmingsection.
For questions or comments, contactHomeLink at www.homelink.com,www.youtube.com/user/HomeLinkGentexor by calling the toll-free help line at1-800-355-3515.
FCC and RSS-210 Industry CanadaCompliance
This device complies with Part 15 of the FCCRules and with RSS-210 of Industry Canada.Operation is subject to the following twoconditions: (1) this device may not causeharmful interference, and (2) this device mustaccept any interference received, includinginterference that may cause undesiredoperation.
Note:Changes or modifications to yourdevice not expressly approved by the partyresponsible for compliance can void theuser’s authority to operate the equipment.
This equipment complies with FCC radiationexposure limits set forth for an uncontrolledenvironment. End Users must follow thespecific operating instructions for satisfyingRF exposure compliance. This transmittermust be at least 8 in (20 cm) from the userand must not be co-located or operating inconjunction with any other antenna ortransmitter.
The term “IC:” before thecertification/registration number only signifiesthat Industry Canada technical specificationswere met.
184
Navigator (TB9) Canada/United States of America, enUSA, Edition date: 201708, Third-Printing-
Universal Garage Door Opener
Page 221 of 649
Shifting To or From 4L - 4X4 LOW
Note:4L mode is not intended for use on drypavement.
1. Bring the vehicle to a rolling speed of3 mph (5 km/h) or less.
2. Place the gearshift in neutral (N).
3. Rotate the drive mode knob to desiredmode.
The information display shows a messageindicating a 4X4 shift is in progress. Theinformation display shows the system modeselected. If any of the previous shiftconditions are not present, the shift does notoccur and the information display shows theinformation guiding the driver through theproper shifting procedures. If the previousconditions are not satisfied in 30 seconds,the system reverts back to the previous 4WDmode or drive mode.
If Shift Delayed Pull Forward displays in theinformation display, transfer case gear toothblockage is present. To alleviate thiscondition, place the transmission in a forwardgear, move the vehicle forwardapproximately 5 ft (2 m), and shift thetransmission back to neutral (N) to allow thetransfer case to complete the range shift.
Operating 4WD Vehicles With Spareor Mismatched Tires
On four-wheel drive vehicles, the size of thespare tire can affect the 4X4 system. If thereis a significant difference between the sizeof the spare tire and the remaining tires, youmay have limited four-wheel drivefunctionality.
When driving with the full-size dissimilarspare wheel and tire assembly, it isrecommended that you do not:
•Exceed 50 mph (80 km/h) with a 4WDmode turned on.
•Turn on a 4WD mode unless the vehicleis stationary.
•Use a 4WD mode on dry pavement.
Use of a dissimilar spare wheel and tireassembly may lead to impairment of thefollowing:
•Comfort and noise.
•Winter weather driving capability.
•Wet driving capability.
•Four-wheel drive capability.
How Your Vehicle Differs From OtherVehicles
WARNING: Vehicles with a highercenter of gravity (utility and four-wheeldrive vehicles) handle differently thanvehicles with a lower center of gravity(passenger cars). Avoid sharp turns,excessive speed and abrupt steering inthese vehicles. Failure to drive cautiouslyincreases the risk of losing control of yourvehicle, vehicle rollover, personal injuryand death.
218
Navigator (TB9) Canada/United States of America, enUSA, Edition date: 201708, Third-Printing-
Four-Wheel Drive (If Equipped)
Page 222 of 649
Truck and utility vehicles can differ fromsome other vehicles. Your vehicle may behigher to allow it to travel over rough terrainwithout getting hung up or damagingunderbody components.
The differences that make your vehicle soversatile also make it handle differently thanan ordinary passenger car.
Maintain steering wheel control at all times,especially in rough terrain. Since suddenchanges in terrain can result in abruptsteering wheel motion, make sure you gripthe steering wheel from the outside. Do notgrip the spokes.
Drive cautiously to avoid vehicle damagefrom concealed objects such as rocks andstumps.
You should either know the terrain orexamine maps of the area before driving.Map out your route before driving in the area.To maintain steering and braking control ofyour vehicle, you must have all four wheelson the ground and they must be rolling, notsliding or spinning.
Driving Off-Road With Truck and UtilityVehicles
Note:On some models, the initial shift fromtwo-wheel drive to four-wheel drive whenthe vehicle is moving can cause somemomentary clunk and ratcheting sounds.This is the front drivetrain coming up tospeed and the automatic locking hubsengaging and is not cause for concern.
Note:Your vehicle may have a front air dam.Due to low ground clearance, you candamage it when taking your vehicle off-road.You can take the air dam off by removingthe bolts that secure it.
Four-wheel drive vehicles are speciallyequipped for driving on sand, snow, mud andrough terrain and have operatingcharacteristics that are somewhat differentfrom conventional vehicles, both on and offthe road.
Power is supplied to all four wheels througha transfer case. On four-wheel drive vehicles,the transfer case allows you to utilizedifferent 4X4 modes when necessary.Information on transfer case operation andshifting procedures can be found in this
chapter and the Driving Aids chapter.Information on transfer case maintenancecan be found in the Maintenance chapter.You should become thoroughly familiar withthis information before you operate yourvehicle.
Four-wheel drive, when you select a4X4-capable drive mode, it uses all fourwheels to power the vehicle. This increasestraction, enabling you to drive over terrainand road conditions that a conventionaltwo-wheel drive vehicle cannot.
219
Navigator (TB9) Canada/United States of America, enUSA, Edition date: 201708, Third-Printing-
Four-Wheel Drive (If Equipped)
Page 223 of 649
Basic Operating Principles
•Do not use SLIPPERY, DEEPCONDITIONS or SLOW CLIMB on dry,hard surfaced roads. Doing so producesexcessive noise, increases tire wear andmay damage drive components. The 4X4system in these modes is only intendedfor consistently slippery or loosesurfaces.
•Drive slower in strong crosswinds whichcan affect the normal steeringcharacteristics of your vehicle.
•When driving your vehicle on surfacesmade slippery by loose sand, water,gravel, snow or ice, proceed with care.
If Your Vehicle leaves the Road
If your vehicle leaves the road, reduce yourvehicle speed and avoid severe braking.When your vehicle speed has been reducedease your vehicle back onto the road. Donot turn the steering wheel sharply whenreturning your vehicle to the road.
It may be safer to stay on the shoulder of theroad and slow down gradually beforereturning to the road. You may lose controlif you do not slow down or if you turn thesteering wheel too sharply or abruptly.
It may be less risky to strike small objects,such as freeway reflectors, with minordamage to your vehicle rather than attempta sudden return to the road which couldcause your vehicle to slide sideways out ofcontrol or roll over. Remember, your safetyand the safety of others should be yourprimary concern.
If your vehicle gets stuck
WARNING: Do not spin the wheelsat over 34 mph (55 km/h). The tires mayfail and injure a passenger or bystander.
Note:Do not rock your vehicle if the engineis not at normal operating temperature,damage to the transmission may occur.
Note:Do not rock your vehicle for more thana minute, damage to the transmission andtires may occur or the engine may overheat.
If your vehicle gets stuck in mud or snow itmay be rocked out by shifting betweenforward and reverse gears, stoppingbetween shifts, in a steady pattern. Presslightly on the accelerator in each gear.
Emergency Maneuvers
In an unavoidable emergency situationwhere a sudden sharp turn must be made,remember to avoid over-driving your vehicle(i.e. turn the steering wheel only as rapidlyand as far as required to avoid theemergency). Excessive steering can resultin loss of vehicle control. Apply smoothpressure to the accelerator pedal or brakepedal when changes in vehicle speed arerequired. Avoid abrupt steering, accelerationand braking. This could result in an increasedrisk of vehicle roll over, loss of vehicle controland personal injury. Use all available roadsurface to bring your vehicle to a safedirection of travel.
In the event of an emergency stop, avoidskidding the tires and do not attempt anysharp steering wheel movements.
220
Navigator (TB9) Canada/United States of America, enUSA, Edition date: 201708, Third-Printing-
Four-Wheel Drive (If Equipped)