display LINCOLN NAVIGATOR 2019 User Guide
[x] Cancel search | Manufacturer: LINCOLN, Model Year: 2019, Model line: NAVIGATOR, Model: LINCOLN NAVIGATOR 2019Pages: 645, PDF Size: 5.02 MB
Page 76 of 645
you press the unlock button once. Theunlocking mode applies to the remotecontrol, keyless entry keypad and intelligentaccess. You can also change between theunlocking modes using the informationdisplay. See General Information (page 120).
Reprogramming the Unlocking Function
Note: When you press the unlock button,either all the doors are unlocked or only thedriver door is unlocked. Pressing the unlockbutton again unlocks all the doors.
Press and hold the unlock and lock buttonson the remote control simultaneously for atleast four seconds with the ignition off. Thedirection indicators flash twice to confirm thechange.
To return to the original unlocking function,repeat the process.
Locking the Doors
Press the button to lock all doors. The direction indicators will flash.
Press the button again within three secondsto confirm that all the doors are closed. Thedoor lock again, the horn sounds and thedirection indicators flash if all the doors andthe liftgate are closed.
Note:If the system does not function, usethe key blade to lock and unlock yourvehicle.
Mislock
If any door or the liftgate is open, or if
the hood is open on vehicles with an
anti-theft alarm or remote start, the horn
sounds twice and the direction
indicators do not flash. You can switch
this feature on or off in the information
display. See General Information (page
120).
Opening the Liftgate
Press twice within three secondsto open the liftgate.
Activating Intelligent Access
General Information
You can unlock and lock the vehicle withouttaking the keys out of your pocket or pursewhen your intelligent access key is within3 ft (1 m) of your vehicle. Intelligent accessuses a sensor on the back of the door handlefor unlocking and a separate sensor on theface of each door handle for locking.
The system does not function if:
•Your vehicle battery has no charge.
•The key battery has no charge.
•The key frequencies are jammed.
Note:The system may not function if the keyis close to metal objects or electronicdevices, for example keys or a cell phone.
Note:If the system does not function, usethe key blade to lock and unlock yourvehicle. See Remote Control (page 62).
73
Navigator (TB9) Canada/United States of America, enUSA, Edition date: 201808, First-Printing
Doors and LocksE138623 E267940
Page 79 of 645
Enabling or Disabling Autounlock
You can enable or disable the autounlockfeature in the information display or anauthorized dealer can do it for you. SeeGeneral Information (page 120).
Illuminated Entry
The interior lamps and some exterior lampsilluminate when you unlock the doors withthe remote control.
The lamps turn off if:
•The ignition is on.
•You press the remote control lock button.
•25 seconds have elapsed.
The lamps do not turn off if:
•You turn them on with the lamp control.
•Any door is open.
Illuminated Exit
The interior lamps and some exterior lampsilluminate when all doors are closed and youswitch the ignition off.
The lamps turn off if all the doors remainclosed and:
•25 seconds have elapsed.
•You press the push button ignitionswitch.
Approach Detection Illumination
When you approach your vehicle and a validkey is detected, the exterior door handlesand some exterior lamps illuminate.
Battery Saver
If you leave the courtesy lamps, interiorlamps or headlamps on, the battery savershuts them off 10 minutes after you switchthe ignition off.
Battery Saver for Intelligent Access Keys
If you leave the ignition switched on, it shutsoff when it detects a certain amount ofbattery drain, or after 45 minutes.
KEYLESS ENTRY
SECURICODE™ KEYLESS ENTRYKEYPAD
The keypad is near the driver window. Itilluminates when touched.
Note: If you enter your entry code too faston the keypad, the unlock function may notwork. Enter your entry code again moreslowly.
76
Navigator (TB9) Canada/United States of America, enUSA, Edition date: 201808, First-Printing
Doors and LocksE138637
Page 80 of 645
You can use the keypad to:
•Lock or unlock the doors.
•Unlock the liftgate glass.
•Program and erase user codes.
•Arm and disarm the anti-theft alarm.
You can operate the keypad with thefactory-set five-digit entry code. The codeis on the owner's wallet card in the glove boxand is available from an authorized dealer. You can also program up to five of your ownfive-digit personal entry codes.
Programming a Personal Entry Code
To create your own personal entry code:
1. Enter the factory-set five-digit code.
2. Press 1·2 on the keypad within fiveseconds.
3.Enter your personal five-digit code. Youmust press each number within fiveseconds of each other.
4.Press 1·2 on the keypad to save personalcode 1.
The doors lock then unlock to confirm thatprogramming was successful.
To program additional personal entry codes,repeat Steps 1-3, then for Step 4:
•Press 3·4 to save personal code 2
•Press 5·6 to save personal code 3
•Press 7·8 to save personal code 4
•Press 9·0 to save personal code 5.
You may also program a personal entry codethrough the information display.
Tips:
•Do not set a code that uses five of thesame number.
•Do not use five numbers in sequentialorder.
•The factory-set code works even if youhave set your own personal code.
Erasing a Personal Code
1. Enter the factory-set 5-digit code.
2. Press and release 1·2 on the keypadwithin five seconds.
3. Press and hold 1·2 for two seconds. Youmust do this within five seconds ofcompleting Step 2.
All personal codes erase and only thefactory-set 5-digit code works.
Anti-Scan Feature
The keypad goes into an anti-scan mode ifyou enter the wrong code seven times. Thismode turns off the keypad for one minuteand the keypad lamp flashes.
The anti-scan feature turns off after:
•One minute of keypad inactivity.
•Pressing the unlock button on the remotecontrol.
•Switching the ignition on.
Locking and Unlocking
To Unlock All Doors
Enter the factory-set 5-digit code or yourpersonal code to unlock all doors.
To Lock All Doors
Press and hold 7·8 and 9·0 at the same timewith the driver door closed to lock all doors.You do not need to enter the keypad codefirst.
77
Navigator (TB9) Canada/United States of America, enUSA, Edition date: 201808, First-Printing
Doors and Locks
Page 81 of 645
To Unlock the Liftgate Glass
Enter the factory-set 5-digit code or yourpersonal code, then press 5·6 to unlock theliftgate glass.
Displaying the Factory-Set Code
Note:Two programmed intelligent accesskeys are required for this procedure.
1. Open the floor console storagecompartment lid.
2. With the buttons facing the rear of yourvehicle and the key ring facing upward,place the first intelligent access key intothe backup slot inside the center console.
3. Press the push button ignition switchonce and wait for a few seconds.
4. Press the push button ignition switchagain and remove the intelligent accesskey from the center console.
5. Insert the second programmed key intothe backup slot in the center console,then press the push button ignitionswitch.
The factory-set code appears in theinformation display for a few seconds.
Note:The code may not display until afterany other warning messages first display.
78
Navigator (TB9) Canada/United States of America, enUSA, Edition date: 201808, First-Printing
Doors and Locks
Page 86 of 645
PASSIVE ANTI-THEFT SYSTEM
Note: The system is not compatible withaftermarket remote start systems. Use ofthese systems may result in vehicle startingproblems and a loss of security protection.
Note:Metallic objects, electronic devices ora second coded key on the same key chainmay cause vehicle starting problems if theyare too close to the key when starting theengine. Prevent these objects from touchingthe coded key while starting the engine.Switch the ignition off, move all objects onthe key chain away from the coded key andrestart the engine if a problem occurs.
Note:Do not leave a duplicate coded keyin the vehicle. Always take your keys andlock all doors when leaving the vehicle.
SecuriLock™
The system is an engine immobilizationsystem. The intended design is to helpprevent the engine from starting unless acoded key programmed to your vehicle isused. Using the wrong key may prevent theengine from starting. A message may appearin the information display.
If you are unable to start the engine with acorrectly coded key, a malfunction hashappened and a message may appear in theinformation display.
Automatic Arming
The vehicle arms immediately after youswitch the ignition off.
Automatic Disarming
If you switch the ignition on with a coded keyyou disarm the vehicle. If you unlock thedoors with the touch handle you disarm thealarm.
Replacement Keys
Note:Your vehicle comes equipped with twointelligent access keys.
The intelligent access key functions as aprogrammed key that operates the driverdoor lock and activates the intelligent accesswith push button start system, as well as aremote control.
If your programmed transmitters are lost orstolen and you do not have an extra codedkey, you will need to have your vehicletowed to an authorized dealer. You need toerase the key codes from your vehicle andprogram new coded keys.
Store an extra programmed key away fromthe vehicle in a safe place to help preventany inconveniences. See your authorizeddealer to purchase additional spare orreplacement keys.
Programming a Spare Intelligent AccessKey
Note:Do not place the device on thewireless accessory charging area whenprogramming intelligent access keys.
83
Navigator (TB9) Canada/United States of America, enUSA, Edition date: 201808, First-Printing
Security
Page 87 of 645
Note:You can program a maximum of fourkeys to your vehicle.
You must have two previously programmedintelligent access keys inside your vehicleand the new unprogrammed intelligentaccess key readily accessible. You canpurchase replacement keys or remotecontrols from an authorized dealer.
Make sure that the ignition is switched offbefore beginning this procedure. Make surethat you close all the doors before beginningand that they remain closed throughout theprocedure. Carry out all steps within 30seconds of starting the sequence. Stop andwait for at least one minute before startingagain if you carry out any steps out ofsequence.
Read and understand the entire procedurebefore you begin.
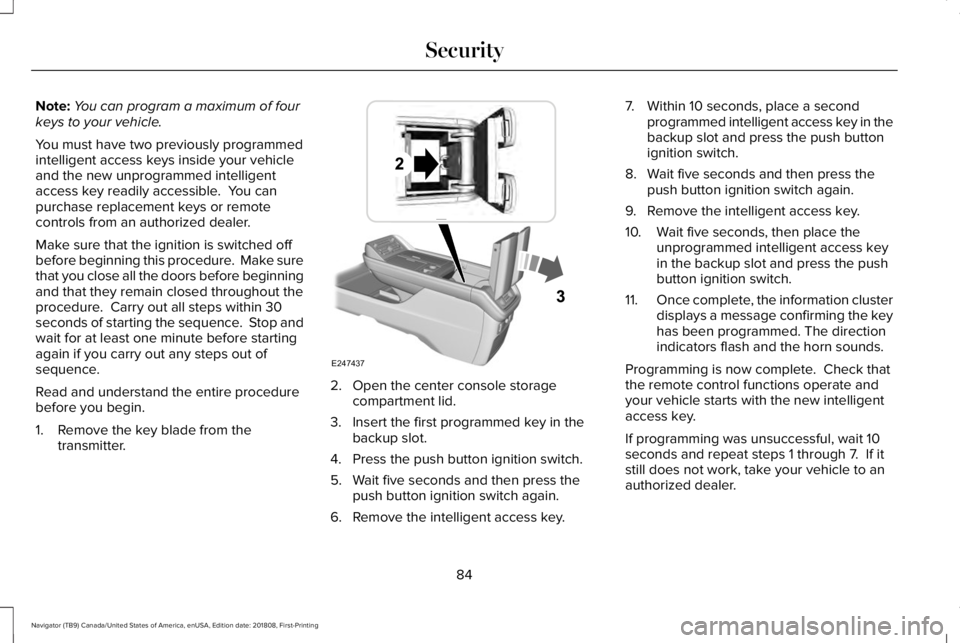
1. Remove the key blade from thetransmitter.
2. Open the center console storagecompartment lid.
3. Insert the first programmed key in thebackup slot.
4. Press the push button ignition switch.
5. Wait five seconds and then press thepush button ignition switch again.
6. Remove the intelligent access key.
7. Within 10 seconds, place a secondprogrammed intelligent access key in thebackup slot and press the push buttonignition switch.
8. Wait five seconds and then press thepush button ignition switch again.
9. Remove the intelligent access key.
10. Wait five seconds, then place theunprogrammed intelligent access keyin the backup slot and press the pushbutton ignition switch.
11.Once complete, the information clusterdisplays a message confirming the keyhas been programmed. The directionindicators flash and the horn sounds.
Programming is now complete. Check thatthe remote control functions operate andyour vehicle starts with the new intelligentaccess key.
If programming was unsuccessful, wait 10seconds and repeat steps 1 through 7. If itstill does not work, take your vehicle to anauthorized dealer.
84
Navigator (TB9) Canada/United States of America, enUSA, Edition date: 201808, First-Printing
SecurityE247437
Page 88 of 645
ANTI-THEFT ALARM - VEHICLES
WITH: INTERIOR SENSOR
Alarm System
Perimeter Alarm
The perimeter alarm is a deterrent againstunauthorized access to your vehicle throughthe doors and the hood.
Interior Sensors
Note:Do not cover up the interior lamp unitsensors.
The interior lamp unit sensors are in theoverhead console. The sensors act as adeterrent against unauthorized intrusion bysensing any movement inside your vehicle.
Inclination Sensors
When you lock your vehicle and arm thealarm, the sensors are designed to detectan attempt to raise your vehicle, for exampleto remove a wheel or to tow it away.
Alarm Settings
ALL SENSORS ACTIVE is the standardsetting. In this mode, the interior sensors areon when you arm the alarm.
In PERIMETER SENSING mode, the interiorsensors are off when you arm the alarm.
You can change the setting through theinformation display. See General Information(page 120).
Ask on Exit (If Equipped)
You can set the information display to askyou each time which level of guard you wishto set.
Triggering the Alarm
Once armed, the alarm triggers in any of thefollowing ways:
•If someone opens a door, the liftgate orthe hood without a valid key or remotecontrol.
•If you switch your vehicle on without acorrectly coded key.
•If the interior sensors detect movementwithin your vehicle.
If the alarm triggers, the alarm horn soundsfor 30 seconds and the hazard flashers turnon for five minutes.
Any further attempts to perform one of theabove triggers the alarm again.
Arming the Alarm
To arm the alarm, lock your vehicle. SeeDoors and Locks (page 72).
85
Navigator (TB9) Canada/United States of America, enUSA, Edition date: 201808, First-Printing
Security
Page 90 of 645
USING POWER RUNNING BOARDS
WARNING: In extreme climates,excessive ice buildup may occur, causingthe running boards not to deploy. Makesure that the running boards havedeployed, and have finished moving beforeattempting to step on them. The runningboards will resume normal function oncethe blockage is cleared.
WARNING: Switch off the runningboards before jacking or placing any objectunder your vehicle. Never place your handbetween the extended running board andyour vehicle. A moving running board maycause injury.
Note:Do not use the running boards, frontand rear hinge assemblies, running boardmotors, or the running board underbodymounts to lift your vehicle when jacking.Always use proper jacking points.
Note:The running boards may operate moreslowly in cool temperatures.
Note:The running board mechanism maytrap debris such as mud, dirt, snow, ice andsalt. This may cause unwanted noise. If thishappens, manually set the running boardsto the deployed position. Then, wash thesystem, in particular the front and rear hingearms, with a high-pressure car wash wand.
Automatic Power Deploy
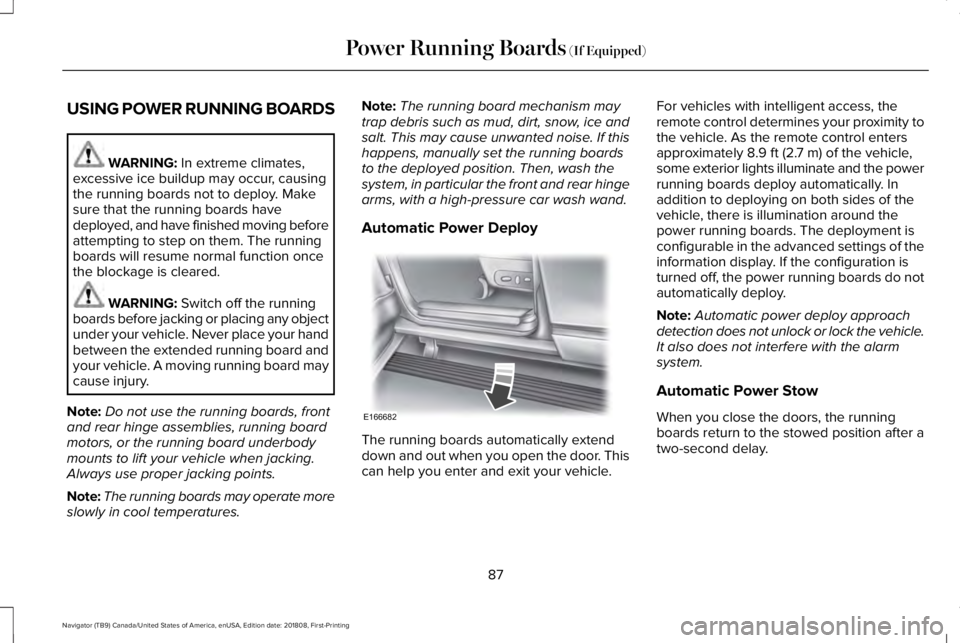
The running boards automatically extenddown and out when you open the door. Thiscan help you enter and exit your vehicle.
For vehicles with intelligent access, theremote control determines your proximity tothe vehicle. As the remote control entersapproximately 8.9 ft (2.7 m) of the vehicle,some exterior lights illuminate and the powerrunning boards deploy automatically. Inaddition to deploying on both sides of thevehicle, there is illumination around thepower running boards. The deployment isconfigurable in the advanced settings of theinformation display. If the configuration isturned off, the power running boards do notautomatically deploy.
Note:Automatic power deploy approachdetection does not unlock or lock the vehicle.It also does not interfere with the alarmsystem.
Automatic Power Stow
When you close the doors, the runningboards return to the stowed position after atwo-second delay.
87
Navigator (TB9) Canada/United States of America, enUSA, Edition date: 201808, First-Printing
Power Running Boards (If Equipped)E166682
Page 91 of 645
Manual Power Deploy
You can manually operate the runningboards in the advanced settings of theinformation display. See GeneralInformation (page 120).
Set the running boards in the deployedposition to access the roof.
The running boards return to the stowedposition and enter automatic mode when thevehicle speed exceeds 5 mph (8 km/h).
Enabling and Disabling
You can enable and disable the powerrunning board feature in the advancedsettings of the information display. SeeGeneral Information (page 120).
•When disabled (OFF), the running boardsmove to the stowed position regardlessof the door position.
•When enabled (AUTO), the runningboards move back to the correctpositions based on the door position.
Bounce-back
The running board will reverse direction andmove to the end of travel if it encounters anobject while moving.
88
Navigator (TB9) Canada/United States of America, enUSA, Edition date: 201808, First-Printing
Power Running Boards (If Equipped)
Page 92 of 645
ADJUSTING THE STEERING WHEEL
WARNING: Do not adjust thesteering wheel when your vehicle ismoving.
Note: Make sure that you are sitting in thecorrect position. See Sitting in the CorrectPosition (page 158).
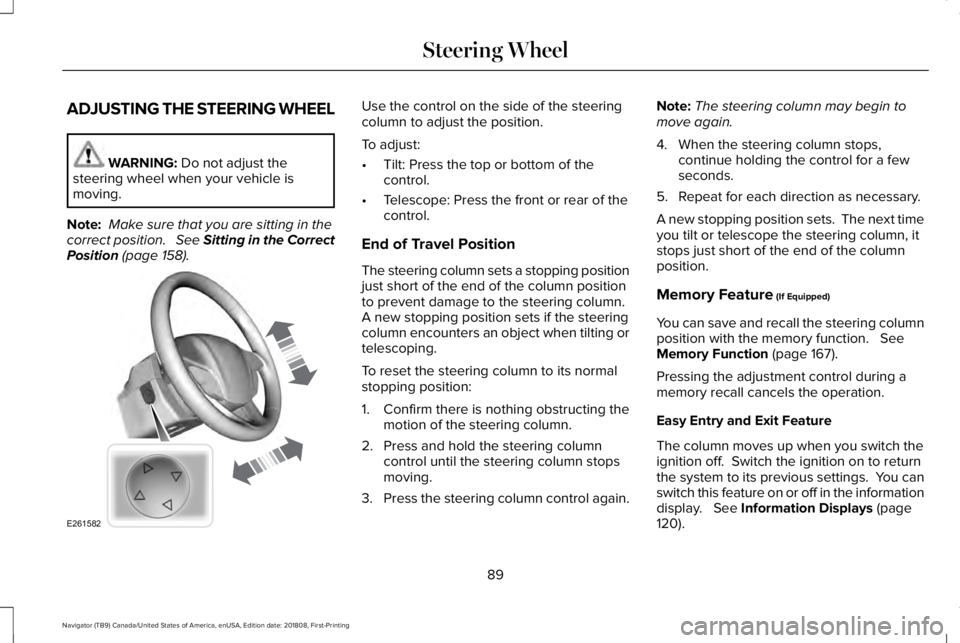
Use the control on the side of the steeringcolumn to adjust the position.
To adjust:
•Tilt: Press the top or bottom of thecontrol.
•Telescope: Press the front or rear of thecontrol.
End of Travel Position
The steering column sets a stopping positionjust short of the end of the column positionto prevent damage to the steering column. A new stopping position sets if the steeringcolumn encounters an object when tilting ortelescoping.
To reset the steering column to its normalstopping position:
1. Confirm there is nothing obstructing themotion of the steering column.
2. Press and hold the steering columncontrol until the steering column stopsmoving.
3.Press the steering column control again.
Note:The steering column may begin tomove again.
4. When the steering column stops,continue holding the control for a fewseconds.
5. Repeat for each direction as necessary.
A new stopping position sets. The next timeyou tilt or telescope the steering column, itstops just short of the end of the columnposition.
Memory Feature (If Equipped)
You can save and recall the steering columnposition with the memory function. SeeMemory Function (page 167).
Pressing the adjustment control during amemory recall cancels the operation.
Easy Entry and Exit Feature
The column moves up when you switch theignition off. Switch the ignition on to returnthe system to its previous settings. You canswitch this feature on or off in the informationdisplay. See Information Displays (page120).
89
Navigator (TB9) Canada/United States of America, enUSA, Edition date: 201808, First-Printing
Steering WheelE261582