jump LINCOLN NAVIGATOR 2019 Owners Manual
[x] Cancel search | Manufacturer: LINCOLN, Model Year: 2019, Model line: NAVIGATOR, Model: LINCOLN NAVIGATOR 2019Pages: 645, PDF Size: 5.02 MB
Page 7 of 645
Using Traction Control................................231
Stability Control
Principle of Operation................................232
Using Stability Control...............................233
Hill Descent Control
Principle of Operation................................235
Using Hill Descent Control.......................235
Parking Aids
Principle of Operation................................236
Rear Parking Aid..........................................237
Front Parking Aid........................................238
Side Sensing System.................................239
Active Park Assist.......................................240
Rear View Camera......................................249
360 Degree Camera..................................252
Cruise Control
Principle of Operation................................255
Using Cruise Control..................................255
Using Adaptive Cruise Control................256
Driving Aids
Driver Alert....................................................264
Lane Keeping System................................265
Blind Spot Information System.................271
Cross Traffic Alert........................................275
Steering.........................................................279
Pre-Collision Assist.....................................280
Drive Mode Control....................................284
Load Carrying
Rear Under Floor Storage.........................287
Cargo Nets....................................................289
Roof Racks and Load Carriers.................290
Load Limit......................................................292
Towing
Towing a Trailer............................................297
Trailer Reversing Aids................................298
Trailer Sway Control...................................308
Recommended Towing Weights.............309
Essential Towing Checks.............................311
Towing the Vehicle on Four Wheels.......319
Driving Hints
Breaking-In....................................................323
Reduced Engine Performance.................323
Economical Driving.....................................323
Driving Through Water..............................324
Floor Mats.....................................................324
Roadside Emergencies
Roadside Assistance..................................326
Hazard Flashers...........................................327
Fuel Shutoff...................................................327
Jump Starting the Vehicle.........................328
Post-Crash Alert System...........................330
Transporting the Vehicle............................331
Towing Points................................................331
Customer Assistance
Getting the Services You Need...............333
In California (U.S. Only)..............................334
The Better Business Bureau (BBB) AutoLine Program (U.S. Only).......................335
Utilizing the Mediation/Arbitration Program(Canada Only)..........................................336
4
Navigator (TB9) Canada/United States of America, enUSA, Edition date: 201808, First-Printing
Table of Contents
Page 210 of 645
•An open or pinched sensor hose.
•Incorrect engine oil level.
•Incorrect fuel for climatic conditions.
•Incorrect engine oil viscosity for climacticconditions.
Note:Some vehicles have a lifetime fuel filterthat is integrated with the fuel tank. Regularmaintenance or replacement is not needed.
Note:If these checks do not help you correctthe concern, have your vehicle checked assoon as possible.
Noise Emissions Warranty, ProhibitedTampering Acts and Maintenance
On January 1, 1978, Federal regulationbecame effective governing the noiseemission on trucks over 10,000 lb (4,536 kg)Gross Vehicle Weight Rating (GVWR). Thepreceding statements concerning prohibitedtampering acts and maintenance, and thenoise warranty found in the Warranty Guide,are applicable to complete chassis cabs over10,000 lb (4,536 kg) GVWR.
CATALYTIC CONVERTER
WARNING: Do not park, idle or driveyour vehicle on dry grass or other dryground cover. The emission system heatsup the engine compartment and exhaustsystem, creating the risk of fire.
WARNING: The normal operatingtemperature of the exhaust system is veryhigh. Never work around or attempt torepair any part of the exhaust system untilit has cooled. Use special care whenworking around the catalytic converter.The catalytic converter heats up to a veryhigh temperature after only a short periodof engine operation and stays hot after theengine is switched off.
WARNING: Exhaust leaks may resultin entry of harmful and potentially lethalfumes into the passenger compartment. Ifyou smell exhaust fumes inside yourvehicle, have your vehicle inspectedimmediately. Do not drive if you smellexhaust fumes.
Your vehicle has various emission controlcomponents and a catalytic converter thatenables it to comply with applicable exhaustemission standards.
To make sure that the catalytic converter andother emission control components continueto work properly:
•Do not crank the engine for more than10 seconds at a time.
•Do not run the engine with a spark pluglead disconnected.
•Do not push-start or tow-start yourvehicle. Use booster cables. See JumpStarting the Vehicle (page 328).
•Use only the specified fuel listed.
•Do not switch the ignition off when yourvehicle is moving.
•Avoid running out of fuel.
•Have the items listed in scheduledmaintenance information performedaccording to the specified schedule.
Note:Resulting component damage maynot be covered by the vehicle Warranty.
207
Navigator (TB9) Canada/United States of America, enUSA, Edition date: 201808, First-Printing
Engine Emission Control
Page 215 of 645
Note:This only functions if your 12-voltbattery has power and the starter can spinthe engine. If vehicle battery voltage is notsufficient, an external 12-volt power sourcesuch as jumper cables, battery charger orjump pack may be required for this featureto function.
Note:Once in this mode, sufficient batteryvoltage must be maintained or your vehiclereturns to park.
WARNING: When doing thisprocedure, you need to take thetransmission out of park (P) which meansyour vehicle can roll freely. To avoidunwanted vehicle movement, always fullyapply the parking brake prior to doing thisprocedure. Use wheels chocks ifappropriate.
1. Do not press the brake pedal. Press theSTART/STOP button.
2. Fully press down on the brake pedal.Keep the brakes applied through step 7.
3. Press the accelerator pedal to the floorand hold through step 7.
4. Press the neutral (N) button on thetransmission selector.
5. Press the neutral (N) button again toenter Stay in Neutral mode.
6. Press and release the push to startbutton, the transmission needs aminimum of 2 seconds to exit park.
7. When neutral (N) is displayed, the brakeand accelerator pedals can be released.
To exit Stay in Neutral mode, select adifferent gear.
A message appears in your informationdisplay screen when your vehicle hasentered Stay in Neutral mode.
Drive (D)
Drive (D) is the normal driving position forthe best fuel economy. The overdrivefunction allows automatic upshifts anddownshifts through gears one through ten.
Adaptive Tow/Haul Mode
WARNING: Do not use tow/haulwhen the road surface is slippery. Failureto follow this instruction could result in theloss of control of your vehicle.
Adaptive tow/haul has two modes, automaticthat is enabled by default and off.
To turn adaptive tow/haul off or on, use theinformation display controls. See GeneralInformation (page 120). The indicator lightilluminates in the instrument cluster.
Key adaptive tow/haul features:
•The system remains in the same mode,even after a key cycle.
•Is only available in normal drive modes(Normal 2H and Normal 4A).
The adaptive tow/haul feature improvestransmission operation when towing a traileror a heavy load. All transmission gear rangesare available when using adaptive tow/haul.
For information on towing. See Towing (page297).
212
Navigator (TB9) Canada/United States of America, enUSA, Edition date: 201808, First-Printing
Transmission
Page 230 of 645
Pull the switch upward and hold it.
The red warning lamp illuminates,a tone sounds and the stoplampsturn on.
The electric parking brake continues to slowyour vehicle down unless you release theswitch.
Manually Releasing the Electric ParkingBrake
Switch the ignition on.
Press and hold the brake pedal.
Push the switch downward.
The red warning lamp turns off.
If it remains illuminated or flashes, the systemhas malfunctioned. Have your vehiclechecked as soon as possible.
Pulling Away on a Hill When Towing aTrailer
Press and hold the brake pedal.
Pull the switch upward and hold it.
Shift into gear.
Press the accelerator pedal until engine hasdeveloped sufficient torque to prevent yourvehicle from rolling down the hill.
Release the switch and pull awayin a normal manner.
Automatically Releasing the ElectricParking Brake
Close the driver door.
Shift into gear.
Press the accelerator pedal and pull away ina normal manner.
The red warning lamp turns off.
If it remains illuminated or flashes, the electricparking brake has not released. Manuallyrelease the parking brake.
Releasing the Electric Parking Brake ifthe Vehicle Battery is Running Out ofCharge
Connect a booster battery to the vehiclebattery to release the electric parking brakeif the vehicle battery is running out of charge.See Jump Starting the Vehicle (page 328).
227
Navigator (TB9) Canada/United States of America, enUSA, Edition date: 201808, First-Printing
BrakesE267156 E270480 E267156 E270480 E267156 E267156 E270480
Page 329 of 645
ROADSIDE ASSISTANCE
Vehicles Sold in the United States:Getting Roadside Assistance
To fully assist you should you have a vehicleconcern, Lincoln Motor Company offers acomplimentary roadside assistance program.This program is separate from the NewVehicle Limited Warranty.
The service is available:
•Throughout the life of the vehicle fororiginal owners.
•For six years or 70,000 mi (110,000 km)(whichever comes first) for subsequentowners.
Roadside Assistance covers:
•A flat tire change with a good spare(except vehicles supplied with a tireinflation kit).
•Battery jump start.
•Lock-out assistance (key replacementcost is the client's responsibility).
•Fuel delivery — independent servicecontractors, if not prohibited by state,local or municipal law shall deliver up to2 gal (8 L) of gasoline or 5 gal (20 L) ofdiesel fuel to a disabled vehicle.Roadside Assistance limits fuel deliveryservice to two no-charge occurrenceswithin a 12-month period.
•Winch out — available within 100 ft (30 m)of a paved or county maintained road,no recoveries.
•Towing — independent servicecontractors, if not prohibited by state,local or municipal law shall tow Lincolneligible vehicles to the client's selling orpreferred dealer within 100 mi (160 km)of the disablement location or to thenearest Lincoln dealer. If a client requestsa tow to a selling or preferred dealer thatis more than 100 mi (160 km) from thedisablement location, the client isresponsible for any mileage costs inexcess of 100 mi (160 km).
•Roadside Assistance includes up to $200for a towed trailer if the disabled eligiblevehicle requires service at the nearestauthorized dealer. If the towing vehicleis operational but the trailer is not, thenthe trailer does not qualify for anyroadside services.
Vehicles Sold in the United States:Using Roadside Assistance
United States clients who require roadsideassistance, call 1-800-521-4140.
326
Navigator (TB9) Canada/United States of America, enUSA, Edition date: 201808, First-Printing
Roadside Emergencies
Page 331 of 645
1. Press START/STOP to switch off yourvehicle.
2.Press the brake pedal and START/STOPto switch on your vehicle.
3. Remove your foot from the brake pedaland press START/STOP to switch offyour vehicle.
4. You can attempt to start the vehicle bypressing the brake pedal andSTART/STOP, or press START/STOPwithout pressing the brake pedal.
JUMP STARTING THE VEHICLE
WARNING: Batteries normallyproduce explosive gases which can causepersonal injury. Therefore, do not allowflames, sparks or lighted substances tocome near the battery. When working nearthe battery, always shield your face andprotect your eyes. Always provide correctventilation.
WARNING: Keep batteries out ofreach of children. Batteries contain sulfuricacid. Avoid contact with skin, eyes orclothing. Shield your eyes when workingnear the battery to protect against possiblesplashing of acid solution. In case of acidcontact with skin or eyes, flush immediatelywith water for a minimum of 15 minutes andget prompt medical attention. If acid isswallowed, call a physician immediately.
WARNING: Use only adequatelysized cables with insulated clamps.
Note:To avoid reverse polarity connections,make sure that you correctly identify thepositive (+) and negative (-) terminals on boththe disabled and booster vehicles beforeconnecting the cables. Stay clear of movingparts.
Preparing Your Vehicle
Do not attempt to push-start your automatictransmission vehicle.
Note:Attempting to push-start a vehicle withan automatic transmission may causetransmission damage.
Note:Use only a 12-volt supply to start yourvehicle.
Note:Do not disconnect the battery of thedisabled vehicle as this could damage thevehicle electrical system.
Park the booster vehicle close to the hoodof the disabled vehicle, making sure the twovehicles do not touch.
Connecting the Jumper Cables
WARNING: Do not use fuel lines,engine valve covers, windshield wiperarms, the intake manifold, or hood latch asground points.
WARNING: Do not connect the endof the second cable to the negative (-)terminal of the battery to be jumped. Aspark may cause an explosion of the gasesthat surround the battery.
328
Navigator (TB9) Canada/United States of America, enUSA, Edition date: 201808, First-Printing
Roadside Emergencies
Page 332 of 645
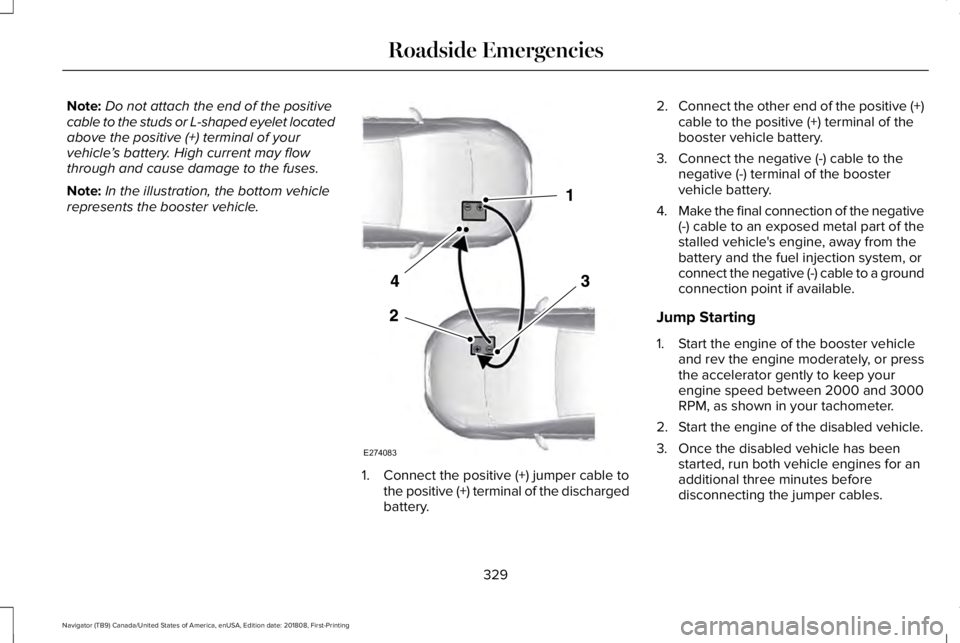
Note:Do not attach the end of the positivecable to the studs or L-shaped eyelet locatedabove the positive (+) terminal of yourvehicle’s battery. High current may flowthrough and cause damage to the fuses.
Note:In the illustration, the bottom vehiclerepresents the booster vehicle.
1. Connect the positive (+) jumper cable tothe positive (+) terminal of the dischargedbattery.
2.Connect the other end of the positive (+)cable to the positive (+) terminal of thebooster vehicle battery.
3. Connect the negative (-) cable to thenegative (-) terminal of the boostervehicle battery.
4.Make the final connection of the negative(-) cable to an exposed metal part of thestalled vehicle's engine, away from thebattery and the fuel injection system, orconnect the negative (-) cable to a groundconnection point if available.
Jump Starting
1. Start the engine of the booster vehicleand rev the engine moderately, or pressthe accelerator gently to keep yourengine speed between 2000 and 3000RPM, as shown in your tachometer.
2. Start the engine of the disabled vehicle.
3. Once the disabled vehicle has beenstarted, run both vehicle engines for anadditional three minutes beforedisconnecting the jumper cables.
329
Navigator (TB9) Canada/United States of America, enUSA, Edition date: 201808, First-Printing
Roadside EmergenciesE274083
Page 333 of 645
Removing the Jumper Cables
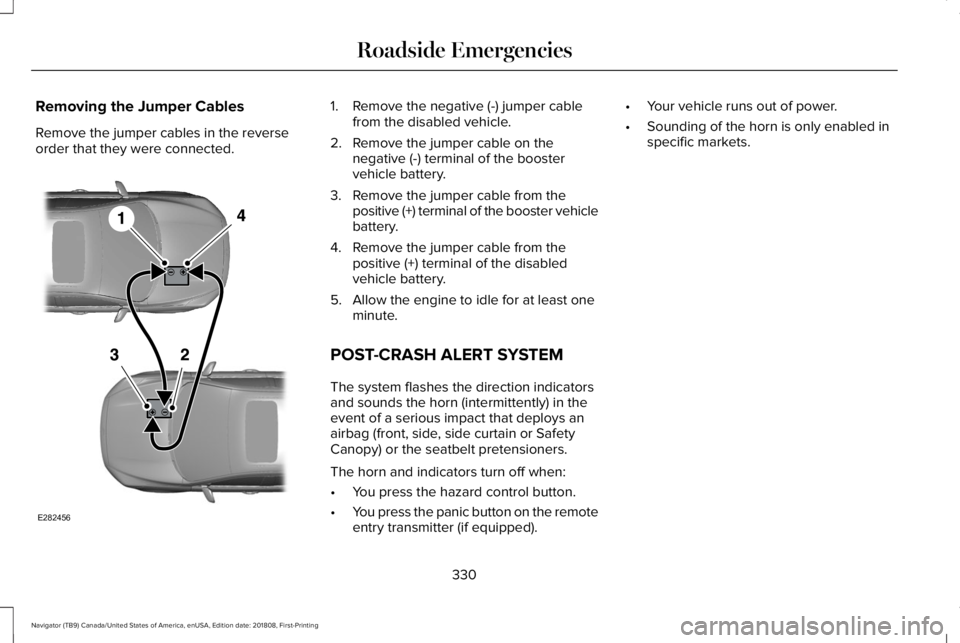
Remove the jumper cables in the reverseorder that they were connected.
1. Remove the negative (-) jumper cablefrom the disabled vehicle.
2. Remove the jumper cable on thenegative (-) terminal of the boostervehicle battery.
3. Remove the jumper cable from thepositive (+) terminal of the booster vehiclebattery.
4. Remove the jumper cable from thepositive (+) terminal of the disabledvehicle battery.
5. Allow the engine to idle for at least oneminute.
POST-CRASH ALERT SYSTEM
The system flashes the direction indicatorsand sounds the horn (intermittently) in theevent of a serious impact that deploys anairbag (front, side, side curtain or SafetyCanopy) or the seatbelt pretensioners.
The horn and indicators turn off when:
•You press the hazard control button.
•You press the panic button on the remoteentry transmitter (if equipped).
•Your vehicle runs out of power.
•Sounding of the horn is only enabled inspecific markets.
330
Navigator (TB9) Canada/United States of America, enUSA, Edition date: 201808, First-Printing
Roadside EmergenciesE282456
Page 484 of 645
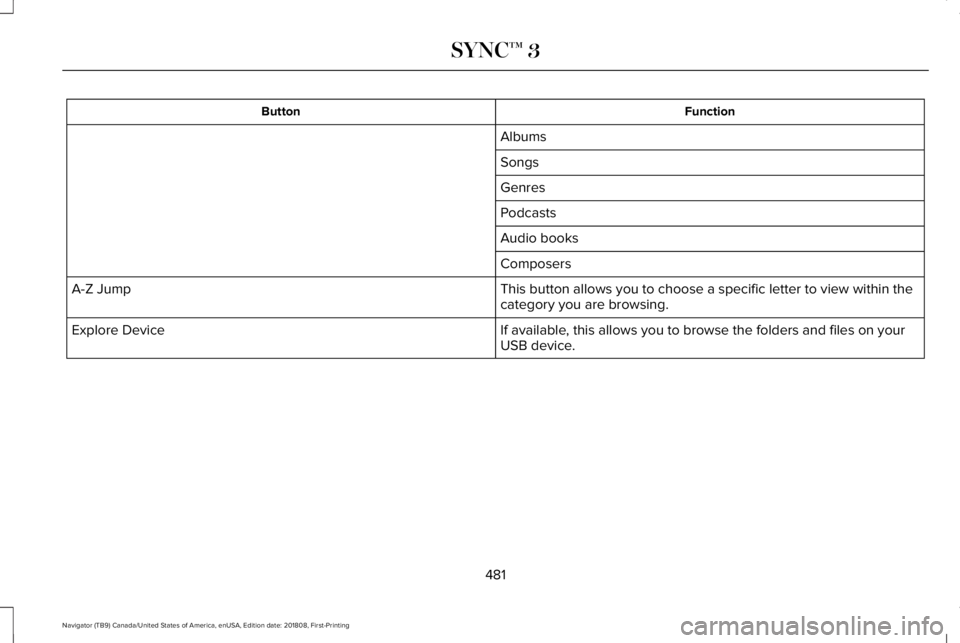
FunctionButton
Albums
Songs
Genres
Podcasts
Audio books
Composers
This button allows you to choose a specific letter to view within thecategory you are browsing.A-Z Jump
If available, this allows you to browse the folders and files on yourUSB device.Explore Device
481
Navigator (TB9) Canada/United States of America, enUSA, Edition date: 201808, First-Printing
SYNC™ 3
Page 488 of 645
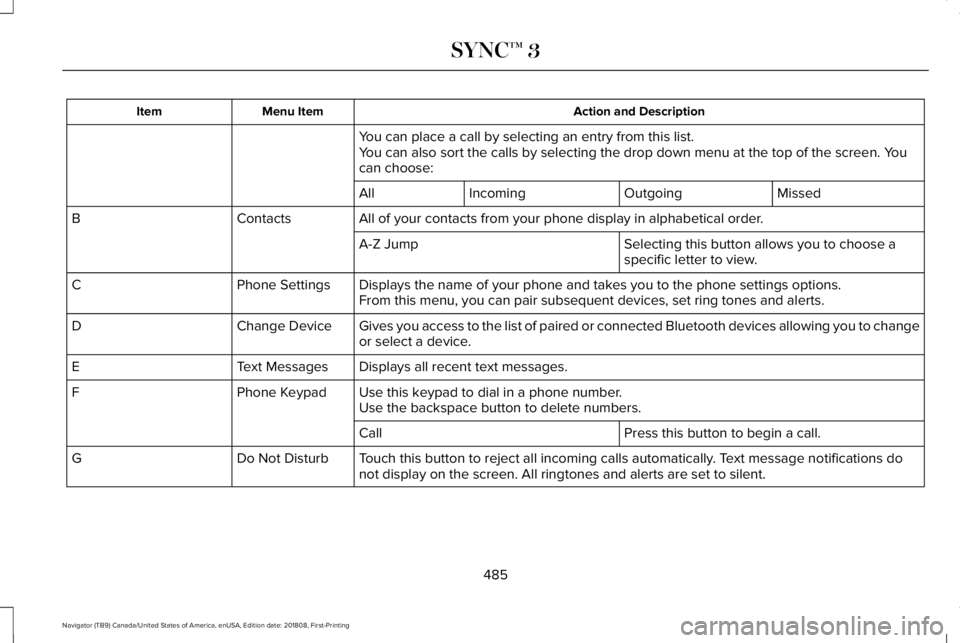
Action and DescriptionMenu ItemItem
You can place a call by selecting an entry from this list.You can also sort the calls by selecting the drop down menu at the top of the screen. Youcan choose:
MissedOutgoingIncomingAll
All of your contacts from your phone display in alphabetical order.ContactsB
Selecting this button allows you to choose aspecific letter to view.A-Z Jump
Displays the name of your phone and takes you to the phone settings options.Phone SettingsCFrom this menu, you can pair subsequent devices, set ring tones and alerts.
Gives you access to the list of paired or connected Bluetooth devices allowing you to changeor select a device.Change DeviceD
Displays all recent text messages.Text MessagesE
Use this keypad to dial in a phone number.Phone KeypadFUse the backspace button to delete numbers.
Press this button to begin a call.Call
Touch this button to reject all incoming calls automatically. Text message notifications donot display on the screen. All ringtones and alerts are set to silent.Do Not DisturbG
485
Navigator (TB9) Canada/United States of America, enUSA, Edition date: 201808, First-Printing
SYNC™ 3