light LINCOLN NAVIGATOR 2020 Owners Manual
[x] Cancel search | Manufacturer: LINCOLN, Model Year: 2020, Model line: NAVIGATOR, Model: LINCOLN NAVIGATOR 2020Pages: 622, PDF Size: 6.47 MB
Page 382 of 622
Action and description
Message
If the instrument cluster
displays one of the following
messages, repeat the
process.
Not Reset
Reset Cancelled
CHANGING THE ENGINE AIR
FILTER WARNING: To reduce the risk of
vehicle damage and personal burn injuries,
do not start your engine with the air
cleaner removed and do not remove it
while the engine is running.
Note: Failure to use the correct air filter
element may result in severe engine
damage. Resulting component damage may
not be covered by the vehicle Warranty. When changing the air filter element, use
only the air filter element listed.
See
Motorcraft Parts (page 436).
Change the air filter element at the correct
interval. See Scheduled Maintenance (page
537
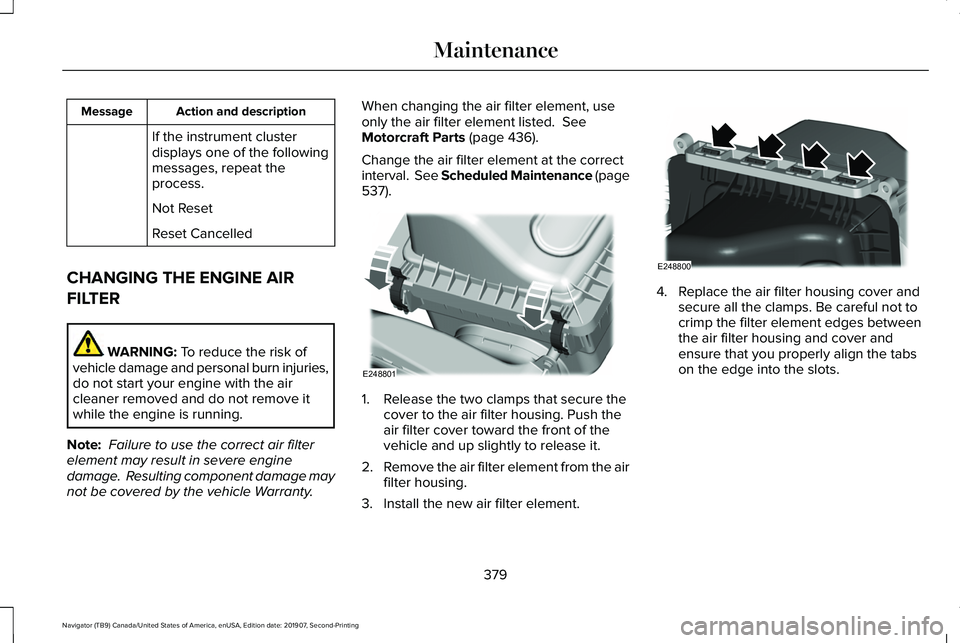
). 1. Release the two clamps that secure the
cover to the air filter housing. Push the
air filter cover toward the front of the
vehicle and up slightly to release it.
2. Remove the air filter element from the air
filter housing.
3. Install the new air filter element. 4. Replace the air filter housing cover and
secure all the clamps. Be careful not to
crimp the filter element edges between
the air filter housing and cover and
ensure that you properly align the tabs
on the edge into the slots.
379
Navigator (TB9) Canada/United States of America, enUSA, Edition date: 201907, Second-Printing MaintenanceE248801 E248800
Page 383 of 622
ENGINE COOLANT CHECK
WARNING: Do not remove the
coolant reservoir cap when the engine is
on or the cooling system is hot. Wait 10
minutes for the cooling system to cool
down. Cover the coolant reservoir cap with
a thick cloth to prevent the possibility of
scalding and slowly remove the cap.
Failure to follow this instruction could result
in personal injury. WARNING: Do not put coolant in the
windshield washer reservoir. If sprayed on
the windshield, coolant could make it
difficult to see through the windshield. WARNING:
To reduce the risk of
personal injury, make sure the engine is
cool before unscrewing the coolant
pressure relief cap. The cooling system is
under pressure. Steam and hot liquid can
come out forcefully when you loosen the
cap slightly. WARNING:
Do not add coolant
further than the MAX mark.
When the engine is cold, check the
concentration and level of the coolant at the
intervals listed in the scheduled maintenance
information.
See Scheduled Maintenance
(page 537).
Note: Make sure that the coolant level is
between the
MIN and MAX marks on the
coolant reservoir.
Note: Coolant expands when it is hot. The
level may extend beyond the
MAX mark.
Maintain coolant concentration within 48%
to 50%, which equates to a freeze point
between
-29°F (-34°C) and -35°F (-37°C).
Coolant concentration should be checked
using a refractometer. We do not recommend
the use of hydrometers or coolant test strips
for measuring coolant concentration. Adding Coolant WARNING:
Do not remove the
coolant reservoir cap when the engine is
on or the cooling system is hot. Wait 10
minutes for the cooling system to cool
down. Cover the coolant reservoir cap with
a thick cloth to prevent the possibility of
scalding and slowly remove the cap.
Failure to follow this instruction could result
in personal injury. WARNING:
Do not add engine
coolant when the engine is on or the
cooling system is hot. Failure to follow this
instruction could result in personal injury.
Note: Automotive fluids are not
interchangeable. Take care not to put
engine coolant in the windshield washer fluid
reservoir or windshield washer fluid in the
engine coolant reservoir.
380
Navigator (TB9) Canada/United States of America, enUSA, Edition date: 201907, Second-Printing Maintenance
Page 390 of 622
CHANGING THE 12V BATTERY
WARNING: Batteries normally
produce explosive gases which can cause
personal injury. Therefore, do not allow
flames, sparks or lighted substances to
come near the battery. When working near
the battery, always shield your face and
protect your eyes. Always provide correct
ventilation. WARNING:
When lifting a
plastic-cased battery, excessive pressure
on the end walls could cause acid to flow
through the vent caps, resulting in personal
injury and damage to the vehicle or battery.
Lift the battery with a battery carrier or with
your hands on opposite corners. WARNING:
Keep batteries out of
reach of children. Batteries contain sulfuric
acid. Avoid contact with skin, eyes or
clothing. Shield your eyes when working
near the battery to protect against possible
splashing of acid solution. In case of acid
contact with skin or eyes, flush immediately
with water for a minimum of 15 minutes and
get prompt medical attention. If acid is
swallowed, call a physician immediately. WARNING:
Battery posts, terminals
and related accessories contain lead and
lead compounds, chemicals known to the
State of California to cause cancer and
reproductive harm. Wash your hands after
handling
. WARNING:
This vehicle may have
more than one battery. Removing the
battery cables from only one battery does
not disconnect your vehicle electrical
system. Make sure you disconnect the
battery cables from all batteries when
disconnecting power. Failure to do so may
cause serious personal injury or property
damage.
Your vehicle is fitted with a Motorcraft
maintenance-free battery which normally
does not require additional water.
When a battery replacement is required, you
must use a recommended replacement
battery that matches the electrical
requirements of the vehicle.
Note: After cleaning or replacing the battery,
make sure you reinstall the battery vent tube,
battery cover or shield.
For longer, trouble-free operation, keep the
top of the battery clean and dry.
387
Navigator (TB9) Canada/United States of America, enUSA, Edition date: 201907, Second-Printing Maintenance
Page 393 of 622
2. Measure the height from the center of
your headlamp (indicated by a dimple at
the center of the outboard projector lens)
to the ground and mark an 8 ft (2.4 m)
horizontal reference line on the vertical
wall or screen at this height (a piece of
masking tape works well).
Note: To see a clearer light pattern for
adjusting, you may want to block the light
from one headlamp while adjusting the
other.
3. Switch on the low beam headlamps to illuminate the wall or screen and open
the hood. Cover one of the headlamps
so no light hits the wall. 4.
For halogen or LED headlamps: On the
wall or screen you will observe a light
pattern with a distinct horizontal edge
toward the right. If this edge is not at the
horizontal reference line, you will need
to adjust the beam so the edge is at the
same height as the horizontal reference
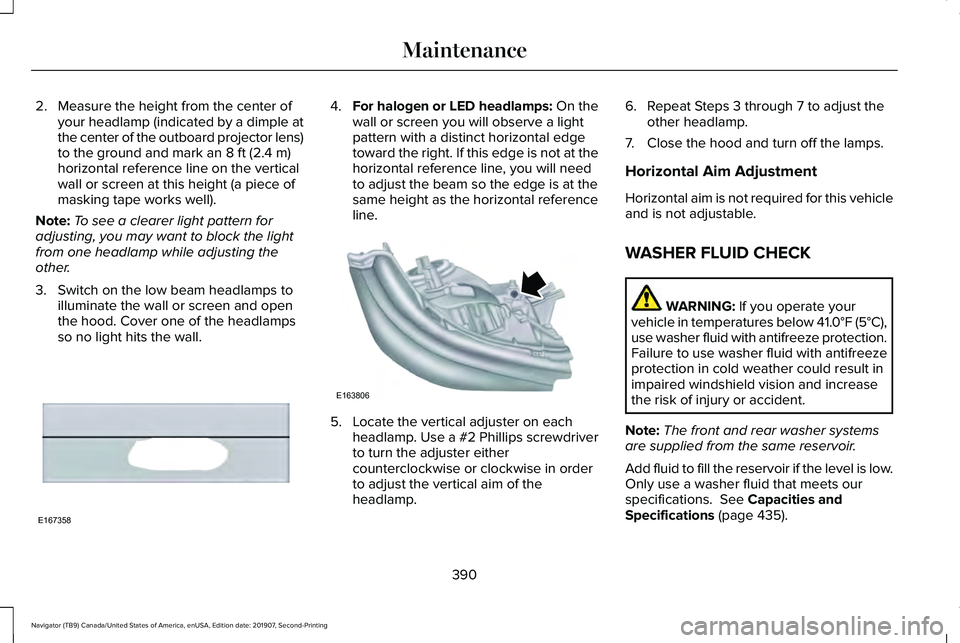
line. 5. Locate the vertical adjuster on each
headlamp. Use a #2 Phillips screwdriver
to turn the adjuster either
counterclockwise or clockwise in order
to adjust the vertical aim of the
headlamp. 6. Repeat Steps 3 through 7 to adjust the
other headlamp.
7. Close the hood and turn off the lamps.
Horizontal Aim Adjustment
Horizontal aim is not required for this vehicle
and is not adjustable.
WASHER FLUID CHECK WARNING:
If you operate your
vehicle in temperatures below 41.0°F (5°C),
use washer fluid with antifreeze protection.
Failure to use washer fluid with antifreeze
protection in cold weather could result in
impaired windshield vision and increase
the risk of injury or accident.
Note: The front and rear washer systems
are supplied from the same reservoir.
Add fluid to fill the reservoir if the level is low.
Only use a washer fluid that meets our
specifications.
See Capacities and
Specifications (page 435).
390
Navigator (TB9) Canada/United States of America, enUSA, Edition date: 201907, Second-Printing MaintenanceE167358 E163806
Page 397 of 622
Specification
Name
Motorcraft® Spot and Stain Remover, ZC-14 (U.S.) ESR-M14P5-A
Motorcraft® Ultra-Clear Spray Glass Cleaner, ZC-23 (U.S.)
Motorcraft® Wheel and Tire Cleaner, ZC-37-A (U.S. & Canada)
CLEANING THE EXTERIOR
Wash your vehicle regularly with cool or
lukewarm water and a neutral pH shampoo,
we recommend Motorcraft Detail Wash.
• Never use strong household detergents
or soap, for example dish washing or
laundry liquid. These products can
discolor and spot painted surfaces.
• Never wash your vehicle when it is hot
to the touch, or during strong or direct
sunlight.
• Dry your vehicle with a chamois or soft
terry cloth towel to eliminate water
spotting. •
Immediately remove fuel spillages, bird
droppings, insect deposits and road tar.
These may cause damage to your
vehicle ’s paintwork or trim over time. We
recommend Motorcraft Bug and Tar
Remover.
• Remove any exterior accessories, for
example antennas, before entering a car
wash.
• When filling with AdBlue®, remove any
residue on painted surfaces immediately.
Note: Suntan lotions and insect repellents
can damage painted surfaces. If these
substances come in contact with your
vehicle, wash the affected area as soon as
possible. Cleaning the Headlamps
Note:
Do not scrape the headlamp lenses
or use abrasives, alcoholic solvents or
chemical solvents to clean them.
Note: Do not wipe the headlamps when they
are dry.
394
Navigator (TB9) Canada/United States of America, enUSA, Edition date: 201907, Second-Printing Vehicle Care
Page 398 of 622
Exterior Chrome Parts
•
Apply a high quality-cleaning product to
bumpers and other chrome parts. Follow
the manufacturer’ s instructions. We
recommend Motorcraft Custom Bright
Metal Cleaner.
• Do not apply the cleaning product to hot
surfaces. Do not leave the cleaning
product on chrome surfaces longer than
the time recommended.
• Using non-recommended cleaners can
result in severe and permanent cosmetic
damage.
Note: Never use abrasive materials, for
example steel wool or plastic pads as they
can scratch the chrome surface.
Note: Do not use chrome cleaner, metal
cleaner or polish on wheels or wheel covers.
Exterior Plastic Parts
For routine cleaning we recommend
Motorcraft Detail Wash. If tar or grease spots
are present, we recommend Motorcraft Bug
and Tar Remover. Stripes or Graphics (If Equipped)
Hand washing your vehicle is preferred
however, pressure washing may be used
under the following conditions:
• Do not use water pressure higher than
2,000 psi (14,000 kPa)
.
• Do not use water hotter than 179°F (82°C).
• Use a spray with a 40° wide spray angle
pattern.
• Keep the nozzle at a
12 in (305 mm)
distance and 90° angle to your vehicle's
surface.
Note: Holding the pressure washer nozzle
at an angle to the vehicle's surface may
damage graphics and cause the edges to
peel away from the vehicle's surface.
Underbody
Regularly clean the underside of your vehicle
using water. Keep body and door drain holes
free of debris or foreign material. Under Hood
For removing black rubber marks from under
the hood we recommend Motorcraft Wheel
and Tire Cleaner or Motorcraft Bug and Tar
Remover.
WAXING
Regular waxing is necessary to protect your
car's paint from the elements. We
recommend that you wash and wax the
painted surface once or twice a year.
When washing and waxing, park your vehicle
in a shaded area out of direct sunlight.
Always wash your vehicle before applying
wax.
•
Use a quality wax that does not contain
abrasives.
• Follow the manufacturer’ s instructions to
apply and remove the wax.
• Apply a small amount of wax in a
back-and-forth motion, not in circles.
395
Navigator (TB9) Canada/United States of America, enUSA, Edition date: 201907, Second-Printing Vehicle Care
Page 400 of 622
Note:
Do not use razor blades or other
sharp objects to clean or remove decals from
the inside of the heated rear window. The
vehicle warranty does not cover damage
caused to the heated rear window grid lines.
CLEANING THE INTERIOR WARNING: Do not use cleaning
solvents, bleach or dye on the vehicle's
seatbelts, as these actions may weaken
the belt webbing. WARNING:
On vehicles equipped
with seat-mounted airbags, do not use
chemical solvents or strong detergents.
Such products could contaminate the side
airbag system and affect performance of
the side airbag in a crash. Note:
Follow the same procedure for
cleaning leather seats when cleaning leather
interior.
See Cleaning Leather Seats (page
400).
Note: Do not use household cleaning
products or glass cleaners, which can stain
and discolor the fabric and affect the flame
retardant abilities of the seat materials.
For fabric, carpets, cloth seats, safety belts
and seats equipped with side airbags:
• Remove dust and loose dirt with a
vacuum cleaner.
• Remove light stains and soil with
Motorcraft® Professional Strength Carpet
& Upholstery Cleaner.
For grease or tar stains:
• Spot clean the area with Motorcraft® Spot
and Stain Remover. In Canada, use
Motorcraft® Multi-Purpose Cleaner.
• If a ring forms on the fabric after spot
cleaning, clean the entire area
immediately, but do not oversaturate or
the ring will set. Cleaning Black Label or Presidential
Interior
(If Equipped)
Note: Alcantara microfiber cloth fabric is
made of polyester microfiber with
micro-porous polyurethane. Using
commercially available fabric cleaners can
cause permanent damage.
Note: Do not use commercially available
leather and vinyl cleaning products on
Alcantara microfiber cloth fabric.
Note: Lincoln Black Label or Presidential
vehicles may have Alcantara microfiber cloth
fabric on the seats, headliner, floor mats and
door panels.
Depending on the type of stain, use water,
lemon juice or pure ethyl alcohol when
cleaning. For cleaning Alcantara microfiber
cloth, refer to the following chart:
397
Navigator (TB9) Canada/United States of America, enUSA, Edition date: 201907, Second-Printing Vehicle Care
Page 404 of 622
Alloy wheels and wheel covers are coated
with a clear coat paint finish. To maintain
their condition we recommend that you:
•
Clean them weekly with the
recommended wheel and tire cleaner.
• Use a sponge to remove heavy deposits
of dirt and brake dust accumulation.
• Rinse them thoroughly with a pressurized
stream of water when you complete the
cleaning process.
We recommend that you use our surface
wheel cleaner. Make sure that you read and
follow the manufacturer’ s instructions.
Using other non-recommended cleaning
products can result in severe and permanent
damage.
VEHICLE STORAGE
If you plan on storing your vehicle for 30
days or more, read the following
maintenance recommendations to make sure
your vehicle stays in good operating
condition. We engineer and test all motor vehicles and
their components for reliable, regular driving.
Under various conditions, long-term storage
may lead to degraded engine performance
or failure unless you use specific precautions
to preserve engine components.
General
•
Store all vehicles in a dry, ventilated
place.
• Protect from sunlight, if possible.
• If vehicles are stored outside, they
require regular maintenance to protect
against rust and damage.
Body
• Wash your vehicle thoroughly to remove
dirt, grease, oil, tar or mud from exterior
surfaces, rear-wheel housing and the
underside of front fenders.
• Periodically wash your vehicle if it is
stored in exposed locations.
• Touch-up exposed or primed metal to
prevent rust. •
Cover chrome and stainless steel parts
with a thick coat of auto wax to prevent
discoloration. Re-wax as necessary when
you wash your vehicle.
• Lubricate all hood, door and luggage
compartment hinges and latches with a
light grade oil.
• Cover interior trim to prevent fading.
• Keep all rubber parts free from oil and
solvents.
Engine
• Change the engine oil and filter prior to
storage because used engine oil contains
contaminates which may cause engine
damage.
• Start the engine every 15 days for a
minimum of 15 minutes. Run at fast idle
with the climate controls set to defrost
until the engine reaches normal
operating temperature.
• With your foot on the brake, shift through
all the gears while the engine is running.
• We recommend that you change the
engine oil before you use your vehicle
again.
401
Navigator (TB9) Canada/United States of America, enUSA, Edition date: 201907, Second-Printing Vehicle Care
Page 409 of 622
•
Higher - to allow higher load carrying
capacity and to allow it to travel over
rough terrain without getting hung up or
damaging underbody components.
• Shorter - to give it the capability to
approach inclines and drive over the
crest of a hill without getting hung up or
damaging underbody components. All
other things held equal, a shorter
wheelbase may make your vehicle
quicker to respond to steering inputs
than a vehicle with a longer wheelbase.
• Narrower - to provide greater
maneuverability in tight spaces,
particularly in off-road use.
As a result of the above dimensional
differences, Sport utility vehicles and trucks
often have a higher center of gravity and a
greater difference in center of gravity
between the loaded and unloaded condition.
These differences that make your vehicle so
versatile also make it handle differently than
an ordinary passenger car. TIRE CARE
Information About Uniform Tire Quality
Grading
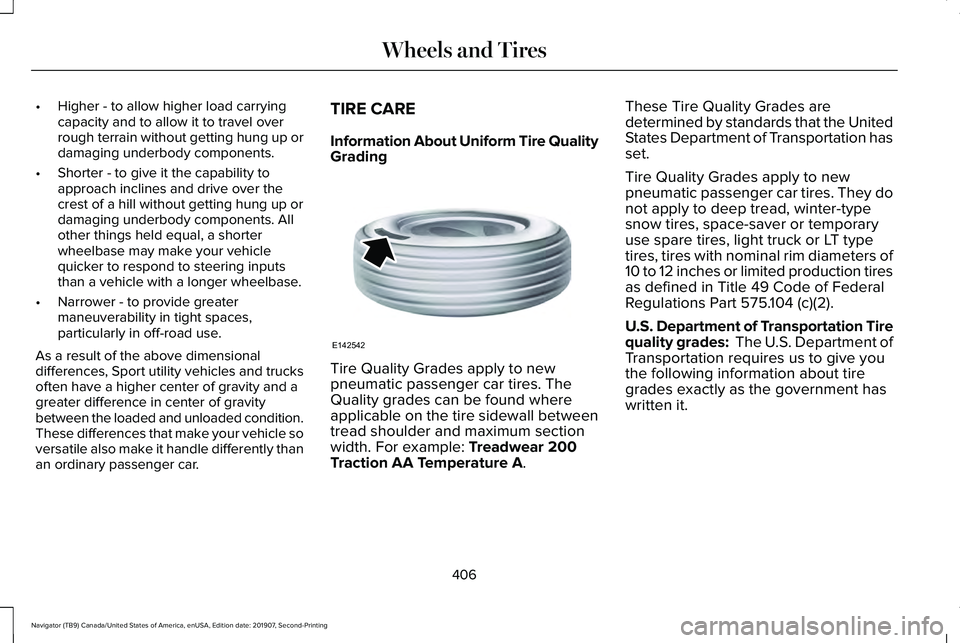
Tire Quality Grades apply to new
pneumatic passenger car tires. The
Quality grades can be found where
applicable on the tire sidewall between
tread shoulder and maximum section
width. For example: Treadwear 200
Traction AA Temperature A. These Tire Quality Grades are
determined by standards that the United
States Department of Transportation has
set.
Tire Quality Grades apply to new
pneumatic passenger car tires. They do
not apply to deep tread, winter-type
snow tires, space-saver or temporary
use spare tires, light truck or LT type
tires, tires with nominal rim diameters of
10 to 12 inches or limited production tires
as defined in Title 49 Code of Federal
Regulations Part 575.104 (c)(2).
U.S. Department of Transportation Tire
quality grades: The U.S. Department of
Transportation requires us to give you
the following information about tire
grades exactly as the government has
written it.
406
Navigator (TB9) Canada/United States of America, enUSA, Edition date: 201907, Second-Printing Wheels and TiresE142542
Page 411 of 622
*Standard load: A class of P-metric or
Metric tires designed to carry a
maximum load at set pressure. For
example: For P-Metric tires
35 psi
(2.4 bar) and for Metric 36 psi (2.5 bar).
Increasing the inflation pressure beyond
this pressure will not increase the tire ’s
load carrying capability.
*
Extra load: A class of P-metric or Metric
tires designed to carry a heavier
maximum load at
42 psi (2.9 bar).
Increasing the inflation pressure beyond
this pressure will not increase the tire ’s
load carrying capability.
*
kPa: Kilopascal, a metric unit of air
pressure.
*PSI: Pounds per square inch, a standard
unit of air pressure.
*
Cold tire pressure: The tire pressure
when the vehicle has been stationary
and out of direct sunlight for an hour or
more and prior to the vehicle being
driven for 1 mile (1.6 kilometers). *
Recommended inflation pressure: The
cold inflation pressure found on the
Safety Compliance Certification Label
(affixed to either the door hinge pillar,
door-latch post, or the door edge that
meets the door-latch post, next to the
driver's seating position), or Tire Label
located on the B-pillar or the edge of the
driver's door.
B-pillar:
The structural member at the
side of the vehicle behind the front door.
*
Bead area of the tire: Area of the tire
next to the rim.
*
Sidewall of the tire: Area between the
bead area and the tread.
*
Tread area of the tire: Area of the
perimeter of the tire that contacts the
road when mounted on the vehicle.
*
Rim: The metal support (wheel) for a
tire or a tire and tube assembly upon
which the tire beads are seated. Information Contained on the Tire
Sidewall
Both United States and Canada Federal
regulations require tire manufacturers
to place standardized information on the
sidewall of all tires. This information
identifies and describes the fundamental
characteristics of the tire and also
provides a U.S. DOT Tire Identification
Number for safety standard certification
and in case of a recall.
408
Navigator (TB9) Canada/United States of America, enUSA, Edition date: 201907, Second-Printing Wheels and Tires