change wheel LINCOLN NAVIGATOR 2020 User Guide
[x] Cancel search | Manufacturer: LINCOLN, Model Year: 2020, Model line: NAVIGATOR, Model: LINCOLN NAVIGATOR 2020Pages: 622, PDF Size: 6.47 MB
Page 248 of 622
Electronic Stability Control
The system enhances your vehicle
’s ability
to prevent skids or lateral slides by applying
brakes to one or more of the wheels
individually and, if necessary, reducing
engine power.
Roll Stability Control
The system enhances your vehicle ’s ability
to prevent rollovers by detecting your
vehicle ’s roll motion and the rate at which it
changes by applying the brakes to one or
more wheels individually.
Traction Control
The system enhances your vehicle ’s ability
to maintain traction of the wheels by
detecting and controlling wheel spin. See
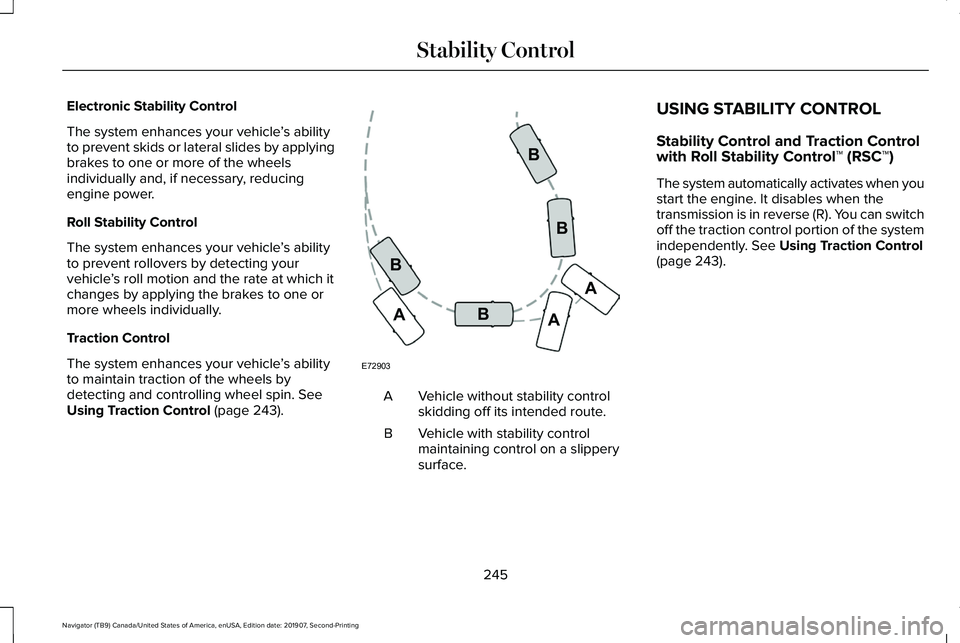
Using Traction Control (page 243). Vehicle without stability control
skidding off its intended route.
A
Vehicle with stability control
maintaining control on a slippery
surface.
B USING STABILITY CONTROL
Stability Control and Traction Control
with Roll Stability Control™ (RSC™)
The system automatically activates when you
start the engine. It disables when the
transmission is in reverse (R). You can switch
off the traction control portion of the system
independently.
See Using Traction Control
(page 243).
245
Navigator (TB9) Canada/United States of America, enUSA, Edition date: 201907, Second-Printing Stability ControlE72903A
AA
B
BB
B
Page 257 of 622
WARNING: Active park assist does
not apply the brakes under any
circumstances. WARNING:
You are responsible for
controlling your vehicle at all times. The
system is designed to be an aid and does
not relieve you of your responsibility to
drive with due care and attention. Failure
to follow this instruction could result in the
loss of control of your vehicle, personal
injury or death.
Active park assist is a multi-step process and
may require you to shift the transmission
multiple times. Follow the onscreen
instructions until the parking maneuver is
complete.
If you are uncomfortable with the proximity
to any vehicle or object, you may choose to
override the system by grabbing the steering
wheel, or by taking full control of your vehicle
after pressing the active park assist button.
Keep your hands, hair, clothing and any
loose items clear of the steering wheel when
using active park assist. The sensors are on the front and rear
bumpers.
Note:
Keep the sensors free from snow, ice
and large accumulations of dirt.
Note: Do not cover up the sensors.
Note: Do not clean the sensors with sharp
objects.
Note: The sensors may not detect objects
with surfaces that absorb ultrasonic waves.
The sensors may falsely detect objects due
to ultrasonic interference caused by
motorcycle exhausts, truck air brakes or
horns, for example.
Note: If you change any tires, the system
must recalibrate and may not correctly
operate for a short time.
The system may not correctly operate in any
of the following conditions:
• You use a spare tire or a tire that is
significantly worn more than the other
tires.
• One or more tires are incorrectly inflated.
• You try to park on a tight curve. •
Something passes between the front
bumper and the parking space. For
example, a pedestrian or cyclist.
• The edge of the neighboring parked
vehicle is high off the ground. For
example, a bus, tow truck or flatbed
truck.
• The weather conditions are poor. For
example, during heavy rain, snow, fog,
high humidity and high temperatures.
Do not use the system if:
• You have attached an add-on accessory
close to the sensors on the front or rear
of your vehicle. For example, a bike rack
or trailer.
• You have attached an overhanging
object to the roof. For example, a
surfboard.
• The front bumper, rear bumper or the
side sensors are damaged.
• The correct tire size is not in use on your
vehicle. For example, a mini-spare tire.
254
Navigator (TB9) Canada/United States of America, enUSA, Edition date: 201907, Second-Printing Parking Aids
Page 266 of 622
The camera may not operate correctly under
the following conditions:
•
Nighttime or dark areas if one or both
reverse lamps are not operating.
• Mud, water or debris obstructs the
camera's view. Clean the lens with a soft,
lint-free cloth and non-abrasive cleaner.
The rear view camera has a washer that
activates when you use the rear window
washer. See Rear Window Wiper and
Washers (page 107).
• The rear of your vehicle is hit or
damaged, causing the camera to become
misaligned.
Camera System Settings
The rear view camera system settings can
be accessed through the display screen.
See
General Information (page 133).
Camera Guidelines
Note: Active guidelines are only available
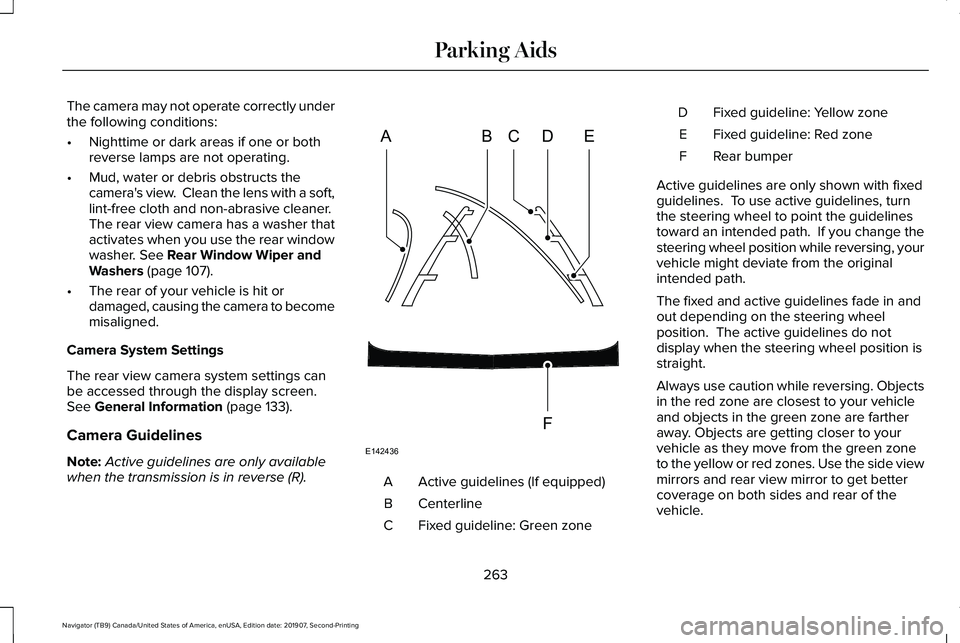
when the transmission is in reverse (R). Active guidelines (If equipped)
A
Centerline
B
Fixed guideline: Green zone
C Fixed guideline: Yellow zone
D
Fixed guideline: Red zone
E
Rear bumper
F
Active guidelines are only shown with fixed
guidelines. To use active guidelines, turn
the steering wheel to point the guidelines
toward an intended path. If you change the
steering wheel position while reversing, your
vehicle might deviate from the original
intended path.
The fixed and active guidelines fade in and
out depending on the steering wheel
position. The active guidelines do not
display when the steering wheel position is
straight.
Always use caution while reversing. Objects
in the red zone are closest to your vehicle
and objects in the green zone are farther
away. Objects are getting closer to your
vehicle as they move from the green zone
to the yellow or red zones. Use the side view
mirrors and rear view mirror to get better
coverage on both sides and rear of the
vehicle.
263
Navigator (TB9) Canada/United States of America, enUSA, Edition date: 201907, Second-Printing Parking AidsABCD
F
E
E142436
Page 271 of 622
WHAT IS CRUISE CONTROL
Cruise control lets you maintain a set speed
without keeping your foot on the accelerator
pedal. You can use cruise control when your
vehicle speed is greater than 20 mph
(30 km/h).
SWITCHING CRUISE CONTROL ON
AND OFF WARNING:
Do not use cruise control
on winding roads, in heavy traffic or when
the road surface is slippery. This could
result in loss of vehicle control, serious
injury or death.
The cruise controls are on the steering
wheel.
See Cruise Control (page 102).
Switching Cruise Control On Press the button. Switching Cruise Control Off Press the button when the system
is in standby mode.
The system also turns off when you switch
the ignition off.
Note: The set speed erases when you switch
the system off.
SETTING THE CRUISE CONTROL
SPEED WARNING:
When you are going
downhill, your vehicle speed could
increase above the set speed. The system
does not apply the brakes.
Drive to the speed you prefer. Press either button to set the
current speed.Take your foot off the accelerator pedal.
Note:
The indicator changes color in the
information display.
Changing the Set Speed Press and release the button to
increase the set speed in small
increments.
Press and hold the button to accelerate.
Release the button when you reach your
preferred speed. Press and release the button to
decrease the set speed in small
increments.
Press and hold the button to decelerate.
Release the button when you reach your
preferred speed.
Note: If you accelerate by pressing the
accelerator pedal, the set speed does not
change. When you release the accelerator
pedal, your vehicle returns to the speed that
you previously set.
268
Navigator (TB9) Canada/United States of America, enUSA, Edition date: 201907, Second-Printing Cruise ControlE265296 E265297
Page 282 of 622

WARNING: The system may not
correctly operate if your vehicle is fitted
with a suspension kit not approved by us.
Note: The system works above
40 mph
(64 km/h).
Note: The system works as long as the
camera can detect one lane marking.
Note: When you select aid or alert and aid
mode and the system detects no steering
activity for a short period, the system alerts
you to put your hands on the steering wheel.
The system may detect a light grip or touch
on the steering wheel as hands off driving.
Note: The system may not function if the
camera is blocked, or if the windshield is
damaged or dirty. When you switch the system on and it
detects an unintentional drift out of your lane
is likely to occur, the system notifies or
assists you to stay in your lane through the
steering system and information display. In
Alert mode, the system provides a warning
by vibrating the steering wheel. In Aid mode,
the system provides steering assistance by
gently counter steering your vehicle back
into the lane.When the system is functioning in the
combined Alert and Aid mode, the system
first provides steering assistance by gently
counter steering your vehicle back into the
lane, followed by a warning that vibrates the
steering wheel if the vehicle is still out of the
lane markings.
Switching the System On and Off
Note:
The system on or off setting is stored
until it is manually changed, unless a MyKey™
is detected. If the system detects a MyKey™,
it defaults to on and the mode is set to alert. Press the button on the direction indicator
stalk to switch the system on or off.
279
Navigator (TB9) Canada/United States of America, enUSA, Edition date: 201907, Second-Printing Driving AidsE249505 E132099
Page 284 of 622
Intensity: This setting affects the intensity of
the steering wheel vibration used for the alert
and alert and aid modes.
This setting does
not affect the aid mode.
• Low.
• Medium.
• High.
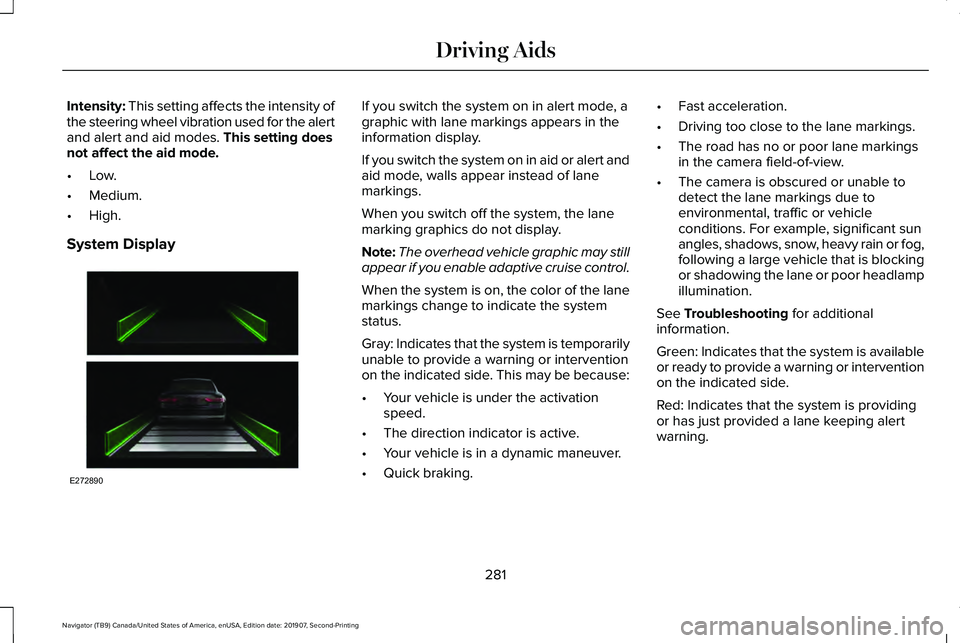
System Display If you switch the system on in alert mode, a
graphic with lane markings appears in the
information display.
If you switch the system on in aid or alert and
aid mode, walls appear instead of lane
markings.
When you switch off the system, the lane
marking graphics do not display.
Note:
The overhead vehicle graphic may still
appear if you enable adaptive cruise control.
When the system is on, the color of the lane
markings change to indicate the system
status.
Gray: Indicates that the system is temporarily
unable to provide a warning or intervention
on the indicated side. This may be because:
• Your vehicle is under the activation
speed.
• The direction indicator is active.
• Your vehicle is in a dynamic maneuver.
• Quick braking. •
Fast acceleration.
• Driving too close to the lane markings.
• The road has no or poor lane markings
in the camera field-of-view.
• The camera is obscured or unable to
detect the lane markings due to
environmental, traffic or vehicle
conditions. For example, significant sun
angles, shadows, snow, heavy rain or fog,
following a large vehicle that is blocking
or shadowing the lane or poor headlamp
illumination.
See
Troubleshooting for additional
information.
Green: Indicates that the system is available
or ready to provide a warning or intervention
on the indicated side.
Red: Indicates that the system is providing
or has just provided a lane keeping alert
warning.
281
Navigator (TB9) Canada/United States of America, enUSA, Edition date: 201907, Second-Printing Driving AidsE272890
Page 303 of 622
•
NORMAL – For everyday driving. This
mode is a perfect balance of excitement,
comfort and convenience.
• EXCITE – For aggressive on-road driving.
This mode increases throttle response,
provides a sportier steering feel, along
with quicker shifting. The suspension
stiffens, with an emphasis on handling
and control. The transmission also holds
gears longer, helping your vehicle
accelerate faster when shifting gears.
• CONSERVE
– Enables efficient and
responsible driving. It helps deliver
maximum fuel efficiency and increases
driving range.
• NORMAL 4A
– For general on-road
driving. Use this mode on normal firm
surfaces such as dry or wet pavement
and hard packed dirt or gravel roads.
Delivers power to all four wheels, as
required. •
SLIPPERY
– For less than ideal road
conditions, such as snow or ice covered
roads. Slippery mode inspires confidence
without taking away from driving
pleasure. Slippery mode lowers throttle
response and optimizes shifting for
slippery surfaces.
• DEEP CONDITIONS
– Used for crossing
terrain that has deformable deep, rutted
surfaces such as mud, deep snow or
deep sand. Do not use on dry, hard
surfaced roads.
• SLOW CLIMB
– Used when you need
extra power, such as when climbing
steep grades, going through deep sand
or pulling a boat out of a launch ramp.
Do not use on dry, hard surfaced roads.
Slow Climb mode puts you in 4x4 Low
drive line settings.
Note: Slow Climb is only available on
vehicles with 4x4 and a two-speed transfer
case. Note:
The system has diagnostic checks that
continuously monitor the system for proper
operation. Certain drive modes are not
available based on gear shifter position. If
a mode is unavailable due to a system fault
or change in gear shifter position, the mode
defaults to
NORMAL.
300
Navigator (TB9) Canada/United States of America, enUSA, Edition date: 201907, Second-Printing Driving Aids
Page 319 of 622
Distance D
The horizontal distance from the bumper to
the center of the trailer axle (single axle
trailers), or the center of the axles (trailers
with dual axles or more).
Note:
If the distance ends in anything less
than one half of an inch, round down to the
current whole inch. If a distance ends in one
half or greater of an inch, round up to the
next whole inch. For example, 12.3 in
(31.12 cm) would be rounded down to 12 in
(30.48 cm). 12.5 in (31.75 cm) would be
rounded up to 13 in (33 cm).
Step 5: Enter Measurements Using the
Information Display
Using the recorded measurements, enter the
required data into the system. Follow the on
screen prompts to enter each of the
measurements taken in step 4. When all four
distances have been entered, a confirmation
display will appear. Check the values are
correct before proceeding, or go back to
change any if required. Step 6: Confirming the Sticker Location
Check the rear view camera display to see
if the sticker is identified by the system and
marked with a red circle.
Confirm that the red circle is correctly located
over the sticker image in the display. The on
screen prompt will ask you to confirm this.
Note:
If the system cannot locate the sticker
try cleaning the camera lens, and also make
sure the sticker is within the green zone as
indicated in step 3.
Calibrating the System
To complete setup, drive your vehicle
straight forward between 4 mph (6 km/h) and
24 mph (39 km/h)
following the on screen
prompt.
Note: Check your measurements to make
sure you measured from the correct points.
Note: If you move the steering wheel during
this procedure, the calibration pauses.
Note: We recommend that you do not do
this at night. A message will be displayed during
calibration and after calibration is complete.
Using Pro Trailer Backup Assist
To use the system press the button and
select the required trailer from the display.
316
Navigator (TB9) Canada/United States of America, enUSA, Edition date: 201907, Second-Printing Towing
Page 325 of 622
System consistently shows Stop Now Max
trailer angle reached warning:
•
The system uses your measurements to
determine sticker position and establish
system limits. Accurate sticker placement
and trailer measurements will provide the
best system performance. If you are
consistently receiving this warning it is
likely there is an issue with sticker
placement or the entered measurements.
Make sure that the sticker is placed
correctly based on steps 3 and the
measurements were made correctly
according to Step 4. The troubleshooting
guide for trailer measurements can also
be reviewed for help in making
measurements.
• To change sticker location or change
trailer measurements, go into the Towing
menu, select trailer options, select
change trailer setting and then select the
change sticker option. •
If the sticker location needs to be
changed, the previous sticker must be
removed and a new sticker needs to be
placed on the trailer. ONLY ONE
STICKER SHOULD BE PLACED ON THE
TRAILER FOR PROPER SYSTEM
FUNCTION.
• Disregard the prompt to remove this
sticker and continue to the next step if
you only plan to update the
measurements for the current sticker
location.
System consistently shows Stop now take
control of steering warning:
• The system displays this warning when
it can no longer steer the vehicle and you
must take over steering. There are four
reasons why this warning displays and
additional information regarding the
reason for the warning is available on the
center display.
• The steering wheel is touched while the
system is controlling it. Avoid touching
the wheel during system operation. •
The maximum speed for feature
operation is exceeded. System
performance is optimized at slower
speeds. Backup slowly.
• The sticker was lost by the camera
system. Once your vehicle is stopped
additional warnings will indicate the
sticker was lost. Refer to sticker lost
trouble shooting tips.
• An internal condition for system
operation was not met which requires
your vehicle return to manual control of
the steering.
Note: The system is designed to be used
with the same trailer connection every time
the trailer is chosen from the selection menu.
Using a different drawbar or a different pin
hole (on drawbars with more than one) when
connecting the drawbar to your vehicle
affects the trailer measurements. Take the
measurements again and update if required.
322
Navigator (TB9) Canada/United States of America, enUSA, Edition date: 201907, Second-Printing Towing
Page 334 of 622
The gain setting sets the trailer brake
controller for the specific towing condition.
You should change the setting as towing
conditions change. Changes to towing
conditions include trailer load, vehicle load,
road conditions and weather.
The gain should be set to provide the
maximum trailer braking assistance while
making sure the trailer wheels do not lock
when using the brakes. Locked trailer wheels
may lead to trailer instability.
1.
Make sure the trailer brakes are in good
working condition, functioning normally
and properly adjusted. See your trailer
dealer if necessary.
2. Hook up the trailer and make the electrical connections according to the
trailer manufacturer's instructions.
3. When you plug in a trailer with electric or
electric-over-hydraulic brakes, a message
confirming connection appears in the
information display. 4.
Use the gain adjustment (+ and -) buttons
to increase or decrease the gain setting
to the desired starting point. A gain
setting of 6.0 is a good starting point for
heavier loads.
5. In a traffic-free environment, tow the trailer on a dry, level surface at a speed
of 20–25 mph (32–40 km/h) and
squeeze the manual control lever
completely.
6. If the trailer wheels lock up, indicated by
squealing tires, reduce the gain setting.
If the trailer wheels turn freely, increase
the gain setting. Repeat Steps 5 and 6
until the gain setting is at a point just
below trailer wheel lock-up. If towing a
heavier trailer, trailer wheel lock-up may
not be attainable even with the maximum
gain setting of 10.
Explanation of Information Display Warning
Messages
Note: An authorized dealer can diagnose
the trailer brake controller to determine
exactly which trailer fault has occurred.
However, your warranty does not cover this
diagnosis if the fault is with the trailer. A message indicating a trailer brake module
fault may display in response to faults sensed
by the trailer brake controller, accompanied
by a single tone. If this message appears,
contact an authorized dealer as soon as
possible for diagnosis and repair. The
controller may still function, but performance
may be degraded.
A message indicating a trailer wiring fault
may display when there is a short circuit on
the electric brake output wire. If this message
displays, accompanied by a single tone, with
no trailer connected, the problem is with your
vehicle wiring between the trailer brake
controller and the 7-pin connector at the
bumper. If the message only displays with a
trailer connected, the problem is with the
trailer wiring. Consult your trailer dealer for
assistance. This can be a short to ground
(such as a chaffed wire), short to voltage
(such as a pulled pin on trailer emergency
breakaway battery) or the trailer brakes may
be drawing too much current.
331
Navigator (TB9) Canada/United States of America, enUSA, Edition date: 201907, Second-Printing Towing