Power port LINCOLN NAVIGATOR 2020 Owners Manual
[x] Cancel search | Manufacturer: LINCOLN, Model Year: 2020, Model line: NAVIGATOR, Model: LINCOLN NAVIGATOR 2020Pages: 622, PDF Size: 6.47 MB
Page 73 of 622
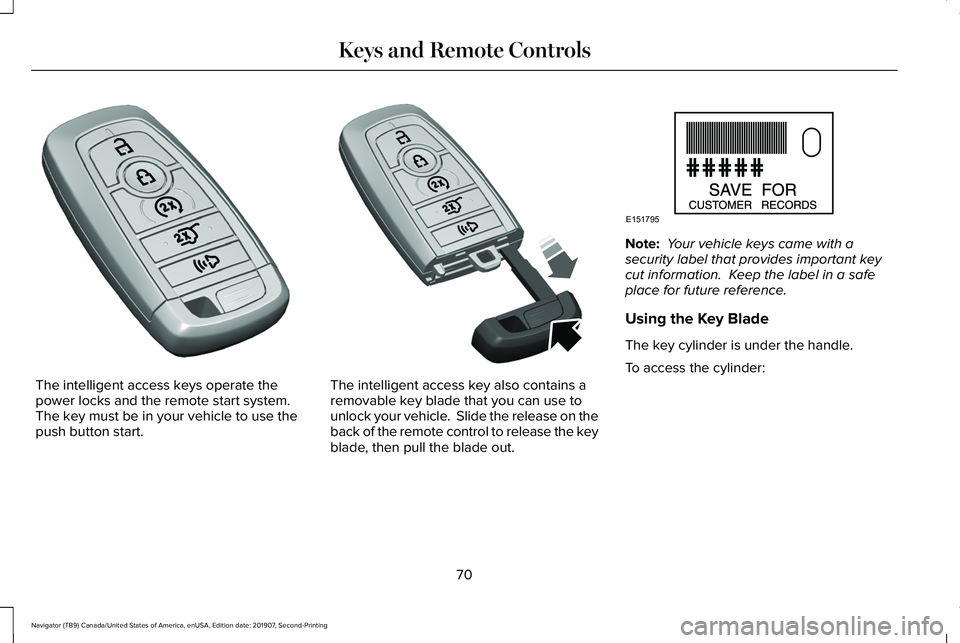
The intelligent access keys operate the
power locks and the remote start system.
The key must be in your vehicle to use the
push button start. The intelligent access key also contains a
removable key blade that you can use to
unlock your vehicle. Slide the release on the
back of the remote control to release the key
blade, then pull the blade out. Note:
Your vehicle keys came with a
security label that provides important key
cut information. Keep the label in a safe
place for future reference.
Using the Key Blade
The key cylinder is under the handle.
To access the cylinder:
70
Navigator (TB9) Canada/United States of America, enUSA, Edition date: 201907, Second-Printing Keys and Remote ControlsE305198 E305199 E151795
Page 123 of 622
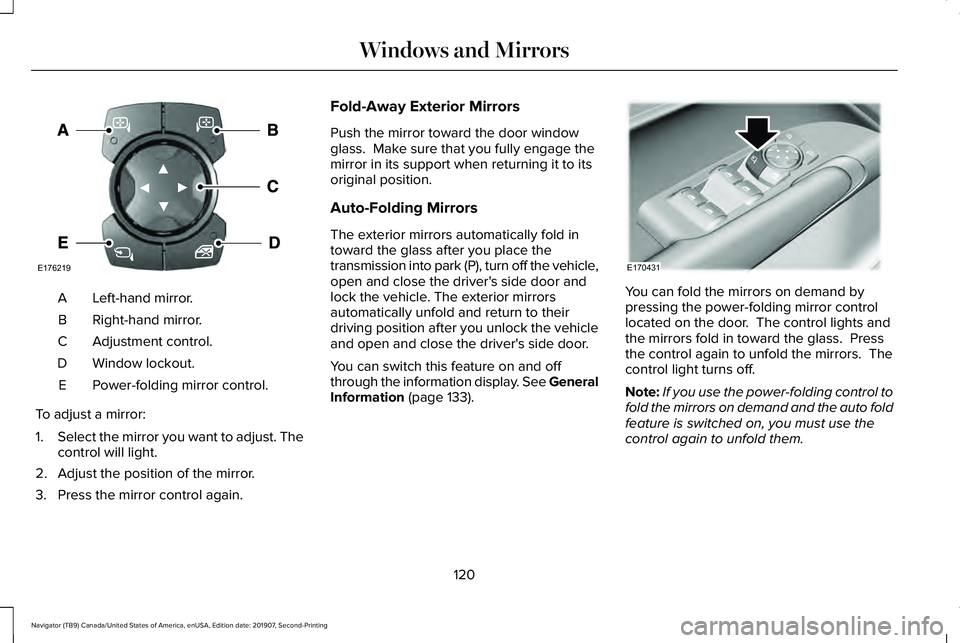
Left-hand mirror.
A
Right-hand mirror.
B
Adjustment control.
C
Window lockout.
D
Power-folding mirror control.
E
To adjust a mirror:
1. Select the mirror you want to adjust. The
control will light.
2. Adjust the position of the mirror.
3. Press the mirror control again. Fold-Away Exterior Mirrors
Push the mirror toward the door window
glass. Make sure that you fully engage the
mirror in its support when returning it to its
original position.
Auto-Folding Mirrors
The exterior mirrors automatically fold in
toward the glass after you place the
transmission into park (P), turn off the vehicle,
open and close the driver's side door and
lock the vehicle. The exterior mirrors
automatically unfold and return to their
driving position after you unlock the vehicle
and open and close the driver's side door.
You can switch this feature on and off
through the information display. See General
Information (page 133).
You can fold the mirrors on demand by
pressing the power-folding mirror control
located on the door. The control lights and
the mirrors fold in toward the glass. Press
the control again to unfold the mirrors. The
control light turns off.
Note:
If you use the power-folding control to
fold the mirrors on demand and the auto fold
feature is switched on, you must use the
control again to unfold them.
120
Navigator (TB9) Canada/United States of America, enUSA, Edition date: 201907, Second-Printing Windows and MirrorsE176219 E170431
Page 124 of 622
Loose Mirror
If your power-folding mirrors are manually
folded, they may not work properly even
after you re-position them. You need to reset
them if:
•
The mirrors vibrate when you drive.
• The mirrors feel loose.
• The mirrors do not stay in the folded or
unfolded position.
• One of the mirrors is not in its normal
driving position.
To reset the power-fold feature, use the
power-folding mirror control to fold and
unfold the mirrors. You may hear a loud noise
as you reset the power-folding mirrors. This
sound is normal. Repeat this process as
needed each time the mirrors are manually
folded.
Heated Exterior Mirrors
See Heated Exterior Mirrors (page 170). Memory Mirrors
You can save and recall the mirror positions
through the memory function. See Memory
Function
(page 181).
Auto-Dimming Feature
The driver’ s exterior mirror automatically
dims when the interior auto-dimming mirror
turns on.
Signal Indicator Mirrors
The outer portion of the appropriate mirror
housing blinks when you switch on the
direction indicator.
Lincoln Welcome Mat
Projection lights, on the bottom of the mirror
housings, project an image onto the ground
a short distance from the vehicle.
360-Degree Camera
(If Equipped)
See
360 Degree Camera (page 264). Blind Spot Monitor
See
Blind Spot Information System (page
284).
INTERIOR MIRROR WARNING: Do not adjust the mirrors
when your vehicle is moving. This could
result in the loss of control of your vehicle,
serious personal injury or death.
Note: Do not clean the housing or glass of
any mirror with harsh abrasives, fuel or other
petroleum or ammonia-based cleaning
products.
You can adjust the interior mirror to your
preference. Some mirrors also have a second
pivot point. This lets you move the mirror
head up or down and from side to side.
121
Navigator (TB9) Canada/United States of America, enUSA, Edition date: 201907, Second-Printing Windows and Mirrors
Page 152 of 622
Maintenance
Action
Message
Stop your vehicle as soon as safely possible, turn off the engine. Check the oil level. If the warningstays on or continues to come on with your engine running, contact an au\
thorized dealer as soon as possible.
Low Engine Oil Pressure
The engine oil life remaining is 10% or less. See General Maintenance Information (page 537).
Change Engine Oil Soon
The oil life left reaches 0%. See General Maintenance Information (page 537).
Oil Change Required
The brake fluid level is low and the brake system should be inspected immediately.
See Brake
Fluid Check (page 385).
Brake Fluid Level Low
The brake system needs servicing. Stop the vehicle in a safe place. Contact an authorized dealer.
Check Brake System
The engine coolant temperature is excessively high.
Engine Coolant Over Temperature
The washer fluid is low and needs to be refilled.
Washer Fluid Level Low
Indicates that your vehicle is still in Transport mode. This may not allow some features to operateproperly. Contact an authorized dealer.
Transport Mode Contact Dealer
Indicates that your vehicle is still in Factory mode. This may not allow some features to operateproperly. Contact an authorized dealer.
Factory Mode Contact Dealer
Informs the driver that the powertrain needs service due to a powertrain\
malfunction.
See Manual
The engine has reduced power to help reduce high engine temperature.
Power Reduced to Lower Engine Temp
The brake system has reduced stopping power.
Brake Applied Power Reduced
149
Navigator (TB9) Canada/United States of America, enUSA, Edition date: 201907, Second-Printing Information Displays
Page 200 of 622
12 Volt DC Power Point
WARNING: Do not plug optional
electrical accessories into the cigar lighter
socket. Incorrect use of the cigar lighter
can cause damage not covered by the
vehicle warranty, and can result in fire or
serious injury.
Note: When you switch the ignition on, you
can use the socket to power 12 volt
appliances with a maximum current rating
of 15 amps.
Note: If the power supply does not work after
you switch the ignition off, switch the ignition
on.
Note: Do not hang any accessory from the
accessory plug.
Note: Do not use the power point over the
vehicle capacity of 12 volt DC 180 watts or
a fuse may blow.
Note: Always keep the power point caps
closed when not in use. Do not insert objects other than an accessory
plug into the power point. This damages the
power point and may blow the fuse.
Run the vehicle for full capacity use of the
power point.
To prevent the battery from running out of
charge:
•
Do not use the power point longer than
necessary when the vehicle is not
running.
• Do not leave devices plugged in
overnight or when you park your vehicle
for extended periods.
USB Port and Power Point Locations
USB Ports and Power Points may be in the
following locations:
• On the lower instrument panel.
• Inside the first row center console.
• Inside the second row center console.
• On the front of the center console.
• On the rear of the center console.
• In the cargo area. •
On the passenger side floor panel.
• 3rd row on the quarter trim panels.
Note: Some of the USB ports may not have
data transfer capabilities.
Note: Incorrect use of the USB ports can
cause damage not covered by the vehicle
warranty.
110 Volt AC Power Point WARNING:
Do not keep electrical
devices plugged in the power point
whenever the device is not in use. Do not
use any extension cord with the 110 volt
AC power point, since it will defeat the
safety protection design. Doing so may
cause the power point to overload due to
powering multiple devices that can reach
beyond the 150 watt load limit and could
result in fire or serious injury.
Note: The power point turns off when you
switch off the ignition, when the vehicle is
not in accessory mode or when the battery
voltage drops below 11 volts.
197
Navigator (TB9) Canada/United States of America, enUSA, Edition date: 201907, Second-Printing Auxiliary Power Points
Page 202 of 622
The system supports one Qi wireless
charging compatible device on the charging
area.
Keep the charging area clean and remove
foreign objects prior to charging a device.
Do not place items with a magnetic strip, for
example passports, parking tickets or credit
cards, near the charging area when charging
a device. Damage may occur to the magnetic
strip.
Do not place metal objects, for example
remote controls, coins and candy wrappers,
on or near the charging area when charging
a device. Metal objects may heat up and
degrade the charging performance.
Note:
The device controls the rate of charge,
or charging power. During charging, the
device and the charger may heat up, this is
normal. If the battery gets hotter than usual,
the charger may stop charging. The charging area is on the center
console or lower instrument panel.
See Center Console (page 201).
You can charge a device if the vehicle is on,
when in accessory mode, or anytime SYNC
is on. To begin charging, place the device on the
center of the charging surface with the
charging side down. The charging stops after
your device reaches a full charge.
Note:
If the system detects a foreign object
or if the device is misaligned on the charging
area, a message appears in the display.
Note: Software and firmware updates may
affect device compatibility, including the use
of unofficial software or firmware. You should
verify charging functionality with your
specific devices when in your vehicle. Description
Behavior
Message
This message appears when wireless chargingbegins.
Message on screen display or pop-up window.
Wireless Charger Active
The system stops charging your device if thesystem detects the phone is misaligned, or a foreign metal object is on the charging surface.
Pop-up window.
Charging Terminated
Phone misaligned or object between phone
and charger detected. Correct the condition to resume charging.
199
Navigator (TB9) Canada/United States of America, enUSA, Edition date: 201907, Second-Printing Auxiliary Power PointsE297549
Page 204 of 622
CENTER CONSOLE
Stow items in the cup holder carefully as
items may become loose during hard
braking, acceleration or crashes, including
hot drinks which may spill.
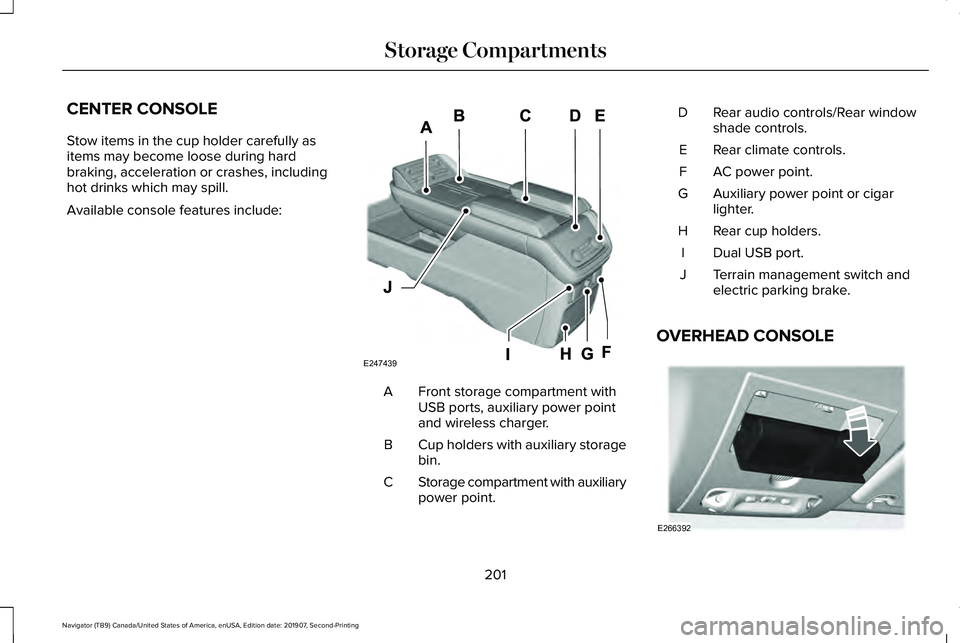
Available console features include:
Front storage compartment with
USB ports, auxiliary power point
and wireless charger.
A
Cup holders with auxiliary storage
bin.
B
Storage compartment with auxiliary
power point.
C Rear audio controls/Rear window
shade controls.
D
Rear climate controls.
E
AC power point.
F
Auxiliary power point or cigar
lighter.
G
Rear cup holders.
H
Dual USB port.
I
Terrain management switch and
electric parking brake.
J
OVERHEAD CONSOLE 201
Navigator (TB9) Canada/United States of America, enUSA, Edition date: 201907, Second-Printing Storage CompartmentsE247439 E266392
Page 248 of 622
Electronic Stability Control
The system enhances your vehicle
’s ability
to prevent skids or lateral slides by applying
brakes to one or more of the wheels
individually and, if necessary, reducing
engine power.
Roll Stability Control
The system enhances your vehicle ’s ability
to prevent rollovers by detecting your
vehicle ’s roll motion and the rate at which it
changes by applying the brakes to one or
more wheels individually.
Traction Control
The system enhances your vehicle ’s ability
to maintain traction of the wheels by
detecting and controlling wheel spin. See
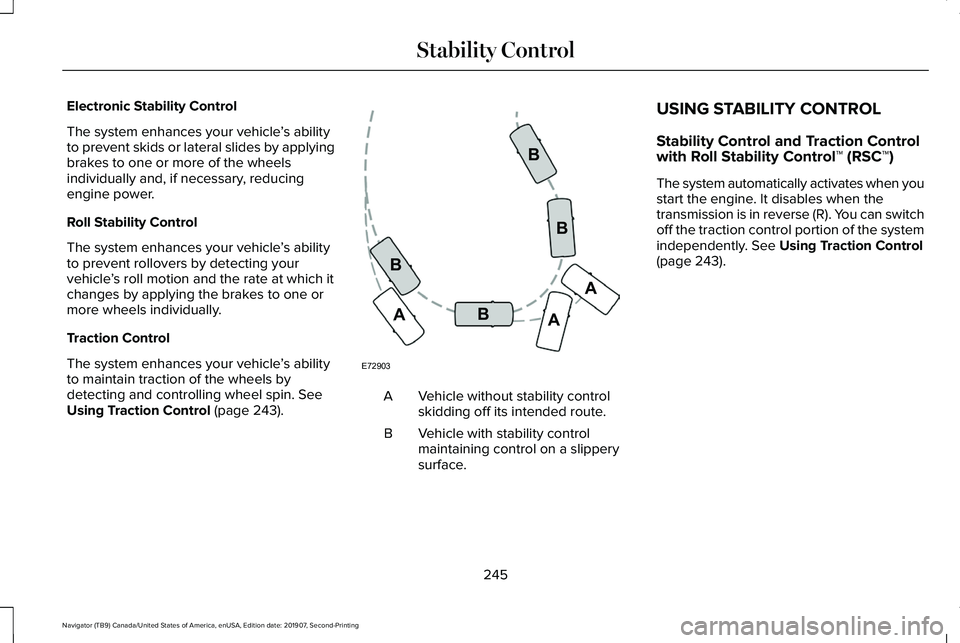
Using Traction Control (page 243). Vehicle without stability control
skidding off its intended route.
A
Vehicle with stability control
maintaining control on a slippery
surface.
B USING STABILITY CONTROL
Stability Control and Traction Control
with Roll Stability Control™ (RSC™)
The system automatically activates when you
start the engine. It disables when the
transmission is in reverse (R). You can switch
off the traction control portion of the system
independently.
See Using Traction Control
(page 243).
245
Navigator (TB9) Canada/United States of America, enUSA, Edition date: 201907, Second-Printing Stability ControlE72903A
AA
B
BB
B
Page 303 of 622
•
NORMAL – For everyday driving. This
mode is a perfect balance of excitement,
comfort and convenience.
• EXCITE – For aggressive on-road driving.
This mode increases throttle response,
provides a sportier steering feel, along
with quicker shifting. The suspension
stiffens, with an emphasis on handling
and control. The transmission also holds
gears longer, helping your vehicle
accelerate faster when shifting gears.
• CONSERVE
– Enables efficient and
responsible driving. It helps deliver
maximum fuel efficiency and increases
driving range.
• NORMAL 4A
– For general on-road
driving. Use this mode on normal firm
surfaces such as dry or wet pavement
and hard packed dirt or gravel roads.
Delivers power to all four wheels, as
required. •
SLIPPERY
– For less than ideal road
conditions, such as snow or ice covered
roads. Slippery mode inspires confidence
without taking away from driving
pleasure. Slippery mode lowers throttle
response and optimizes shifting for
slippery surfaces.
• DEEP CONDITIONS
– Used for crossing
terrain that has deformable deep, rutted
surfaces such as mud, deep snow or
deep sand. Do not use on dry, hard
surfaced roads.
• SLOW CLIMB
– Used when you need
extra power, such as when climbing
steep grades, going through deep sand
or pulling a boat out of a launch ramp.
Do not use on dry, hard surfaced roads.
Slow Climb mode puts you in 4x4 Low
drive line settings.
Note: Slow Climb is only available on
vehicles with 4x4 and a two-speed transfer
case. Note:
The system has diagnostic checks that
continuously monitor the system for proper
operation. Certain drive modes are not
available based on gear shifter position. If
a mode is unavailable due to a system fault
or change in gear shifter position, the mode
defaults to
NORMAL.
300
Navigator (TB9) Canada/United States of America, enUSA, Edition date: 201907, Second-Printing Driving Aids
Page 332 of 622
Trailer Brakes (If Equipped)
WARNING:
Do not connect a trailer's
hydraulic brake system directly to your
vehicle's brake system. Your vehicle may
not have enough braking power and your
chances of having a collision greatly
increase.
Electric brakes and manual, automatic or
surge-type trailer brakes are safe if you install
them properly and adjust them to the
manufacturer's specifications. The trailer
brakes must meet local and federal
regulations.
The rating for the tow vehicle's braking
system operation is at the gross vehicle
weight rating, not the gross combined
weight rating.
Separate functioning brake systems are
required for safe control of towed vehicles
and trailers weighing more than 1500 lb
(680 kg) when loaded. Integrated Trailer Brake Controller
(If
Equipped) WARNING:
Use the integrated trailer
brake controller to properly adjust the
trailer brakes and check all connections
before towing a trailer. Failure to follow
this instruction could result in the loss of
control of your vehicle, personal injury or
death. When used properly, the trailer brake
controller assists in smooth and effective
trailer braking by powering the trailer’
s
electric or electric-over-hydraulic brakes with
a proportional output based on the towing
vehicle ’s brake pressure.
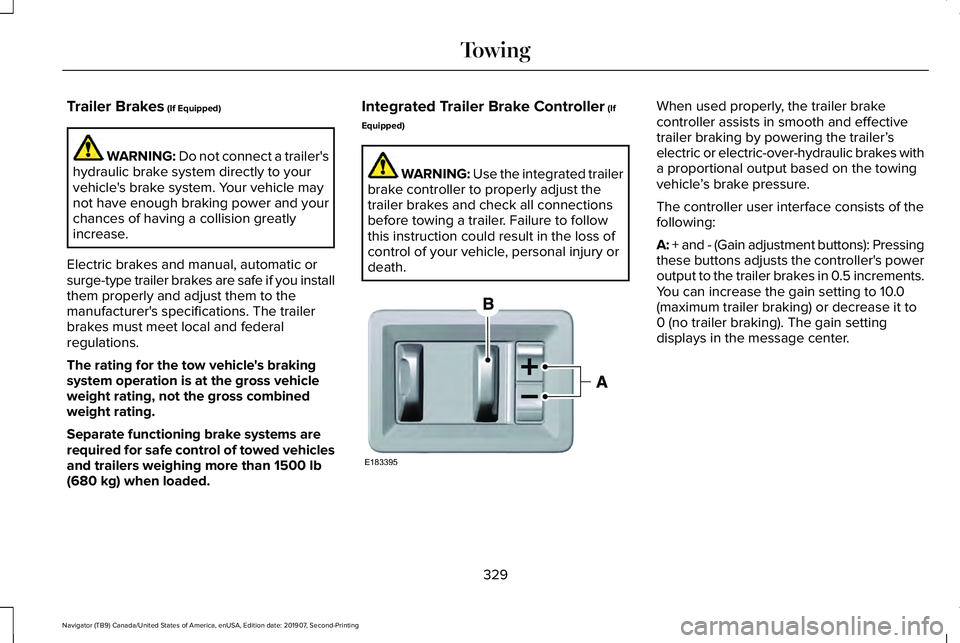
The controller user interface consists of the
following:
A: + and - (Gain adjustment buttons): Pressing
these buttons adjusts the controller's power
output to the trailer brakes in 0.5 increments.
You can increase the gain setting to 10.0
(maximum trailer braking) or decrease it to
0 (no trailer braking). The gain setting
displays in the message center.
329
Navigator (TB9) Canada/United States of America, enUSA, Edition date: 201907, Second-Printing TowingE183395