stop start LINCOLN NAVIGATOR 2021 Owner's Guide
[x] Cancel search | Manufacturer: LINCOLN, Model Year: 2021, Model line: NAVIGATOR, Model: LINCOLN NAVIGATOR 2021Pages: 639, PDF Size: 6.09 MB
Page 340 of 639
Before Towing a Trailer
Practice turning, stopping and backing up to
get the feel of your vehicle-trailer
combination before starting on a trip. When
turning, make wider turns so the trailer
wheels clear curbs and other obstacles.
When Towing a Trailer
•
Do not drive faster than 70 mph
(113 km/h) during the first 500 mi
(800 km).
• Do not make full-throttle starts.
• Check your hitch, electrical connections
and trailer wheel lug nuts thoroughly after
you have traveled
50 mi (80 km).
• When stopped in congested or heavy
traffic during hot weather, place the
transmission in park (P) to aid engine and
transmission cooling and to help A/C
performance.
• Turn off the speed control when carrying
heavy loads or in hilly terrain. The speed
control may turn off automatically when
you are towing on long, steep grades. •
Shift to a lower gear when driving down
a long or steep hill. Do not apply the
brakes continuously, as they may
overheat and become less effective.
• If your transmission has a Grade Assist
or Tow/Haul feature, use this feature
when towing. This provides engine
braking and helps eliminate excessive
transmission shifting for optimum fuel
economy and transmission cooling.
• If your vehicle has AdvanceTrac with
RSC, this system may turn on during
typical cornering maneuvers with a
heavily loaded trailer. This is normal.
Turning the corner at a slower speed
while towing may reduce this tendency.
• If your vehicle has Adaptive suspension,
you can select NORMAL or SPORT drive
control modes for better experience
when towing a trailer.
See Information
Displays (page 134). •
If you are towing a trailer frequently in
hot weather, hilly conditions, at the gross
combined weight rating (or any
combination of these factors), consider
refilling your rear axle with synthetic gear
lubricant (if the axle is not already filled
with it).
See Capacities and
Specifications (page 438).
• Allow more distance for stopping with a
trailer attached. Anticipate stops and
brake gradually.
• Avoid parking on a grade. However, if
you must park on a grade:
1. Turn the steering wheel to point your vehicle tires away from traffic flow.
2. Set your vehicle parking brake.
3. Place the transmission in park (P).
4. Place wheel chocks in the front and back
of the trailer wheels.
Note: Chocks are not included with your
vehicle.
337
Navigator (TB9) Canada/United States of America, enUSA, First-Printing Towing
Page 342 of 639
Four-wheel Drive Vehicles With SLOW
CLIMB Mode
You can only tow your vehicle with all wheels
on the ground by placing the transfer case
in its neutral position and engaging the four
wheel down towing feature. Perform the
steps outlined in the following section after
positioning your vehicle behind the tow
vehicle and properly securing them together.
Four-wheel-down Towing
Note: If completed successfully, the
information display shows
Neutral Tow
Enabled Leave Transmission in Neutral.
This indicates that your vehicle is safe to tow
with all wheels on the ground.
Note: If you do not see the message in the
information display, you must perform the
procedure again from the beginning.
Note: Make sure you properly secure your
vehicle to the tow vehicle.
1. Start your vehicle.
2. Confirm that your vehicle is in
NORMAL
mode. See Drive Mode Control (page
303). 3. Place your vehicle in stay in neutral
mode.
See Automatic Transmission
(page 227).
4. Switch your vehicle off by pressing the engine
START/STOP button once. A
Transmission Not in Park message
appears in the information display.
5. Place your vehicle in accessory mode by
pressing the start button once without
pressing the brake pedal.
6. Press and hold the brake pedal.
7. Enable neutral tow through the information display by selecting Settings
from the menu. See General Information
(page
134).
8. Then select
Advanced Settings.
9. Then select
Vehicle.
10. Then select
Neutral Tow.
11. Press and hold the
OK button until the
information display states Neutral Tow
Enabled Leave Transmission in
Neutral
. Note:
If completed successfully, the
information display shows
Neutral Tow
Enabled Leave Transmission in Neutral.
This indicates that your vehicle is safe to tow
with all wheels on the ground.
Note: If you do not see the message in the
information display, you must perform the
procedure again from the beginning.
Note: You may hear an audible noise as the
transfer case shifts into neutral, this is
normal.
12. Leave the transmission in neutral (N) and switch the ignition off by pressing
the engine
START/STOP button once
without pressing the brake pedal. You
do not need to leave your keys in the
vehicle. You can lock and unlock your
vehicle as you normally do. WARNING:
Do not disconnect the
battery during recreational towing. It
prevents the transfer case from shifting
properly and may cause the vehicle to roll,
even if the transmission is in park (P).
339
Navigator (TB9) Canada/United States of America, enUSA, First-Printing Towing
Page 343 of 639
WARNING: Shifting the transfer case
to its neutral position for recreational
towing may cause the vehicle to roll, even
if the transmission is in park (P). It may
injure the driver and others. Make sure you
press the foot brake and the vehicle is in
a secure, safe position when you shift to
neutral (N).
Note: Failing to put the transfer case in its
neutral position can damage vehicle
components.
Note: You can check four-wheel-down
towing status at any time by opening the
driver's door or turning the ignition to the
accessory or on position. A message
appears in the information display confirming
your vehicle is in neutral tow.
To exit four-wheel-down towing and return
the transfer case to its
2H position:
1. With your vehicle still properly secured to the tow vehicle, press the brake pedal
and start the engine.
2. Switch your vehicle off by pressing the engine
START/STOP button once. 3.
Place your vehicle in accessory mode by
pressing the start button once without
pressing the brake pedal.
4. Press the brake pedal.
5. Place the transmission back into park (P).
6. Release the brake pedal.
Note: If completed successfully, the
information display shows
2H and Neutral
Tow Disabled.
Note: If the indicator light and message do
not display, you must perform the procedure
again from the beginning.
Note: You may hear an audible noise as the
transfer case shifts out of its neutral position,
this is normal.
Note: If Shift Delayed Pull Forward displays
in the instrument cluster, transfer case gear
tooth blockage is present. See the
instructions following this section.
7. Apply the parking brake, then disconnect
your vehicle from the tow vehicle. 8. Release the parking brake, start the
engine, and shift the transmission into
drive (D) to make sure the transfer case
is out of the neutral tow position.
9. If the transfer case does not successfully
shift out of neutral (N), set the parking
brake until you can have your vehicle
serviced.
Resolving the Shift Delayed Pull Forward
or To Exit 4x4 LOW Shift to N Message
If the instrument cluster displays these
messages, perform the following:
1. Press and hold the brake pedal.
2. Put the transmission into neutral (N), then
start the engine.
3. With the engine running, shift the transmission into drive (D) and let the
vehicle roll forward, up to
3 ft (1 m). You
may hear an audible noise as the transfer
case shifts out of its neutral position. This
is normal.
4. Make sure the instrument cluster displays
Neutral Tow Disabled
.
340
Navigator (TB9) Canada/United States of America, enUSA, First-Printing Towing
Page 349 of 639
The fuel pump shutoff stops the flow of fuel
to the engine in the event of a moderate to
severe crash. Not every impact causes a
shutoff.
Should your vehicle shut off after a crash,
you may restart your vehicle.
1. Press START/STOP to switch off your
vehicle.
2. Press the brake pedal and
START/STOP
to switch on your vehicle.
3. Remove your foot from the brake pedal and press
START/STOP to switch off
your vehicle.
4. You can attempt to start the vehicle by pressing the brake pedal and
START/STOP
, or press START/STOP
without pressing the brake pedal.
5. If the vehicle does not start, repeat steps
1 through 4. JUMP STARTING THE VEHICLE WARNING:
Batteries normally
produce explosive gases which can cause
personal injury. Therefore, do not allow
flames, sparks or lighted substances to
come near the battery. When working near
the battery, always shield your face and
protect your eyes. Always provide correct
ventilation. WARNING:
Keep batteries out of
reach of children. Batteries contain sulfuric
acid. Avoid contact with skin, eyes or
clothing. Shield your eyes when working
near the battery to protect against possible
splashing of acid solution. In case of acid
contact with skin or eyes, flush immediately
with water for a minimum of 15 minutes and
get prompt medical attention. If acid is
swallowed, call a physician immediately. WARNING:
Use only adequately
sized cables with insulated clamps. Note:
To avoid reverse polarity connections,
make sure that you correctly identify the
positive (+) and negative (-) terminals on both
the disabled and booster vehicles before
connecting the cables. Stay clear of moving
parts.
Preparing Your Vehicle
Do not attempt to push-start your automatic
transmission vehicle.
Note: Attempting to push-start a vehicle with
an automatic transmission may cause
transmission damage.
Note: Use only a 12-volt supply to start your
vehicle.
Note: Do not disconnect the battery of the
disabled vehicle as this could damage the
vehicle electrical system.
Park the booster vehicle close to the hood
of the disabled vehicle, making sure the two
vehicles do not touch.
346
Navigator (TB9) Canada/United States of America, enUSA, First-Printing Roadside Emergencies
Page 390 of 639
Your vehicle has limited engine power when
in the fail-safe mode, drive your vehicle with
caution. Your vehicle does not maintain
high-speed operation and the engine may
operate poorly.
Remember that the engine is capable of
automatically shutting down to prevent
engine damage. In this situation:
1. Pull off the road as soon as safely
possible and switch the engine off.
2. If you are a member of a roadside assistance program, we recommend that
you contact your roadside assistance
service provider.
3. If this is not possible, wait a short period
for the engine to cool.
4. Check the coolant level. If the coolant level is at or below the minimum mark,
add prediluted coolant immediately.
5. When the engine temperature cools, you
can re-start the engine. Have your vehicle
checked as soon as possible to minimize
engine damage.
Note: Driving your vehicle without repair
increases the chance of engine damage. Engine Coolant Temperature
Management (If Equipped) WARNING:
To reduce the risk of
crash and injury, be prepared that the
vehicle speed may reduce and the vehicle
may not be able to accelerate with full
power until the coolant temperature
reduces.
If you tow a trailer with your vehicle, the
engine may temporarily reach a higher
temperature during severe operating
conditions, for example ascending a long or
steep grade in high ambient temperatures.
At this time, you may notice the coolant
temperature gauge moves toward the red
zone and a message may appear in the
information display. You may notice a reduction in vehicle speed
caused by reduced engine power in order
to manage the engine coolant temperature.
Your vehicle may enter this mode if certain
high-temperature and high-load conditions
take place. The amount of speed reduction
depends on vehicle loading, grade and
ambient temperature. If this occurs, there is
no need to stop your vehicle. You can
continue to drive.
The air conditioning may automatically turn
on and off during severe operating
conditions to protect the engine from
overheating. When the coolant temperature
decreases to the normal operating
temperature, the air conditioning turns on.
If the coolant temperature gauge moves fully
into the red zone, or if the coolant
temperature warning or service engine soon
messages appear in your information display,
do the following:
1.
Stop your vehicle as soon as it is safe to
do so. Fully apply the parking brake, shift
into park (P) or neutral (N).
387
Navigator (TB9) Canada/United States of America, enUSA, First-Printing Maintenance
Page 424 of 639
•
Make sure that you have the correct
tire and wheel size.
• Lubricate the tire bead and wheel
bead seat area again.
• Stand at a minimum of 12 ft (3.66 m)
away from the wheel and tire
assembly.
• Use both eye and ear protection. WARNING:
For a mounting
pressure more than 20 psi (1.38 bar)
greater than the maximum pressure,
a Ford dealer or other tire service
professional should do the mounting. WARNING:
Always inflate steel
carcass tires with a remote air fill with
the person inflating standing at a
minimum of
12 ft (3.66 m) away from
the wheel and tire assembly.
Important:
Remember to replace the
wheel valve stems when the road tires
are replaced on your vehicle. The two front tires or two rear tires
should generally be replaced as a pair,
except if the vehicle is equipped with
four wheel drive. Vehicles equipped with
four wheel drive should have all four
tires replaced simultaneously. Unevenly
worn tires, mismatched makes, models
or brands can be different in size,
resulting in potential damage to the four
wheel drive system.
The tire pressure sensors mounted in
the wheels are not designed to be used
in aftermarket wheels.
The use of wheels or tires not
recommended by us may affect the
operation of your tire pressure
monitoring system.
If the tire pressure monitoring system
indicator is flashing, the system is
malfunctioning. Your replacement tire
might be incompatible with your tire
pressure monitoring system, or some
component of the system may be
damaged.
Safety Practices WARNING:
If your vehicle is
stuck in snow, mud or sand, do not
rapidly spin the tires; spinning the tires
can tear the tire and cause an
explosion. A tire can explode in as little
as three to five seconds. WARNING:
Do not spin the
wheels at over 34 mph (55 km/h). The
tires may fail and injure a passenger
or bystander.
Driving habits have a great deal to do
with your tire mileage and safety.
*Observe posted speed limits
*Avoid fast starts, stops and turns
*Avoid potholes and objects on the road
*Do not run over curbs or hit the tire
against a curb when parking
421
Navigator (TB9) Canada/United States of America, enUSA, First-Printing Wheels and Tires
Page 428 of 639
Each tire, including the spare (if
provided), should be checked
monthly when cold and inflated to
the inflation pressure recommended by the
vehicle manufacturer on the vehicle placard
or tire inflation pressure label. (If your vehicle
has tires of a different size than the size
indicated on the vehicle placard or tire
inflation pressure label, you should
determine the proper tire inflation pressure
for those tires).
As an added safety feature, your vehicle has
been equipped with a Tire Pressure
Monitoring System (TPMS) that illuminates a
low tire pressure telltale when one or more
of your tires is significantly under-inflated.
Accordingly, when the low tire pressure
telltale illuminates, you should stop and
check your tires as soon as possible, and
inflate them to the proper pressure. Driving
on a significantly under-inflated tire causes
the tire to overheat and can lead to tire
failure. Under-inflation also reduces fuel
efficiency and tire tread life, and could affect
the vehicle ’s handling and stopping ability. Please note that the TPMS is not a substitute
for proper tire maintenance, and it is the
driver’
s responsibility to maintain correct tire
pressure, even if under-inflation has not
reached the level to trigger illumination of
the TPMS low tire pressure telltale.
Your vehicle has also been equipped with a
TPMS malfunction indicator to indicate when
the system is not operating properly. The
TPMS malfunction indicator is combined with
the low tire pressure telltale. When the
system detects a malfunction, the telltale will
flash for approximately one minute and then
remain continuously illuminated. This
sequence will continue upon subsequent
vehicle start-ups as long as the malfunction
exists.
When the malfunction indicator is illuminated,
the system will not be able to detect or signal
low tire pressure as intended. TPMS
malfunctions could occur for a variety of
reasons, including the installation of
replacement or alternate tires or wheels on
the vehicle that prevent the TPMS from functioning properly. Always check the TPMS
malfunction telltale after replacing one or
more tires or wheels on your vehicle to
ensure that the replacement or alternate tires
and wheels allow the TPMS to continue to
function properly.
This device complies with Part 15 of the FCC
Rules and with License exempt RSS
Standards of Industry Canada. Operation is
subject to the following two conditions:
1. This device will not cause harmful
interference, and
2. This device must accept any interference
received, including interference that
could cause undesired operation. WARNING: Changes or modifications
not expressively approved by the party
responsible for compliance could void the
user's authority to operate the equipment.
The term "IC:" before the radio certification
number only signifies that Industry Canada
technical specifications were met.
425
Navigator (TB9) Canada/United States of America, enUSA, First-Printing Wheels and Tires
Page 518 of 639
SETTINGS
Press the button to enter the
settings menu.
Once you select a tile, press the
button next to a menu item to view
an explanation of the feature or
setting.
Sound
Select this tile to adjust the sound settings.
Clock
Select this tile to adjust the clock settings.
Bluetooth
Select this tile to switch Bluetooth on and off
and adjust settings.
Phone
Select this tile to connect, disconnect, and
manage the connected device settings. Audio
Select this tile to adjust the audio settings.
Driver Assist (If Equipped)
Select this tile to adjust Driver Assist features
like Parking Aids, Lane Keeping system,
Pedestrian Detection, and Auto-Start-Stop.
Vehicle
Select this tile to adjust vehicle settings like
windows, alarm, lighting, backup starting
passcode, and MyKey settings.
Lincoln Way
Select this tile to adjust the Lincoln Way
settings.
General
Select this tile to adjust settings like
language, measurement units, or to reset the
system.
911 Assist
(If Equipped)
Select this tile to switch 911 Assist on and off. Automatic Updates
Select this tile to adjust automatic update
settings.
Mobile Apps
Select this tile to adjust permissions, enable,
disable, and update mobile apps.
Display
Select this tile to adjust display settings like
brightness and auto dim.
Charge Settings
(If Equipped)
Select this tile to adjust the electric vehicle
charge setting.
Voice Control
Select this tile to adjust voice control settings
like command confirmations and displayed
lists.
Navigation
(If Equipped)
Select this tile to adjust navigation settings
like map preferences and route guidance.
515
Navigator (TB9) Canada/United States of America, enUSA, First-Printing SYNC™ 3E280315 E268570
Page 530 of 639
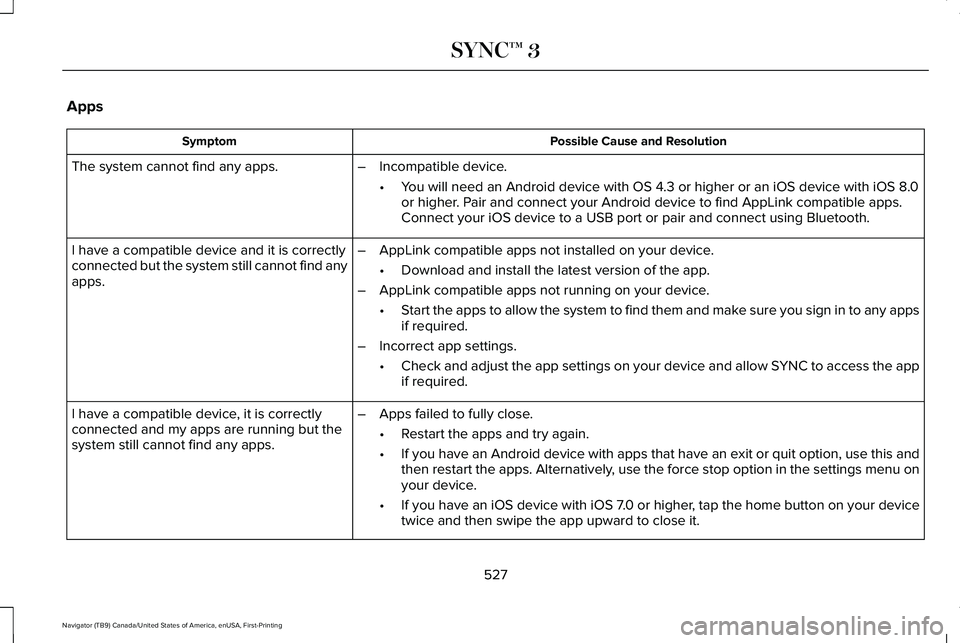
Apps
Possible Cause and Resolution
Symptom
The system cannot find any apps. –Incompatible device.
•You will need an Android device with OS 4.3 or higher or an iOS device wi\
th iOS 8.0
or higher. Pair and connect your Android device to find AppLink compatible apps.
Connect your iOS device to a USB port or pair and connect using Bluetoot\
h.
I have a compatible device and it is correctly
connected but the system still cannot find any
apps. –
AppLink compatible apps not installed on your device.
•Download and install the latest version of the app.
– AppLink compatible apps not running on your device.
•Start the apps to allow the system to find them and make sure you sign in to any apps
if required.
– Incorrect app settings.
•Check and adjust the app settings on your device and allow SYNC to access the app
if required.
I have a compatible device, it is correctly
connected and my apps are running but the
system still cannot find any apps. –
Apps failed to fully close.
•Restart the apps and try again.
• If you have an Android device with apps that have an exit or quit option\
, use this and
then restart the apps. Alternatively, use the force stop option in the settings menu on
your device.
• If you have an iOS device with iOS 7.0 or higher, tap the home button on your device
twice and then swipe the app upward to close it.
527
Navigator (TB9) Canada/United States of America, enUSA, First-Printing SYNC™ 3
Page 625 of 639

Audio Unit......................................................462
Adjusting the Volume........................................462
Changing Radio Stations..................................462
Locking the Rear Audio Controls...................463
Rear Passenger Audio Controls - Vehicles with: Second Row Center Console...........464
Rear Seat Audio Controls - Vehicles without: Second Row Center Console.....................463
Selecting the Audio Modes.............................463
Switching the Audio Unit On and Off............
463
Using Seek, Fast Forward and Reverse.......463
Auto Hold
.......................................................245
Using Auto Hold.................................................246
Autolamps.........................................................111 Windshield Wiper Activated Headlamps........111
Automatic Climate Control.........................166 Accessing Rear Climate Controls...................166
Accessing the Climate Control Menu............166
Setting the Blower Motor Speed....................
166
Setting the Temperature...................................166
Switching Auto Mode On and Off...................166
Switching Defrost On and Off..........................167
Switching Maximum Air Conditioning On and Off.......................................................................168
Switching Recirculated Air On and Off..........168
Switching the Air Conditioning On and Off.......................................................................167
Switching the Heated Seats On and Off.......168 Switching the Ventilated Seats On and
Off.......................................................................168
Automatic High Beam Control....................117
Automatic High Beam Control Indicators.......................................................118
Automatic Transmission
..............................227
Automatic Transmission Adaptive
Learning...........................................................232
Brake-Shift Interlock Override.........................
231
If Your Vehicle Gets Stuck in Mud or Snow.................................................................232
SelectShift™ Automatic Transmission............230
Understanding the Shift Positions of your Automatic Transmission...............................227
Automatic Transmission Fluid Check............................................................388
Auto-Start-Stop..............................................212 Disabling Auto-Start-Stop..................................214
Enabling Auto-Start-Stop...................................212
Autowipers......................................................107 Autowipers Settings............................................107
B
Battery See: Changing the 12V Battery......................390
Blind Spot Information System.................288 ........................................................................\
........288 Blind Spot Information System with Trailer
Tow....................................................................289
Switching the System On and Off..................292
System Errors......................................................292
Using the Blind Spot Information System..............................................................288
BLIS See: Blind Spot Information System..............288
Body Styling Kits...........................................406
Bonnet Lock See: Opening and Closing the Hood............377
Booster Seats..................................................39 Types of Booster Seats.......................................39
Brake Fluid Check........................................389 Brake Fluid Service Interval.............................390
Brakes..............................................................241 General Information............................................241
Breaking-In.....................................................342
Bulb Specification Chart..............................451
C
Canceling the Set Speed
...........................273
Capacities and Specifications...................440 Air Conditioning System...................................440
Alternative Engine Oil for Extremely Cold
Climates............................................................444
Automatic Transmission.....................................441
622
Navigator (TB9) Canada/United States of America, enUSA, First-Printing Index