manual transmission LINCOLN NAVIGATOR 2021 Owners Manual
[x] Cancel search | Manufacturer: LINCOLN, Model Year: 2021, Model line: NAVIGATOR, Model: LINCOLN NAVIGATOR 2021Pages: 639, PDF Size: 6.09 MB
Page 90 of 639
Locking and Unlocking the Doors with
the Key Blade
A key cylinder is located under the driver
side door handle. You can use your key
blade to manually lock and unlock the driver
side door. See Remote Control (page 69).
Smart Unlocks for Intelligent Access
Keys
This helps to prevent you from locking your
key inside the passenger compartment or
rear cargo area.
When you electronically lock your vehicle
with any door open, the transmission is in
park (P) and the ignition is off, the system
searches for an intelligent access key inside
your vehicle after you close the last door. If
the system finds a key, all the doors
immediately unlock and the horn sounds
twice, indicating that a key is inside.
You can override the smart unlock feature
and intentionally lock the intelligent access
key inside your vehicle. To do this, lock your vehicle after you have
closed all the doors by:
•
Using the keyless entry keypad.
• Pressing the lock button on another
intelligent access key.
When you open one of the front doors and
lock your vehicle using the power door lock
control, all doors will lock then unlock if:
• The ignition is on.
• The ignition is off and the transmission
is not in park (P).
Autolock
(If Equipped)
Autolock locks all the doors when:
• All doors are closed.
• The ignition is on.
• You shift into any gear putting your
vehicle in motion.
• Your vehicle reaches a speed greater
than
12.4 mph (20 km/h). Autolock repeats when:
•
You open then close any door while the
ignition is on and your vehicle speed is
9 mph (15 km/h)
or lower.
• Your vehicle reaches a speed greater
than
12 mph (20 km/h).
Autounlock
Autounlock unlocks all the doors when:
• The ignition is on, all the doors are
closed, and your vehicle has been
moving at a speed greater than 12.4 mph
(20 km/h)
.
• Your vehicle comes to a stop and you
switch the ignition off, or to the accessory
position.
• You open the driver door within 10
minutes of switching the ignition off or to
accessory.
Note: The doors do not autounlock if you
electronically lock your vehicle after you
switch the ignition off and before you open
the driver door.
87
Navigator (TB9) Canada/United States of America, enUSA, First-Printing Doors and Locks
Page 95 of 639
Note:
Make sure the area behind your
vehicle is free from obstruction and that
there is enough room for you to operate the
liftgate. Objects too close to your vehicle,
for example a wall, garage door or another
vehicle may come into contact with the
moving liftgate. This could damage the
liftgate and its components.
Note: Be careful when opening or closing
the liftgate in a garage or other enclosed
area to avoid damaging the liftgate.
Note: Do not leave the liftgate open when
driving. This could damage the liftgate and
its components.
From the Instrument Panel With the transmission in park (P),
press the button on the instrument
panel.
Remote Control Press the button twice within a few
seconds. Outside Control
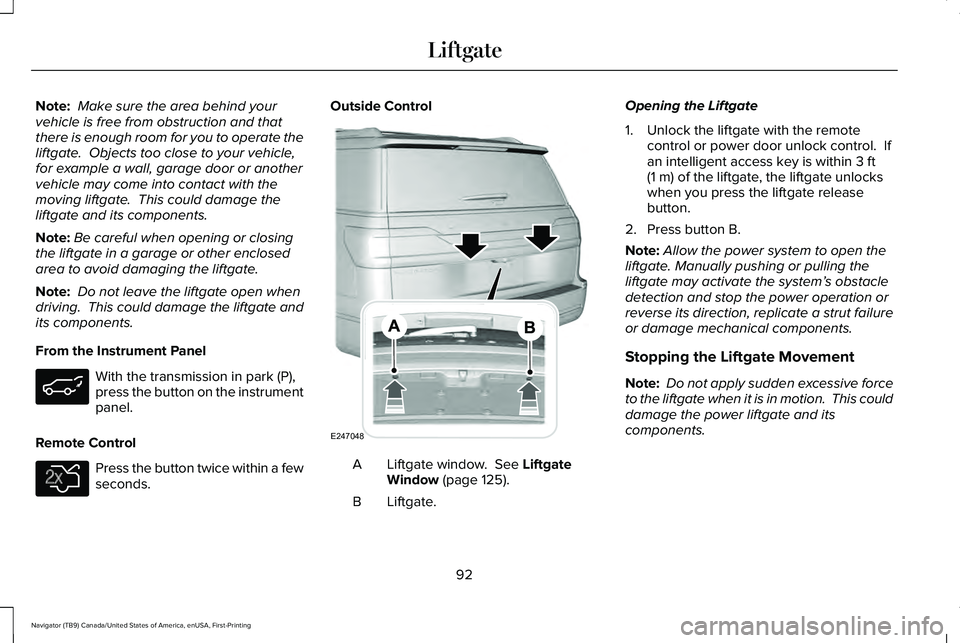
Liftgate window. See Liftgate
Window (page 125).
A
Liftgate.
B Opening the Liftgate
1. Unlock the liftgate with the remote
control or power door unlock control. If
an intelligent access key is within
3 ft
(1 m) of the liftgate, the liftgate unlocks
when you press the liftgate release
button.
2. Press button B.
Note: Allow the power system to open the
liftgate. Manually pushing or pulling the
liftgate may activate the system’ s obstacle
detection and stop the power operation or
reverse its direction, replicate a strut failure
or damage mechanical components.
Stopping the Liftgate Movement
Note: Do not apply sudden excessive force
to the liftgate when it is in motion. This could
damage the power liftgate and its
components.
92
Navigator (TB9) Canada/United States of America, enUSA, First-Printing Liftgate E138630 E247048
Page 115 of 639
Note:
If you switch the autolamps and the
autowipers on, the headlamps turn on when
the windshield wipers continuously operate.
INSTRUMENT LIGHTING DIMMER
The instrument lighting dimmer buttons are
on the lighting control. Repeatedly press one of the
buttons to adjust the brightness.
HEADLAMP EXIT DELAY
After you switch the ignition off, you can
switch the headlamps on by pulling the
direction indicator lever toward you. You will
hear a short tone. The headlamps will switch
off automatically after three minutes with any
door open or 30 seconds after the last door
has been closed. You can cancel this feature
by pulling the direction indicator lever toward
you again or switching the ignition on. DAYTIME RUNNING LAMPS -
VEHICLES WITH: CONFIGURABLE
DAYTIME RUNNING LAMPS WARNING: The daytime running
lamps system does not activate the rear
lamps and may not provide adequate
lighting during low visibility driving
conditions. Make sure you switch the
headlamps on, as appropriate, during all
low visibility conditions. Failure to do so
may result in a crash.
Switch the daytime running lamps on or off
using the information display.
See General
Information (page 134).
The daytime running lamps turn on when:
1. The lamps are on in the information display.
2. You switch the ignition on.
3. The transmission is not in park (P) for vehicles with automatic transmissions or
you release the parking brake for
vehicles with manual transmissions. 4. The lighting control is in the autolamps
position.
5. The headlamps are off.
The other lighting control switch positions
do not turn on the daytime running lamps.
If the daytime running lamps are off in the
information display, the lamps stay off in all
switch positions.
DAYTIME RUNNING LAMPS -
VEHICLES WITH: DAYTIME
RUNNING LAMPS (DRL) WARNING: The daytime running
lamps system does not activate the rear
lamps and may not provide adequate
lighting during low visibility driving
conditions. Make sure you switch the
headlamps on, as appropriate, during all
low visibility conditions. Failure to do so
may result in a crash.
The system turns the lamps on in daylight
conditions.
112
Navigator (TB9) Canada/United States of America, enUSA, First-Printing LightingE291299 E291298
Page 163 of 639
Action
Message
One or more tires on your trailer is below the specified tire pressure.
Trailer Tire Low Specified:
A trailer tire pressure sensor is malfunctioning. If the warning stayson or continues to come on, have the system checked as soon as possible.
Trailer Tire Pressure Sensor Fault
The trailer tire pressure monitoring system is malfunctioning. If the
warning stays on or continues to come on, have the system checked as soon as possible.
Trailer Tire Pressure Monitor Fault
The system cannot detect the trailer tire pressure monitoring system.
Trailer Tire Pressure Monitor Capability Not Detected
The trailer tire pressure monitoring system is not setup. See GeneralInformation (page 134).
Trailer Tire Pressure Indication Not Setup See Manual
Transmission Action
Message
You switched the engine off with the shift select lever in any position o\
ther than park (P).
Shift to Park
Transmission is too cold. Wait for it to warm up before you drive.
Transmission Warming Up Please Wait
Displays when the brake pedal needs to be pressed.
Press Brake Pedal
The transmission is overheating and needs to cool. Stop in a safe place as soon as possible.
Transmission Over Temperature Stop Safely
Have the system checked.
Transmission Service Required
160
Navigator (TB9) Canada/United States of America, enUSA, First-Printing Information Displays
Page 164 of 639
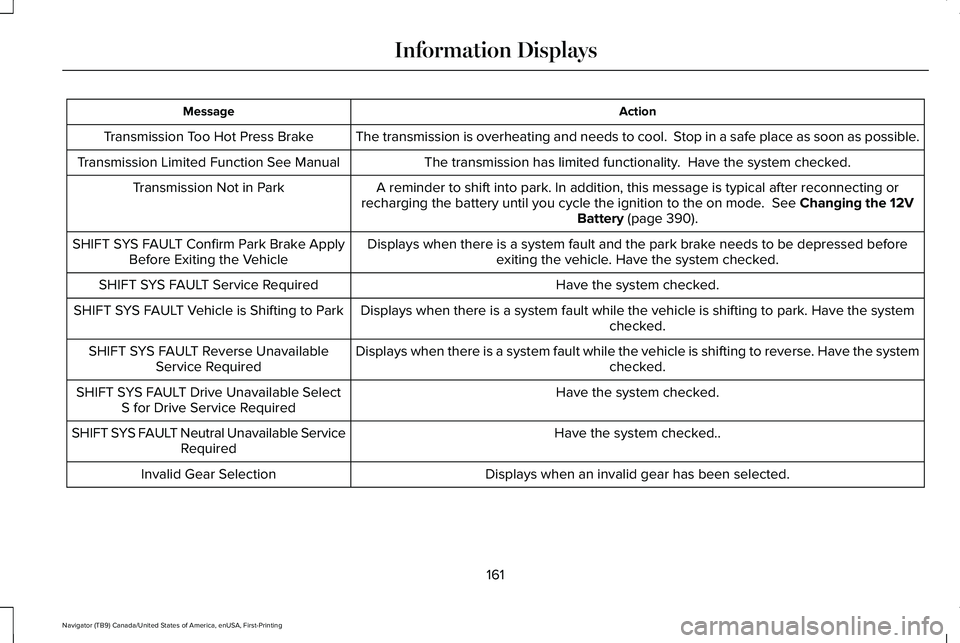
Action
Message
The transmission is overheating and needs to cool. Stop in a safe place as soon as possible.
Transmission Too Hot Press Brake
The transmission has limited functionality. Have the system checked.
Transmission Limited Function See Manual
A reminder to shift into park. In addition, this message is typical afte\
r reconnecting or
recharging the battery until you cycle the ignition to the on mode. See Changing the 12V
Battery (page 390).
Transmission Not in Park
Displays when there is a system fault and the park brake needs to be depressed beforeexiting the vehicle. Have the system checked.
SHIFT SYS FAULT Confirm Park Brake Apply
Before Exiting the Vehicle
Have the system checked.
SHIFT SYS FAULT Service Required
Displays when there is a system fault while the vehicle is shifting to p\
ark. Have the systemchecked.
SHIFT SYS FAULT Vehicle is Shifting to Park
Displays when there is a system fault while the vehicle is shifting to r\
everse. Have the systemchecked.
SHIFT SYS FAULT Reverse Unavailable
Service Required
Have the system checked.
SHIFT SYS FAULT Drive Unavailable Select
S for Drive Service Required
Have the system checked..
SHIFT SYS FAULT Neutral Unavailable Service
Required
Displays when an invalid gear has been selected.
Invalid Gear Selection
161
Navigator (TB9) Canada/United States of America, enUSA, First-Printing Information Displays
Page 217 of 639
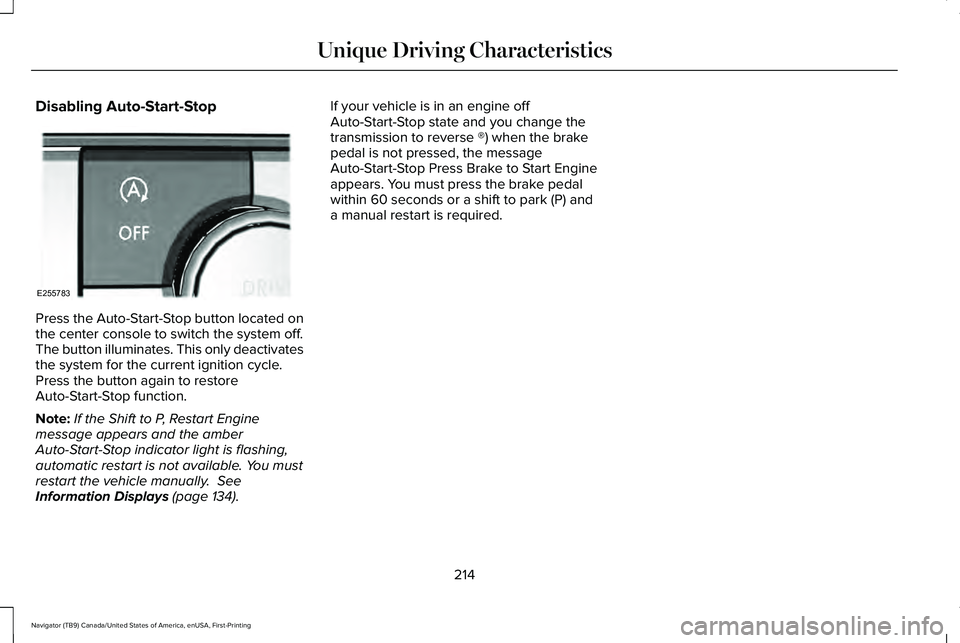
Disabling Auto-Start-Stop
Press the Auto-Start-Stop button located on
the center console to switch the system off.
The button illuminates. This only deactivates
the system for the current ignition cycle.
Press the button again to restore
Auto-Start-Stop function.
Note:
If the Shift to P, Restart Engine
message appears and the amber
Auto-Start-Stop indicator light is flashing,
automatic restart is not available. You must
restart the vehicle manually. See
Information Displays (page 134). If your vehicle is in an engine off
Auto-Start-Stop state and you change the
transmission to reverse ®) when the brake
pedal is not pressed, the message
Auto-Start-Stop Press Brake to Start Engine
appears. You must press the brake pedal
within 60 seconds or a shift to park (P) and
a manual restart is required.
214
Navigator (TB9) Canada/United States of America, enUSA, First-Printing Unique Driving CharacteristicsE255783
Page 230 of 639
AUTOMATIC TRANSMISSION
WARNING: Always fully apply the
parking brake and make sure you shift into
park (P). Failure to follow this instruction
could result in personal injury or death. WARNING:
Do not use tow/haul
when the road surface is slippery. Failure
to follow this instruction could result in the
loss of control of your vehicle. WARNING:
When your vehicle is
stationary, keep the brake pedal fully
pressed when shifting gears. Failure to
follow this instruction could result in
personal injury, death or property damage.
Note: You may not be able to shift out of
park (P) unless the intelligent access key is
inside your vehicle. Understanding the Shift Positions of
your Automatic Transmission
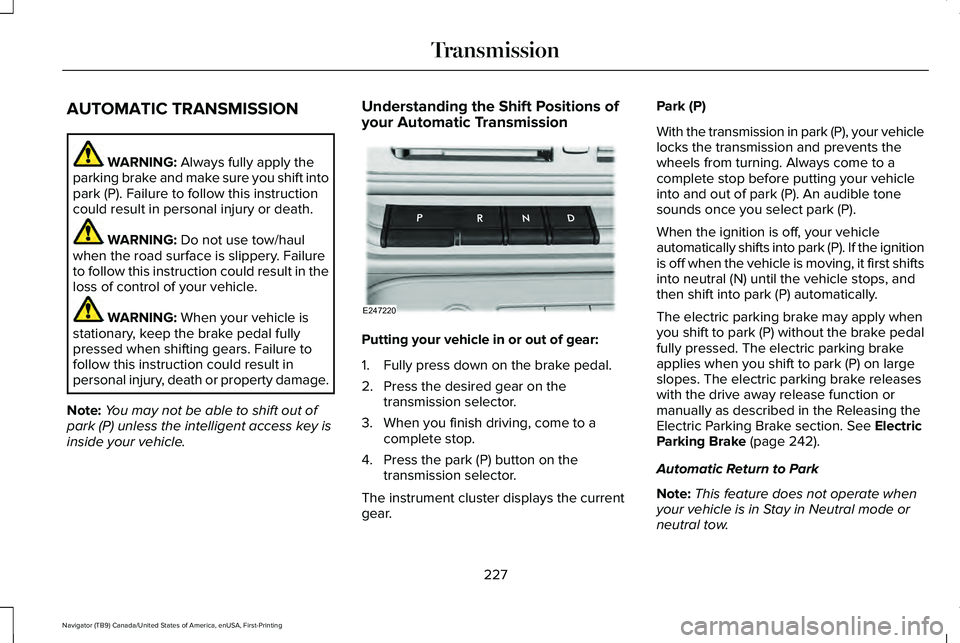
Putting your vehicle in or out of gear:
1. Fully press down on the brake pedal.
2. Press the desired gear on the
transmission selector.
3. When you finish driving, come to a complete stop.
4. Press the park (P) button on the transmission selector.
The instrument cluster displays the current
gear. Park (P)
With the transmission in park (P), your vehicle
locks the transmission and prevents the
wheels from turning. Always come to a
complete stop before putting your vehicle
into and out of park (P). An audible tone
sounds once you select park (P).
When the ignition is off, your vehicle
automatically shifts into park (P). If the ignition
is off when the vehicle is moving, it first shifts
into neutral (N) until the vehicle stops, and
then shift into park (P) automatically.
The electric parking brake may apply when
you shift to park (P) without the brake pedal
fully pressed. The electric parking brake
applies when you shift to park (P) on large
slopes. The electric parking brake releases
with the drive away release function or
manually as described in the Releasing the
Electric Parking Brake section.
See Electric
Parking Brake (page 242).
Automatic Return to Park
Note: This feature does not operate when
your vehicle is in Stay in Neutral mode or
neutral tow.
227
Navigator (TB9) Canada/United States of America, enUSA, First-Printing TransmissionE247220
Page 233 of 639
SelectShift™ Automatic Transmission
Your vehicle has a SelectShift Automatic
transmission. The SelectShift Automatic
transmission gives you the ability to change
gears up or down, without a clutch, as
desired.
In order to prevent the engine from running
at too low of an RPM, which may cause it to
stall, SelectShift still automatically makes
some downshifts if it has determined that
you have not downshifted in time. Although
SelectShift makes some downshifts for you,
it still allows you to downshift at any time as
long as the SelectShift determines that
damage to the engine does not occur from
over-revving.
Note:
Engine damage may occur if you
maintain excessive engine revving without
shifting.
SelectShift does not automatically upshift,
even if the engine is approaching the RPM
limit. Shift manually by pressing the + paddle.
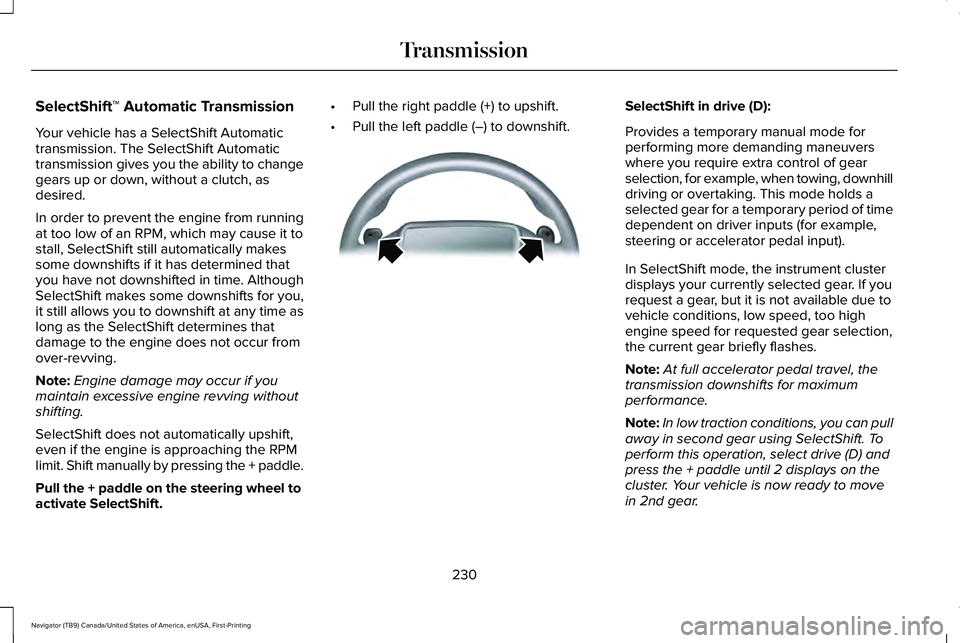
Pull the + paddle on the steering wheel to
activate SelectShift. •
Pull the right paddle (+) to upshift.
• Pull the left paddle (–) to downshift. SelectShift in drive (D):
Provides a temporary manual mode for
performing more demanding maneuvers
where you require extra control of gear
selection, for example, when towing, downhill
driving or overtaking. This mode holds a
selected gear for a temporary period of time
dependent on driver inputs (for example,
steering or accelerator pedal input).
In SelectShift mode, the instrument cluster
displays your currently selected gear. If you
request a gear, but it is not available due to
vehicle conditions, low speed, too high
engine speed for requested gear selection,
the current gear briefly flashes.
Note:
At full accelerator pedal travel, the
transmission downshifts for maximum
performance.
Note: In low traction conditions, you can pull
away in second gear using SelectShift. To
perform this operation, select drive (D) and
press the + paddle until 2 displays on the
cluster. Your vehicle is now ready to move
in 2nd gear.
230
Navigator (TB9) Canada/United States of America, enUSA, First-Printing TransmissionE144821
Page 247 of 639
HILL START ASSIST
WARNING: The system does not
replace the parking brake. When you leave
your vehicle, always apply the parking
brake and shift the transmission into park
(P) for automatic transmission or first gear
for manual transmission. WARNING: You must remain in your
vehicle when the system turns on. At all
times, you are responsible for controlling
your vehicle, supervising the system and
intervening, if required. Failure to take care
may result in the loss of control of your
vehicle, serious personal injury or death.
Note: If the engine is revved excessively, or
if a malfunction is detected, the system will
be deactivated.
The system makes it easier to pull away
when your vehicle is on a slope without the
need to use the parking brake. When the system is active, your vehicle will
remain stationary on the slope for two to
three seconds after you release the brake
pedal. This allows you time to move your
foot from the brake to the accelerator pedal.
The brakes release automatically when the
engine has sufficient torque to prevent your
vehicle from rolling down the grade. This is
an advantage when pulling away on a slope,
for example from a car park ramp, traffic
lights or when reversing uphill into a parking
space.
The system will activate automatically on any
slope that will cause significant vehicle
rollback. For vehicles with a manual
transmission, you can switch this feature off
using the information display.
See
Information Displays (page 134). The system
will remain on or off depending on how it
was last set.
Note: There is no warning lamp to indicate
the system is either on or off.
Note: If your vehicle is equipped with Auto
Hold, Hill Start Assist will not be available
while Auto Hold is active. Using Hill Start Assist
1. Bring your vehicle to a complete
standstill. Keep the brake pedal pressed
and select an uphill gear (for example,
drive (D) or first (1) when facing uphill or
reverse (R) when facing downhill).
2. If the sensors detect that your vehicle is on a slope, the system will activate
automatically.
3. When you remove your foot from the brake pedal, your vehicle will remain on
the slope without rolling away for about
two or three seconds. This hold time will
automatically be extended if you are in
the process of driving off.
4. Drive off in the normal manner. The brakes will release automatically.
Switching the System On and Off
You can switch this feature on or off if your
vehicle is equipped with a manual
transmission and an information display. See
General Information (page 134). The system
remembers the last setting when you start
your vehicle.
244
Navigator (TB9) Canada/United States of America, enUSA, First-Printing Brakes
Page 248 of 639
If your vehicle is not equipped with a manual
transmission and an information display, you
cannot turn the system on or off. When you
switch the ignition on, the system
automatically turns on.
AUTO HOLD
WARNING: The system does not
replace the parking brake. When you leave
your vehicle, always apply the parking
brake. WARNING: You must remain in your
vehicle when the system turns on. At all
times, you are responsible for controlling
your vehicle, supervising the system and
intervening, if required. Failure to take care
may result in the loss of control of your
vehicle, serious personal injury or death. WARNING:
The system will turn off
if a malfunction is apparent. Failure to take
care may result in the loss of control of
your vehicle, serious personal injury or
death. The system uses your vehicle's brakes to
hold your vehicle at a standstill after you stop
your vehicle and release the brake pedal.
For example, Auto Hold can assist you while
stopping at traffic lights or while in traffic
jams by holding the brake pressure for you
once you bring your vehicle to a stop.
Make sure you switch the system off before
towing with your vehicle.
Note:
In case of a malfunction in the system
while Auto Hold actively holds the vehicle
(for example, low power supply), a message
appears in the information display asking
you to press the brake pedal. If you see this
message, press the brake pedal
immediately.
Note: The system only activates if it
recognizes it is applying enough brake
pressure. On a steep hill or slope, make sure
you press the brake pedal sufficiently to
activate the system. Note:
In some cases, Auto Hold might hand
over to the parking brake. When the parking
brake applies, the red brake lamp appears.
This is normal. When you press the
accelerator pedal, the drive away release
feature releases the parking brake.
Note: Auto Hold works on all road grades. Press the button to switch the system on and
off. The indicator light illuminates when you
switch the system on.
Note:
You can only switch the system on if
you close the door and fasten your seatbelt.
Note: The system turns off every time you
power down your vehicle.
245
Navigator (TB9) Canada/United States of America, enUSA, First-Printing BrakesE256165