oil filter LINCOLN NAVIGATOR 2021 Owners Manual
[x] Cancel search | Manufacturer: LINCOLN, Model Year: 2021, Model line: NAVIGATOR, Model: LINCOLN NAVIGATOR 2021Pages: 639, PDF Size: 6.09 MB
Page 9 of 639
Reporting Safety Defects (Canada Only)
......................................................................358
Fuses
Fuse Specification Chart ...........................
360
Changing a Fuse ..........................................
374
Maintenance
General Information ....................................
377
Opening and Closing the Hood ...............
377
Under Hood Overview ...............................
379
Engine Oil Dipstick .....................................
380
Engine Oil Check ........................................
380
Oil Change Indicator Reset .......................
381
Changing the Engine Air Filter ................
382
Engine Coolant Check ...............................
383
Automatic Transmission Fluid Check ......
388
Transfer Case Fluid Check .......................
388
Brake Fluid Check ......................................
389
Power Steering Fluid Check ....................
390
Changing the 12V Battery .........................
390
Adjusting the Headlamps .........................
392
Washer Fluid Check ...................................
394Fuel Filter
.......................................................
394
Checking the Wiper Blades ......................
394
Changing the Wiper Blades .....................
394
Changing a Bulb ..........................................
395
Vehicle Care
General Information ...................................
396
Cleaning Products ......................................
396
Cleaning the Exterior ..................................
397
Waxing ...........................................................
398
Cleaning the Engine ...................................
399
Cleaning the Windows and Wiper Blades ......................................................................
399
Cleaning the Interior ..................................
400
Cleaning the Instrument Panel and Instrument Cluster Lens ........................
402
Cleaning Leather Seats .............................
403
Repairing Minor Paint Damage ................
403
Cleaning the Wheels ..................................
403
Vehicle Storage ...........................................
404
Body Styling Kits .........................................
406Wheels and Tires
General Information
....................................
407
Tire Care ........................................................
409
Using Snow Chains .....................................
423
Tire Pressure Monitoring System ............
424
Changing a Road Wheel ...........................
429
Technical Specifications ............................
436
Capacities and Specifications
Engine Specifications .................................
438
Motorcraft Parts ...........................................
439
Vehicle Identification Number .................
440
Capacities and Specifications ..................
440
Bulb Specification Chart .............................
451
Vehicle Identification
Installing the Vehicle Identification Card ......................................................................
454
Connected Vehicle
Connected Vehicle Requirements ..........
455
Connected Vehicle Limitations ................
455
6
Navigator (TB9) Canada/United States of America, enUSA, First-Printing Table of Contents
Page 13 of 639
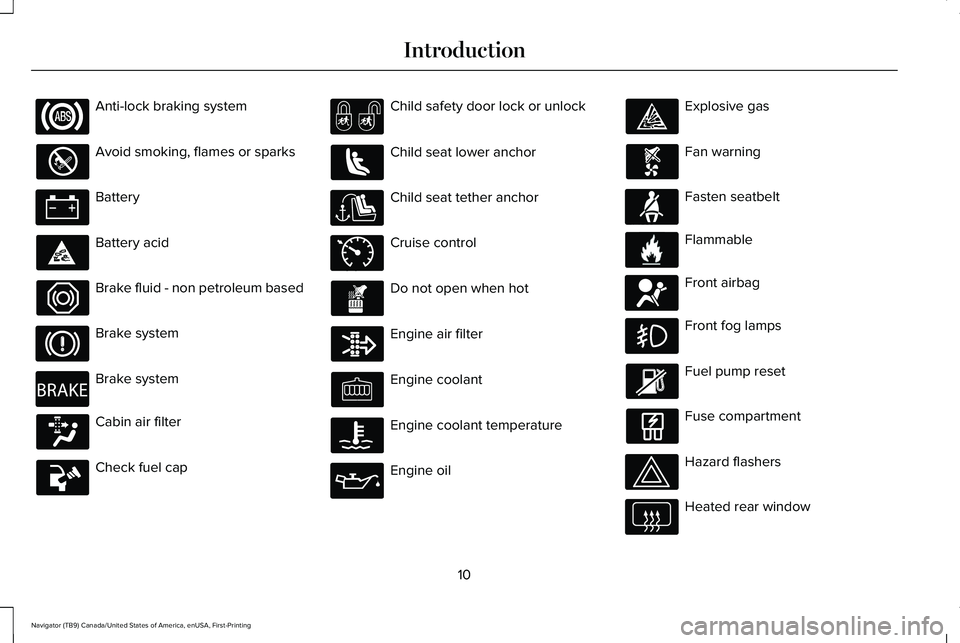
Anti-lock braking system
Avoid smoking, flames or sparks
Battery
Battery acid
Brake fluid - non petroleum based
Brake system
Brake system
Cabin air filter
Check fuel cap Child safety door lock or unlock
Child seat lower anchor
Child seat tether anchor
Cruise control
Do not open when hot
Engine air filter
Engine coolant
Engine coolant temperature
Engine oil Explosive gas
Fan warning
Fasten seatbelt
Flammable
Front airbag
Front fog lamps
Fuel pump reset
Fuse compartment
Hazard flashers
Heated rear window
10
Navigator (TB9) Canada/United States of America, enUSA, First-Printing Introduction E270480 E71340 E71880 E231160 E67017
Page 227 of 639
•
An open or pinched sensor hose.
• Incorrect engine oil level.
• Incorrect fuel for climatic conditions.
• Incorrect engine oil viscosity for climactic
conditions.
Note: Some vehicles have a lifetime fuel filter
that is integrated with the fuel tank. Regular
maintenance or replacement is not needed.
Note: If these checks do not help you correct
the concern, have your vehicle checked as
soon as possible.
Noise Emissions Warranty, Prohibited
Tampering Acts and Maintenance
On January 1, 1978, Federal regulation
became effective governing the noise
emission on trucks over 10,000 lb (4,536 kg)
Gross Vehicle Weight Rating (GVWR). The
preceding statements concerning prohibited
tampering acts and maintenance, and the
noise warranty found in the Warranty Guide,
are applicable to complete chassis cabs over
10,000 lb (4,536 kg)
GVWR. CATALYTIC CONVERTER WARNING:
Do not park, idle or drive
your vehicle on dry grass or other dry
ground cover. The emission system heats
up the engine compartment and exhaust
system, creating the risk of fire. WARNING:
The normal operating
temperature of the exhaust system is very
high. Never work around or attempt to
repair any part of the exhaust system until
it has cooled. Use special care when
working around the catalytic converter.
The catalytic converter heats up to a very
high temperature after only a short period
of engine operation and stays hot after the
engine is switched off. WARNING: Exhaust leaks may result
in entry of harmful and potentially lethal
fumes into the passenger compartment. If
you smell exhaust fumes inside your
vehicle, have your vehicle inspected
immediately. Do not drive if you smell
exhaust fumes. Your vehicle has various emission control
components and a catalytic converter that
enables it to comply with applicable exhaust
emission standards.
To make sure that the catalytic converter and
other emission control components continue
to work properly:
•
Do not crank the engine for more than
10 seconds at a time.
• Do not run the engine with a spark plug
lead disconnected.
• Do not push-start or tow-start your
vehicle. Use booster cables.
See Jump
Starting the Vehicle (page 346).
• Use only the specified fuel listed.
• Do not switch the ignition off when your
vehicle is moving.
• Avoid running out of fuel.
• Have the items listed in scheduled
maintenance information performed
according to the specified schedule.
Note: Resulting component damage may
not be covered by the vehicle Warranty.
224
Navigator (TB9) Canada/United States of America, enUSA, First-Printing Engine Emission Control
Page 383 of 639
Brake fluid reservoir. See Brake Fluid Check (page 389).
F.
Air filter.
See Changing the Engine Air Filter (page 382).
G.
Engine coolant reservoir.
See Engine Coolant Check (page 383).
H.
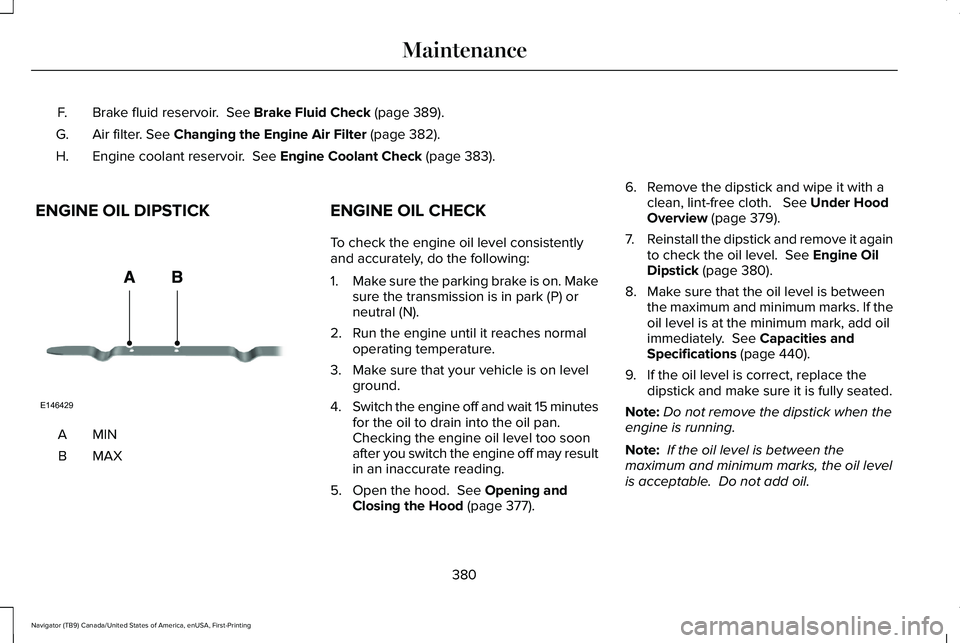
ENGINE OIL DIPSTICK MINA
MAXB ENGINE OIL CHECK
To check the engine oil level consistently
and accurately, do the following:
1.
Make sure the parking brake is on. Make
sure the transmission is in park (P) or
neutral (N).
2. Run the engine until it reaches normal operating temperature.
3. Make sure that your vehicle is on level ground.
4. Switch the engine off and wait 15 minutes
for the oil to drain into the oil pan.
Checking the engine oil level too soon
after you switch the engine off may result
in an inaccurate reading.
5. Open the hood.
See Opening and
Closing the Hood (page 377). 6. Remove the dipstick and wipe it with a
clean, lint-free cloth.
See Under Hood
Overview (page 379).
7. Reinstall the dipstick and remove it again
to check the oil level.
See Engine Oil
Dipstick (page 380).
8. Make sure that the oil level is between the maximum and minimum marks. If the
oil level is at the minimum mark, add oil
immediately.
See Capacities and
Specifications (page 440).
9. If the oil level is correct, replace the dipstick and make sure it is fully seated.
Note: Do not remove the dipstick when the
engine is running.
Note: If the oil level is between the
maximum and minimum marks, the oil level
is acceptable. Do not add oil.
380
Navigator (TB9) Canada/United States of America, enUSA, First-Printing MaintenanceE146429
Page 385 of 639
From the main menu scroll to:
Action and description
Message
Press the right arrow button,
then from this menu scroll to
the following message.
Settings
Press the right arrow button,
then from this menu scroll to
the following message.
Vehicle
Press the right arrow button,
then from this menu scroll to
the following message.
Oil Life
Press and hold the OK button
until the instrument cluster
displays the following
message.
Hold OK to
Reset
Reset Successful
When the oil change indicator
resets the instrument cluster
displays 100%.
Remaining Life
{00}% Action and description
Message
If the instrument cluster
displays one of the following
messages, repeat the
process.
Not Reset
Reset Cancelled
CHANGING THE ENGINE AIR
FILTER WARNING: To reduce the risk of
vehicle damage and personal burn injuries,
do not start your engine with the air
cleaner removed and do not remove it
while the engine is running.
Note: Failure to use the correct air filter
element may result in severe engine
damage. Resulting component damage may
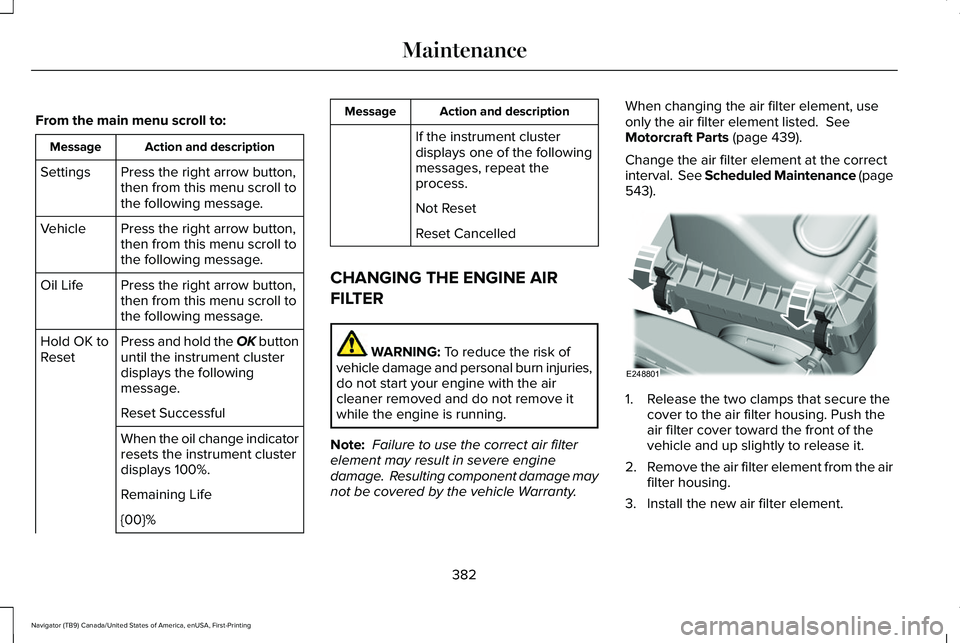
not be covered by the vehicle Warranty. When changing the air filter element, use
only the air filter element listed.
See
Motorcraft Parts (page 439).
Change the air filter element at the correct
interval. See Scheduled Maintenance (page
543
). 1. Release the two clamps that secure the
cover to the air filter housing. Push the
air filter cover toward the front of the
vehicle and up slightly to release it.
2. Remove the air filter element from the air
filter housing.
3. Install the new air filter element.
382
Navigator (TB9) Canada/United States of America, enUSA, First-Printing MaintenanceE248801
Page 402 of 639
•
Do not allow wax to come in contact with
any non-body (low-gloss black) colored
trim. The wax will discolor or stain the
parts over time.
•Roof racks.
• Bumpers.
• Grained door handles.
• Side moldings.
• Mirror housings.
• Windshield cowl area.
• Do not apply wax to glass areas.
• After waxing, your car's paint should feel
smooth, and be free of streaks and
smudges.
CLEANING THE ENGINE
Engines are more efficient when they are
clean because grease and dirt buildup keep
the engine warmer than normal. When washing:
•
Take care when using a power washer
to clean the engine. The high-pressure
fluid could penetrate the sealed parts
and cause damage.
• Do not spray a hot engine with cold water
to avoid cracking the engine block or
other engine components.
• Spray Motorcraft Engine Shampoo and
Degreaser on all parts that require
cleaning and pressure rinse clean. In
Canada, use Motorcraft Engine Shampoo.
Note: If your vehicle has an engine cover
remove the cover before application of
Motorcraft Engine Shampoo and Degreaser.
Immediately rinse away any over spray.
• Never wash or rinse the engine while it
is hot or running; water in the running
engine may cause internal damage.
• Never wash or rinse any ignition coil,
spark plug wire or spark plug well, or the
area in and around these locations.
• Cover the battery, power distribution box,
and air filter assembly to prevent water
damage when cleaning the engine. CLEANING THE WINDOWS AND
WIPER BLADES
Car wash chemicals and environmental
fallout can result in windshield and wiper
blade contamination. Dirty windshield and
wipers will result in poor windshield wiper
operation. Keep the windshield and wiper
blades clean to maintain windshield wiper
performance.
To clean the windshield and wiper blades:
•
Clean the windshield with a non-abrasive
glass cleaner. When cleaning the interior
of the windshield, avoid getting any glass
cleaner on the instrument panel or door
panels. Wipe any glass cleaner off these
surfaces immediately.
• For windshields contaminated with tree
sap, chemicals, wax or bugs, clean the
entire windshield using steel wool (no
greater than 0000 grade) in a circular
motion and rinse with water.
• Clean the wiper blades with isopropyl
rubbing alcohol or windshield washer
concentrate.
399
Navigator (TB9) Canada/United States of America, enUSA, First-Printing Vehicle Care
Page 407 of 639
Alloy wheels and wheel covers are coated
with a clear coat paint finish. To maintain
their condition we recommend that you:
•
Clean them weekly with the
recommended wheel and tire cleaner.
• Use a sponge to remove heavy deposits
of dirt and brake dust accumulation.
• Rinse them thoroughly with a pressurized
stream of water when you complete the
cleaning process.
We recommend that you use our surface
wheel cleaner. Make sure that you read and
follow the manufacturer’ s instructions.
Using other non-recommended cleaning
products can result in severe and permanent
damage.
VEHICLE STORAGE
If you plan on storing your vehicle for 30
days or more, read the following
maintenance recommendations to make sure
your vehicle stays in good operating
condition. We engineer and test all motor vehicles and
their components for reliable, regular driving.
Under various conditions, long-term storage
may lead to degraded engine performance
or failure unless you use specific precautions
to preserve engine components.
General
•
Store all vehicles in a dry, ventilated
place.
• Protect from sunlight, if possible.
• If vehicles are stored outside, they
require regular maintenance to protect
against rust and damage.
Body
• Wash your vehicle thoroughly to remove
dirt, grease, oil, tar or mud from exterior
surfaces, rear-wheel housing and the
underside of front fenders.
• Periodically wash your vehicle if it is
stored in exposed locations.
• Touch-up exposed or primed metal to
prevent rust. •
Cover chrome and stainless steel parts
with a thick coat of auto wax to prevent
discoloration. Re-wax as necessary when
you wash your vehicle.
• Lubricate all hood, door and luggage
compartment hinges and latches with a
light grade oil.
• Cover interior trim to prevent fading.
• Keep all rubber parts free from oil and
solvents.
Engine
• Change the engine oil and filter prior to
storage because used engine oil contains
contaminates which may cause engine
damage.
• Start the engine every 15 days for a
minimum of 15 minutes. Run at fast idle
with the climate controls set to defrost
until the engine reaches normal
operating temperature.
• With your foot on the brake, shift through
all the gears while the engine is running.
• We recommend that you change the
engine oil before you use your vehicle
again.
404
Navigator (TB9) Canada/United States of America, enUSA, First-Printing Vehicle Care
Page 442 of 639
MOTORCRAFT PARTS
Part Number
Component
FA-1883
Air filter element.
FP-79
Cabin air filter.
FL-500-S1
Oil filter.
BAGM-49H8
Battery.
SP-5782
Spark plugs.
FT-215
Transmission filter.
WW-2248
Windshield wiper blade.
WW-1107
Rear window wiper blade.
1 If a Motorcraft oil filter is not available, use an oil filter that meets industry performance specification SAE/USCAR-36.
2 For spark plug replacement, contact an authorized dealer. Replace the spark plugs at the appropriate intervals. See Scheduled Maintenance
(page 539).
We recommend Motorcraft replacement parts available at your authorized de\
aler or at fordparts.com for scheduled maintenance. We engineer
the parts for your vehicle to meet and exceed our specifications. Use of other parts may impact vehicle performan\
ce, emissions and durability.
Your warranty could be void for any damage related to use of other parts.\
439
Navigator (TB9) Canada/United States of America, enUSA, First-Printing Capacities and Specifications
Page 447 of 639
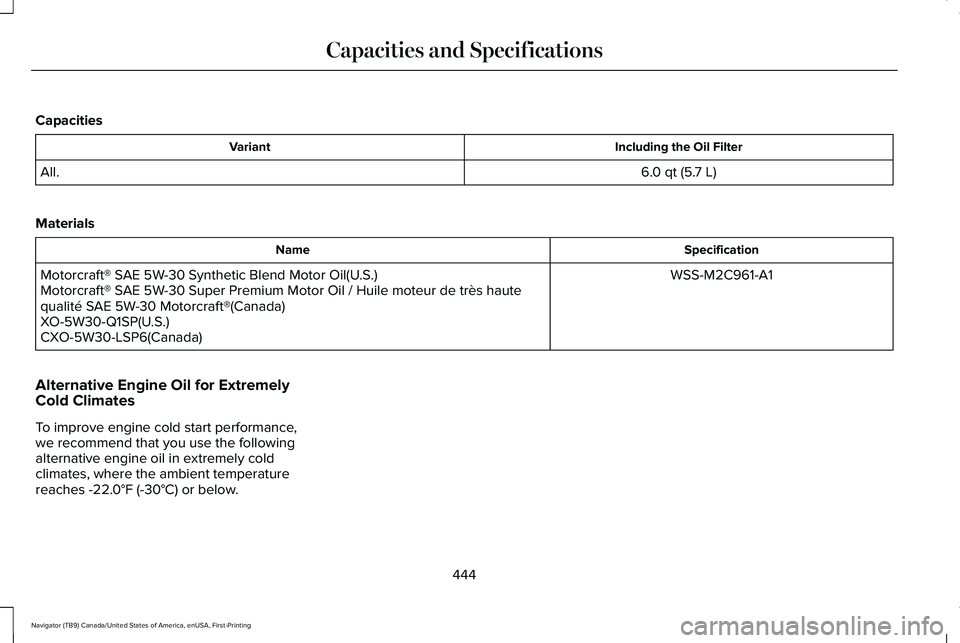
Capacities
Including the Oil Filter
Variant
6.0 qt (5.7 L)
All.
Materials Specification
Name
WSS-M2C961-A1
Motorcraft® SAE 5W-30 Synthetic Blend Motor Oil(U.S.)
Motorcraft® SAE 5W-30 Super Premium Motor Oil / Huile moteur de très haute
qualité SAE 5W-30 Motorcraft®(Canada)
XO-5W30-Q1SP(U.S.)
CXO-5W30-LSP6(Canada)
Alternative Engine Oil for Extremely
Cold Climates
To improve engine cold start performance,
we recommend that you use the following
alternative engine oil in extremely cold
climates, where the ambient temperature
reaches -22.0°F (-30°C) or below.
444
Navigator (TB9) Canada/United States of America, enUSA, First-Printing Capacities and Specifications
Page 548 of 639
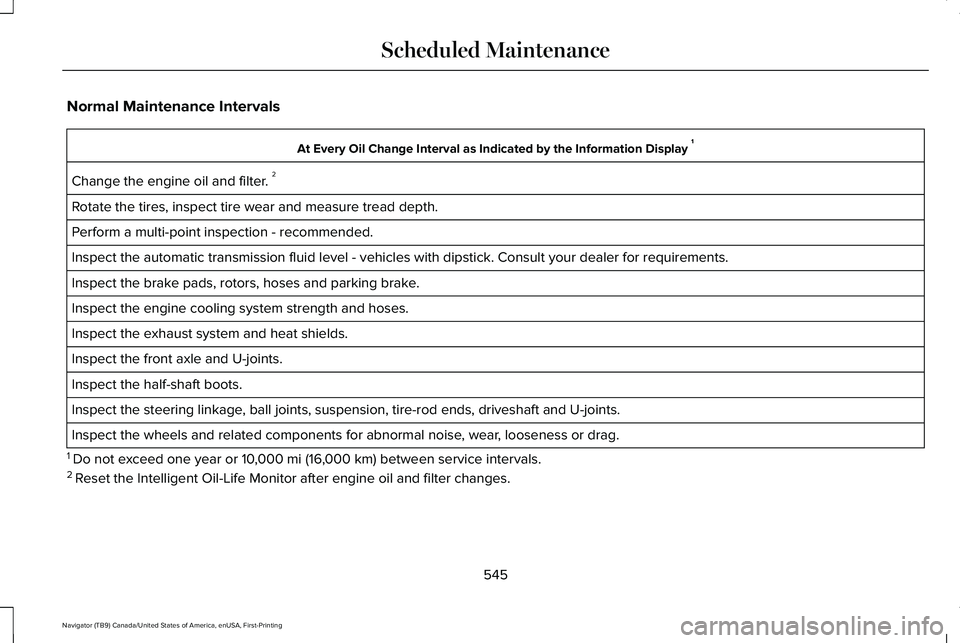
Normal Maintenance Intervals
At Every Oil Change Interval as Indicated by the Information Display
1
Change the engine oil and filter. 2
Rotate the tires, inspect tire wear and measure tread depth.
Perform a multi-point inspection - recommended.
Inspect the automatic transmission fluid level - vehicles with dipstick.\
Consult your dealer for requirements.
Inspect the brake pads, rotors, hoses and parking brake.
Inspect the engine cooling system strength and hoses.
Inspect the exhaust system and heat shields.
Inspect the front axle and U-joints.
Inspect the half-shaft boots.
Inspect the steering linkage, ball joints, suspension, tire-rod ends, driveshaft and U-joints.
Inspect the wheels and related components for abnormal noise, wear, looseness or drag.
1 Do not exceed one year or 10,000 mi (16,000 km) between service intervals.
2 Reset the Intelligent Oil-Life Monitor after engine oil and filter change\
s.
545
Navigator (TB9) Canada/United States of America, enUSA, First-Printing Scheduled Maintenance