spare tire location LINCOLN NAVIGATOR 2021 Owners Manual
[x] Cancel search | Manufacturer: LINCOLN, Model Year: 2021, Model line: NAVIGATOR, Model: LINCOLN NAVIGATOR 2021Pages: 639, PDF Size: 6.09 MB
Page 148 of 639
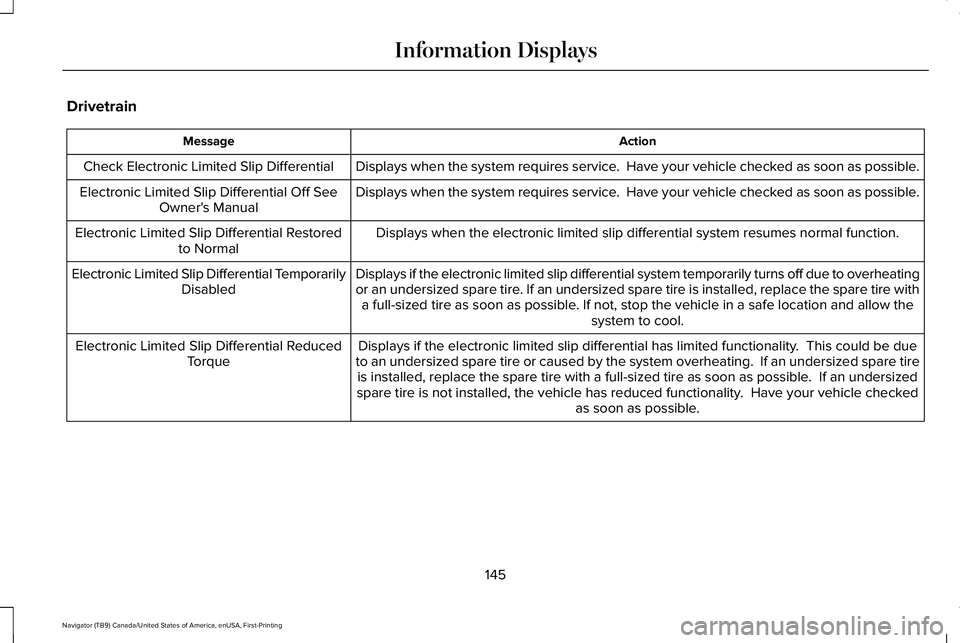
Drivetrain
Action
Message
Displays when the system requires service. Have your vehicle checked as soon as possible.
Check Electronic Limited Slip Differential
Displays when the system requires service. Have your vehicle checked as soon as possible.
Electronic Limited Slip Differential Off See
Owner's Manual
Displays when the electronic limited slip differential system resumes no\
rmal function.
Electronic Limited Slip Differential Restored
to Normal
Displays if the electronic limited slip differential system temporarily \
turns off due to overheating
or an undersized spare tire. If an undersized spare tire is installed, replace the spare tire witha full-sized tire as soon as possible. If not, stop the vehicle in a safe location and allow the system to cool.
Electronic Limited Slip Differential Temporarily
Disabled
Displays if the electronic limited slip differential has limited functio\
nality. This could be due
to an undersized spare tire or caused by the system overheating. If an \
undersized spare tire is installed, replace the spare tire with a full-sized tire as soon as p\
ossible. If an undersized
spare tire is not installed, the vehicle has reduced functionality. Have your vehicle checked as soon as possible.
Electronic Limited Slip Differential Reduced
Torque
145
Navigator (TB9) Canada/United States of America, enUSA, First-Printing Information Displays
Page 243 of 639
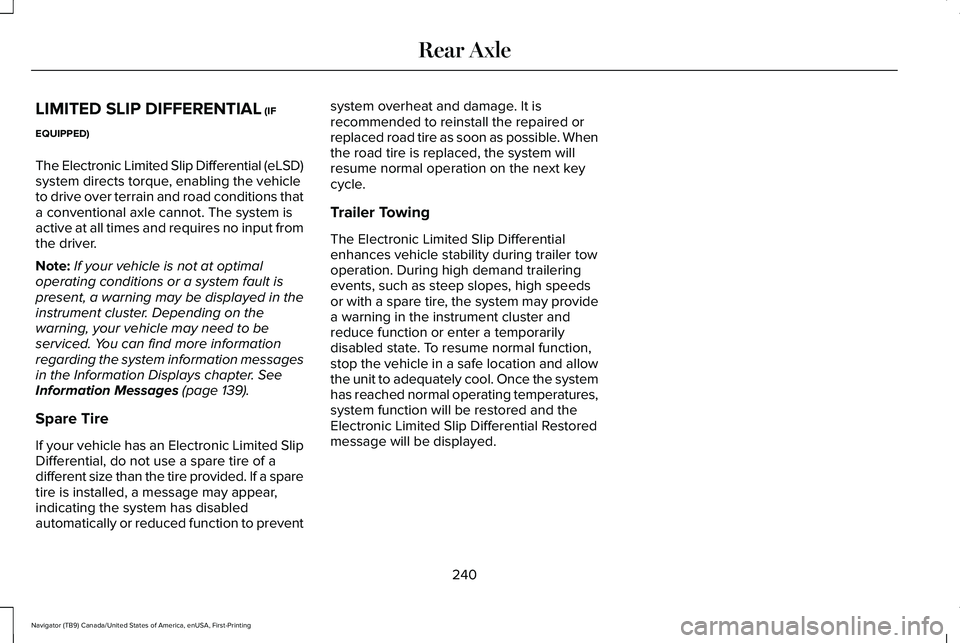
LIMITED SLIP DIFFERENTIAL (IF
EQUIPPED)
The Electronic Limited Slip Differential (eLSD)
system directs torque, enabling the vehicle
to drive over terrain and road conditions that
a conventional axle cannot. The system is
active at all times and requires no input from
the driver.
Note: If your vehicle is not at optimal
operating conditions or a system fault is
present, a warning may be displayed in the
instrument cluster. Depending on the
warning, your vehicle may need to be
serviced. You can find more information
regarding the system information messages
in the Information Displays chapter.
See
Information Messages (page 139).
Spare Tire
If your vehicle has an Electronic Limited Slip
Differential, do not use a spare tire of a
different size than the tire provided. If a spare
tire is installed, a message may appear,
indicating the system has disabled
automatically or reduced function to prevent system overheat and damage. It is
recommended to reinstall the repaired or
replaced road tire as soon as possible. When
the road tire is replaced, the system will
resume normal operation on the next key
cycle.
Trailer Towing
The Electronic Limited Slip Differential
enhances vehicle stability during trailer tow
operation. During high demand trailering
events, such as steep slopes, high speeds
or with a spare tire, the system may provide
a warning in the instrument cluster and
reduce function or enter a temporarily
disabled state. To resume normal function,
stop the vehicle in a safe location and allow
the unit to adequately cool. Once the system
has reached normal operating temperatures,
system function will be restored and the
Electronic Limited Slip Differential Restored
message will be displayed.
240
Navigator (TB9) Canada/United States of America, enUSA, First-Printing Rear Axle
Page 347 of 639
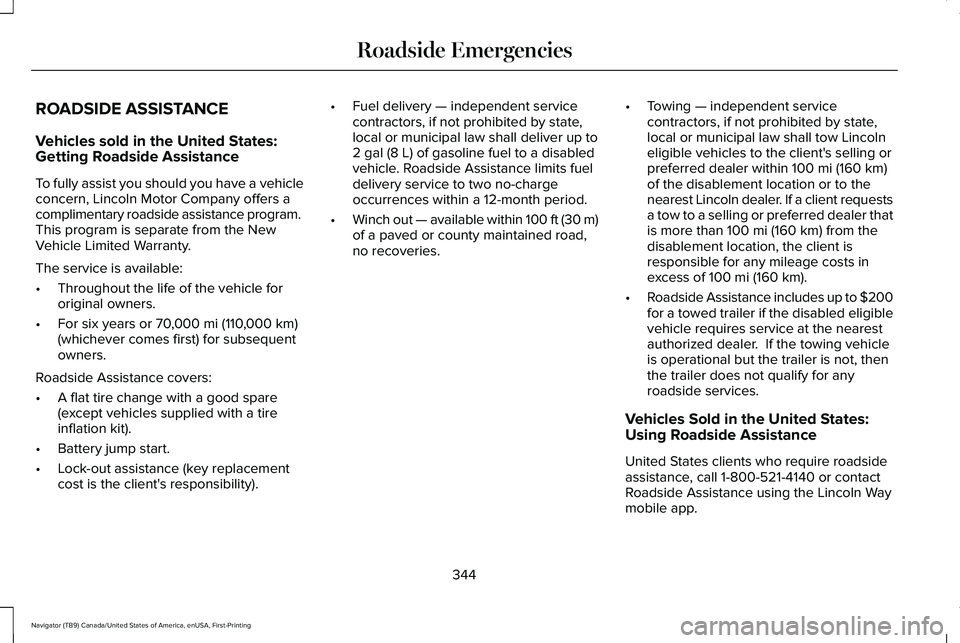
ROADSIDE ASSISTANCE
Vehicles sold in the United States:
Getting Roadside Assistance
To fully assist you should you have a vehicle
concern, Lincoln Motor Company offers a
complimentary roadside assistance program.
This program is separate from the New
Vehicle Limited Warranty.
The service is available:
•
Throughout the life of the vehicle for
original owners.
• For six years or 70,000 mi (110,000 km)
(whichever comes first) for subsequent
owners.
Roadside Assistance covers:
• A flat tire change with a good spare
(except vehicles supplied with a tire
inflation kit).
• Battery jump start.
• Lock-out assistance (key replacement
cost is the client's responsibility). •
Fuel delivery — independent service
contractors, if not prohibited by state,
local or municipal law shall deliver up to
2 gal (8 L)
of gasoline fuel to a disabled
vehicle. Roadside Assistance limits fuel
delivery service to two no-charge
occurrences within a 12-month period.
• Winch out — available within 100 ft (30 m)
of a paved or county maintained road,
no recoveries. •
Towing — independent service
contractors, if not prohibited by state,
local or municipal law shall tow Lincoln
eligible vehicles to the client's selling or
preferred dealer within 100 mi (160 km)
of the disablement location or to the
nearest Lincoln dealer. If a client requests
a tow to a selling or preferred dealer that
is more than
100 mi (160 km) from the
disablement location, the client is
responsible for any mileage costs in
excess of
100 mi (160 km).
• Roadside Assistance includes up to $200
for a towed trailer if the disabled eligible
vehicle requires service at the nearest
authorized dealer. If the towing vehicle
is operational but the trailer is not, then
the trailer does not qualify for any
roadside services.
Vehicles Sold in the United States:
Using Roadside Assistance
United States clients who require roadside
assistance, call 1-800-521-4140 or contact
Roadside Assistance using the Lincoln Way
mobile app.
344
Navigator (TB9) Canada/United States of America, enUSA, First-Printing Roadside Emergencies
Page 419 of 639
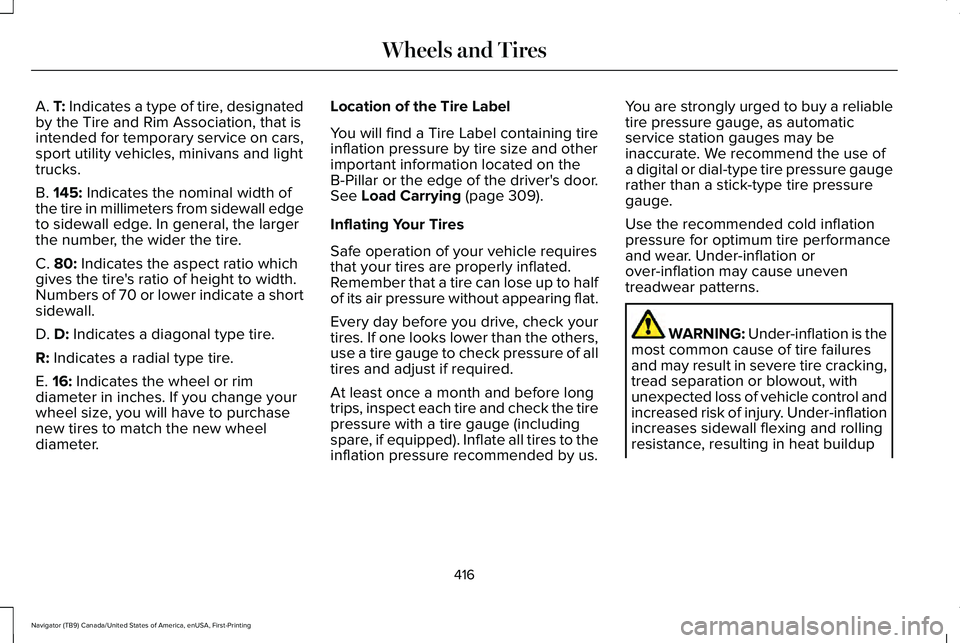
A. T: Indicates a type of tire, designated
by the Tire and Rim Association, that is
intended for temporary service on cars,
sport utility vehicles, minivans and light
trucks.
B.
145: Indicates the nominal width of
the tire in millimeters from sidewall edge
to sidewall edge. In general, the larger
the number, the wider the tire.
C.
80: Indicates the aspect ratio which
gives the tire's ratio of height to width.
Numbers of 70 or lower indicate a short
sidewall.
D.
D: Indicates a diagonal type tire.
R:
Indicates a radial type tire.
E.
16: Indicates the wheel or rim
diameter in inches. If you change your
wheel size, you will have to purchase
new tires to match the new wheel
diameter. Location of the Tire Label
You will find a Tire Label containing tire
inflation pressure by tire size and other
important information located on the
B-Pillar or the edge of the driver's door.
See
Load Carrying (page 309).
Inflating Your Tires
Safe operation of your vehicle requires
that your tires are properly inflated.
Remember that a tire can lose up to half
of its air pressure without appearing flat.
Every day before you drive, check your
tires. If one looks lower than the others,
use a tire gauge to check pressure of all
tires and adjust if required.
At least once a month and before long
trips, inspect each tire and check the tire
pressure with a tire gauge (including
spare, if equipped). Inflate all tires to the
inflation pressure recommended by us. You are strongly urged to buy a reliable
tire pressure gauge, as automatic
service station gauges may be
inaccurate. We recommend the use of
a digital or dial-type tire pressure gauge
rather than a stick-type tire pressure
gauge.
Use the recommended cold inflation
pressure for optimum tire performance
and wear. Under-inflation or
over-inflation may cause uneven
treadwear patterns.
WARNING: Under-inflation is the
most common cause of tire failures
and may result in severe tire cracking,
tread separation or blowout, with
unexpected loss of vehicle control and
increased risk of injury. Under-inflation
increases sidewall flexing and rolling
resistance, resulting in heat buildup
416
Navigator (TB9) Canada/United States of America, enUSA, First-Printing Wheels and Tires
Page 432 of 639
When Inflating Your Tires
WARNING: Do not use the tire
pressure displayed in the information
display as a tire pressure gauge. Failure to
follow this instruction could result in
personal injury or death.
When putting air into your tires (such as at a
gas station or in your garage), the tire
pressure monitoring system will not respond
immediately to the air added to your tires.
It could take up to two minutes of driving
over
20 mph (32 km/h) for the light to turn
off after you have filled your tires to the
recommended inflation pressure.
How Temperature Affects Your Tire
Pressure
The tire pressure monitoring system monitors
tire pressure in each pneumatic tire. While
driving in a normal manner, a typical
passenger tire inflation pressure could
increase about
2–4 psi (14–28 kPa) from a
cold start situation. If the vehicle is stationary
overnight with the outside temperature significantly lower than the daytime
temperature, the tire pressure could
decrease about
3 psi (21 kPa) for a drop of
30°F (17°C) in ambient temperature. This
lower pressure value could be detected by
the tire pressure monitoring system as being
significantly lower than the recommended
inflation pressure and activate the system
warning light for low tire pressure. If the low
tire pressure warning light is on, visually
check each tire to verify that no tire is flat. If
one or more tires are flat, repair as
necessary. Check the air pressure in the road
tires. If any tire is under-inflated, carefully
drive the vehicle to the nearest location
where air can be added to the tires. Inflate
all the tires to the recommended inflation
pressure.
CHANGING A ROAD WHEEL WARNING:
If the tire pressure
monitor sensor becomes damaged it may
not function. Note:
You should only use tire sealants in
roadside emergencies as they may cause
damage to the tire pressure monitoring
system sensor.
Note: The tire pressure monitoring system
indicator light illuminates when the spare
tire is in use. To restore the full function of
the monitoring system, all road wheels
equipped with tire pressure monitoring
sensors must be mounted on this vehicle.
If you get a flat tire when driving, do not
apply the brake heavily. Instead, gradually
decrease your speed. Hold the steering
wheel firmly and slowly move to a safe place
on the side of the road.
Have a flat serviced by an authorized dealer
in order to prevent damage to the system
sensors.
See Tire Pressure Monitoring
System (page 424). Replace the spare tire
with a road tire as soon as possible. During
repairing or replacing of the flat tire, have
the authorized dealer inspect the system
sensor for damage.
429
Navigator (TB9) Canada/United States of America, enUSA, First-Printing Wheels and Tires
Page 433 of 639

Dissimilar Spare Wheel and Tire
Assembly Information
WARNING: Failure to follow these
guidelines could result in an increased risk
of loss of vehicle control, injury or death.
If you have a dissimilar spare wheel and tire,
then it is intended for temporary use only.
This means that if you need to use it, you
should replace it as soon as possible with a
road wheel and tire assembly that is the
same size and type as the road tires and
wheels that were originally provided. If the
dissimilar spare tire or wheel is damaged, it
should be replaced rather than repaired.
A dissimilar spare wheel and tire assembly
is defined as a spare wheel and tire assembly
that is different in brand, size or appearance
from the road tires and wheels.
Full-size dissimilar spare When driving with the full-size dissimilar
spare wheel and tire assembly, do not:
•
Exceed
70 mph (113 km/h).
• Use more than one dissimilar spare
wheel and tire assembly at a time.
• Use snow chains on the end of the
vehicle with the dissimilar spare wheel
and tire assembly.
When driving with the full-size dissimilar
spare wheel and tire assembly, it is
recommended that you do not:
• Exceed
50 mph (80 km/h) in 4WD.
• Engage 4WD unless the vehicle is
stationary.
• Use 4WD on dry pavement.
The usage of a full-size dissimilar spare
wheel and tire assembly can lead to
impairment of the following:
• Handling, stability and braking
performance.
• Comfort and noise. •
Ground clearance and parking at curbs.
• Winter weather driving capability.
• Wet weather driving capability.
• Four-wheel driving capability.
When driving with the full-size dissimilar
spare wheel and tire assembly additional
caution should be given to:
• Towing a trailer.
• Driving vehicles equipped with a camper
body.
• Driving vehicles with a load on the cargo
rack.
Drive cautiously when using a full-size
dissimilar spare wheel and tire assembly and
seek service as soon as possible.
Location of the Spare Tire and Tools
The spare tire is located under the vehicle,
just forward of the rear bumper. The jack,
swivel wrench and lug wrench are in the
following locations:
430
Navigator (TB9) Canada/United States of America, enUSA, First-Printing Wheels and Tires
Page 434 of 639
Location
Item
Under the vehicle, just forward of the rear bumper
Spare tire
Under the access panel located in the floor compartment behind therear seat
Jack and tool kit bag
Tire Change Procedure WARNING: Only use replacement
tires and wheels that are the same size,
load index, speed rating and type (such as
P-metric versus LT-metric or all-season
versus all-terrain) as those originally
provided by Ford. The recommended tire
and wheel size may be found on either the
Safety Compliance Certification Label
(affixed to either the door hinge pillar,
door-latch post, or the door edge that
meets the door-latch post, next to the
driver's seating position), or the Tire Label
which is located on the B-Pillar or edge of
the driver's door. If this information is not
found on these labels, then you should
contact your authorized dealer as soon as possible. Use of any tire or wheel not
recommended by Ford can affect the
safety and performance of your vehicle,
which could result in an increased risk of
loss of vehicle control, vehicle rollover,
personal injury and death.
WARNING:
To help prevent your
vehicle from moving when changing a
wheel, shift the transmission into park (P),
set the parking brake and use an
appropriate block or wheel chock to
secure the wheel diagonally opposite to
the wheel being changed. For example,
when changing the front left wheel, place
an appropriate block or wheel chock on
the right rear wheel. WARNING: Do not attempt to change
a tire on the side of the vehicle close to
moving traffic. Pull far enough off the road
to avoid the danger of being hit when
operating the jack or changing the wheel. WARNING: Always use the jack
provided as original equipment with your
vehicle. If using a jack other than the one
provided, make sure the jack capacity is
adequate for the vehicle weight, including
any vehicle cargo or modifications. If you
are unsure if the jack capacity is adequate,
contact the authorized dealer.
431
Navigator (TB9) Canada/United States of America, enUSA, First-Printing Wheels and Tires
Page 437 of 639
WARNING: It is recommended that
the wheels of the vehicle be chocked, and
that no person should remain in a vehicle
that is being jacked. WARNING:
Failure to follow these
guidelines could result in an increased risk
of loss of vehicle control, injury or death.
Note: The jack does not require
maintenance or additional lubrication over
the service life of your vehicle.
Note: Both the front and rear jacking points
are on the frame rails. The correct locations
on the frame rails are marked with an arrow
punched into the frame rail. Jack at the
specified locations to avoid damaging your
vehicle.
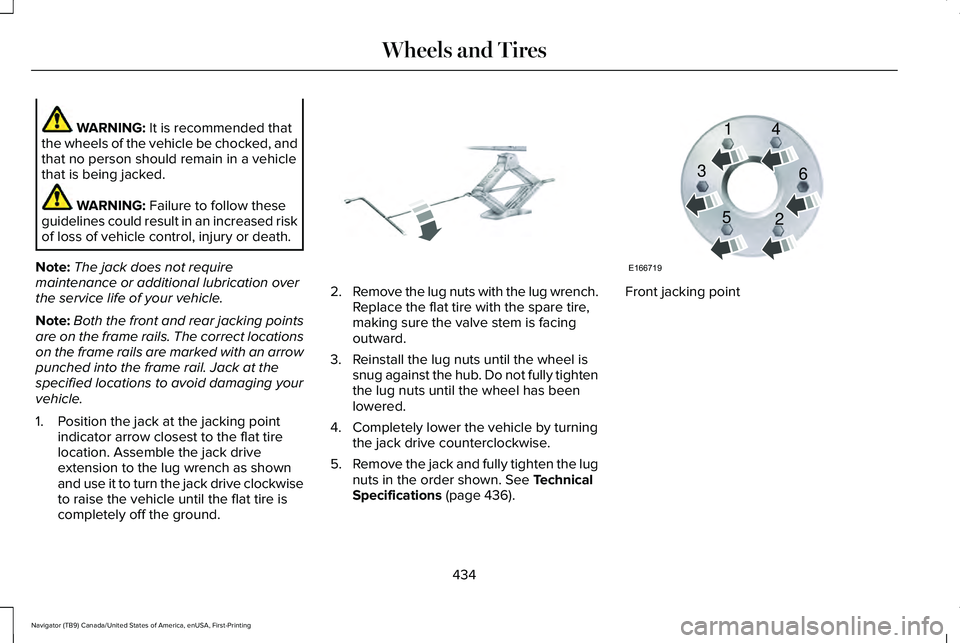
1. Position the jack at the jacking point indicator arrow closest to the flat tire
location. Assemble the jack drive
extension to the lug wrench as shown
and use it to turn the jack drive clockwise
to raise the vehicle until the flat tire is
completely off the ground. 2.
Remove the lug nuts with the lug wrench.
Replace the flat tire with the spare tire,
making sure the valve stem is facing
outward.
3. Reinstall the lug nuts until the wheel is snug against the hub. Do not fully tighten
the lug nuts until the wheel has been
lowered.
4. Completely lower the vehicle by turning the jack drive counterclockwise.
5. Remove the jack and fully tighten the lug
nuts in the order shown.
See Technical
Specifications (page 436). Front jacking point
434
Navigator (TB9) Canada/United States of America, enUSA, First-Printing Wheels and TiresE325278 E166719
1
3
5 4
6
2
Page 626 of 639
Engine Coolant...................................................442
Engine Oil.............................................................443
Front Axle.............................................................449
Fuel Tank..............................................................446
Grease...................................................................446
Hydraulic Brake System....................................447
Locks......................................................................447
Rear Axle..............................................................449
Transfer Case......................................................448
Washer Reservoir...............................................450
Cargo Nets.....................................................307
Car Wash See: Cleaning the Exterior...............................397
Catalytic Converter
......................................224
On-Board Diagnostics (OBD-II).......................225
Readiness for Inspection and Maintenance
(I/M) Testing.....................................................226
Center Console
............................................205
Changing a Bulb...........................................395
LED Lamps...........................................................395
Changing a Fuse...........................................374 Fuses......................................................................374
Changing a Road Wheel............................429 Dissimilar Spare Wheel and Tire Assembly
Information......................................................430
Location of the Spare Tire and Tools............430
Tire Change Procedure.....................................
431 Changing the 12V Battery..........................390
Battery Management System..........................392
Changing the Engine Air Filter.................382
Changing the Vehicle Wi-Fi Hotspot Name or Password................................................459
Changing the Wiper Blades......................394
Charging a Wireless Device......................204
Checking MyKey System Status
..................81
MyKey Distance......................................................81
Number of Admin Keys.......................................82
Number of MyKeys...............................................82
Checking the Wiper Blades.......................394
Childminder Mirror
........................................123
Child Restraint and Seatbelt Maintenance..................................................54
Child Restraint Positioning
...........................42
Child Safety......................................................24
General Information.............................................24
Child Safety Locks
..........................................44
Left-Hand Side.......................................................44
Right-Hand Side....................................................44
Cleaning Leather Seats..............................403
Cleaning Products.......................................396 Materials...............................................................396
Cleaning the Engine
....................................399
Cleaning the Exterior...................................397 Cleaning the Exterior Lamps...........................397
Cleaning the Exterior Precautions.................397 Exterior Chrome Parts.......................................398
Exterior Plastic Parts..........................................398
Stripes or Graphics............................................398
Underbody...........................................................398
Under Hood.........................................................398
Cleaning the Instrument Panel and Instrument Cluster Lens...........................402
Cleaning the Interior...................................400 Cleaning Black Label or Presidential
Interior..............................................................400
Cleaning the Wheels
...................................403
Cleaning the Windows and Wiper Blades...........................................................399
Clearing All MyKeys........................................81
Climate............................................................499 Accessing Rear Climate Controls..................502
Accessing the Climate Control Menu...........499
Directing the Airflow..........................................499
Rear Climate Control Lock Indicator.............502
Setting the Blower Motor Speed...................
500
Setting the Temperature..................................500
Switching Auto Mode On and Off.................500
Switching Dual Zone Mode On and Off.......500
Switching Maximum Air Conditioning On and Off.......................................................................501
Switching Maximum Defrost On and Off......501
Switching Rear Auto Mode On and Off........502
Switching Recirculated Air On and Off..........501
623
Navigator (TB9) Canada/United States of America, enUSA, First-Printing Index