ECO mode LINCOLN NAVIGATOR 2023 Owner's Manual
[x] Cancel search | Manufacturer: LINCOLN, Model Year: 2023, Model line: NAVIGATOR, Model: LINCOLN NAVIGATOR 2023Pages: 660, PDF Size: 14.04 MB
Page 187 of 660
The rear seat heat controls are on the rearof the center console.
Press the heated seat symbol to cyclethrough the various heat settings and off.More indicator lights indicate warmersettings.
Note:The heated seats may remain on afteryou remote start your vehicle, based on yourremote start settings. The heated seats mayalso turn on when you start your vehicle ifthey were on when you switched yourvehicle off.
Automatic Climate Controlled Seats (If
Equipped)
When you switch the auto setting on, theclimate controlled seats switch between theheated seats and ventilated seats to matchyour climate control setting.
VENTILATED SEATS
VENTILATED SEAT PRECAUTIONS
Do not:
•Spill liquid on the seats. This may causethe air vent holes to become blocked andnot work properly.
•Place cargo or objects under the seats.They may block the air intake causingthe air vents to not work properly.
SWITCHING THE VENTILATED SEATSON AND OFF
The vehicle must be running to use thisfeature.
Press this symbol on the climate controls orthe rear touchscreen to cycle through thevarious ventilation settings and off. Moreindicator lights indicate higher fan speeds.
Note:When you switch the climate controlfan speed and the ventilated seats to theirmaximum settings, the ventilated seatsprovide increased cooling.
If the engine falls below 350 RPM while theventilated seats are on, the feature switchesitself off unless the vehicle is inAuto-Start-Stop mode. You may need toreactivate the ventilated seats.
Note:The ventilated seats may remain onafter you remote start your vehicle, basedon your remote start settings. The ventilatedseats may also switch on when you startyour vehicle if they were on when youswitched your vehicle off.
183
2023 Navigator (TB9) Canada/United States of America, enUSA, Edition date: 202207, DOMRear SeatsE146322 E224689
Page 202 of 660
WHAT IS THE WIRELESS
ACCESSORY CHARGER
The wireless accessory charger allows youto charge one compatible Qi wirelesscharging device on the charging area.
WIRELESS ACCESSORY CHARGER
PRECAUTIONS
WARNING: Wireless chargingdevices can affect the operation ofimplanted medical devices, includingcardiac pacemakers. If you have anyimplanted medical devices, we recommendthat you consult with your physician.
Keep the charging area clean and removeforeign objects prior to charging a device.
Do not place items with a magnetic strip orradio-frequency identification chip, forexample passports, parking tickets,transportation passes or credit cards, nearthe charging area when charging a device.Damage could occur to the magnetic stripor radio-frequency identification chip.
Do not place metal objects, for exampleremote controls, coins and candy wrappers,on or near the charging area when charginga device. Metal objects may heat up anddegrade the charging performance, inaddition to causing interruptions in charging.
Charging could be interrupted, degraded, orcould stop if any of the following occur:
•The system detects a foreign object.
•The device is misaligned on the chargingarea.
•The device moves on the active chargingarea when the vehicle is in motion.
•The vehicle ambient temperature is toohigh.
•You attempt to charge a non-Qicompatible device on the wirelesscharger.
Note:During charging, the device and thecharger could heat up, this is normal. If thebattery gets hotter than usual, the devicemay stop charging.
LOCATING THE WIRELESS
ACCESSORY CHARGER
The charging area is on the centerconsole or in the media bin belowthe instrument panel.
CHARGING A WIRELESS DEVICE
Place the device on the center of thecharging surface with the charging sidedown. The charging stops after your devicereaches a full charge.
You can use the charger when the vehicleis in accessory mode, when the vehicle isrunning, or when SYNC is on.
Displays on the status bar whenwireless charging is in progress.
198
2023 Navigator (TB9) Canada/United States of America, enUSA, Edition date: 202207, DOMWireless Accessory ChargerE297549 E263583
Page 205 of 660
STARTING AND STOPPING THE
ENGINE – PRECAUTIONS
WARNING: Extended idling at highengine speeds can produce very hightemperatures in the engine and exhaustsystem, creating the risk of fire or otherdamage.
WARNING: Do not park, idle or driveyour vehicle on dry grass or other dryground cover. The emission system heatsup the engine compartment and exhaustsystem, creating the risk of fire.
WARNING: Do not start the enginein a closed garage or in other enclosedareas. Exhaust fumes are toxic. Alwaysopen the garage door before you start theengine. Failure to follow this instructioncould result in personal injury or death.
WARNING: Do not use starting fluid,for example ether, in the air intake system.Such fluid could cause immediateexplosive damage to the engine andpossible personal injury.
WARNING: Exhaust leaks may resultin entry of harmful and potentially lethalfumes into the passenger compartment. Ifyou smell exhaust fumes inside yourvehicle, have your vehicle inspectedimmediately. Do not drive if you smellexhaust fumes.
The powertrain control system meets allCanadian interference-causing equipmentstandard requirements regulating theimpulse electrical field or radio noise.
Note:If you use your vehicle regularly abovethe altitude of 7,500 ft (2,286 m) and underthe temperature of -4.0°F (-20°C), it isrecommended to use the alternative engineoil. See Capacities and Specifications(page 467).
If you stop your vehicle and leave the engineidling for long periods, we recommend thatyou do one of the following:
•Open the windows at least 1 in (2.5 cm).
•Set your climate control to outside air.
PUSH BUTTON IGNITION SWITCH
Switching the Ignition Off
When the ignition is on or in accessory mode,press the push button ignition switch oncewithout your foot on the brake pedal.
Switching the Ignition to AccessoryMode
When the ignition is off, press the pushbutton ignition switch once without your footon the brake pedal.
201
2023 Navigator (TB9) Canada/United States of America, enUSA, Edition date: 202207, DOMStarting and Stopping the EngineE321258
Page 206 of 660
All electrical circuits and accessories areoperational and the warning lamps andindicators illuminate.
Note:Your vehicle has a battery saverfeature that shuts your vehicle off when itdetects a certain amount of battery drain, orafter approximately 30 minutes of inactivityin accessory mode.
Note:The system may not function if theremote control is close to metal objects orelectronic devices, for example keys or acell phone.
Note:You need a valid key inside yourvehicle to switch the ignition on and start theengine.
STARTING THE ENGINE
STARTING A GASOLINE ENGINE
Before starting your vehicle, check thefollowing:
•Make sure that the headlamps andelectrical accessories are off.
•Make sure that the parking brake is on.
•Make sure that the transmission is in park(P).
1.Fully press the brake pedal.
Note:Do not touch the accelerator pedal.
2.Press the push button ignition switch.
Note:The engine may continue cranking forup to 15 seconds or until it starts.
Note:The engine takes longer to start atlower temperatures. It may crank for severalseconds when very cold.
RESTARTING THE ENGINE AFTERSTOPPING IT
The system allows you to start the enginewithin 10 seconds of switching it off, even ifit does not detect a valid passive key.
Within 10 seconds of switching the engineoff, fully press the brake pedal and press thepush button ignition switch. After 10 seconds,you can no longer start the engine if thesystem does not detect a valid passive key.
When you start the engine, it remains runninguntil you press the push button ignitionswitch, even if your vehicle does not detecta valid passive key. If you open and close adoor when the engine is running, the systemsearches for a valid passive key.
202
2023 Navigator (TB9) Canada/United States of America, enUSA, Edition date: 202207, DOMStarting and Stopping the EngineE357998
Page 225 of 660

DRIVE (D)
In drive (D) power is transmitted to the drivenwheels.
SHIFTING YOUR VEHICLE INTO
GEAR
The transmission selector is on the centerstack.
1.Press and hold the brake pedal.
2.Press a button to select a position.
Note:The position illuminates on thetransmission selector.
AUTOMATIC TRANSMISSION
POSITION INDICATORS
The instrument cluster displays the currentposition.
Note:The position could illuminate on thetransmission selector.
MANUALLY SHIFTING GEARS
SHIFTING USING THE PADDLESHIFTERS
The instrument cluster displays the currentgear. The current gear flashes when yourvehicle cannot shift into the requested gear.Your vehicle will not shift if the requestedgear raises or lowers the engine speedbeyond the limit.
Your vehicle could shift when you fully pressthe accelerator or brake pedal.
Note:Prolonged driving with high enginespeed could cause vehicle damage notcovered by the vehicle warranty.
Note:Drive modes could affect when thevehicle shifts into the requested gear.
Manually Shifting Gears in Drive (D)
Use this feature to temporarily change gear.
Note:We recommend using this feature forengine braking or driving on hilly ormountainous roads.
•Pull any paddle to switch the feature on.
•Pull the right (+) paddle to upshift.
221
2023 Navigator (TB9) Canada/United States of America, enUSA, Edition date: 202207, DOMAutomatic TransmissionE247220 E358682 E144821
Page 226 of 660
•Pull the left (-) paddle to downshift.
•Hold the + paddle for a few seconds toswitch the feature off.
Note:The feature switches off after a shortperiod of time if neither paddle is pulled.
TEMPORARY NEUTRAL MODE
WHAT IS TEMPORARY NEUTRALMODE
This mode keeps your vehicle in neutral (N),for a limited time, when you exit your vehicleor switch your vehicle off.
Note:Do not tow your vehicle in this mode.
HOW DOES TEMPORARY NEUTRALMODE WORK
Use this mode to keep your vehicle in neutral(N) when you exit your vehicle or switch yourvehicle off. For example, if you exit yourvehicle before an automatic car wash.
Note:You do not need to use this mode atan automatic car wash if you stay in yourvehicle with power on.
Note:Do not tow your vehicle in this mode.
Note:Automatic return to park (P) is delayedwhen your vehicle is in this mode. See WhatIs Automatic Return to Park (P) (page 223).
TEMPORARY NEUTRAL MODELIMITATIONS
Your vehicle could shift to park (P) after 30minutes, or when the vehicle battery chargelevel is low. Prolonged use of this mode cancause the 12 V battery to run out of charge.
Do not tow your vehicle in this mode. Failureto follow these instructions could result invehicle damage not covered by the vehiclewarranty.
ENTERING TEMPORARY NEUTRALMODE
1.Power your vehicle on.
2.Bring your vehicle to a complete stop.
3.Press and hold the brake pedal.
4.Shift into neutral (N).
Note:An instructional message appears.
5.Press the neutral (N) button.
Note:A confirmation message appearswhen your vehicle enters the mode.
6.Release the brake pedal.
Note:Your vehicle is free to roll.
7.Switch your vehicle off.
Note:Do not tow your vehicle in this mode.
Note:The neutral (N) indicator on thetransmission selector may flash in this mode.
EXITING TEMPORARY NEUTRALMODE
1.Press the brake pedal.
2.Shift into park (P), or power your vehicleon and shift into drive (D) or reverse (R).
222
2023 Navigator (TB9) Canada/United States of America, enUSA, Edition date: 202207, DOMAutomatic Transmission
Page 229 of 660
WARNING: Do not becomeoverconfident in the ability of four-wheeldrive vehicles. Although a four-wheel drivevehicle may accelerate better than atwo-wheel drive vehicle in low tractionsituations, it won't stop any faster thantwo-wheel drive vehicles. Always drive ata safe speed.
Truck and utility vehicles can differ fromsome other vehicles. Your vehicle could behigher to allow it to travel over rough terrainwithout getting stuck or damagingunderbody components. The differences thatmake your vehicle so versatile also make ithandle differently than an ordinary passengercar. Always maintain steering wheel control,especially in rough terrain. Since suddenchanges in terrain can result in abruptsteering wheel motion, make sure you gripthe steering wheel from the outside. Do notgrip the spokes. Drive cautiously to avoidvehicle damage from concealed objects such
as rocks and stumps. Drive slower in strongcrosswinds which can affect the normalsteering characteristics of your vehicle. Beextremely careful when driving on pavementmade slippery by loose sand, water, gravel,snow or ice.
Note:Do not use four-wheel drive high orfour-wheel drive low mode on dry, hardsurfaced roads. Doing so can produceexcessive noise, increase tire wear and candamage drive components.
FOUR-WHEEL DRIVE LIMITATIONS
Operating Four-Wheel Drive with aSpare or Mismatched Tires (If Equipped)
On four-wheel drive vehicles, the size of thespare tire can affect the four-wheel drivesystem. If there is a significant differencebetween the size of the spare tire and theremaining tires, you could have limitedfour-wheel drive functionality. When drivingwith the full-size dissimilar spare wheel andtire assembly, we recommend that you donot:
•Exceed 50 mph (80 km/h) with afour-wheel drive mode turned on.
•Use a four-wheel drive mode on drypavement.
Driving with the full-size dissimilar sparewheel and tire assembly can limit four-wheeldrive functionality. You can experience thefollowing:
•Additional noise from the transfer caseor other drive components.
Use of a dissimilar spare wheel and tireassembly can lead to impairment of thefollowing:
•Comfort and noise.
•Winter weather driving capability.
•Wet driving capability.
•Four-wheel drive capability.
Note:Your vehicle could have a front airdam that can become damaged, due toreduced ground clearance, when taking yourvehicle off-road. You can remove this airdam by removing the eight bolts that secureit.
225
2023 Navigator (TB9) Canada/United States of America, enUSA, Edition date: 202207, DOMFour-Wheel Drive (If Equipped)
Page 230 of 660
Note:Your vehicle could have side stepsthat can become damaged, due to reducedground clearance, when taking your vehicleoff-road. Remove side steps before drivingyour vehicle off-road.
SELECTING A FOUR-WHEEL DRIVE
MODE
To select a specific four-wheel drive modeplease select one of the desired drivemodes. For additional information. SeeSelecting a Drive Mode (page 295).
Note:When shifting to and from four-wheeldrive, a message appears in the instrumentcluster display indicating that the system isin the process of making a shift.
Note:Do not perform this operation if therear wheels are slipping or while applyingthe accelerator pedal.
If the system detects a fault, a warningmessage appears in the instrument clusterdisplay. See Four-Wheel Drive –Information Messages (page 228).
Note:Do not use DEEP CONDITIONS orSLOW CLIMB on dry, hard surfaced roads.Doing so produces excessive noise,increases tire wear and may damage drivecomponents. The 4X4 system in thesemodes is only intended for consistentlyslippery or loose surfaces.
Shifting to or from Slow Climb (4L)
To select or exit SLOW CLIMB (4L):
1.Bring your vehicle to a speed of 3 mph(5 km/h) or less.
2.Place the transmission in neutral (N).
3.Select SLOW CLIMB on the drive modeswitch.
A message appears in the instrument clusterdisplay indicating a four-wheel drive shift isin progress. If any of the above shiftconditions are not present, the shift will notoccur and a message appears in theinstrument cluster display guiding youthrough the proper shifting procedures. Ifthere is a transfer case tooth blockage, amessage appears in the instrument cluster
display. To alleviate this condition, place thetransmission in a forward gear, move yourvehicle forward approximately 4.9 ft (1.5 m),and shift the transmission back to neutral (N)to allow the transfer case to complete therange shift.
Note:You could hear some noise as thesystem shifts or engages which is normal. Ifthe system detects a fault, a warningmessage appears in the instrument clusterdisplay. See Four-Wheel Drive –Information Messages (page 228).
FOUR-WHEEL DRIVE MODES
TWO-WHEEL DRIVE HIGH
2H turns on when you select NORMAL orCONSERVE. Two-wheel drive high is forgeneral on-road driving. Power is sent to therear wheels only.
Note:Two-wheel drive high can turn on oroff based on Drive Mode selection See DriveMode Control (page 294).
226
2023 Navigator (TB9) Canada/United States of America, enUSA, Edition date: 202207, DOMFour-Wheel Drive (If Equipped)
Page 249 of 660
WHAT IS TRACTION CONTROL
The traction control system helps to avoiddrive wheel spin and loss of traction.
HOW DOES TRACTION CONTROL
WORK
If your wheels begin to spin, the loss oftraction can compromise steering controland stability of the vehicle. The tractioncontrol system applies the brakes toindividual wheels and when needed, reducesengine power at the same time to increasetraction.
SWITCHING TRACTION CONTROL
ON AND OFF
WARNING: Operating your vehiclewith the traction control disabled couldlead to an increased risk of loss of vehiclecontrol, vehicle rollover, personal injuryand death.
The system turns traction control and stabilitycontrol on each time you power on yourvehicle.
1.Press Features on the touchscreen.
2.Press Driver Assistance.
3.Switch Traction Control on or off.
Note:When you switch traction control off,a message and an illuminated icon appearon the information display.
Turn the system back on to return to normaloperation.
If your vehicle is stuck in mud or snow,switching traction control off may bebeneficial as this allows the wheels to spin.
Note:When you switch traction control off,stability control remains fully active.
Your vehicle could have MyKey restrictionsregarding this feature. See ConfigurableMyKey Settings (page 82).
TRACTION CONTROL INDICATOR
Stability and Traction Control Indicator
If the indicator does not illuminatewhen you switch the ignition on,or remains on when the engine isrunning, this indicates a malfunction. Haveyour vehicle checked by an authorizeddealer as soon as possible.
The traction control off indicatorilluminates when you switch thetraction control system off, or whenan alternative stability control mode isselected that requires the traction control offdepending on the drive mode selected.
245
2023 Navigator (TB9) Canada/United States of America, enUSA, Edition date: 202207, DOMTraction ControlE138639 E130458
Page 277 of 660
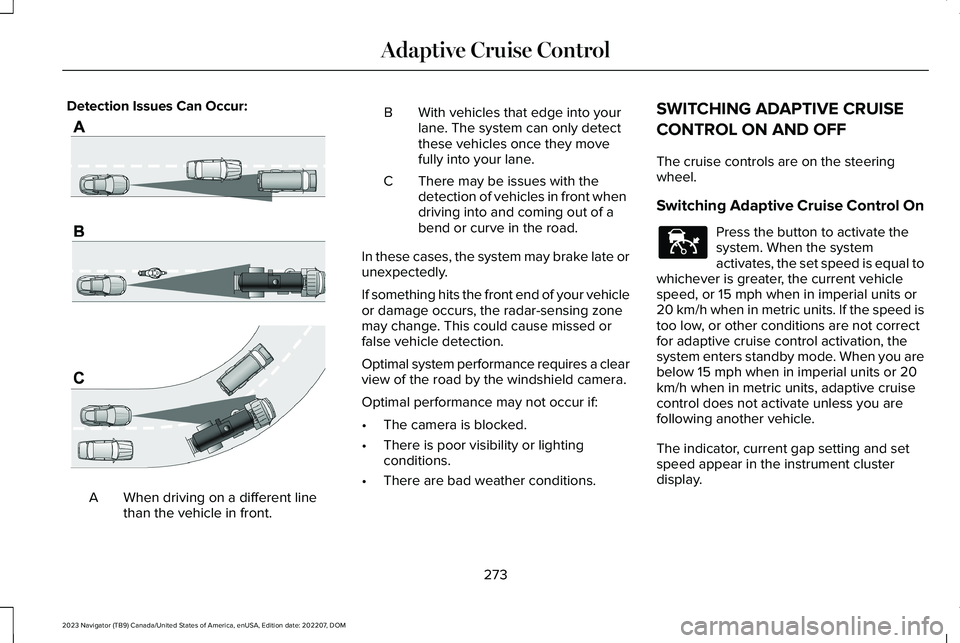
Detection Issues Can Occur:
When driving on a different linethan the vehicle in front.A
BWith vehicles that edge into yourlane. The system can only detectthese vehicles once they movefully into your lane.
There may be issues with thedetection of vehicles in front whendriving into and coming out of abend or curve in the road.
C
In these cases, the system may brake late orunexpectedly.
If something hits the front end of your vehicleor damage occurs, the radar-sensing zonemay change. This could cause missed orfalse vehicle detection.
Optimal system performance requires a clearview of the road by the windshield camera.
Optimal performance may not occur if:
•The camera is blocked.
•There is poor visibility or lightingconditions.
•There are bad weather conditions.
SWITCHING ADAPTIVE CRUISE
CONTROL ON AND OFF
The cruise controls are on the steeringwheel.
Switching Adaptive Cruise Control On
Press the button to activate thesystem. When the systemactivates, the set speed is equal towhichever is greater, the current vehiclespeed, or 15 mph when in imperial units or20 km/h when in metric units. If the speed istoo low, or other conditions are not correctfor adaptive cruise control activation, thesystem enters standby mode. When you arebelow 15 mph when in imperial units or 20km/h when in metric units, adaptive cruisecontrol does not activate unless you arefollowing another vehicle.
The indicator, current gap setting and setspeed appear in the instrument clusterdisplay.
273
2023 Navigator (TB9) Canada/United States of America, enUSA, Edition date: 202207, DOMAdaptive Cruise ControlE71621 E144529