manual transmission LINCOLN NAVIGATOR 2023 Owners Manual
[x] Cancel search | Manufacturer: LINCOLN, Model Year: 2023, Model line: NAVIGATOR, Model: LINCOLN NAVIGATOR 2023Pages: 660, PDF Size: 14.04 MB
Page 11 of 660
Accessing the Passive Key BackupPosition......................................................205
Starting and Stopping the Engine –Troubleshooting......................................206
Auto-Start-Stop
What Is Auto-Start-Stop.............................208
Auto-Start-Stop Precautions....................208
Switching Auto-Start-Stop On and Off......................................................................208
Stopping the Engine..................................208
Restarting the Engine................................208
Auto-Start-Stop Indicators........................208
Auto-Start-Stop – Troubleshooting........209
Fuel and Refueling
Fuel and Refueling Precautions................211
Fuel Quality...................................................212
Locating the Fuel Filler Funnel.................212
Running Out of Fuel....................................213
Refueling........................................................214
Fuel Tank Capacity......................................216
Fuel and Refueling – Troubleshooting.......................................................................217
Catalytic Converter
What Is the Catalytic Converter...............218
Catalytic Converter Precautions..............218
Catalytic Converter – Troubleshooting.......................................................................219
Automatic Transmission
Automatic Transmission Precautions.....220
Automatic Transmission Positions..........220
Shifting Your Vehicle Into Gear................221
Automatic Transmission Position Indicators.......................................................................221
Manually Shifting Gears.............................221
Temporary Neutral Mode..........................222
Automatic Return to Park (P)....................223
Automatic Transmission Audible Warnings......................................................................223
Four-Wheel Drive
How Does Four-Wheel Drive Work........224
Four-Wheel Drive Precautions.................224
Four-Wheel Drive Limitations..................225
Selecting a Four-Wheel Drive Mode......226
Four-Wheel Drive Modes..........................226
Four-Wheel Drive Indicators.....................227
Four-Wheel Drive – Troubleshooting......227
Electronic Limited-Slip Differential
What Is the Electronic Limited-SlipDifferential................................................230
Electronic Limited-Slip Differential –Troubleshooting.......................................231
Brakes
Brake Precautions.......................................232
Anti-Lock Braking System.........................232
Brake Over Accelerator.............................232
Locating the Brake Fluid Reservoir........232
Checking the Brake Fluid.........................232
Brake Fluid Specification..........................233
Brakes – Troubleshooting.........................233
Electric Parking Brake
What Is the Electric Parking Brake.........235
Applying the Electric Parking Brake.......235
7
2023 Navigator (TB9) Canada/United States of America, enUSA, Edition date: 202207, DOMTable of Contents
Page 104 of 660
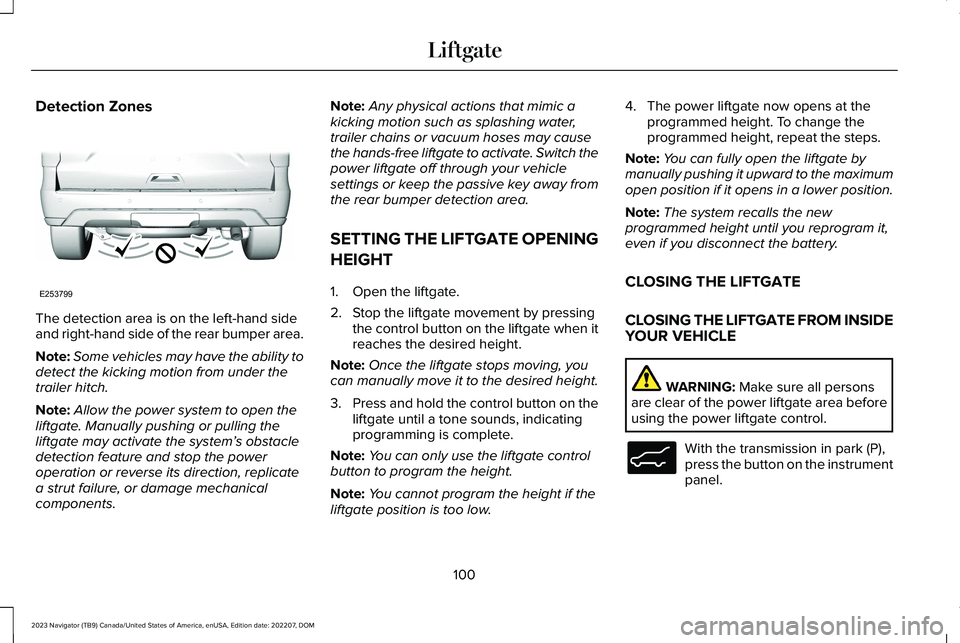
Detection Zones
The detection area is on the left-hand sideand right-hand side of the rear bumper area.
Note:Some vehicles may have the ability todetect the kicking motion from under thetrailer hitch.
Note:Allow the power system to open theliftgate. Manually pushing or pulling theliftgate may activate the system’s obstacledetection feature and stop the poweroperation or reverse its direction, replicatea strut failure, or damage mechanicalcomponents.
Note:Any physical actions that mimic akicking motion such as splashing water,trailer chains or vacuum hoses may causethe hands-free liftgate to activate. Switch thepower liftgate off through your vehiclesettings or keep the passive key away fromthe rear bumper detection area.
SETTING THE LIFTGATE OPENING
HEIGHT
1.Open the liftgate.
2.Stop the liftgate movement by pressingthe control button on the liftgate when itreaches the desired height.
Note:Once the liftgate stops moving, youcan manually move it to the desired height.
3.Press and hold the control button on theliftgate until a tone sounds, indicatingprogramming is complete.
Note:You can only use the liftgate controlbutton to program the height.
Note:You cannot program the height if theliftgate position is too low.
4.The power liftgate now opens at theprogrammed height. To change theprogrammed height, repeat the steps.
Note:You can fully open the liftgate bymanually pushing it upward to the maximumopen position if it opens in a lower position.
Note:The system recalls the newprogrammed height until you reprogram it,even if you disconnect the battery.
CLOSING THE LIFTGATE
CLOSING THE LIFTGATE FROM INSIDEYOUR VEHICLE
WARNING: Make sure all personsare clear of the power liftgate area beforeusing the power liftgate control.
With the transmission in park (P),press the button on the instrumentpanel.
100
2023 Navigator (TB9) Canada/United States of America, enUSA, Edition date: 202207, DOMLiftgateE253799 E138633
Page 126 of 660
2.Press Vehicle Settings.
3.Press Lighting.
4.Press Autolamp Delay.
5.Press a setting.
EXTERIOR LAMPS
USING THE TURN SIGNAL LAMPS
Push the lever up or down toswitch the turn signal lamps on.
Set the lever to the middle position to switchthe turn signal lamps off.
Note:Tap the lever up or down to make theturn signal lamps flash three times.
Turn Signal Lamp Indicator
It flashes when you switch the turnsignal lamps on.
Note:An increase in the rate of flashingwarns of a failed turn signal lamp.
SWITCHING THE DAYTIME RUNNINGLAMPS ON AND OFF - VEHICLESWITH: CONFIGURABLE DAYTIMERUNNING LAMPS
WARNING: The daytime runninglamps system does not activate the rearlamps and may not provide adequatelighting during low visibility drivingconditions. Make sure you switch theheadlamps on, as appropriate, during alllow visibility conditions. Failure to do somay result in a crash.
1.Press Settings on the touchscreen.
2.Press Vehicle Settings.
3.Press Lighting.
4.Switch Daytime Running Lights on oroff.
The daytime running lamps turn on when allof the following occur:
•You switch the system on.
•You switch your vehicle on.
•The transmission is not in park (P) forvehicles with automatic transmissions oryou release the parking brake forvehicles with manual transmissions.
•The lighting control is in the autolampsposition.
•The headlamps are off.
Note:Other lighting control positions do notturn on the daytime running lamps.
122
2023 Navigator (TB9) Canada/United States of America, enUSA, Edition date: 202207, DOMExterior Lighting E273180 E67018 E67018
Page 225 of 660

DRIVE (D)
In drive (D) power is transmitted to the drivenwheels.
SHIFTING YOUR VEHICLE INTO
GEAR
The transmission selector is on the centerstack.
1.Press and hold the brake pedal.
2.Press a button to select a position.
Note:The position illuminates on thetransmission selector.
AUTOMATIC TRANSMISSION
POSITION INDICATORS
The instrument cluster displays the currentposition.
Note:The position could illuminate on thetransmission selector.
MANUALLY SHIFTING GEARS
SHIFTING USING THE PADDLESHIFTERS
The instrument cluster displays the currentgear. The current gear flashes when yourvehicle cannot shift into the requested gear.Your vehicle will not shift if the requestedgear raises or lowers the engine speedbeyond the limit.
Your vehicle could shift when you fully pressthe accelerator or brake pedal.
Note:Prolonged driving with high enginespeed could cause vehicle damage notcovered by the vehicle warranty.
Note:Drive modes could affect when thevehicle shifts into the requested gear.
Manually Shifting Gears in Drive (D)
Use this feature to temporarily change gear.
Note:We recommend using this feature forengine braking or driving on hilly ormountainous roads.
•Pull any paddle to switch the feature on.
•Pull the right (+) paddle to upshift.
221
2023 Navigator (TB9) Canada/United States of America, enUSA, Edition date: 202207, DOMAutomatic TransmissionE247220 E358682 E144821
Page 254 of 660
WHAT IS HILL DESCENT CONTROL
Hill descent control allows the driver to setand maintain vehicle speed whiledescending steep slopes in various surfaceconditions.
HOW DOES HILL DESCENT
CONTROL WORK
Hill descent control can maintain vehiclespeeds on downhill slopes between2–20 mph (3–32 km/h). Above 20 mph(32 km/h), the system remains on but thedescent speed cannot be set or maintained.
Note:The system does not function below2 mph (3 km/h).
The system requires a cool down intervalafter a period of sustained use. Hill descentcontrol provides a warning in the messagecenter and a tone sounds when the systemis about to disengage for cooling. At thistime, manually apply the brakes as neededto maintain descent speed.
Note:The amount of time that the systemcan remain active before cooling varies withconditions.
HILL DESCENT CONTROL
PRECAUTIONS
WARNING: The system does notcontrol speed in low traction conditions orextremely steep slopes. The system isdesigned to be an aid and does not relieveyou of your responsibility to drive with duecare and attention. Failure to follow thisinstruction could result in personal injury.
WARNING: Hill descent controlcannot control descent in all surfaceconditions and circumstances, such as iceor extremely steep grades. Hill descentcontrol is a driver assist system and cannotsubstitute for good judgment by the driver.Failure to do so may result in loss ofvehicle control, crash or serious injury.
WARNING: The system does notreplace the parking brake. When you leaveyour vehicle, always apply the parkingbrake and shift the transmission into park(P) for automatic transmission or first gearfor manual transmission.
SWITCHING HILL DESCENT
CONTROL ON AND OFF
1.Press Features on the touchscreen.
2.Press Driver Assistance.
3.Switch Hill Descent Control on or off.
Note:A message appears in the informationdisplay when the system is active.
250
2023 Navigator (TB9) Canada/United States of America, enUSA, Edition date: 202207, DOMHill Descent Control (If Equipped)
Page 265 of 660
WHAT IS THE 360 DEGREE
CAMERA
The 360 degree camera system consists offront, side and rear cameras which providevisibility around your vehicle.
HOW DOES THE 360 DEGREE
CAMERA WORK
The 360 Degree Camera system:
•Allows you to see what is directly in frontof or behind your vehicle.
•Provides a cross traffic view in front ofand behind your vehicle.
•Allows you to see a top-down view of thearea outside your vehicle, including theblind spots and obstacles near yourvehicle.
360 DEGREE CAMERA
PRECAUTIONS
WARNING: The 360 degree camerasystem still requires the driver to use it inconjunction with looking out of thewindows, and checking the interior andexterior mirrors for maximum coverage.
WARNING: Objects that are close toeither corner of the bumper or under thebumper, might not be seen on the screendue to the limited coverage of the camerasystem.
WARNING: Use caution when turningcamera features on or off when thetransmission is not in park (P). Make sureyour vehicle is not moving.
WARNING: You are responsible forcontrolling your vehicle at all times. Thesystem is designed to be an aid and doesnot relieve you of your responsibility todrive with due care and attention. Failureto follow this instruction could result in theloss of control of your vehicle, personalinjury or death.
WARNING: Use caution when therear cargo door is ajar. If the rear cargodoor is ajar, the camera will be out ofposition and the video image could beincorrect. All guide lines disappear whenthe rear cargo door is ajar. Failure to followthis instruction could result in personalinjury.
WARNING: When manual zoom ison, the full area behind your vehicle maynot show. Be aware of your surroundingswhen using the manual zoom feature.
261
2023 Navigator (TB9) Canada/United States of America, enUSA, Edition date: 202207, DOM360 Degree Camera
Page 353 of 660
TOWING A TRAILER PRECAUTIONS
WARNING: Do not exceed theGVWR or the GAWR specified on thecertification label.
WARNING: Towing trailersbeyond the maximum recommendedgross trailer weight exceeds the limitof your vehicle and could result inengine damage, transmission damage,structural damage, loss of vehiclecontrol, vehicle rollover and personalinjury.
WARNING: Do not exceed thelowest rating capacity for your vehicleor trailer hitch. Overloading yourvehicle or trailer hitch can impair yourvehicle stability and handling. Failureto follow this instruction could resultin the loss of control of your vehicle,personal injury or death.
WARNING: Make sure that thevertical load on the tow ball is betweenthe minimum and maximumrecommended weight at all times.Failure to follow this instruction couldresult in the loss of control of yourvehicle, personal injury or death.
WARNING: Do not cut, drill, weldor modify the trailer hitch. Modifyingthe trailer hitch could reduce the hitchrating.
WARNING: The anti-lock brakesystem does not control the trailerbrakes.
TRAILER BRAKE PRECAUTIONS
WARNING: Do not connect a trailer'shydraulic brake system directly to yourvehicle's brake system. Your vehicle maynot have enough braking power and yourchances of having a collision greatlyincrease.
WARNING: Do not tow a trailer fittedwith electric trailer brakes unless yourvehicle is fitted with a compatibleaftermarket electronic trailer brakecontroller. Failure to follow this instructioncould result in the loss of control of yourvehicle, personal injury or death. Foradditional information and assistance, werecommend that you contact an authorizeddealer.
Electric brakes and manual, automatic orsurge-type trailer brakes are safe if you installthem properly and adjust them to themanufacturer's specifications. The trailerbrakes must meet local and federalregulations.
349
2023 Navigator (TB9) Canada/United States of America, enUSA, Edition date: 202207, DOMTowing a Trailer
Page 399 of 660
•Align the tow vehicle and stuck vehiclein a straight line, within 10 degrees.
•Keep bystanders to the sides of thevehicle, at a distance of at least twice thelength of the recovery strap. This helpsavoid injury from the hazard of a recoveryhook or strap breaking, or a vehiclelurching into their path.
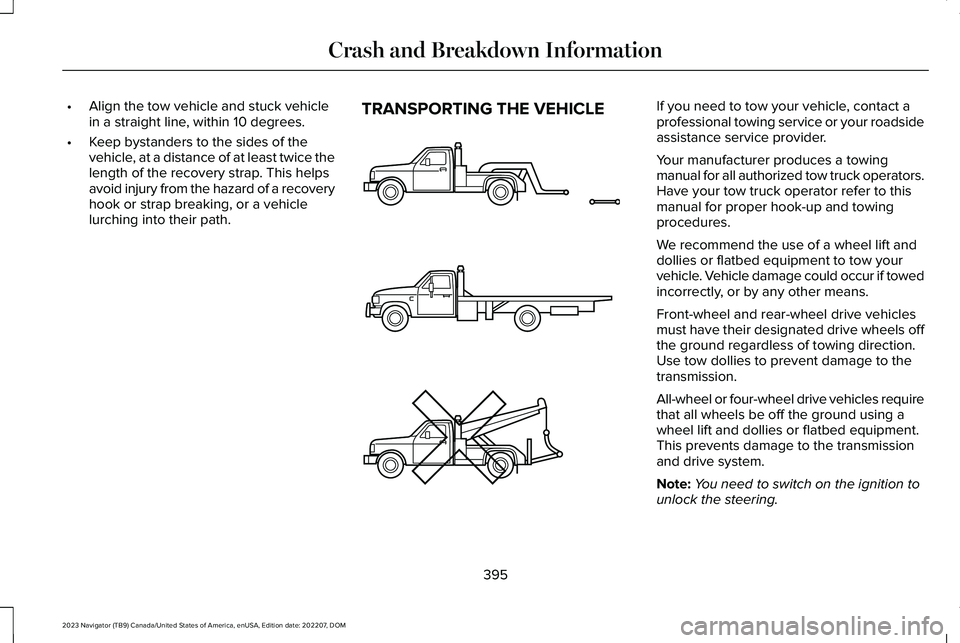
TRANSPORTING THE VEHICLEIf you need to tow your vehicle, contact aprofessional towing service or your roadsideassistance service provider.
Your manufacturer produces a towingmanual for all authorized tow truck operators.Have your tow truck operator refer to thismanual for proper hook-up and towingprocedures.
We recommend the use of a wheel lift anddollies or flatbed equipment to tow yourvehicle. Vehicle damage could occur if towedincorrectly, or by any other means.
Front-wheel and rear-wheel drive vehiclesmust have their designated drive wheels offthe ground regardless of towing direction.Use tow dollies to prevent damage to thetransmission.
All-wheel or four-wheel drive vehicles requirethat all wheels be off the ground using awheel lift and dollies or flatbed equipment.This prevents damage to the transmissionand drive system.
Note:You need to switch on the ignition tounlock the steering.
395
2023 Navigator (TB9) Canada/United States of America, enUSA, Edition date: 202207, DOMCrash and Breakdown InformationE143886
Page 403 of 660
3.Shift into neutral (N).
4.With the vehicle running, shift into drive(D) and let the vehicle roll forward up to3 ft (1 m).
Note:You may hear a noise as the transfercase shifts out of its neutral position. This isnormal.
5.Make sure the instrument cluster displaysNeutral Tow Disabled.
RECREATIONALLY TOWING YOUR
VEHICLE - 4X2
You cannot recreational tow your vehiclewith all wheels on the ground becausevehicle or transmission damage could occur.You must recreational tow your vehicle withall four wheels off the ground, such as whenusing a car-hauling trailer. Otherwise, youcannot recreational tow your vehicle.
EMERGENCY TOWING
If your vehicle becomes inoperable withoutaccess to wheel dollies or a vehicle transporttrailer, it can be flat-towed with all wheels onthe ground, regardless of the powertrain andtransmission configuration, under thefollowing conditions:
•Your vehicle is facing forward for towingin a forward direction.
•Use the manual park release procedure.See Manually Releasing the ElectricParking Brake (page 235). Failure to doso may result in damage to thetransmission.
•Maximum speed is 35 mph (56 km/h).
•Maximum distance is 50 mi (80 km).
399
2023 Navigator (TB9) Canada/United States of America, enUSA, Edition date: 202207, DOMTowing Your Vehicle
Page 465 of 660
WARNING: To help prevent yourvehicle from moving when changing awheel, shift the transmission into park (P),set the parking brake and use anappropriate block or wheel chock tosecure the wheel diagonally opposite tothe wheel being changed. For example,when changing the front left wheel, placean appropriate block or wheel chock onthe right rear wheel.
WARNING: Only use the jackprovided as original equipment with yourvehicle.
WARNING: Switch off the runningboards before jacking or placing any objectunder your vehicle. Never place your handbetween the extended running board andyour vehicle. A moving running board maycause injury.
WARNING: Only use the spare wheelcarrier to stow wheels provided with yourvehicle.
WARNING: Ensure screwthread isadequately lubricated before use.
WARNING: Switch the ignition offand apply the parking brake. If your vehiclehas a manual transmission, shift into firstor reverse gear. If your vehicle has anautomatic transmission, shift into park (P).
WARNING: Only use the specifiedjacking points. If you use any otherlocations you could damage vehiclecomponents, such as brake lines.
WARNING: Do not attempt to changea tire on the side of the vehicle close tomoving traffic. Pull far enough off the roadto not obstruct the flow of traffic and avoidthe danger of being hit when operating thejack or changing the wheel.
1.Park the vehicle on firm, level ground andactivate the hazard flashers.
2.Apply the parking brake, place thetransmission in park (P) and switch theignition off.
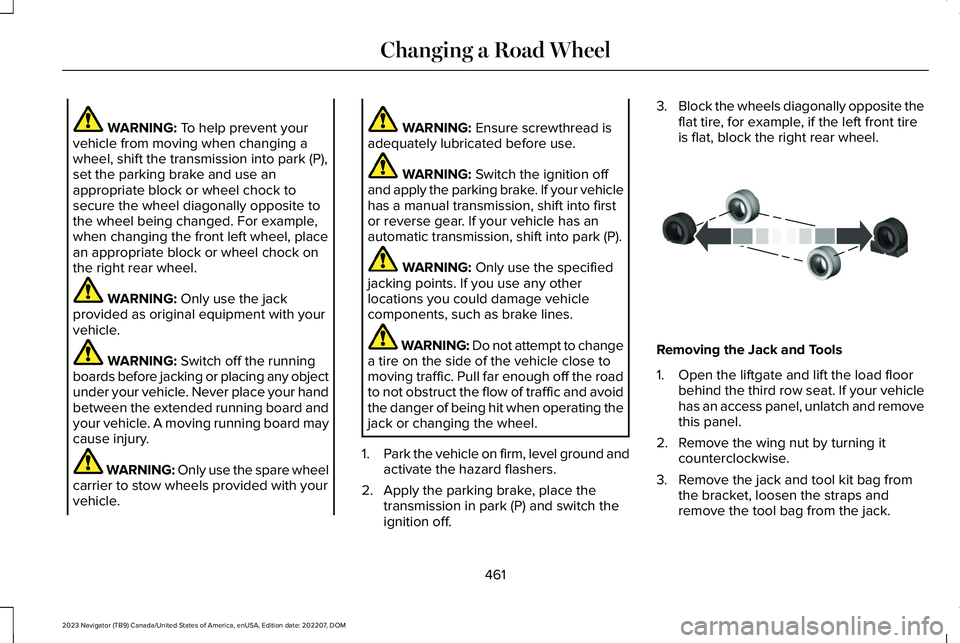
3.Block the wheels diagonally opposite theflat tire, for example, if the left front tireis flat, block the right rear wheel.
Removing the Jack and Tools
1.Open the liftgate and lift the load floorbehind the third row seat. If your vehiclehas an access panel, unlatch and removethis panel.
2.Remove the wing nut by turning itcounterclockwise.
3.Remove the jack and tool kit bag fromthe bracket, loosen the straps andremove the tool bag from the jack.
461
2023 Navigator (TB9) Canada/United States of America, enUSA, Edition date: 202207, DOMChanging a Road WheelE175447