mirror LINCOLN TOWN CAR 2004 Owners Manual
[x] Cancel search | Manufacturer: LINCOLN, Model Year: 2004, Model line: TOWN CAR, Model: LINCOLN TOWN CAR 2004Pages: 304, PDF Size: 2.87 MB
Page 1 of 304
Introduction 4
Instrument Cluster 10
Warning and control lights 10
Gauges 15
Entertainment Systems 17
AM/FM stereo cassette with CD 17
CD changer 21
Navigation system 25
Climate Controls 88
Dual automatic temperature control 88
Rear window defroster 91
Lights 92
Headlamps 92
Turn signal control 95
Bulb replacement 96
Driver Controls 101
Windshield wiper/washer control 101
Steering wheel adjustment 102
Power windows 114
Mirrors 115
Speed control 117
Message center 122
Locks and Security 130
Locks 130
Anti-theft system 141
Table of Contents
1
REVIEW COPY
2004 Town Car(tow), Owners Guide (post-2002-fmt)(own2002),
Market:USA_English(fus)
Table of Contents
Page 103 of 304
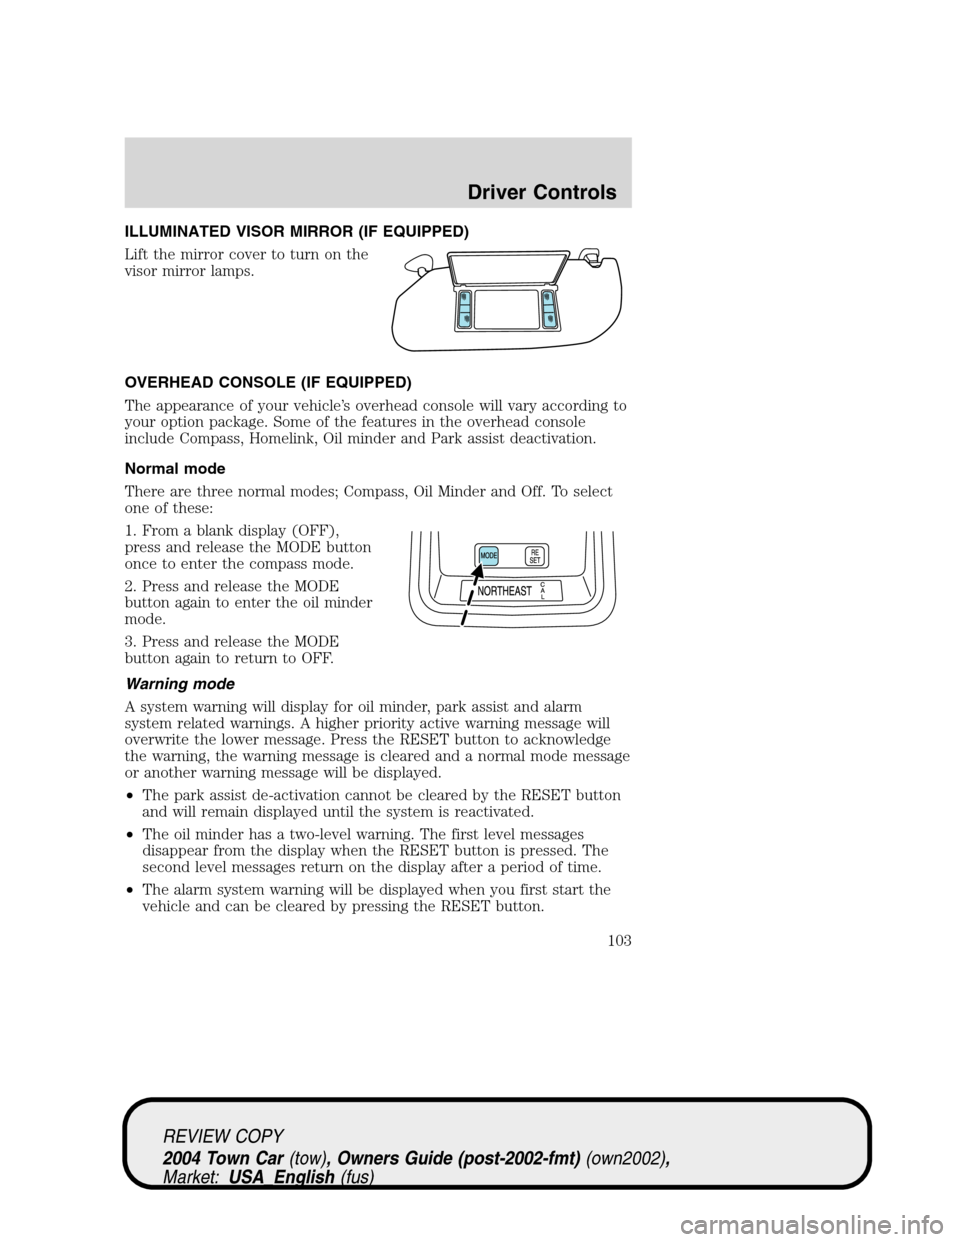
ILLUMINATED VISOR MIRROR (IF EQUIPPED)
Lift the mirror cover to turn on the
visor mirror lamps.
OVERHEAD CONSOLE (IF EQUIPPED)
The appearance of your vehicle’s overhead console will vary according to
your option package. Some of the features in the overhead console
include Compass, Homelink, Oil minder and Park assist deactivation.
Normal mode
There are three normal modes; Compass, Oil Minder and Off. To select
one of these:
1. From a blank display (OFF),
press and release the MODE button
once to enter the compass mode.
2. Press and release the MODE
button again to enter the oil minder
mode.
3. Press and release the MODE
button again to return to OFF.
Warning mode
A system warning will display for oil minder, park assist and alarm
system related warnings. A higher priority active warning message will
overwrite the lower message. Press the RESET button to acknowledge
the warning, the warning message is cleared and a normal mode message
or another warning message will be displayed.
•The park assist de-activation cannot be cleared by the RESET button
and will remain displayed until the system is reactivated.
•The oil minder has a two-level warning. The first level messages
disappear from the display when the RESET button is pressed. The
second level messages return on the display after a period of time.
•The alarm system warning will be displayed when you first start the
vehicle and can be cleared by pressing the RESET button.
REVIEW COPY
2004 Town Car(tow), Owners Guide (post-2002-fmt)(own2002),
Market:USA_English(fus)
Driver Controls
103
Page 115 of 304
MIRRORS
Automatic dimming inside rear view mirror (if equipped)
Your vehicle is equipped with an inside rear view mirror which has an
auto-dimming function (available as an option on the outside driver’s side
mirror). The electronic day/night mirror will change from the normal
state to the non-glare state when bright lights (glare) reach the mirror.
When the mirror detects bright light from behind the vehicle, it will
automatically adjust (darken) to minimize glare.
The mirror will automatically return to the normal state whenever the
vehicle is placed in R (Reverse)(when the mirror is on) to ensure a
bright clear view when backing up.
Do not block the sensor on the backside of the mirror since this may
impair proper mirror performance.
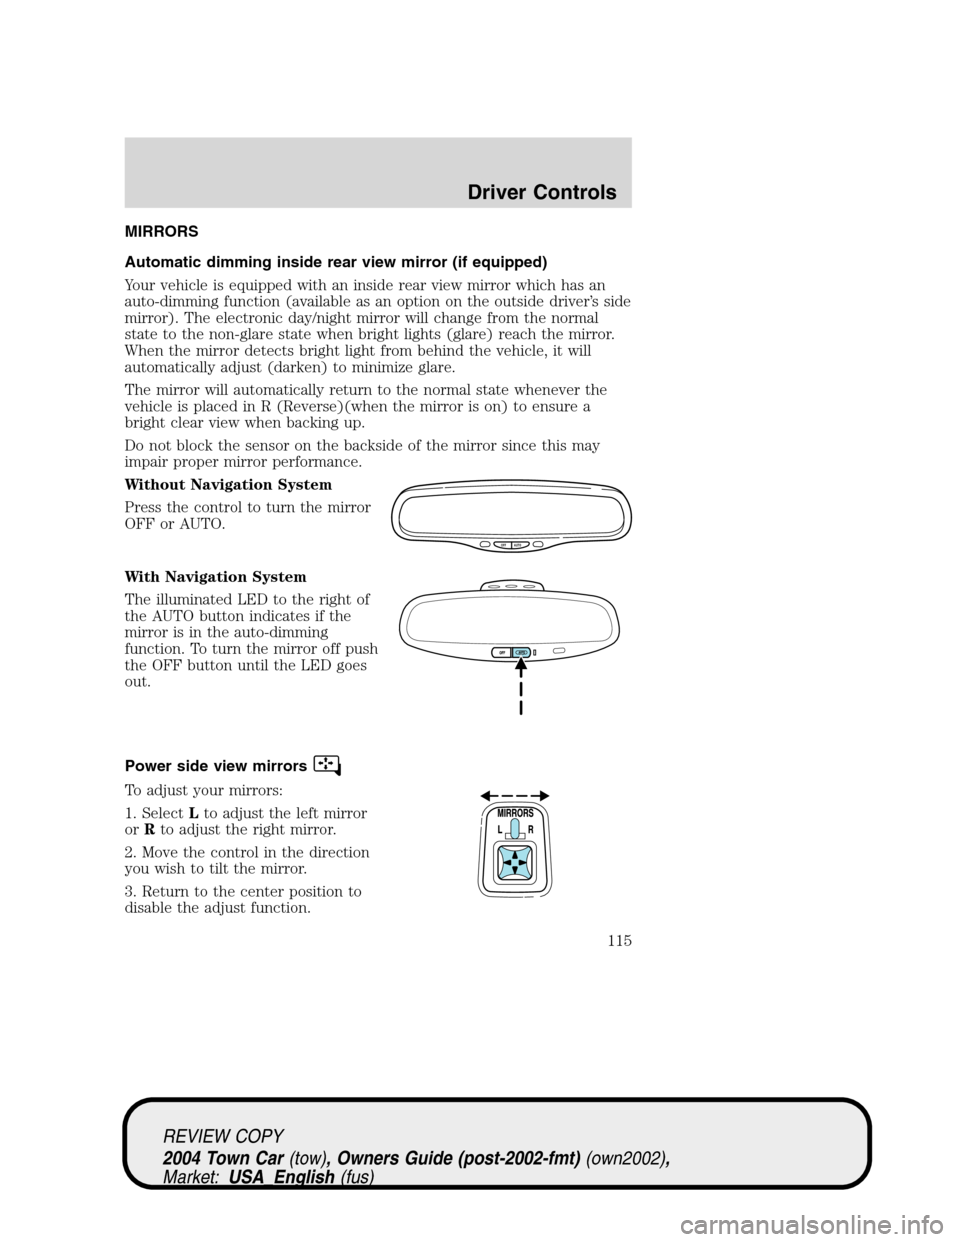
Without Navigation System
Press the control to turn the mirror
OFF or AUTO.
With Navigation System
The illuminated LED to the right of
the AUTO button indicates if the
mirror is in the auto-dimming
function. To turn the mirror off push
the OFF button until the LED goes
out.
Power side view mirrors
To adjust your mirrors:
1. SelectLto adjust the left mirror
orRto adjust the right mirror.
2. Move the control in the direction
you wish to tilt the mirror.
3. Return to the center position to
disable the adjust function.
OFF AUTO
REVIEW COPY
2004 Town Car(tow), Owners Guide (post-2002-fmt)(own2002),
Market:USA_English(fus)
Driver Controls
115
Page 116 of 304
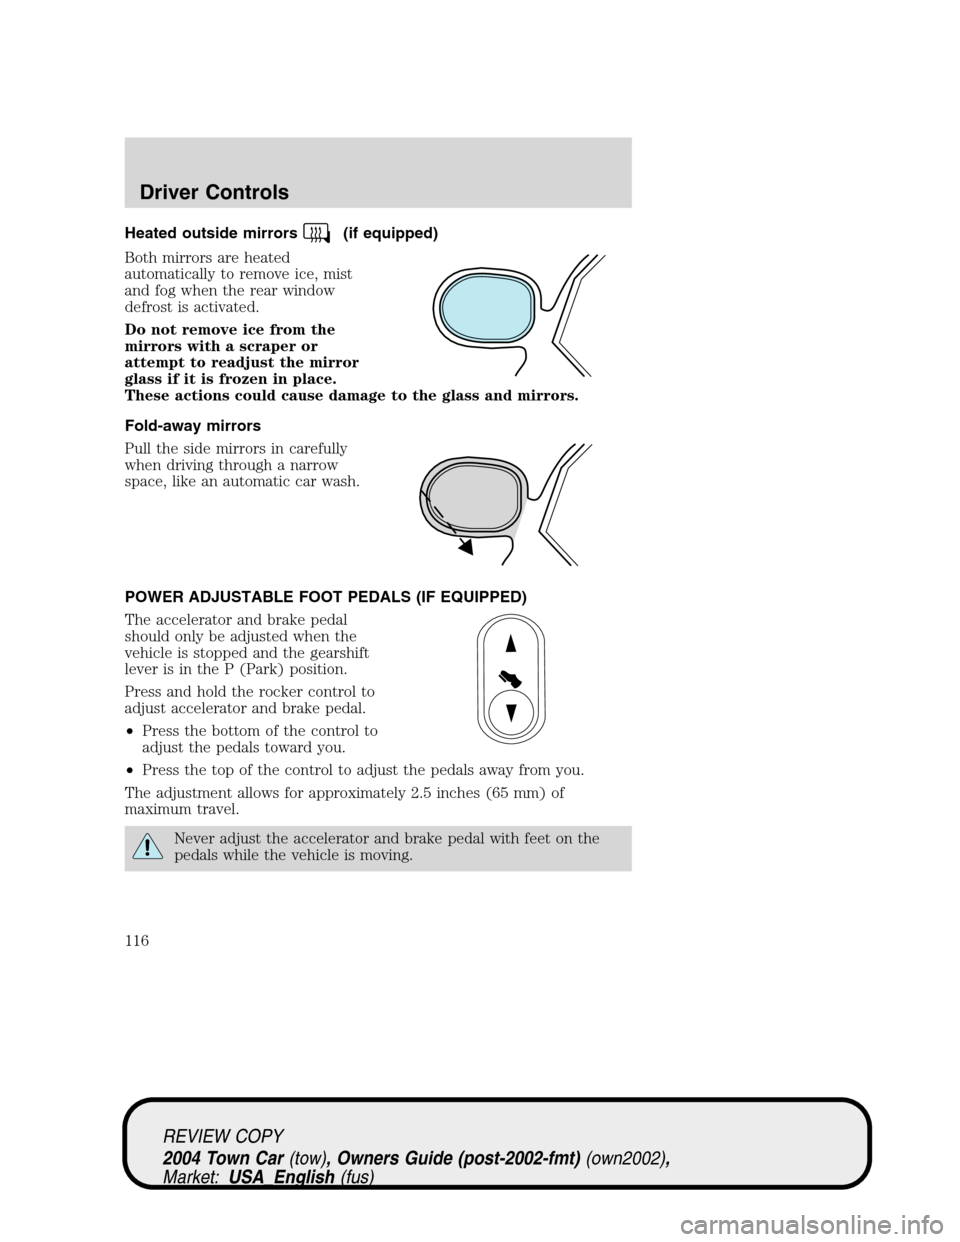
Heated outside mirrors(if equipped)
Both mirrors are heated
automatically to remove ice, mist
and fog when the rear window
defrost is activated.
Do not remove ice from the
mirrors with a scraper or
attempt to readjust the mirror
glass if it is frozen in place.
These actions could cause damage to the glass and mirrors.
Fold-away mirrors
Pull the side mirrors in carefully
when driving through a narrow
space, like an automatic car wash.
POWER ADJUSTABLE FOOT PEDALS (IF EQUIPPED)
The accelerator and brake pedal
should only be adjusted when the
vehicle is stopped and the gearshift
lever is in the P (Park) position.
Press and hold the rocker control to
adjust accelerator and brake pedal.
•Press the bottom of the control to
adjust the pedals toward you.
•Press the top of the control to adjust the pedals away from you.
The adjustment allows for approximately 2.5 inches (65 mm) of
maximum travel.
Never adjust the accelerator and brake pedal with feet on the
pedals while the vehicle is moving.
REVIEW COPY
2004 Town Car(tow), Owners Guide (post-2002-fmt)(own2002),
Market:USA_English(fus)
Driver Controls
116
Page 138 of 304
The inside lights will not turn off if:
•they have been turned on with the dimmer control, or
•any door is open.
The battery saver will shut off the interior lamps 30 minutes after the
last door is closed, or after 10 minutes if the last door is left open.
Autolock
This feature automatically locks all vehicle doors when the following
conditions are met:
•all the doors are closed,
•the engine is running,
•you shift into gear, putting the vehicle in motion, and.
•the vehicle’s speed is greater than 3 mph (5 km/h).
Relock
The autolock feature repeats when the following conditions are met:
•any door is opened then closed while the engine is running, and
•you shift into gear, putting the vehicle in motion, and.
•the vehicle’s speed is greater than 3 mph (5 km/h).
To deactivate/reactivate the autolock feature using the power door
unlock control
You must complete Steps 1-7 within 30 seconds or the procedure will
have to be repeated. If the procedure needs to be repeated, you must
wait 30 seconds.
1. Turn the ignition to the 4 (ON) position.
2. Press the power door unlock control three times.
3. Turn the ignition from the 4 (ON) to the 3 (OFF) position.
4. Press the power door unlock control three times.
5. Turn the ignition back to the 4 (ON) position. The door locks will
cycle to lock and unlock.
6. Press the unlock control. After five seconds, the horn will chirp once
to indicate the enabling/disabling of the autolock feature.
7. Turn the ignition to the 3 (OFF) position.
Memory seat/mirrors/adjustable pedals feature (if equipped)
The remote keyless entry system can also control the memory
seats/mirrors/adjustable pedals feature. With this feature, the first two
programmed transmitters will recall a different memory position.
REVIEW COPY
2004 Town Car(tow), Owners Guide (post-2002-fmt)(own2002),
Market:USA_English(fus)
Locks and Security
138
Page 139 of 304
Pressonce to unlock the driver’s door and move the memory features
to the corresponding memory position, just as if you had pressed the
memory control in the vehicle.
Activating the memory seat/mirrors/adjustable pedals feature
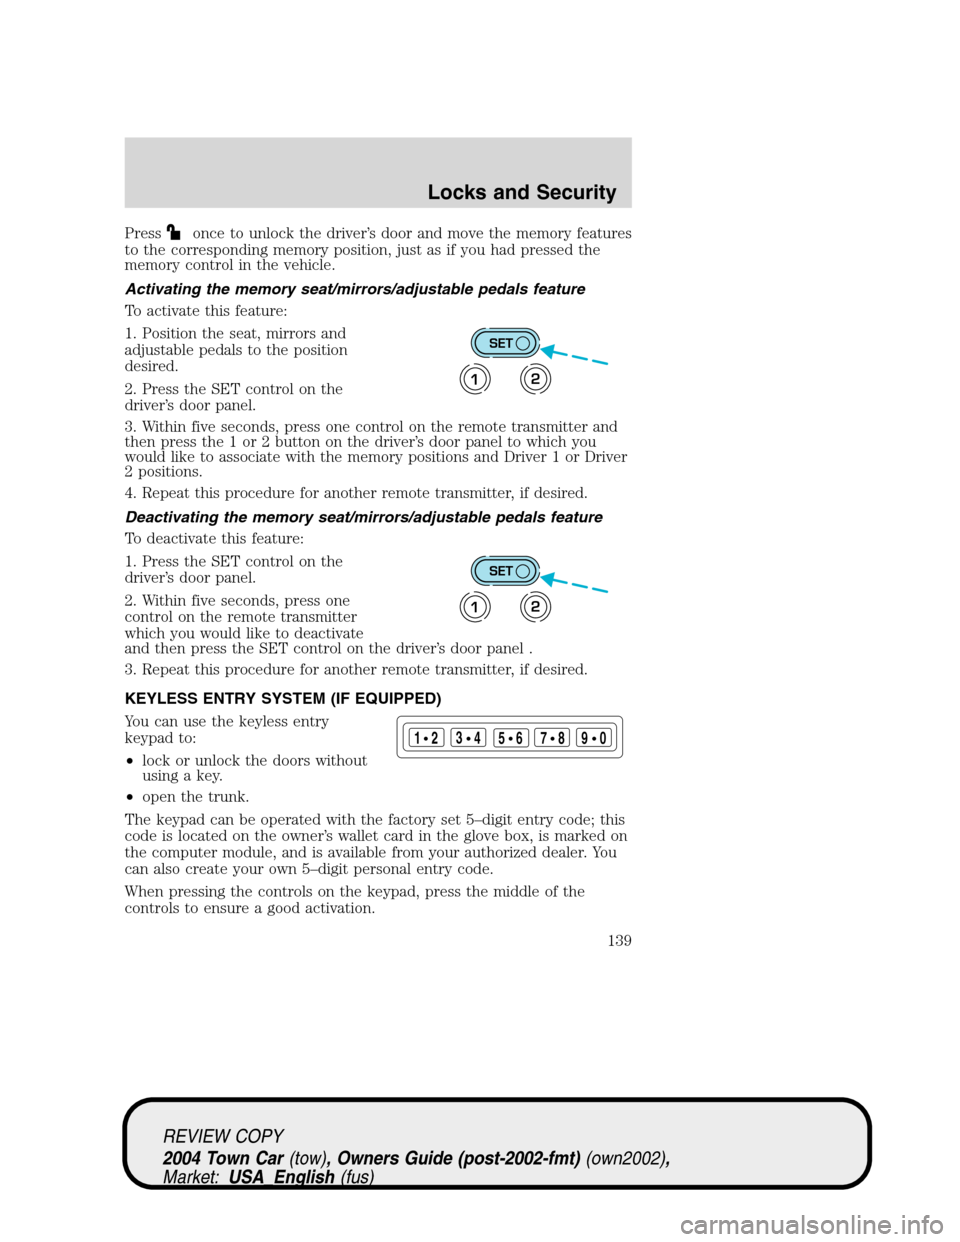
To activate this feature:
1. Position the seat, mirrors and
adjustable pedals to the position
desired.
2. Press the SET control on the
driver’s door panel.
3. Within five seconds, press one control on the remote transmitter and
then press the 1 or 2 button on the driver’s door panel to which you
would like to associate with the memory positions and Driver 1 or Driver
2 positions.
4. Repeat this procedure for another remote transmitter, if desired.
Deactivating the memory seat/mirrors/adjustable pedals feature
To deactivate this feature:
1. Press the SET control on the
driver’s door panel.
2. Within five seconds, press one
control on the remote transmitter
which you would like to deactivate
and then press the SET control on the driver’s door panel .
3. Repeat this procedure for another remote transmitter, if desired.
KEYLESS ENTRY SYSTEM (IF EQUIPPED)
You can use the keyless entry
keypad to:
•lock or unlock the doors without
using a key.
•open the trunk.
The keypad can be operated with the factory set 5–digit entry code; this
code is located on the owner’s wallet card in the glove box, is marked on
the computer module, and is available from your authorized dealer. You
can also create your own 5–digit personal entry code.
When pressing the controls on the keypad, press the middle of the
controls to ensure a good activation.
SET
12
SET
12
123
45678
90
REVIEW COPY
2004 Town Car(tow), Owners Guide (post-2002-fmt)(own2002),
Market:USA_English(fus)
Locks and Security
139
Page 150 of 304
The heated seat module resets at every ignition run cycle. While the
ignition is in the ON position, activating the high or low heated seat
switch enables heating mode. When activated, they will turn off
automatically when the ignition is turned to the OFF position.
The indicator light will illuminate when the heated seats have been
activated.
Rear heated seats (if equipped)
The rear seat heat controls are located on the rear door panels and
operate like the front heated seats. Refer to theHeated Seatssection in
this chapter for instructions on operating the rear heated seats.
Easy-access/easy-out feature (if equipped)
This feature automatically moves the driver’s seat backward when:
•the transmission is in N (Neutral) or P (Park)
•the key is removed from the ignition cylinder
The seat will move 2 inches (5 cm) forward (to the original position)
when:
•the transmission is in N (Neutral) or P (Park)
•the key is placed in the ignition cylinder
Seat mounted cup holders
Your vehicle may be equipped with cupholders in the cushion of the
front center seat and the rear seat . The rear seat cupholder is designed
to over rotate from the seat when subjected to a heavy load. The rear
seat cupholder can be reset by rotating to the closed position.
Use only soft cups in the cupholder. Hard objects can injure you
in a collision.
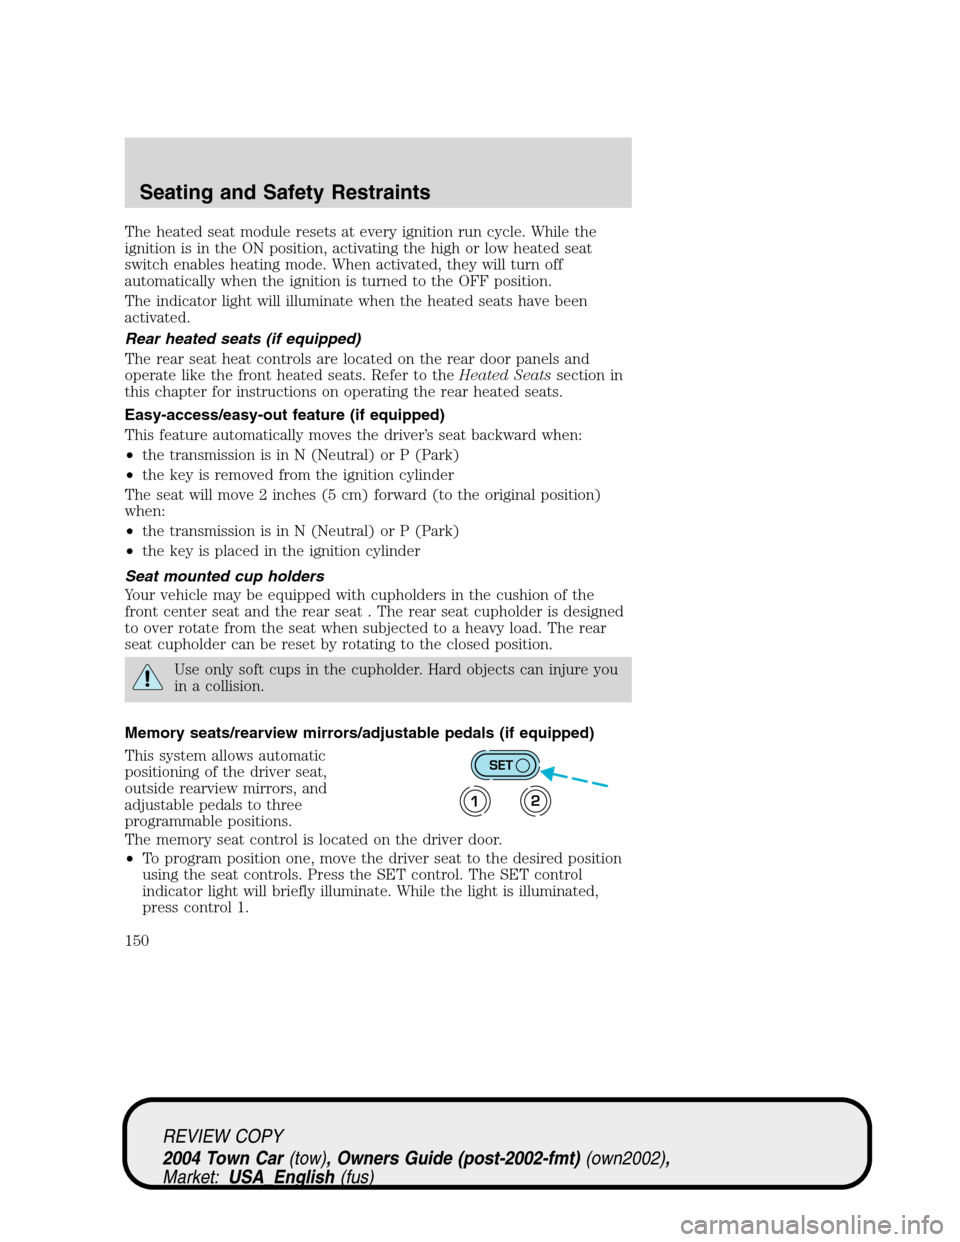
Memory seats/rearview mirrors/adjustable pedals (if equipped)
This system allows automatic
positioning of the driver seat,
outside rearview mirrors, and
adjustable pedals to three
programmable positions.
The memory seat control is located on the driver door.
•To program position one, move the driver seat to the desired position
using the seat controls. Press the SET control. The SET control
indicator light will briefly illuminate. While the light is illuminated,
press control 1.
SET
12
REVIEW COPY
2004 Town Car(tow), Owners Guide (post-2002-fmt)(own2002),
Market:USA_English(fus)
Seating and Safety Restraints
150
Page 211 of 304
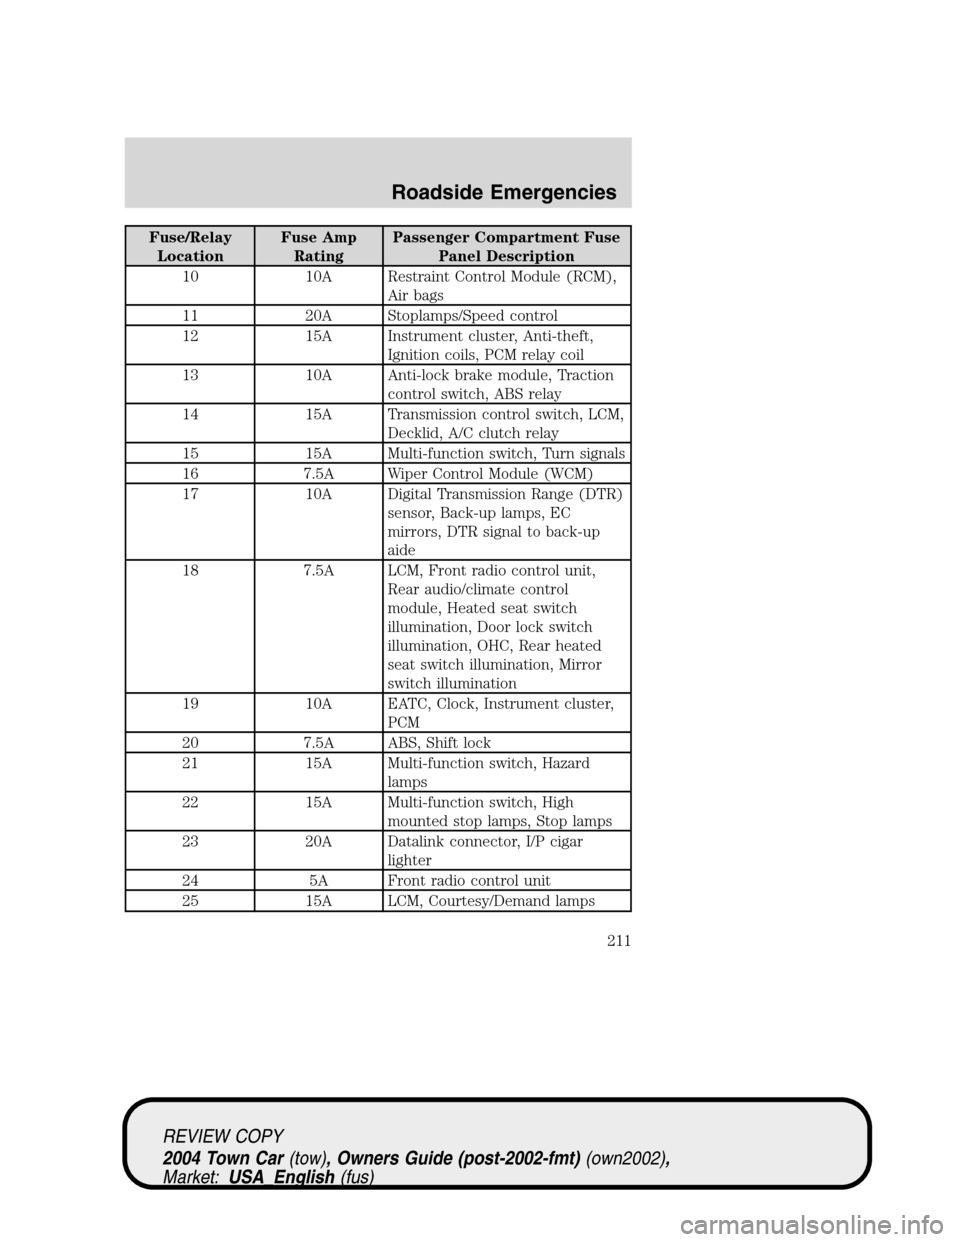
Fuse/Relay
LocationFuse Amp
RatingPassenger Compartment Fuse
Panel Description
10 10A Restraint Control Module (RCM),
Air bags
11 20A Stoplamps/Speed control
12 15A Instrument cluster, Anti-theft,
Ignition coils, PCM relay coil
13 10A Anti-lock brake module, Traction
control switch, ABS relay
14 15A Transmission control switch, LCM,
Decklid, A/C clutch relay
15 15A Multi-function switch, Turn signals
16 7.5A Wiper Control Module (WCM)
17 10A Digital Transmission Range (DTR)
sensor, Back-up lamps, EC
mirrors, DTR signal to back-up
aide
18 7.5A LCM, Front radio control unit,
Rear audio/climate control
module, Heated seat switch
illumination, Door lock switch
illumination, OHC, Rear heated
seat switch illumination, Mirror
switch illumination
19 10A EATC, Clock, Instrument cluster,
PCM
20 7.5A ABS, Shift lock
21 15A Multi-function switch, Hazard
lamps
22 15A Multi-function switch, High
mounted stop lamps, Stop lamps
23 20A Datalink connector, I/P cigar
lighter
24 5A Front radio control unit
25 15A LCM, Courtesy/Demand lamps
REVIEW COPY
2004 Town Car(tow), Owners Guide (post-2002-fmt)(own2002),
Market:USA_English(fus)
Roadside Emergencies
211
Page 212 of 304
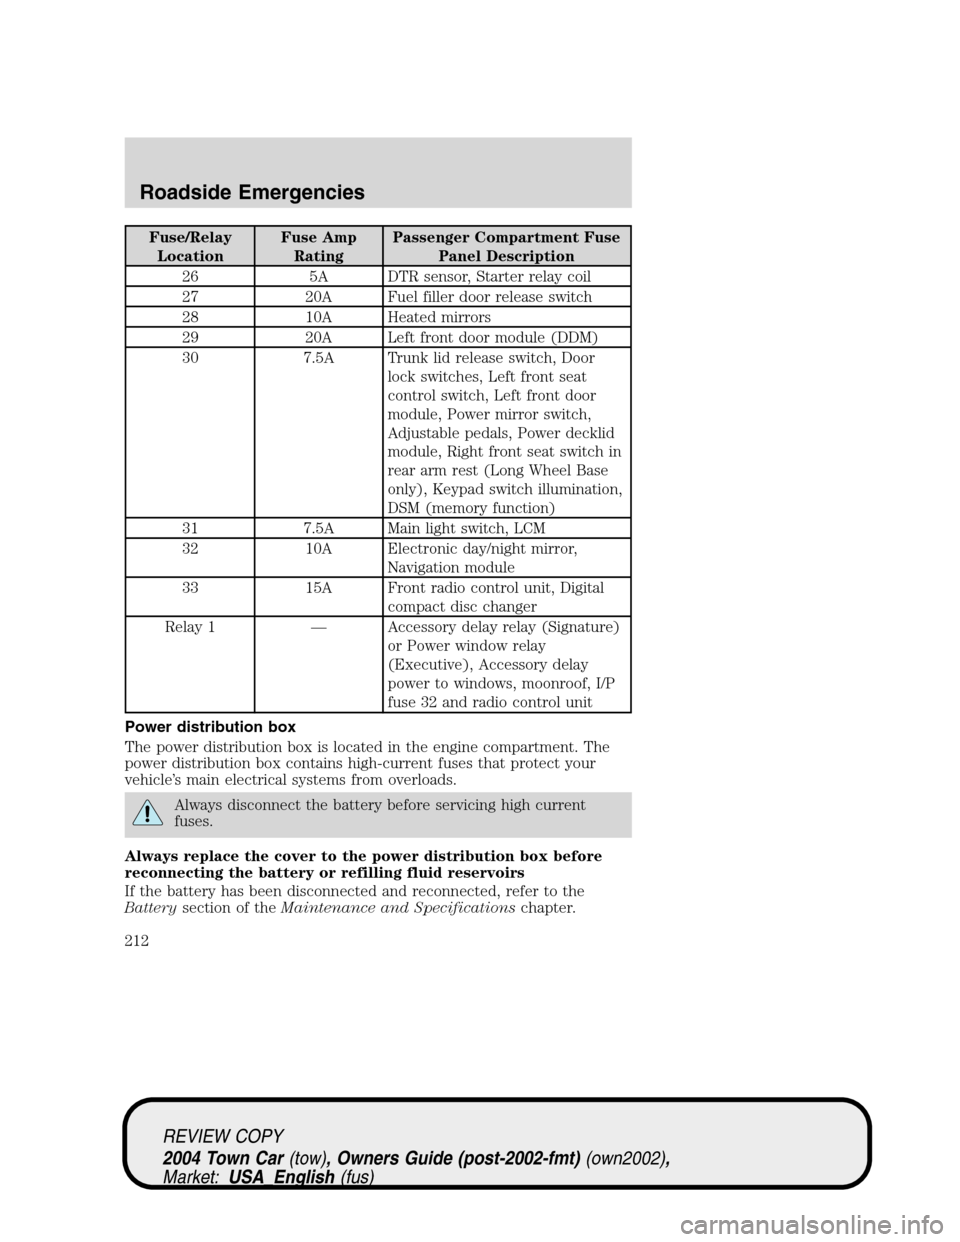
Fuse/Relay
LocationFuse Amp
RatingPassenger Compartment Fuse
Panel Description
26 5A DTR sensor, Starter relay coil
27 20A Fuel filler door release switch
28 10A Heated mirrors
29 20A Left front door module (DDM)
30 7.5A Trunk lid release switch, Door
lock switches, Left front seat
control switch, Left front door
module, Power mirror switch,
Adjustable pedals, Power decklid
module, Right front seat switch in
rear arm rest (Long Wheel Base
only), Keypad switch illumination,
DSM (memory function)
31 7.5A Main light switch, LCM
32 10A Electronic day/night mirror,
Navigation module
33 15A Front radio control unit, Digital
compact disc changer
Relay 1—Accessory delay relay (Signature)
or Power window relay
(Executive), Accessory delay
power to windows, moonroof, I/P
fuse 32 and radio control unit
Power distribution box
The power distribution box is located in the engine compartment. The
power distribution box contains high-current fuses that protect your
vehicle’s main electrical systems from overloads.
Always disconnect the battery before servicing high current
fuses.
Always replace the cover to the power distribution box before
reconnecting the battery or refilling fluid reservoirs
If the battery has been disconnected and reconnected, refer to the
Batterysection of theMaintenance and Specificationschapter.
REVIEW COPY
2004 Town Car(tow), Owners Guide (post-2002-fmt)(own2002),
Market:USA_English(fus)
Roadside Emergencies
212
Page 214 of 304
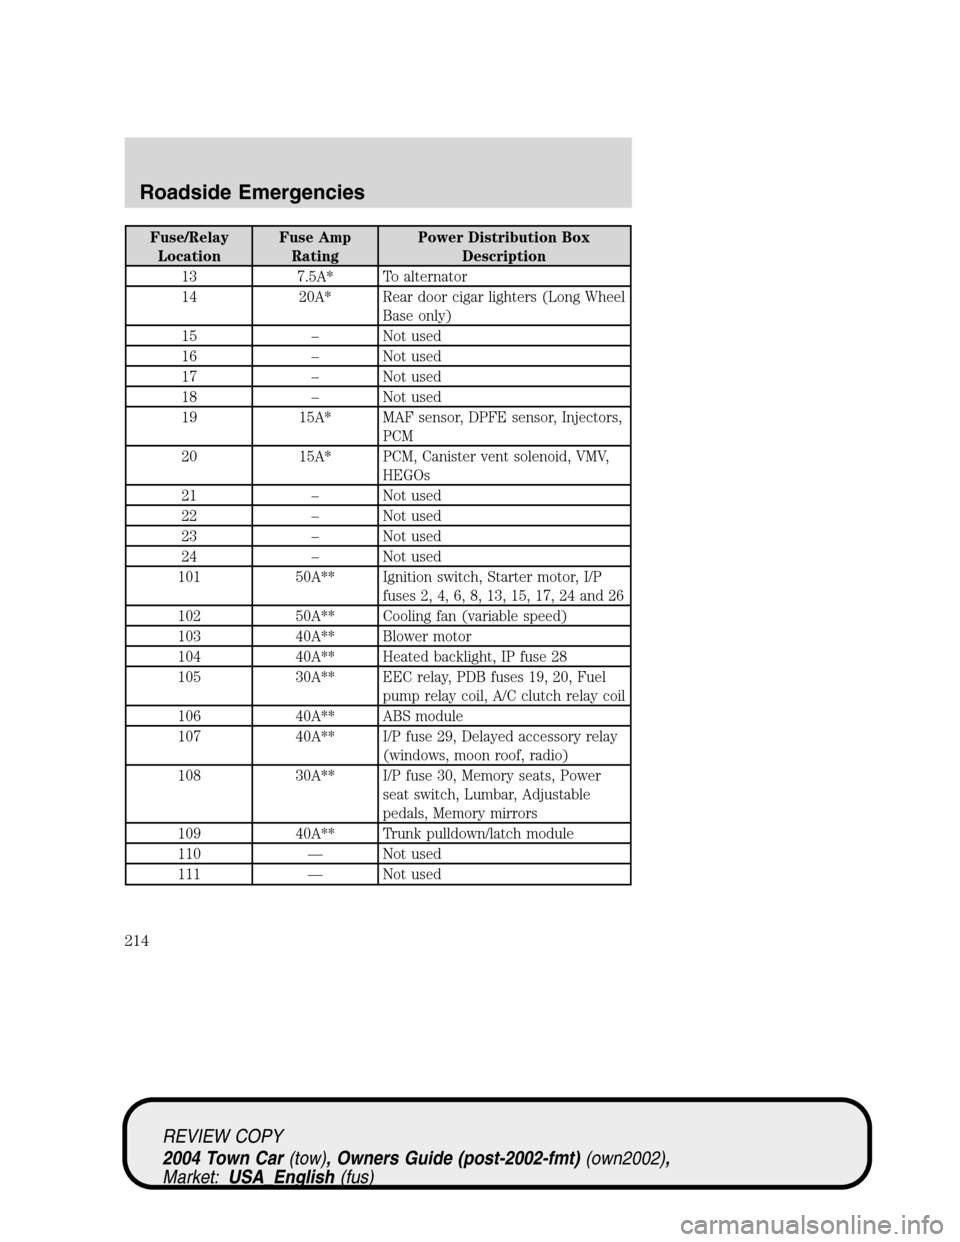
Fuse/Relay
LocationFuse Amp
RatingPower Distribution Box
Description
13 7.5A* To alternator
14 20A* Rear door cigar lighters (Long Wheel
Base only)
15–Not used
16–Not used
17–Not used
18–Not used
19 15A* MAF sensor, DPFE sensor, Injectors,
PCM
20 15A* PCM, Canister vent solenoid, VMV,
HEGOs
21–Not used
22–Not used
23–Not used
24–Not used
101 50A** Ignition switch, Starter motor, I/P
fuses 2, 4, 6, 8, 13, 15, 17, 24 and 26
102 50A** Cooling fan (variable speed)
103 40A** Blower motor
104 40A** Heated backlight, IP fuse 28
105 30A** EEC relay, PDB fuses 19, 20, Fuel
pump relay coil, A/C clutch relay coil
106 40A** ABS module
107 40A** I/P fuse 29, Delayed accessory relay
(windows, moon roof, radio)
108 30A** I/P fuse 30, Memory seats, Power
seat switch, Lumbar, Adjustable
pedals, Memory mirrors
109 40A** Trunk pulldown/latch module
110—Not used
111—Not used
REVIEW COPY
2004 Town Car(tow), Owners Guide (post-2002-fmt)(own2002),
Market:USA_English(fus)
Roadside Emergencies
214