LINCOLN TOWN CAR 2011 Owners Manual
Manufacturer: LINCOLN, Model Year: 2011, Model line: TOWN CAR, Model: LINCOLN TOWN CAR 2011Pages: 306, PDF Size: 2.04 MB
Page 191 of 306
2 (Second)
This position allows for second gear only.
•Provides engine braking.
•Use to start-up on slippery roads.
•To return to
(Overdrive), move the gearshift lever into the
(Overdrive) position.
•Selecting 2 (Second) at higher speeds will cause the transmission to
downshift to second gear at the appropriate vehicle speed.
1 (First)
•Provides maximum engine braking.
•Allows upshifts by moving gearshift lever.
•Will not downshift into 1 (First) at high speeds; allows for 1 (First)
when vehicle reaches slower speeds.
Forced downshifts
•Allowed in
(Overdrive) or Drive.
•Press the accelerator to the floor.
•Allows transmission to select an appropriate gear.
If your vehicle gets stuck in mud or snow
If your vehicle gets stuck in mud or snow, it may be rocked out by
shifting between forward and reverse gears, stopping between shifts in a
steady pattern. Press lightly on the accelerator in each gear.
If necessary, try turning the traction control system off. This will allow
the wheels to spin, which may help to free your stuck vehicle. For more
information, refer toTraction controlin this chapter.
Do not rock the vehicle if the engine is not at normal operating
temperature or damage to the transmission may occur.
Do not rock the vehicle for more than a minute or damage to the
transmission and tires may occur, or the engine may overheat.
Driving
191
2011 Town Car(tow)
Owners Guide, 2nd Printing
USA(fus)
Page 192 of 306
DRIVING THROUGH WATER
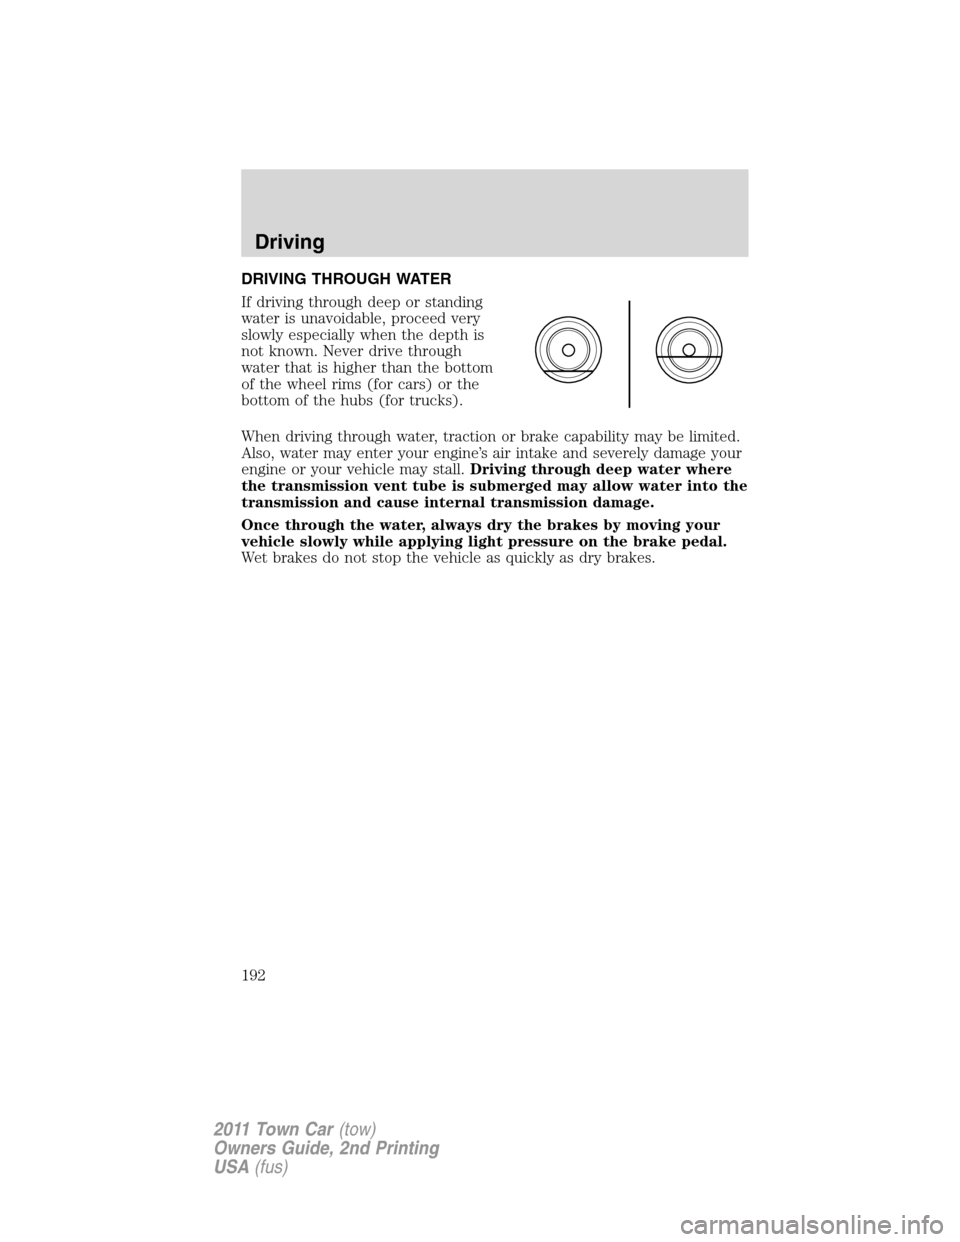
If driving through deep or standing
water is unavoidable, proceed very
slowly especially when the depth is
not known. Never drive through
water that is higher than the bottom
of the wheel rims (for cars) or the
bottom of the hubs (for trucks).
When driving through water, traction or brake capability may be limited.
Also, water may enter your engine’s air intake and severely damage your
engine or your vehicle may stall.Driving through deep water where
the transmission vent tube is submerged may allow water into the
transmission and cause internal transmission damage.
Once through the water, always dry the brakes by moving your
vehicle slowly while applying light pressure on the brake pedal.
Wet brakes do not stop the vehicle as quickly as dry brakes.
Driving
192
2011 Town Car(tow)
Owners Guide, 2nd Printing
USA(fus)
Page 193 of 306
ROADSIDE ASSISTANCE
Vehicles sold in the U.S. : Getting roadside assistance
To fully assist you should you have a vehicle concern, Ford Motor
Company offers a complimentary roadside assistance program. This
program is separate from the New Vehicle Limited Warranty. The service
is available:
•24-hours, seven days a week
•for the coverage period listed on the Roadside Assistance Card
included in your Owner Guide portfolio.
Roadside assistance will cover:
•a flat tire change with a good spare (except vehicles that have been
supplied with a tire inflation kit)
•battery jump start
•lock-out assistance (key replacement cost is the customer’s
responsibility)
•fuel delivery – Independent Service Contractors, if not prohibited by
state, local or municipal law shall deliver up to 2.0 gallons (7.5L) of
gasoline or 5.0 gallons (18.9L) of diesel fuel to a disabled vehicle. Fuel
delivery service is limited to two no-charge occurrences within a
12-month period.
•winch out – available within 100 feet (30.5 meters) of a paved or
county maintained road, no recoveries.
•towing – Ford and Lincoln eligible vehicles towed to an authorized
dealer within 35 miles (56 km) of the disablement location or to the
nearest authorized dealer. If a member requests to be towed to an
authorized dealer more than 35 miles (56 km) from the disablement
location, the member shall be responsible for any mileage costs in
excess of 35 miles (56 km).
Trailers shall be covered up to $200 if the disabled eligible vehicle
requires service at the nearest authorized dealer. If the trailer is disabled,
but the towing vehicle is operational, the trailer does not qualify for any
roadside services.
Vehicles sold in the U.S. : Using roadside assistance
Complete the roadside assistance identification card and place it in your
wallet for quick reference. In the United States, this card is found in the
Owner Guide portfolio in the glove compartment. In Canada, the card is
found in theWarranty Guidein the glove compartment.
Roadside Emergencies
193
2011 Town Car(tow)
Owners Guide, 2nd Printing
USA(fus)
Page 194 of 306
U.S. Ford and Lincoln vehicle customers who require Roadside
Assistance, call 1-800-241-3673.
If you need to arrange roadside assistance for yourself, Ford Motor
Company will reimburse a reasonable amount for towing to the nearest
dealership within 35 miles (56 km). To obtain reimbursement
information, U.S. Ford and Lincoln vehicle customers call
1-800-241-3673. Customers will be asked to submit their original
receipts.
Vehicles sold in Canada : Getting roadside assistance
Canadian customers who require roadside assistance, call
1–800–665–2006.
Vehicles sold in Canada : Using roadside assistance
Complete the roadside assistance identification card and place it in your
wallet for quick reference. In Canada, the card is found in the Warranty
Guide in the glove box.
Canadian Roadside coverage and benefits may differ from the U.S.
coverage. Please refer to your Warranty Guide or visit our website at
www.ford.ca for information on Canadian services and benefits.
Canadian customers who need to obtain roadside information, call
1-800-665-2006 or visit our website at www.ford.ca.
HAZARD FLASHER CONTROL
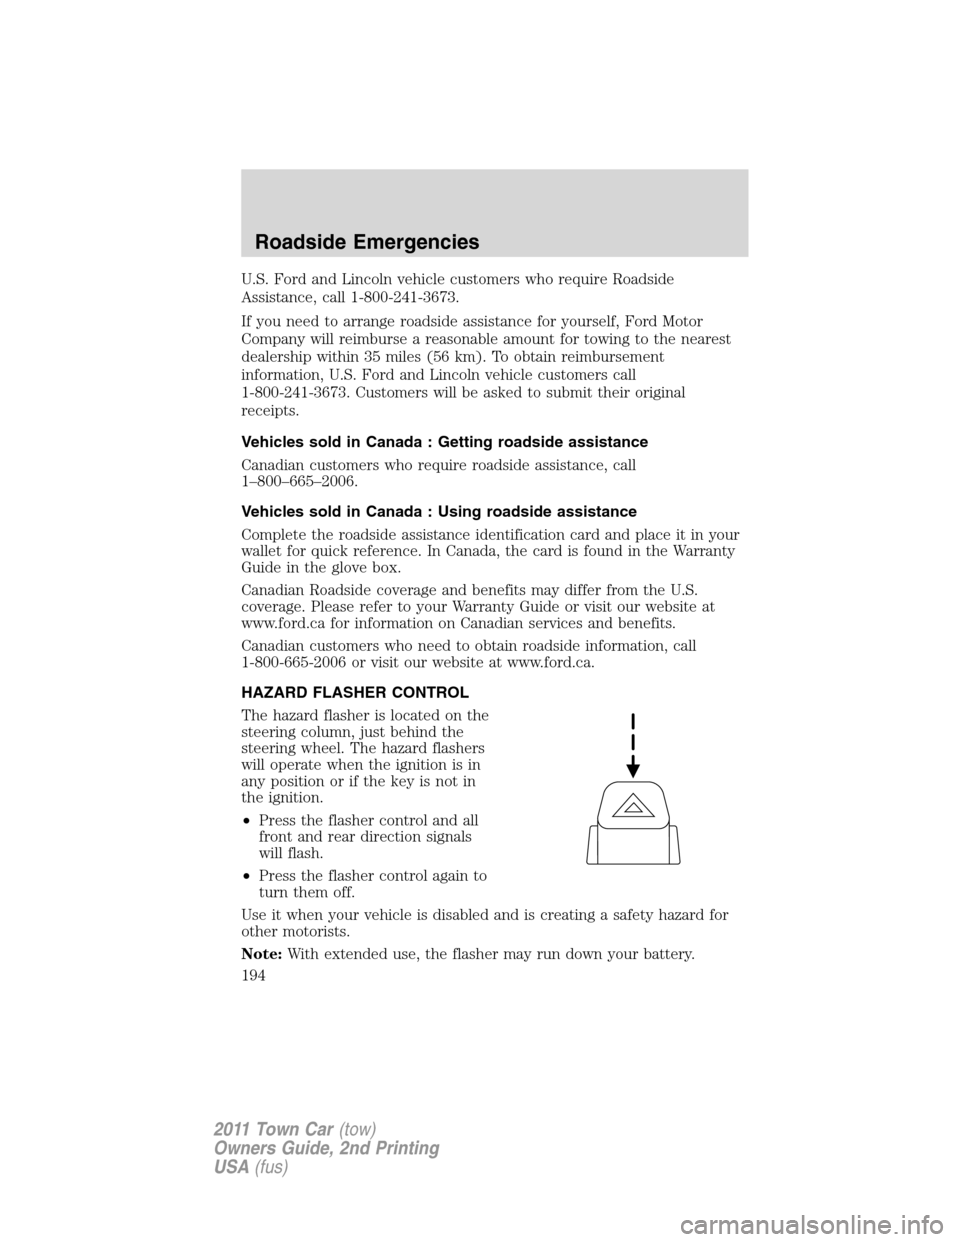
The hazard flasher is located on the
steering column, just behind the
steering wheel. The hazard flashers
will operate when the ignition is in
any position or if the key is not in
the ignition.
•Press the flasher control and all
front and rear direction signals
will flash.
•Press the flasher control again to
turn them off.
Use it when your vehicle is disabled and is creating a safety hazard for
other motorists.
Note:With extended use, the flasher may run down your battery.
Roadside Emergencies
194
2011 Town Car(tow)
Owners Guide, 2nd Printing
USA(fus)
Page 195 of 306
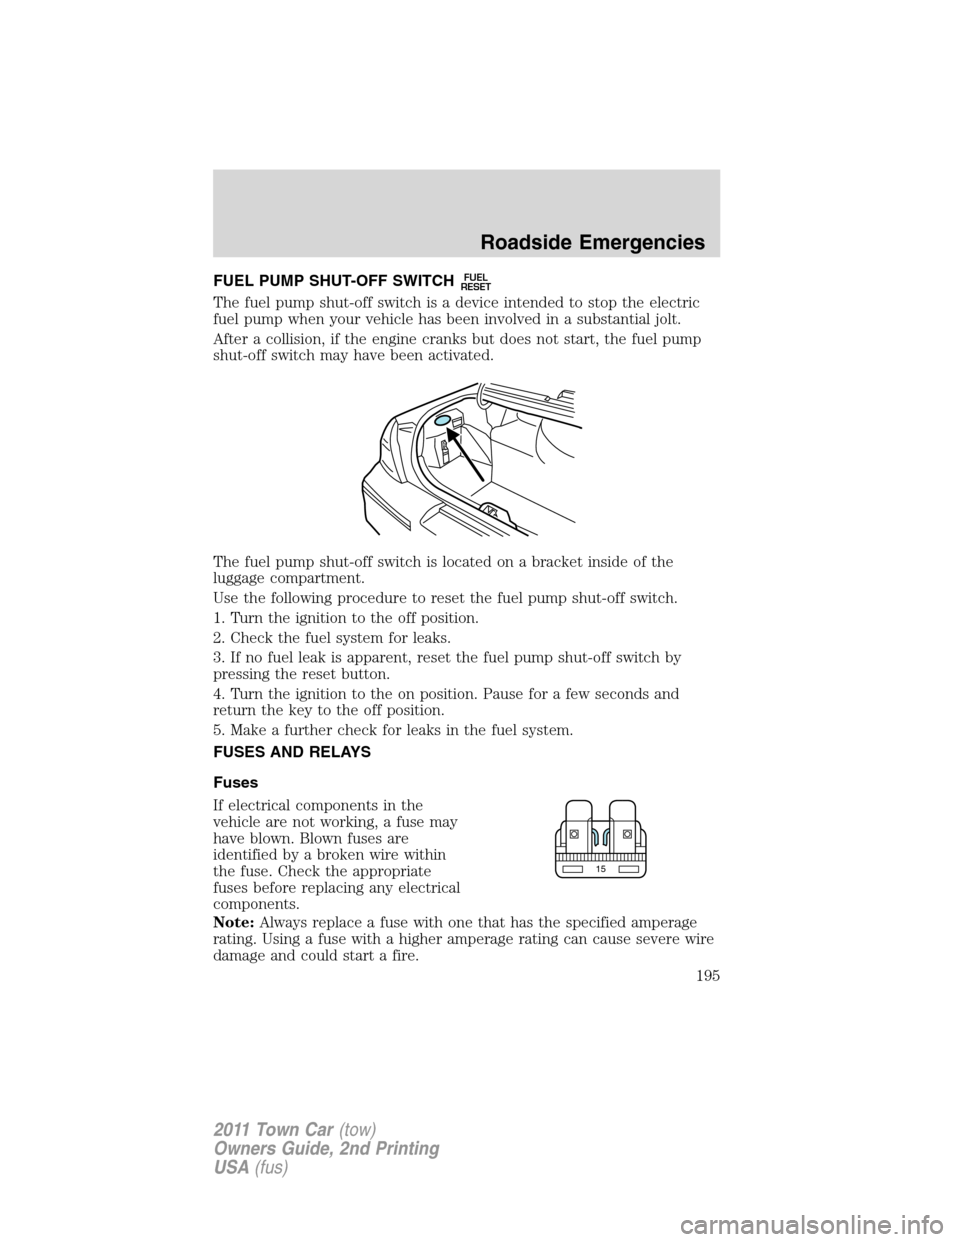
FUEL PUMP SHUT-OFF SWITCHFUEL
RESET
The fuel pump shut-off switch is a device intended to stop the electric
fuel pump when your vehicle has been involved in a substantial jolt.
After a collision, if the engine cranks but does not start, the fuel pump
shut-off switch may have been activated.
The fuel pump shut-off switch is located on a bracket inside of the
luggage compartment.
Use the following procedure to reset the fuel pump shut-off switch.
1. Turn the ignition to the off position.
2. Check the fuel system for leaks.
3. If no fuel leak is apparent, reset the fuel pump shut-off switch by
pressing the reset button.
4. Turn the ignition to the on position. Pause for a few seconds and
return the key to the off position.
5. Make a further check for leaks in the fuel system.
FUSES AND RELAYS
Fuses
If electrical components in the
vehicle are not working, a fuse may
have blown. Blown fuses are
identified by a broken wire within
the fuse. Check the appropriate
fuses before replacing any electrical
components.
Note:Always replace a fuse with one that has the specified amperage
rating. Using a fuse with a higher amperage rating can cause severe wire
damage and could start a fire.
15
Roadside Emergencies
195
2011 Town Car(tow)
Owners Guide, 2nd Printing
USA(fus)
Page 196 of 306
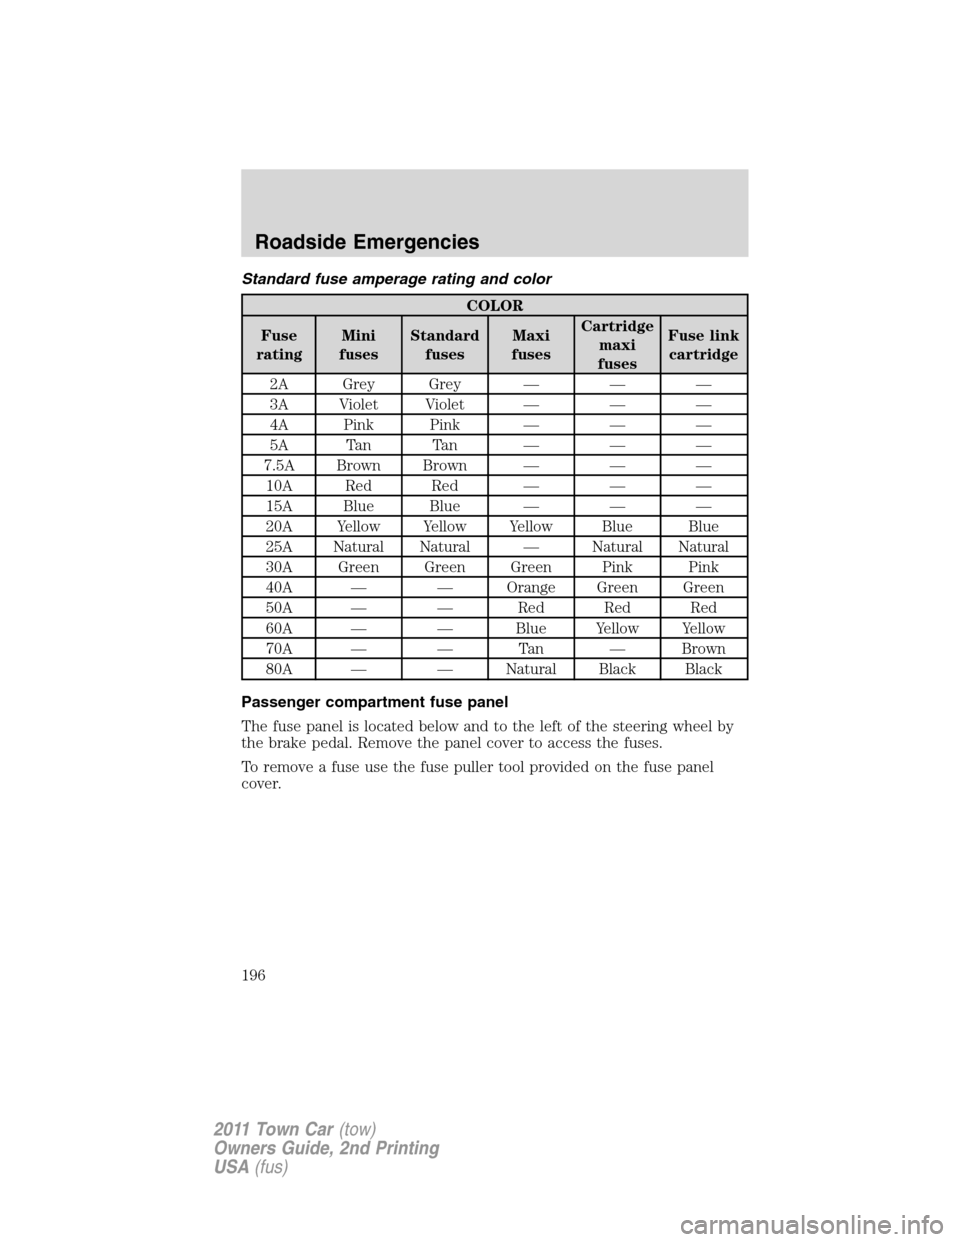
Standard fuse amperage rating and color
COLOR
Fuse
ratingMini
fusesStandard
fusesMaxi
fusesCartridge
maxi
fusesFuse link
cartridge
2A Grey Grey — — —
3A Violet Violet — — —
4A Pink Pink — — —
5A Tan Tan — — —
7.5A Brown Brown — — —
10A Red Red — — —
15A Blue Blue — — —
20A Yellow Yellow Yellow Blue Blue
25A Natural Natural — Natural Natural
30A Green Green Green Pink Pink
40A — — Orange Green Green
50A — — Red Red Red
60A — — Blue Yellow Yellow
70A — — Tan — Brown
80A — — Natural Black Black
Passenger compartment fuse panel
The fuse panel is located below and to the left of the steering wheel by
the brake pedal. Remove the panel cover to access the fuses.
To remove a fuse use the fuse puller tool provided on the fuse panel
cover.
Roadside Emergencies
196
2011 Town Car(tow)
Owners Guide, 2nd Printing
USA(fus)
Page 197 of 306
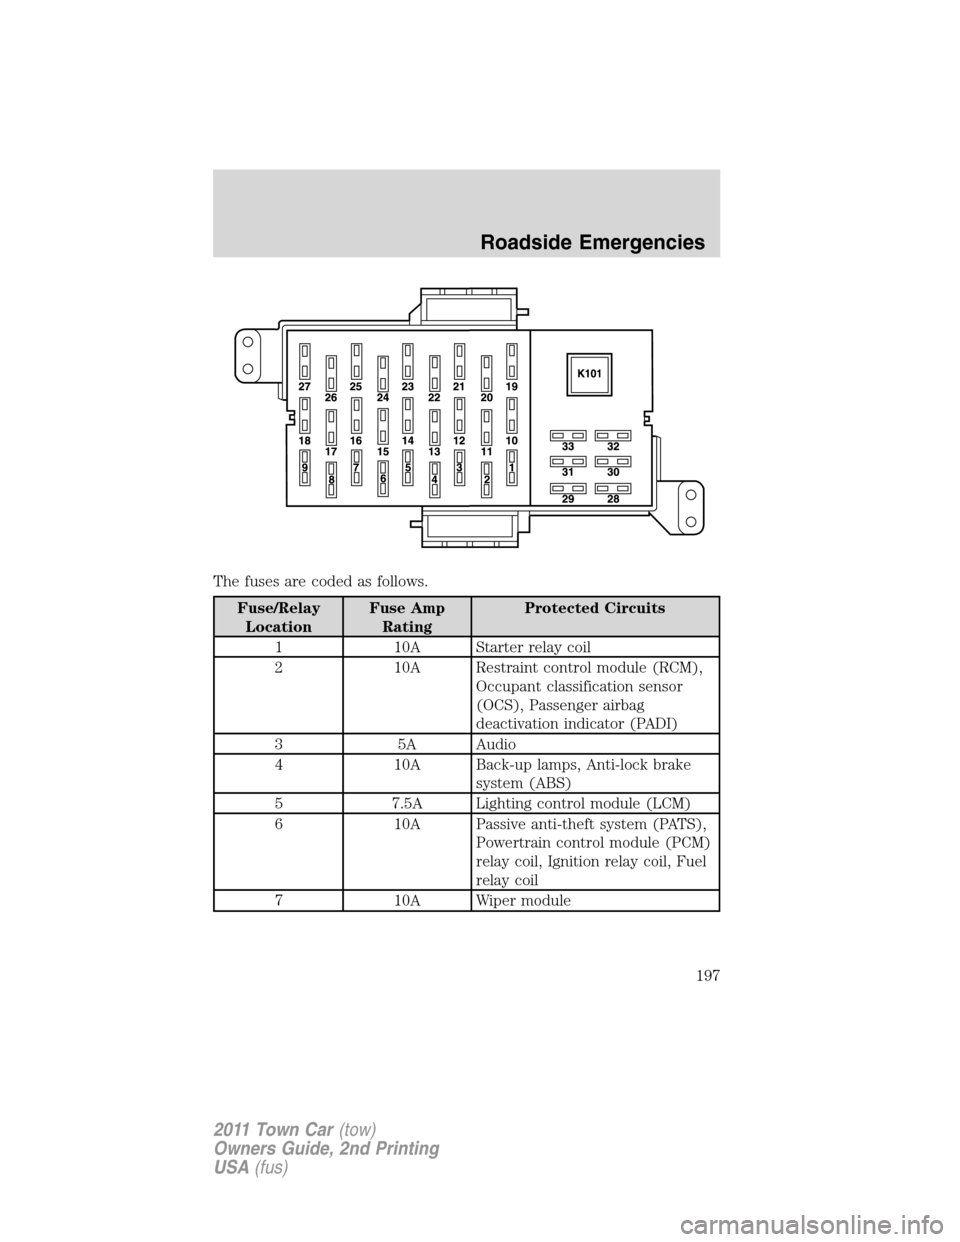
The fuses are coded as follows.
Fuse/Relay
LocationFuse Amp
RatingProtected Circuits
1 10A Starter relay coil
2 10A Restraint control module (RCM),
Occupant classification sensor
(OCS), Passenger airbag
deactivation indicator (PADI)
3 5A Audio
4 10A Back-up lamps, Anti-lock brake
system (ABS)
5 7.5A Lighting control module (LCM)
6 10A Passive anti-theft system (PATS),
Powertrain control module (PCM)
relay coil, Ignition relay coil, Fuel
relay coil
7 10A Wiper module
Roadside Emergencies
197
2011 Town Car(tow)
Owners Guide, 2nd Printing
USA(fus)
Page 198 of 306
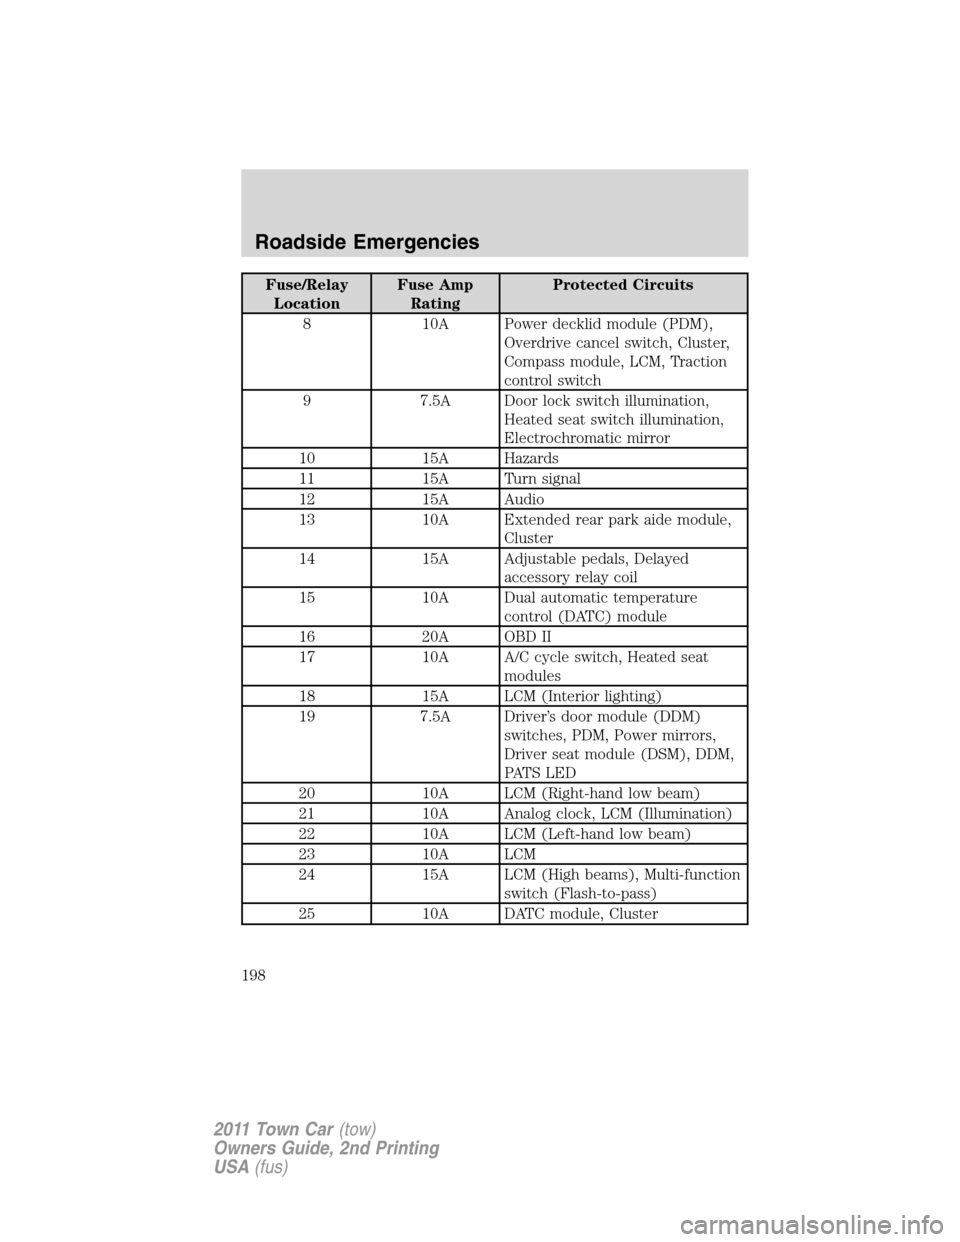
Fuse/Relay
LocationFuse Amp
RatingProtected Circuits
8 10A Power decklid module (PDM),
Overdrive cancel switch, Cluster,
Compass module, LCM, Traction
control switch
9 7.5A Door lock switch illumination,
Heated seat switch illumination,
Electrochromatic mirror
10 15A Hazards
11 15A Turn signal
12 15A Audio
13 10A Extended rear park aide module,
Cluster
14 15A Adjustable pedals, Delayed
accessory relay coil
15 10A Dual automatic temperature
control (DATC) module
16 20A OBD II
17 10A A/C cycle switch, Heated seat
modules
18 15A LCM (Interior lighting)
19 7.5A Driver’s door module (DDM)
switches, PDM, Power mirrors,
Driver seat module (DSM), DDM,
PAT S L E D
20 10A LCM (Right-hand low beam)
21 10A Analog clock, LCM (Illumination)
22 10A LCM (Left-hand low beam)
23 10A LCM
24 15A LCM (High beams), Multi-function
switch (Flash-to-pass)
25 10A DATC module, Cluster
Roadside Emergencies
198
2011 Town Car(tow)
Owners Guide, 2nd Printing
USA(fus)
Page 199 of 306
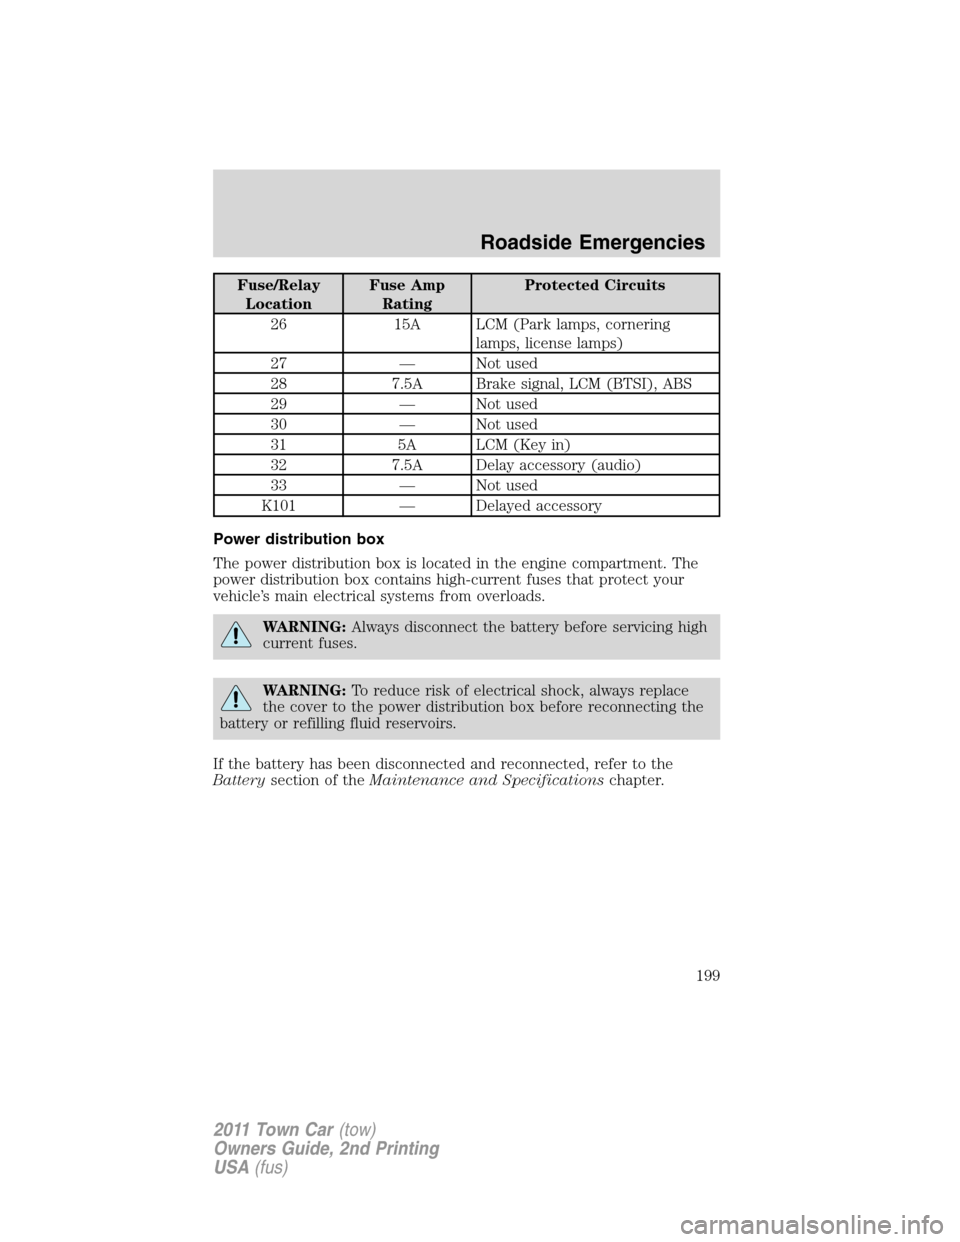
Fuse/Relay
LocationFuse Amp
RatingProtected Circuits
26 15A LCM (Park lamps, cornering
lamps, license lamps)
27 — Not used
28 7.5A Brake signal, LCM (BTSI), ABS
29 — Not used
30 — Not used
31 5A LCM (Key in)
32 7.5A Delay accessory (audio)
33 — Not used
K101 — Delayed accessory
Power distribution box
The power distribution box is located in the engine compartment. The
power distribution box contains high-current fuses that protect your
vehicle’s main electrical systems from overloads.
WARNING:Always disconnect the battery before servicing high
current fuses.
WARNING:To reduce risk of electrical shock, always replace
the cover to the power distribution box before reconnecting the
battery or refilling fluid reservoirs.
If the battery has been disconnected and reconnected, refer to the
Batterysection of theMaintenance and Specificationschapter.
Roadside Emergencies
199
2011 Town Car(tow)
Owners Guide, 2nd Printing
USA(fus)
Page 200 of 306
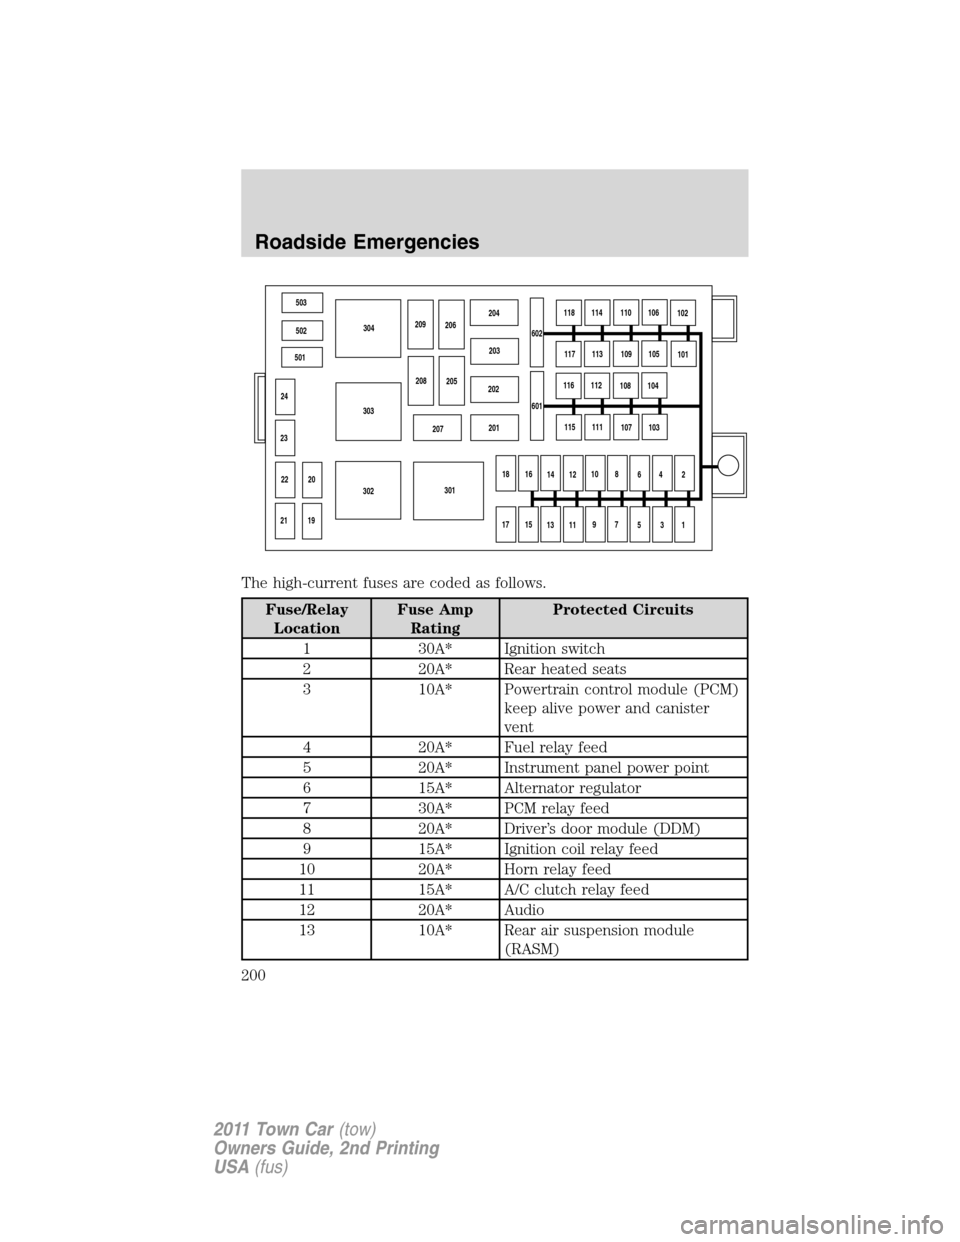
The high-current fuses are coded as follows.
Fuse/Relay
LocationFuse Amp
RatingProtected Circuits
1 30A* Ignition switch
2 20A* Rear heated seats
3 10A* Powertrain control module (PCM)
keep alive power and canister
vent
4 20A* Fuel relay feed
5 20A* Instrument panel power point
6 15A* Alternator regulator
7 30A* PCM relay feed
8 20A* Driver’s door module (DDM)
9 15A* Ignition coil relay feed
10 20A* Horn relay feed
11 15A* A/C clutch relay feed
12 20A* Audio
13 10A* Rear air suspension module
(RASM)
503
502
501
24
23
20
19 22
21302303304
301 207201 202203 204
209
206
208
205602118
114
110
106
102
117
113
109
105
101
116
112
108
104
115
111
107
103
18
16
14
1210
8
6
4
2
17
15
13
119
7
5
3
1 601
Roadside Emergencies
200
2011 Town Car(tow)
Owners Guide, 2nd Printing
USA(fus)