check LOTUS ELISE 2005 User Guide
[x] Cancel search | Manufacturer: LOTUS, Model Year: 2005, Model line: ELISE, Model: LOTUS ELISE 2005Pages: 205, PDF Size: 4.51 MB
Page 29 of 205
Behaviour: It is essential that the behaviour of any child trav-
elling in the car is such that they remain correctly seated and belted, and it is the responsibility of the driver to ensure that
this occurs.
The following wording has been included to comply with
National Highway Traffic Safety Authority requirements,
however;
WARNING: Lotus str ongly recommen ds that you do not fit any type
of child seat into the Elise due to the risk of death or seri
-
ous injury if the c hild is too close to the dashboard when
the airbag inflates.
Procedure for Proper Fitment of For ward- Facing Child
Seat
A utomatic Locking Retractor: The safety belt for the passen-
ger’s seat is equipped with an automatic locking retractor that
must be used for securing a forward-facing child restraint sy
s-
tem. When activated , this retractor allows you to securely fas
-
ten the child restraint system.
Activating the Automatic Retracto r:
1. Pull the passenger seat safety belt completely
out . At this
point, the locking mechanism is activated.
2.
P lace the forward-facing child seat in the passenger seat,
using the safety belt to secure the child seat,
fo llowing the
instructions that come with the child seat
.
3. Insert the safety tongu e into the buckle and make sure that
it is properl y latched.
4. Allow the safety belt to retract until it is tight on the child seat.
You may further tighten the belt by pulling on it to allow more of
it to retract. Check to make sure the child seat is secured, and
that the belt is snug and will not pull out.
Releasing the safety bel t and child seat:
1. Unbuckle the safety belt. 2. Remove the child seat.
3. Make sure that the belt has fully retracted. At this point the
automatic locking feature is disengaged.
Seating & Safety Restraints
27
oh_croft_InD.indd 2720/05/2004 07:58:46ProCarManuals.com
Page 34 of 205
Arming the AlarmRemove the ignition key, close (and lock) both doors, and
check that the engine cover and front body access panels are
secure. The roof may be either closed or open. Press once, and for a full second, the larger of the two buttons on the trans
-
mitter fob (on cars with central door locking, this action will automatically lock both doors - see later). This command will
be acknowledged by:
- 2 flashes of the hazard warning lamps;
- Continuous flashing of the security tell tale.
Check that these indications occur. If not, press the button a
second time, as the first press may have only switched off the passive immobilisation (see above). Note that if the system is armed when a door or engine cover/
front access panel is not fully closed or if the interior lamp is in the ‘off’ position, a continuous buzz will be heard as warning. If still open after expiry of the arming period, (see below)
the alarm will be armed with that switch group (both doors, or
front/rear access lids) excluded from the circuit.
After arming the system, the engine is immediately immo
-
bilised, but a period of approximately 45 seconds must elapse
before all functions and sensors become fully active. After
this time, the alarm will be triggered by any of the following actions:
- Interruption of the car battery power supply.
- Energising the ignition circuit (‘hot wiring’).
- Opening a door;
- Opening the engine cover or a front access panel.
- Movement detected within the cabin.
When the alarm is triggered, the hazard warning lamps will
flash and the electronic wailing siren will sound for a period of approximately 30 seconds before closing down and resetting, ready for any further triggering input. If a trigger is continuously
present, the alarm will repeat after a short delay, and continue
in this sequence for about 10 cycles. To silence the siren when triggered, press once, and for a full
second, the larger button on the transmitter fob. This will not affect the status of the alarm which will remain armed.
Keys & Car Security Alarm
32
oh_croft_InD.indd 3220/05/2004 07:58:47ProCarManuals.com
Page 40 of 205
the doors will be ‘deadlocked’ meaning that the interior door release handles will not open the doors. In order to get
out of the car in an emergency when the doors are locked
see the section below ‘to unlock from inside’.
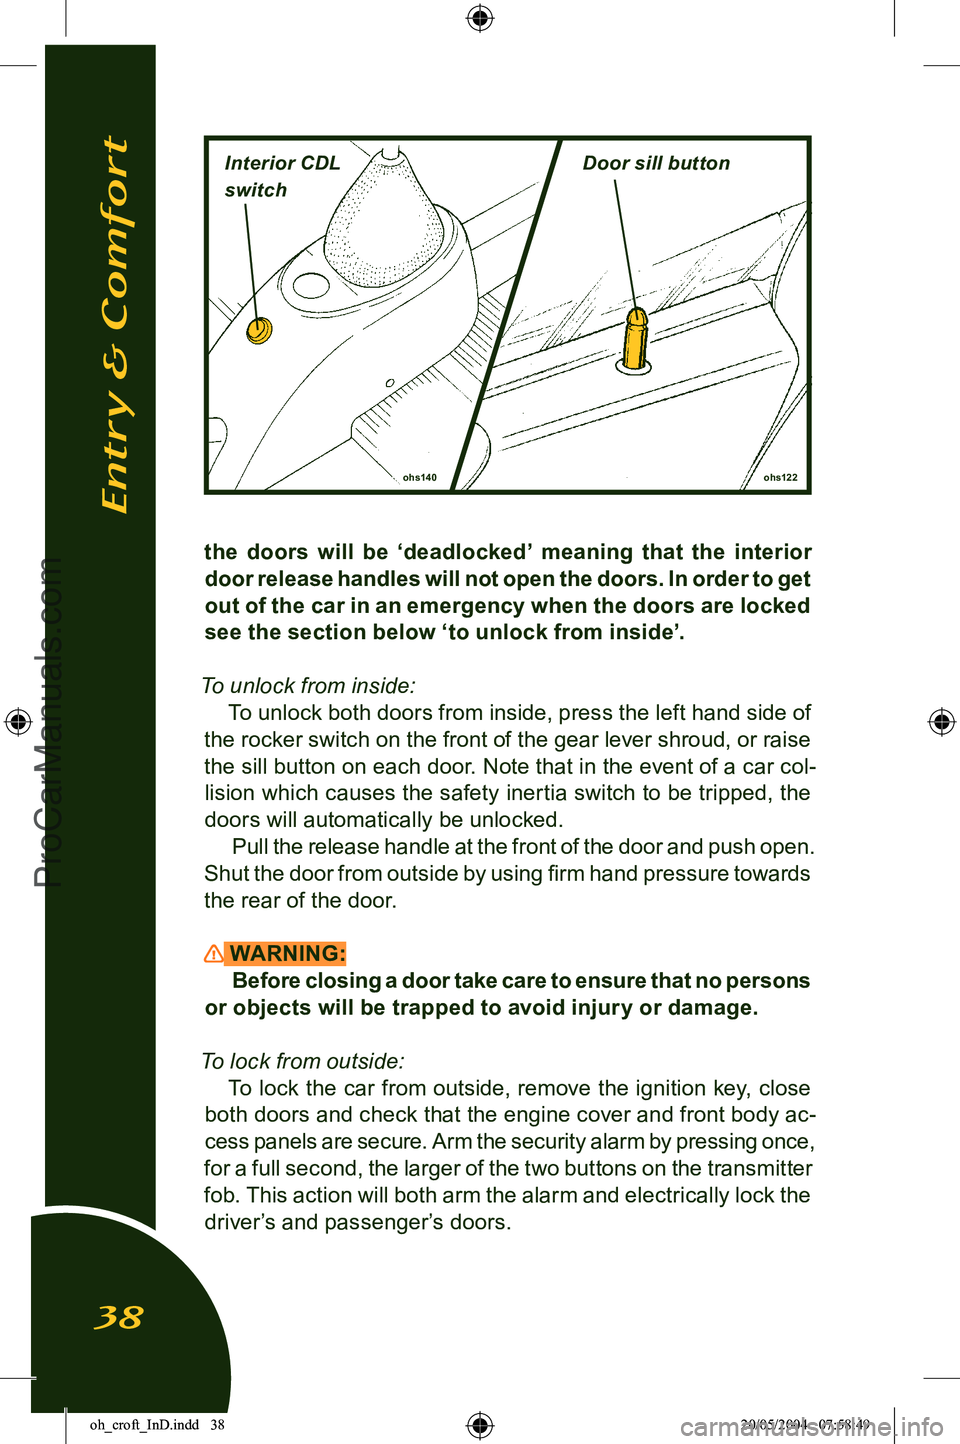
To unlock from inside: To unlock both doors from inside, press the left hand side of
the rocker switch on the front of the gear lever shroud, or raise
the sill button on each door. Note that in the event of a car col
-
lision which causes the safety inertia switch to be tripped, the doors will automatically be unlocked.
Pull the release handle at the front of the door and push open.
Shut the door from outside by using firm hand pressure towards the rear of the door.
WARNING: Before closing a door take care to ensure that no persons
or objects will be trapped to avoid injury or damage.
To lock from outside: To lock the car from outside, remove the ignition key, close
both doors and check that the engine cover and front body ac
-
cess panels are secure. Arm the security alarm by pressing once,
for a full second, the larger of the two buttons on the transmitter
fob. This action will both arm the alarm and electrically lock the driver’s and passenger’s doors.
ohs122
ohs140
Entry & Comfort
38
Interior CDL
switchDoor sill button
oh_croft_InD.indd 3820/05/2004 07:58:49ProCarManuals.com
Page 42 of 205
ohs149
NightDay
‘Lights On’ Buzzer
A ‘lights on’ reminder buzzer will sound if the lights are on, the
ignition is switched off, and the driver’s door is then opened.
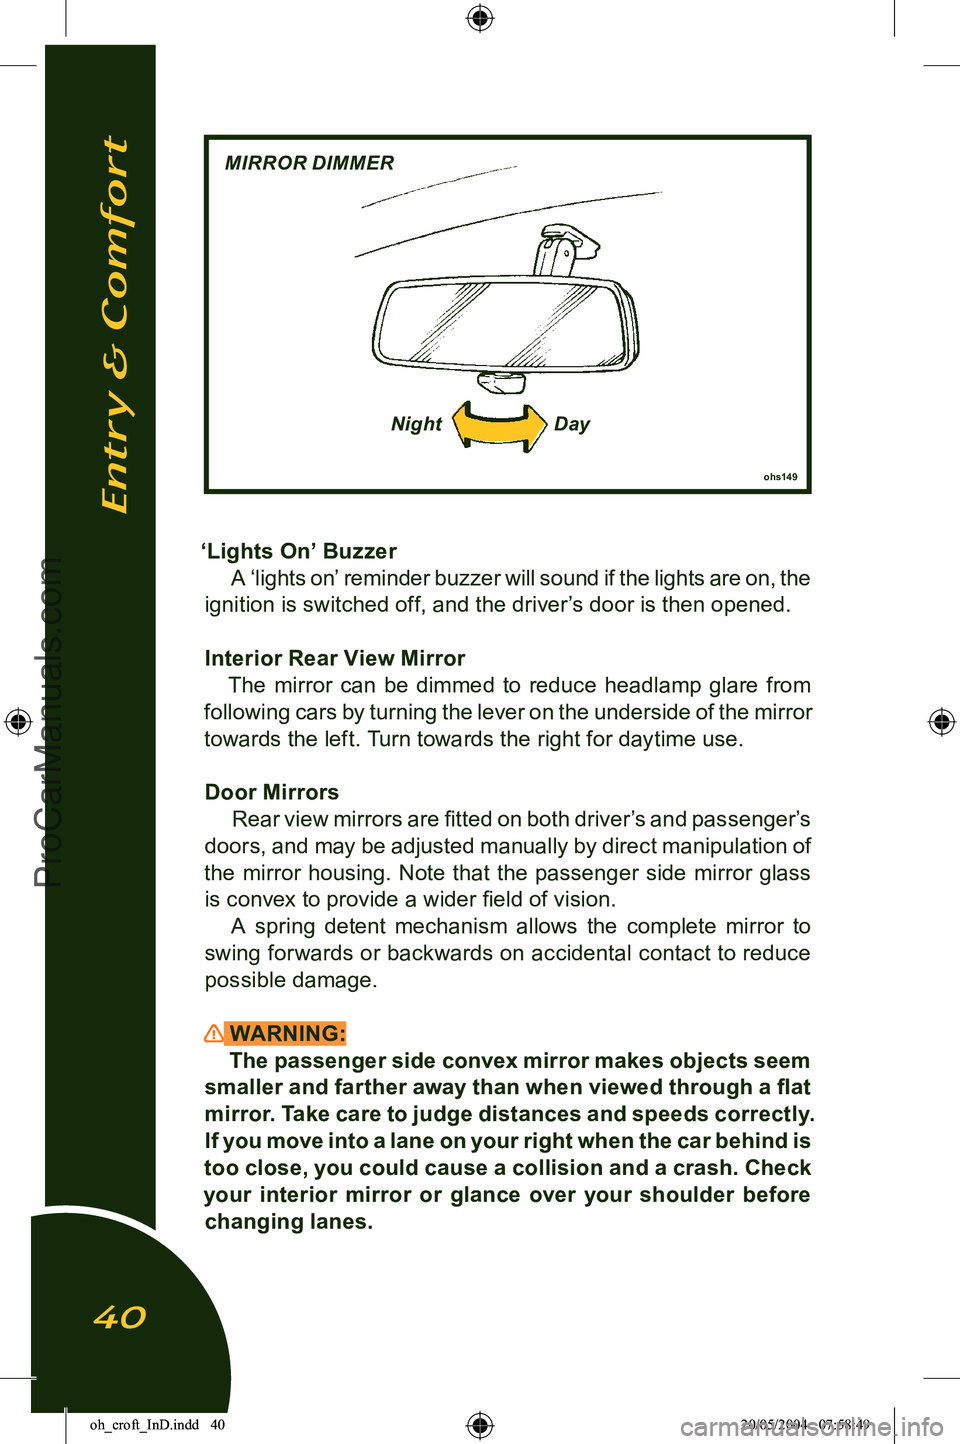
Interior Rear View Mirror The mirror can be dimmed to reduce headlamp glare from
following cars by turning the lever on the underside of the mirror
towards the left. Turn towards the right for daytime use.
Door Mirrors Rear view mirrors are fitted on both driver’s and passenger’s
doors, and may be adjusted manually by direct manipulation of
the mirror housing. Note that the passenger side mirror glass is convex to provide a wider field of vision. A spring detent mechanism allows the complete mirror to
swing forwards or backwards on accidental contact to reduce
possible damage.
WARNING: The passenger side convex mirror makes objects seem
smaller and farther away than when viewed through a flat
mirror. Take care to judge distances and speeds correctly.
If you move into a lane on your right when the car behind is
too close, you could cause a collision and a crash. Check
your interior mirror or glance over your shoulder before
changing lanes.
Entry & Comfort
40
MIRROR DIMMER
oh_croft_InD.indd 4020/05/2004 07:58:49ProCarManuals.com
Page 44 of 205
Door WindowsIn frosty or icy weather conditions, the windows may become
frozen to the weatherstrip seals. Use a windscreen de-icer spray
to free the glass before operating the windows.
WARNING:
• Before closing a window, always check that no persons or objects will be trapped; incautious window operation
could be dangerous, especially to children. Ensure that any passenger is also made aware of this danger.
• To guard against incautious electric window operation, do not leave small children unattended in the car with
the ignition key in position.
• Do not leave children or animals in a parked car with the roof and windows closed, in hot weather conditions as
they may suffocate and/or experience heat exhaustion.
Manual Winders: Each door window may be raised or lowered by the winder
handle near the front of the door.
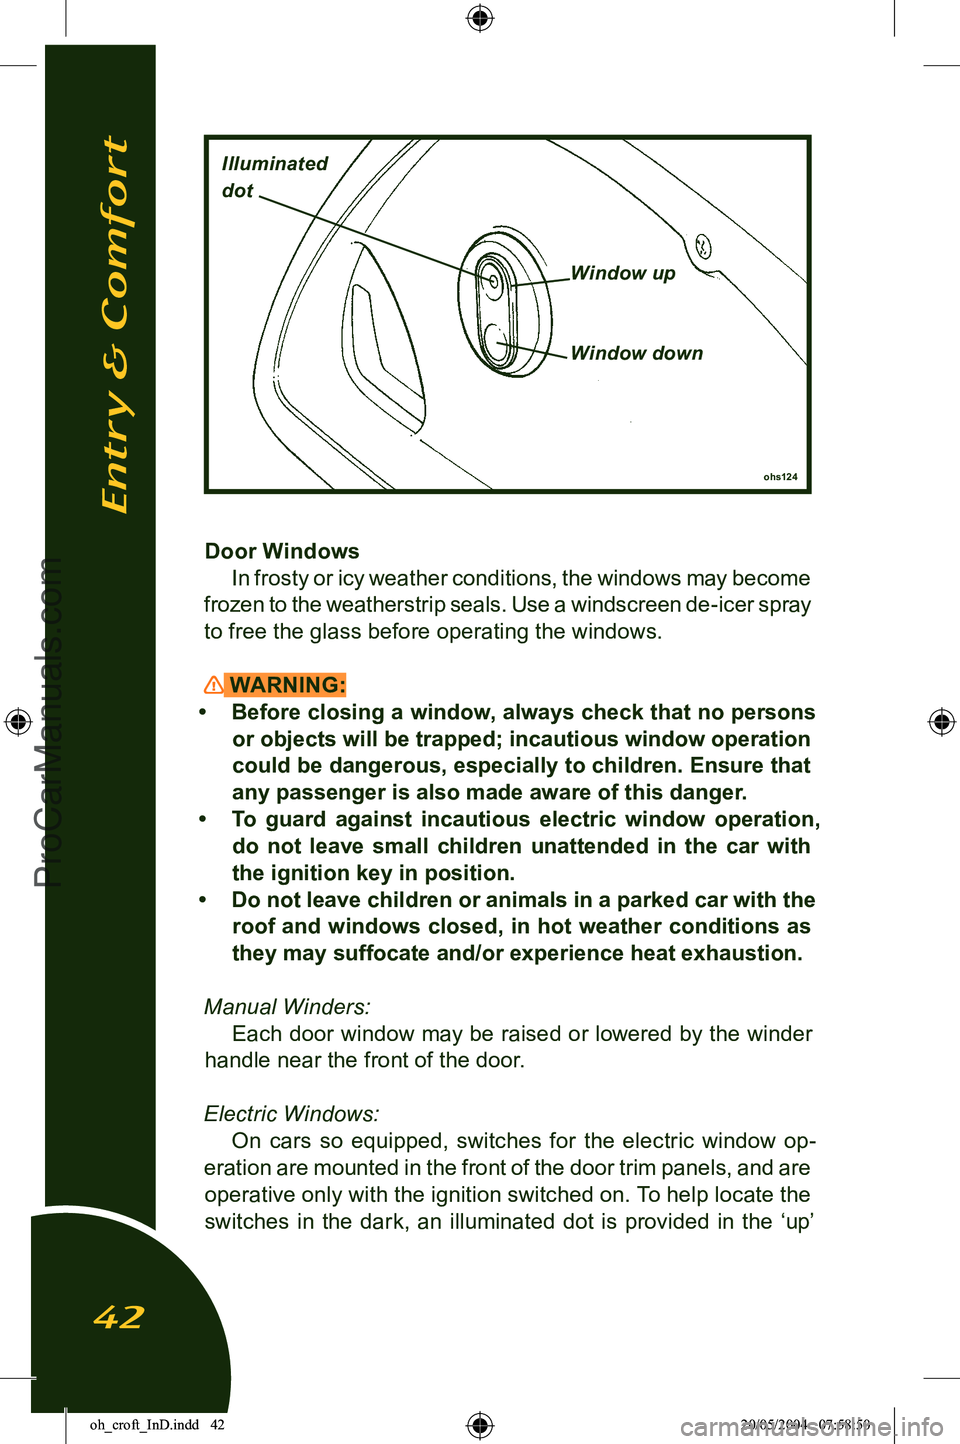
Electric Windows: On cars so equipped, switches for the electric window op
-
eration are mounted in the front of the door trim panels, and are operative only with the ignition switched on. To help locate the
switches in the dark, an illuminated dot is provided in the ‘up’
Entry & Comfort
42
ohs124
Illuminated
dot
Window up
Window down
oh_croft_InD.indd 4220/05/2004 07:58:50ProCarManuals.com
Page 48 of 205
Passive Ilisation: The start button will operate only when the
security tell tale in the tachometer face is out. If the tell tale is
flashing, the engine is immobilised; Press once,
and for a full second, the larger of the two buttons on the trans
-
mitter fob. The security tell tale will be extinguished. For further
information see ‘Car Security Alarm’.
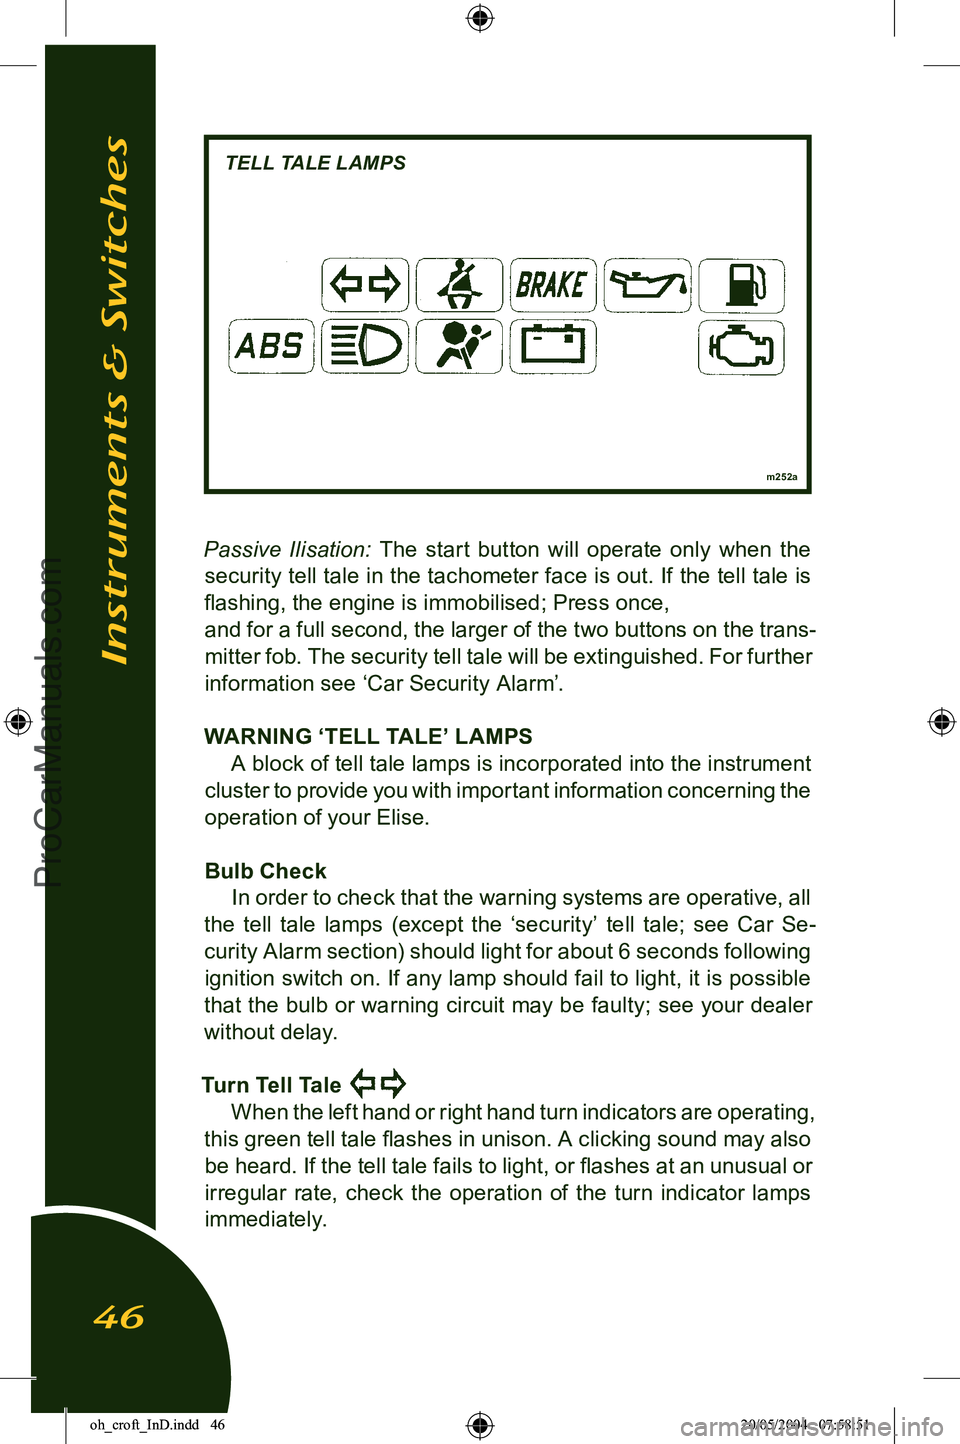
WARNING ‘TELL TALE’ LAMPS A block of tell tale lamps is incorporated into the instrument
cluster to provide you with important information concerning the
operation of your Elise.
Bulb Check In order to check that the warning systems are operative, all
the tell tale lamps (except the ‘security’ tell tale; see Car Se
-
curity Alarm section) should light for about 6 seconds following ignition switch on. If any lamp should fail to light, it is possible
that the bulb or warning circuit may be faulty; see your dealer
without delay.
Turn Tell Tale
When the left hand or right hand turn indicators are operating,
this green tell tale flashes in unison. A clicking sound may also be heard. If the tell tale fails to light, or flashes at an unusual or
irregular rate, check the operation of the turn indicator lamps
immediately.
m252a
Instruments & Switches
46
TELL TALE LAMPS
oh_croft_InD.indd 4620/05/2004 07:58:51ProCarManuals.com
Page 49 of 205
Seat Belt Tell Tale
The red seat belt tell tale is provided as a reminder that both
driver and passenger should always wear the seat belts, no
matter how short the journey. The lamp will flash until the driv
-
er’s seat belt is fastened, accompanied for the first 8 seconds by a buzzer.
Brake Tell Tale
This tell tale will glow red with the ignition switched on
whenever the parking brake is applied. Driving the car with the brake not fully released will cause overheat damage to the rear
brakes. Each time the parking brake is released, check that the
tell tale is extinguished. With the parking brake released, if the tell tale should light
at any time after the six second check period, stop the car im
-
mediately, as the circuit has detected a dangerously low level of brake fluid in the master cylinder reservoir, possibly caused
by a hydraulic leak in one of the separate front or rear brake
circuits. In the event of a leak there is a danger that air may enter the hydraulic system and cause spongy operation and
extended pedal travel. The divided brake circuit should ensure
that emergency braking remains, but the car should not be driven until the fault has been identified and rectified.
WARNING: If the tell tale remains lit when the parking brake has been
released, the footbrake may not be working properly. Stop
the car immediately it is safe to do so, and do not continue until the fault has been rectified. Continuing to drive could cause a crash and result in death or serious injury.
Oil Pressure Tell Tale
This red tell tale warns of low engine oil pressure. The lamp
will be lit whenever the ignition is on and the engine is stopped, but should go out as soon as the engine is started. If the lamp
fails to go out after engine start up, or comes on when the engine is running, stop the engine immediately and do not restart until
the cause has been investigated and rectified.
Instruments & Switches
47
oh_croft_InD.indd 4720/05/2004 07:58:52ProCarManuals.com
Page 50 of 205
WARNING:Continuing to run the engine with the oil tell tale lit could
cause major engine damage or seizure, resulting in loss
of car control and a crash. You or others could be killed
or seriously injured.
Low Fuel Level Tell Tale
When only a single segment of the fuel gauge bar graph
remains, representing approximately 1.3 U.S. gall. (5 litres), this
amber tell tale will flash. Refuel at the next opportunity.
ABS Tell Tale
This amber tell tale should light for about four seconds follow-
ing ignition switch on, and then go out. If the lamp remains lit, or
comes on whilst driving, a fault in the anti-lock brake system is
indicated. The base brake system will continue to operate nor
-
mally, but without the anti-lock feature. The car can be driven but should be checked and repaired at the earliest opportunity.
High Beam Tell Tale
This lamp glows blue whenever the headlamp high beams
are operating.
Airbag Tell Tale
The airbag safety system has a self-diagnostic feature which
lights the red tell tale if a fault is detected. As a bulb and circuit
check, the tell tale will light for about six seconds following ig
-
nition switch on, and then go out. If the lamp remains lit, or comes on at any other time, a fault in the airbag system is indicated,
which should be rectified without delay.
WARNING: If the airbag tell tale is lit, the airbags may not inflate
correctly in a crash, or may inflate without warning. To
help avoid injury to you or others, have the airbag system repaired as soon as possible.
Battery Charging Tell Tale
This red tell tale will light whenever the ignition is on and the
engine is stopped. If it lights any time that the engine is running,
the battery is not being charged, which may be due to a broken
auxiliary drive belt, or an electrical fault. A broken drive belt
Instruments & Switches
48
oh_croft_InD.indd 4820/05/2004 07:58:52ProCarManuals.com
Page 52 of 205
Note that the tell tale also functions as a high engine speed
(rpm) warning - see ‘Tachometer’.
NOTICE: The car is not fitted with a low pressure tell tale. You should check the tire condition and pressure regularly. See
section in the handbook on tires which specifies tire care and pressures.
Instruments & Switches
50
oh_croft_InD.indd 5020/05/2004 07:58:53ProCarManuals.com
Page 71 of 205
integral self diagnostics have switched out the anti-lock function.
See ‘ABS tell tale lamp’.
WARNING:
• The increased control that ABS provides should not induce you to take more risks with your safety. ABS will
not prevent a skid caused by abrupt steering movements,
or attempting to corner too quickly.
• Always maintain a safe following distance from other cars relative to the road surface and weather conditions.
Obey all traffic laws.
• Risk of accidents due to inappropriate speed cannot be reduced even by ABS. The driver is responsible for the
judgement of safe speed.
• The control unit of the ABS is set for standard tire size. If non-standard Tires are fitted, the control unit may mis-
interpret the speed of the car, because of the variant data
it receives from the wheel speed sensors. Fitting non standard tires would seriously affect the performance of
your ABS.
• The amber ABS tell tale in the instrument panel should light for about 4 seconds following ignition switch on, and
then go out. If the lamp remains lit, or comes on whilst driving, a fault in the anti-lock brake system is indicated.
The base brake system will continue to operate normally,
but without ABS. The car can be driven but should be
checked and repaired at the earliest opportunity.
• Activation of the ABS will vary according to the level of grip available at the Tires. On dry surfaces, activation
will occur only with a high pedal pressure. On slippery
surfaces, only a low pressure will be needed.
• On loose or uneven surfaces, such as gravel or snow, a car with ABS may need a longer stopping distance. Allow
a greater distance between cars in these conditions.
Driving Controls
69
oh_croft_InD.indd 6920/05/2004 07:58:57ProCarManuals.com