remove LOTUS ELISE 2005 User Guide
[x] Cancel search | Manufacturer: LOTUS, Model Year: 2005, Model line: ELISE, Model: LOTUS ELISE 2005Pages: 205, PDF Size: 4.51 MB
Page 80 of 205
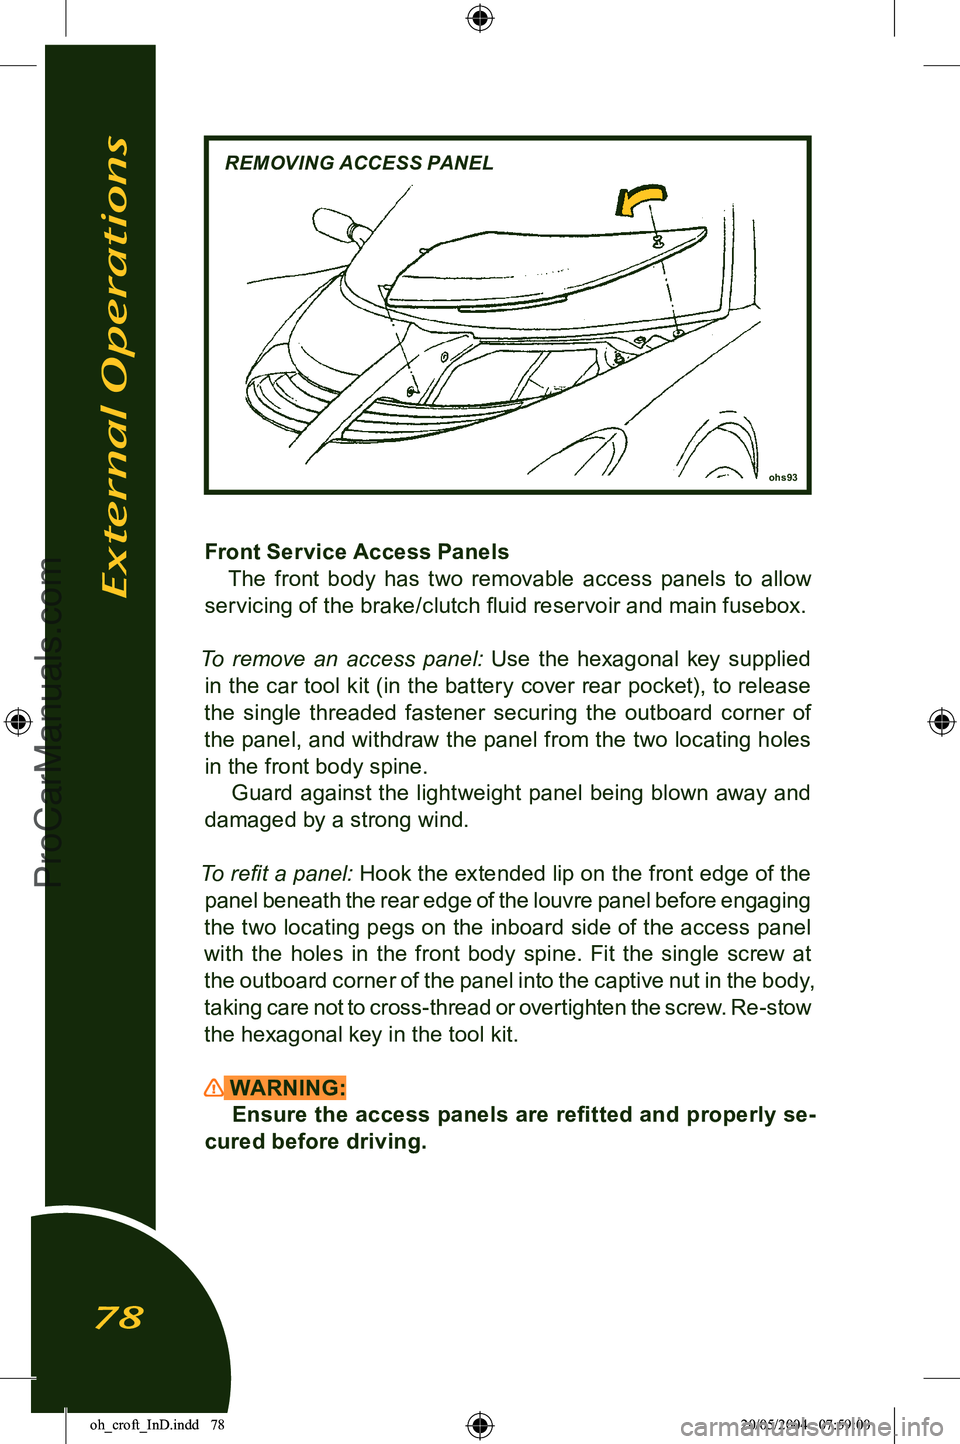
ohs93
REMOVING ACCESS PANEL
Front Service Access PanelsThe front body has two removable access panels to allow
servicing of the brake/clutch fluid reservoir and main fusebox.
To remove an access panel:
Use the hexagonal key supplied
in the car tool kit (in the battery cover rear pocket), to release
the single threaded fastener securing the outboard corner of
the panel, and withdraw the panel from the two locating holes in the front body spine. Guard against the lightweight panel being blown away and
damaged by a strong wind.
To refit a panel: Hook the extended lip on the front edge of the panel beneath the rear edge of the louvre panel before engaging
the two locating pegs on the inboard side of the access panel
with the holes in the front body spine. Fit the single screw at
the outboard corner of the panel into the captive nut in the body,
taking care not to cross-thread or overtighten the screw. Re-stow
the hexagonal key in the tool kit.
WARNING: Ensure the access panels are refitted and properly se
-
cured before driving.
External Operations
78
oh_croft_InD.indd 7820/05/2004 07:59:00ProCarManuals.com
Page 83 of 205

REMOVABLE ROOF CONCEPTThe Lotus Elise has been designed to exploit the pleasures
of open top motoring, the better to enjoy exposure to the natu
-
ral environment, without the restrictions and confinement of a
cockpit roof.
In order to provide some weather protection to the occupants
and car interior, and allow the continued enjoyment of the car in unfavourable weather conditions, a simple hard or soft top roof may be fitted. The constant changing of loads and strains
to which a car is subject to when driving on roads, and the
tolerances required to allow for repeated removal and refitting of the roof, means that minor wind noise, and seepage at joints between the roof, body and doors cannot be completely sealed
in certain areas. Therefore small leaks are considered normal
for this model.
NOTICE: Do not take the car through an automatic car wash.
The soft top may suffer damage by the brushes or suffer leaks due to the high pressure water streams directed in areas which
would not apply in normal driving conditions.
WARNING: The soft or hard top roofs should be removed only whilst
the car is safely parked. Do not attempt to remove the soft
or hard top roof whilst the car is in motion.
External Operations
81
oh_croft_InD.indd 8120/05/2004 07:59:00ProCarManuals.com
Page 86 of 205

ohs149
RELEASING ROOF SIDE RAIL
Soft Top - Removal
WARNING:Do not attempt to remove the soft top roof whilst the
car is in motion. This could cause a crash in which you or
others could be killed or seriously injured.
1. With the car stationary, open both doors or lower both door windows.
2. On the inside face of the right hand roof side rail, locate the
two latch release levers: Pull the two lever handles towards each other to release the side rail latches (press down on the
side rail if necessary to relieve the load on the latch pins), and rotate the rail upwards to release the canopy tension.
3. Repeat step (2) for the
left hand side rail.
NOTICE: Releasing the right hand roof side rail first, will minimise
the possibility of the canopy tensioning cable adjusters causing damage to the roof seals.
4. Free the front and rear tensioning cables from the gutters be
-
fore carefully rolling up each side of the roof canopy towards the centre. Lift the roof assembly off the car, and pack in the
roof bag.
External Operations
84
oh_croft_InD.indd 8420/05/2004 07:59:01ProCarManuals.com
Page 90 of 205

REAR CORNER COVER PANEL
7. Fit the trimmed cover panels to each rear corner of the roof, noting that the panels are handed for left and right sides. Press
the panels firmly into position fully to engage the ‘Velcro’ fixing
patches.
WARNING: Do not drive the car with the cover panels removed.
Injury could result from contact with the roof brackets in
a car collision.
External Operations
88
oh_croft_InD.indd 8820/05/2004 07:59:02ProCarManuals.com
Page 91 of 205
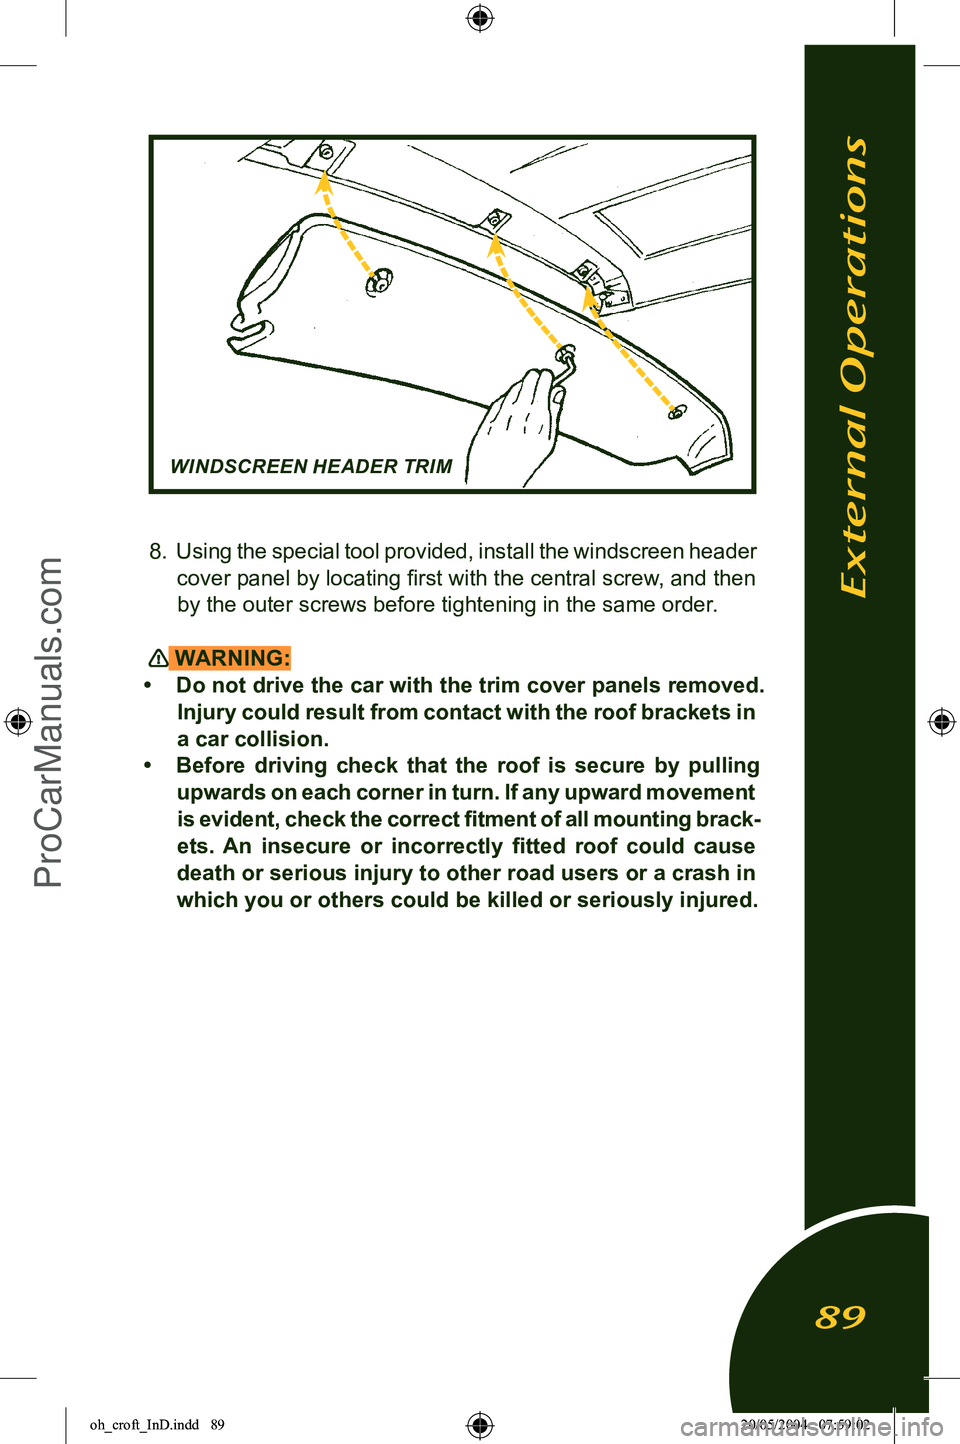
8. Using the special tool provided, install the windscreen header
cover panel by locating first with the central screw, and then by the outer screws before tightening in the same order.
WARNING:
• Do not drive the car with the trim cover panels removed. Injury could result from contact with the roof brackets in
a car collision.
• Before driving check that the roof is secure by pulling upwards on each corner in turn. If any upward movement
is evident, check the correct fitment of all mounting brack
-
ets. An insecure or incorrectly fitted roof could cause
death or serious injury to other road users or a crash in
which you or others could be killed or seriously injured.
WINDSCREEN HEADER TRIM
External Operations
89
oh_croft_InD.indd 8920/05/2004 07:59:02ProCarManuals.com
Page 92 of 205
b331
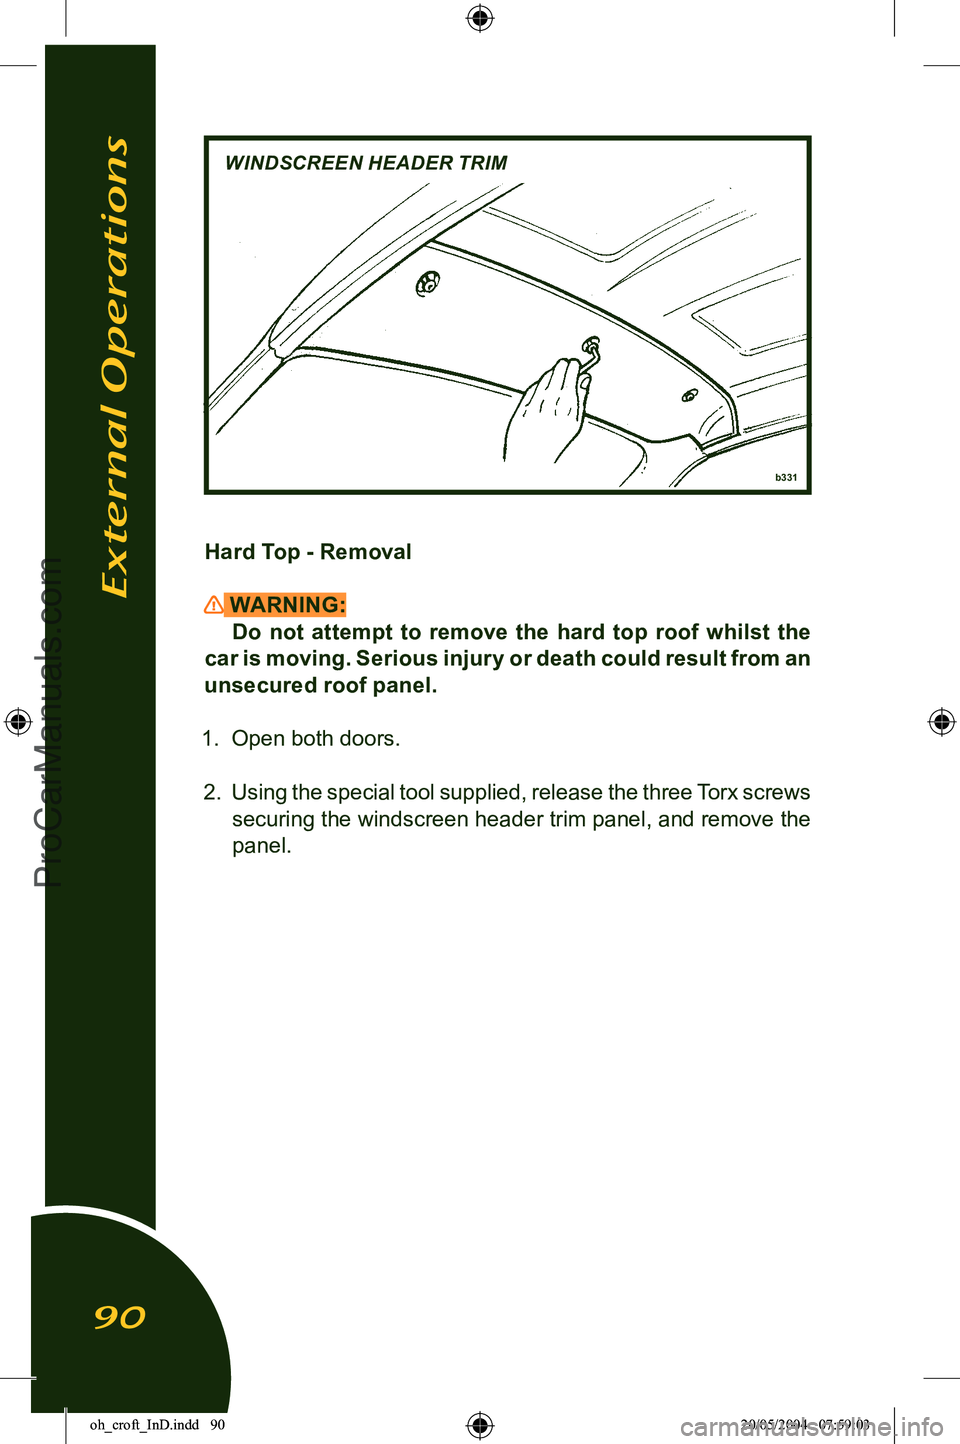
WINDSCREEN HEADER TRIM
Hard Top - Removal
WARNING:Do not attempt to remove the hard top roof whilst the
car is moving. Serious injury or death could result from an
unsecured roof panel.
1. Open both doors.
2. Using the special tool supplied, release the three Torx screws securing the windscreen header trim panel, and remove the
panel.
External Operations
90
oh_croft_InD.indd 9020/05/2004 07:59:03ProCarManuals.com
Page 93 of 205

3. Using the special tool supplied, slacken the Torx screw se-
curing each front corner spigot bracket to the roof, but do not
yet remove the screws.
b330
FRONT CORNER SPIGOT BRACKET
External Operations
91
oh_croft_InD.indd 9120/05/2004 07:59:03ProCarManuals.com
Page 94 of 205
ohs149
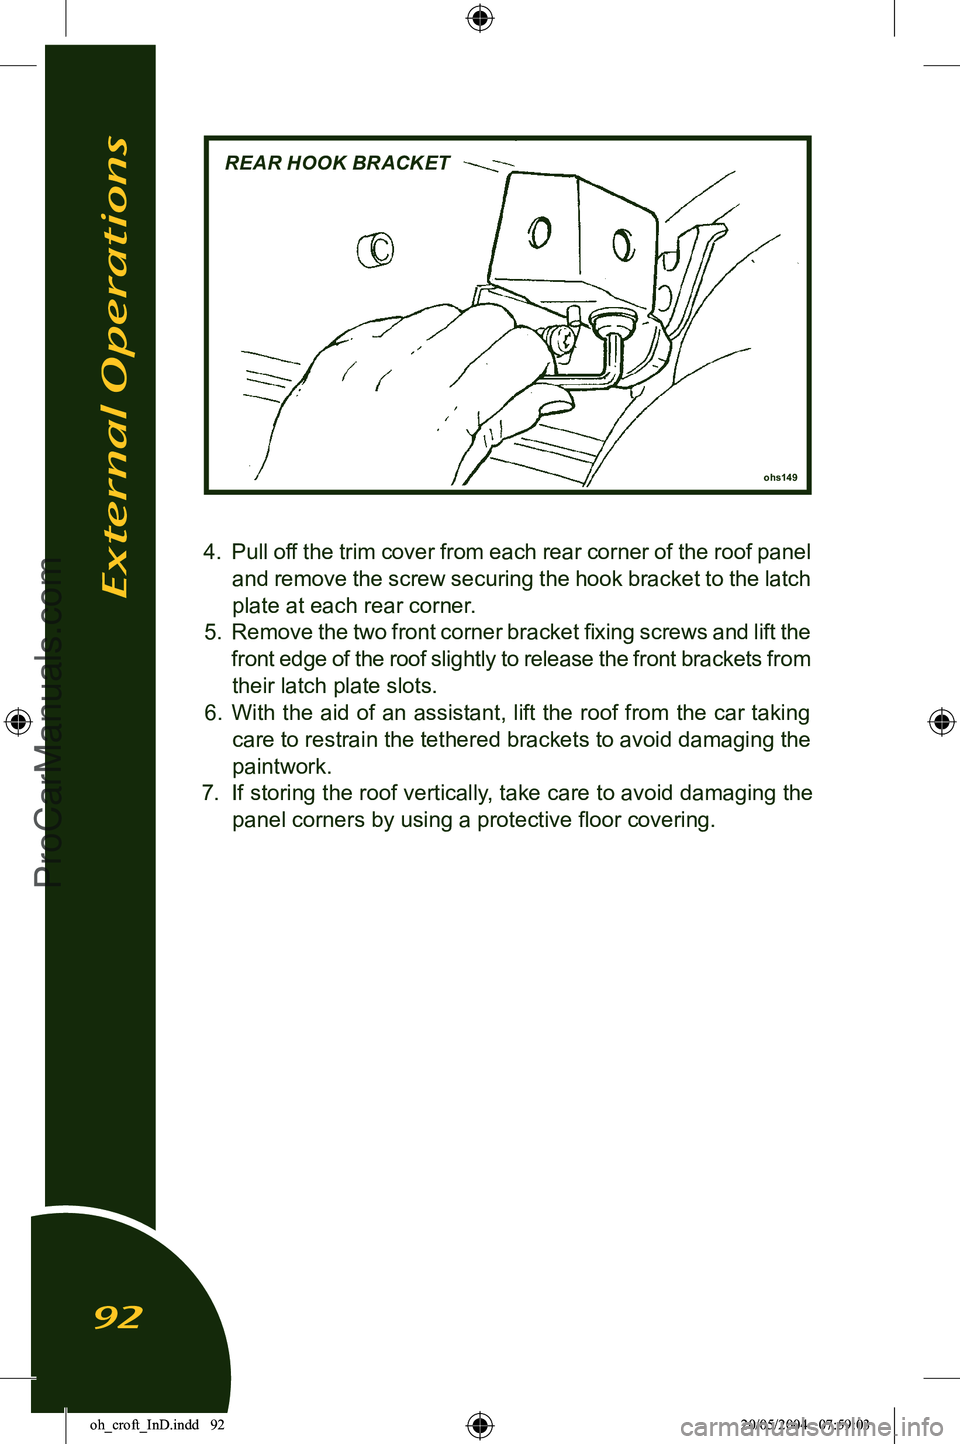
REAR HOOK BRACKET
4. Pull off the trim cover from each rear corner of the roof panel and remove the screw securing the hook bracket to the latch plate at each rear corner.
5. Remove the two front corner bracket fixing screws and lift the
front edge of the roof slightly to release the front brackets
from
their latch plate slots.
6. With the aid of an assistant, lift the roof from the car taking care to restrain the tethered brackets to avoid damaging the
paintwork.
7. If storing the roof vertically, take care to avoid damaging the panel corners by using a protective floor covering.
External Operations
92
oh_croft_InD.indd 9220/05/2004 07:59:03ProCarManuals.com
Page 97 of 205

It is not recommended to store a wet car in a poorly ventilated
garage. If good ventilation cannot be provided, storage outside
on a hard standing or under a carport is to be preferred.
Paintwork Polishing Eventually some loss of gloss, and an accumulation of traffic
film, will occur. At this stage, after normal washing, the appli
-
cation of a good quality liquid polish will restore the original lustre of the paint film.
Higher gloss of the paint finish, and added protection against
contamination, can be obtained by the use of a wax polish.
However, this can only be used successfully on a clean surface,
from which the previous application has been removed with white
spirit or a liquid polish cleaner.
Washing NOTICE: Lotus recommends hand washing of the painted
bodywork. The car is a speciality sports vehicle not intended
to go through an automatic car wash. Automatic car washing machines and jet wash facilities may have a detrimental effect on the paint film and the soft top. Use of automatic car washes
will invalidate the terms of the Limited Warranty.
Many contaminants are water soluble and can be removed
before any harm occurs by thorough washing with plenty of
lukewarm water, together with a proprietary car wash additive
(Household detergent and washing up liquid can contain cor
-
rosive salts, and will remove wax and accelerate oxidation).
Frequent washing is the best safeguard against both seen and
invisible contaminants. Wash in the shade, and use a cotton chenille wash mitt or a
sponge rinsed frequently to minimise the retension of dirt parti
-
cles in the mitt or sponge. Use a straight back and forth washing motion to avoid swirled micro scratches, and rinse thoroughly.
In order to minimise degradation from road salt, the underside
of the chassis should be rinsed with clean water as soon as possible after driving on treated roads. Many fuel filling stations
offer pressure washing facilities ideal for this purpose, but do
not use on the painted bodywork or soft top roof.
Servicing & Maintenance
95
oh_croft_InD.indd 9520/05/2004 07:59:04ProCarManuals.com
Page 98 of 205
Soft Top Roof
1. Careful vacuuming of the soft top before washing may be
helpful in removing excess dust and other foreign particles.
2. Wash in partial shade rather than strong sunlight.
3. Using only clean lukewarm water and a sponge (a chamois or
cloth will leave lint, and a brush may abrade the threads), wash
the entire soft top uniformly. Do NOT use a detergent, which may
affect the waterproofing properties of the material.
4. Rinse the whole car to prevent streaking on the paintwork. 5. Remove surface water with a sponge and allow to air dry in direct sunlight. Ensure that the roof is fully dry before stow
-
ing, as prolonged stowage of a wet or damp roof will promote
rotting of the fabric.
Keeping the soft top clean by regular washing will enhance
the life and maintain the appearance of the roof, and facilitate subsequent cleaning. The use of stronger cleansers should be left to professionals experienced in handling this type of fabric
as discoloration and degradation of the material may result.
The application of wax finishes, dressings or preservatives may cause stains, and should be avoided. Your dealer will be able to advise on current Lotus approved soft top care products.
Windscreen Cleaning When washing the windscreen, take care to lift the wiper
blade only a small distance from the glass in order not to dam
-
age the wiper arm mechanism. Wash the wiper blade with
clean water.
Alloy Road Wheels It is recommended that the aluminium alloy road wheels
are washed with the same preparation as is used to wash the bodywork. Use a brush having only nylon bristles. During the
winter months, particularly when salt has been used on the
roads for the dispersal of snow and ice, remove all the wheels,
and wash thoroughly to remove all accumulated road filth from
the wheels and Tires. Be aware that on cars fitted with optional clear anodised
forged alloy wheels (with 7 twin-spokes), the anodised surface
finish may be attacked by some proprietary wheel cleaning products. Wash only using hot soapy water or car bodywork
shampoo. Advise tire fitting companies accordingly.
Servicing & Maintenance
96
oh_croft_InD.indd 9620/05/2004 07:59:04ProCarManuals.com