engine LOTUS ELISE 2005 Workshop Manual
[x] Cancel search | Manufacturer: LOTUS, Model Year: 2005, Model line: ELISE, Model: LOTUS ELISE 2005Pages: 205, PDF Size: 4.51 MB
Page 132 of 205
If the battery is to be disconnected, the following precautions
should be taken: i) Ensure that all electrical loads (e.g. lights) are switched off. If
the car is fitted with security coded audio equipment, check
that the code is available for entering after battery reconnec
-
tion.
ii) Wait for at least ten seconds after switching off the ig-
nition to allow the engine management system to adjust the
setting of some components ready for re-starting.
iii) Ensure the alarm is disarmed. If the battery is disconnected
when armed, the alarm will be triggered.
iv) Disconnect the
negative (earth; black; ‘-’) battery cable first,
and re-connect last.
WARNING:
If the battery positive terminal is inadvertently earthed
(e.g. when using a spanner) whilst the negative terminal
is still connected, the resultant short circuit with heavy sparking and current flow could cause serious burns.
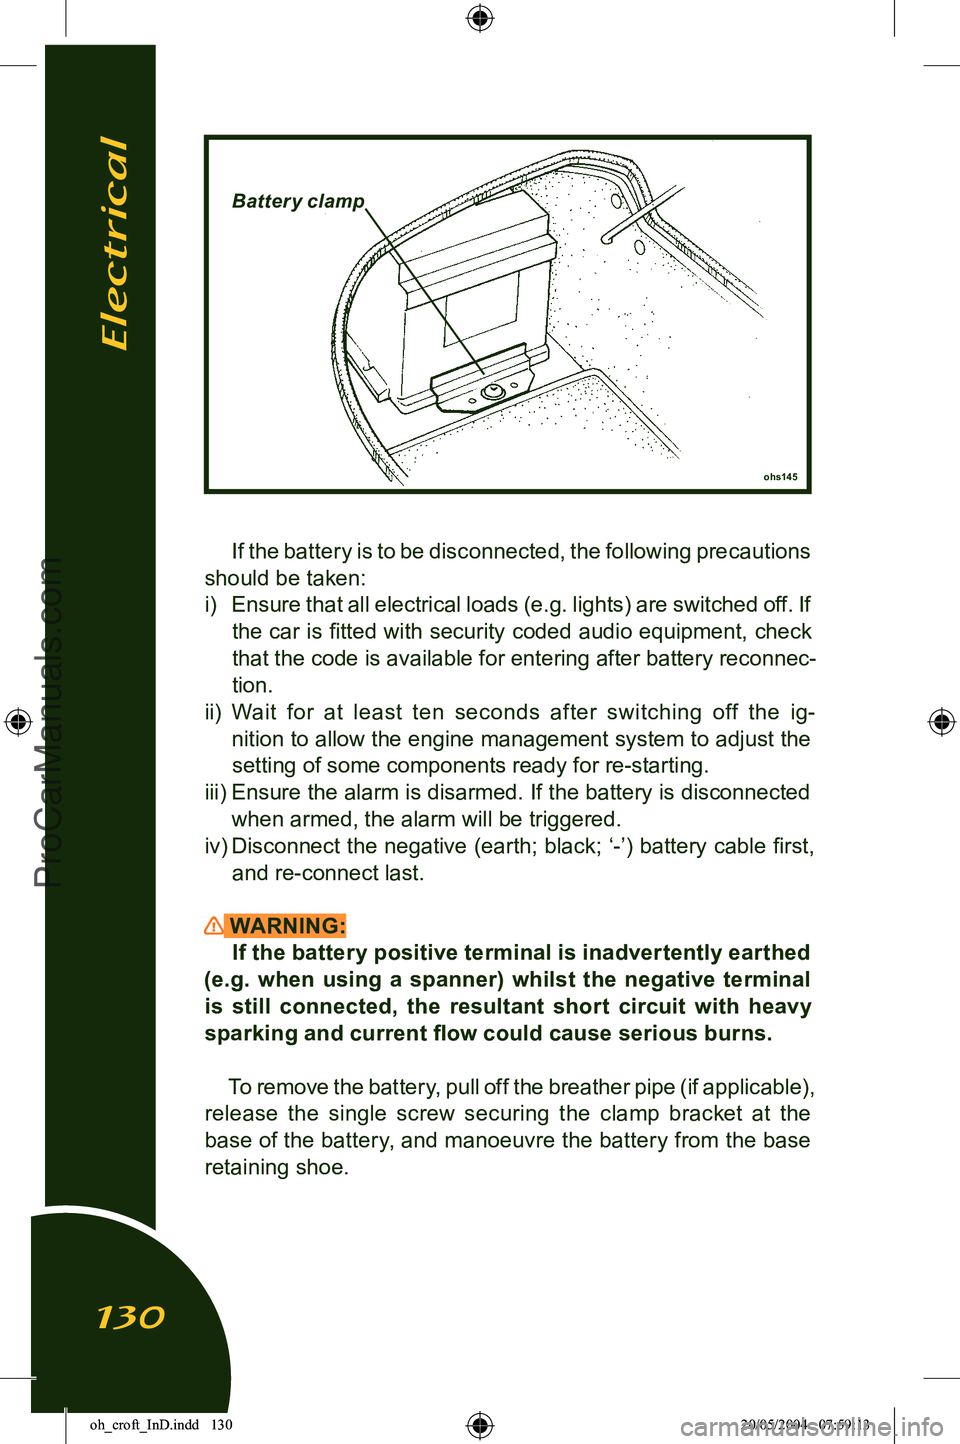
To remove the battery, pull off the breather pipe (if applicable),
release the single screw securing the clamp bracket at the
base of the battery, and manoeuvre the battery from the base
retaining shoe.
ohs145
Batter y clamp
Electrical
130
oh_croft_InD.indd 13020/05/2004 07:59:13ProCarManuals.com
Page 133 of 205
WARNING:When lifting the battery out of, or into the car, be aware
of the considerable weight and take all appropriate precau
-
tions to safeguard personal health. Injury can result from improperly lifting the battery.
Keep the battery upright, and protect from sharp knocks
and shocks.
Reconnecting the Battery
WARNING: Failure to follow the correct battery re- connection pro
-
cedure detailed above could result in serious burns.
Refit the battery, with its terminals outboard, by reversing the
above procedure. Remember to push on the breather pipe (if
applicable), and reconnect the battery cables as detailed below.
Refit the battery cover.
i) Check again that all electrical loads are switched off.
ii) Connect the positive battery cable first, followed by the neg
-
ative (earth) cable.
iii) After reconnection, a change in the engine performance
characteristics may be noted for a period whilst the computer
controlled engine management system ‘re-learns’ some of its
settings.
iv) If necessary, enter the security code into audio equipment.
Battery Charging Under conditions of normal daily use, it should not be nec
-
essary to use external battery charging equipment. In a low usage regime, however, it is important to maintain the charge
state of the battery using a trickle charger, or an automatic bat
-
tery management conditioner such as that available through Lotus Dealers. Starting difficulties may be encountered after an
unattended period of 3 weeks. A battery conditioner is able to continuously monitor battery charge state and switch on and off automatically in order to maintain the battery in a fully charged
state without danger of damage through overcharging.
If the battery becomes discharged to the extent that the
car cannot be started, the recommended course of action is
to fit a substitute battery whilst the original battery is trickle
Electrical
131
oh_croft_InD.indd 13120/05/2004 07:59:13ProCarManuals.com
Page 135 of 205

‘Jump’ StartingIf the battery becomes discharged to the extent that the en
-
gine cannot be started, proprietary good quality ‘jumper cables’ may be used to connect with the battery of a second car in order
to provide the energy necessary for starting.
WARNING: It is most important that the correct procedure is fol
-
lowed in order to avoid damage to either car’s electrical system, and most importantly, to minimise the danger of a
spark induced battery explosion. Check that the slave car
also has a NEGATIVE EARTH electrical system.
i) With the engine of the slave car running at a fast idle, use one jumper cable (red) to connect the positive (+) terminal of
one battery to the positive terminal of the other battery. Take
care during this process to avoid inadvertently earthing a free end of this cable to the metal body or chassis of either car.
ii) Connect one end of the other jumper cable (black) to the negative (-) terminal of the discharged battery.
iii) A spark will occur when the other end of this cable (the final connection) is connected to an earth on the slave car. This
connection should therefore be made to a point away from
the battery, and away from any fuel vapour area or moving
parts. An engine hanger bracket is often ideal.
iv) Start the car in the usual way, and run at a fast idle.
ohs14c
JUMP STARTING
Electrical
133
oh_croft_InD.indd 13320/05/2004 07:59:14ProCarManuals.com
Page 136 of 205

v) A spark will occur at the first disconnection of a jumper cable, so it is essential that the first disconnection is made from the
slave car earth. Both batteries (especially the
discharged one) will be ‘gassing’ heavily at this time, and if the first disconnection is made at a battery terminal, there is
a danger that the hydrogen gas may be ignited by the spark
with a resultant explosion.
vi) Have the cause of the flat battery investigated and rectified,
and trickle charge the battery as detailed above.
WARNING:
• Risk of damage and serious personal injury due to
shortcircuit.
• Use only jumper cables of adequate cross-section, fitted
with completely insulated alligator clamps. The cables must be long enough to allow that neither cars nor cables
touch each other.
• Follow all warnings and instructions of the jumper cable
manufacturer.
• When connnecting the jumper cables, keep them away
from engine moving parts.
• The two cars must not contact each other, or current could flow as soon as the positive terminals are connected.
• When the first clamp on each cable is connected, the other clamp on that cable must be held carefully to make sure it does not come into contact with either another cable
clamp or either car.
• Ensure that tools or metal watches or jewellery do not contact the battery terminals or live car parts.
NOTICE:
• Improper jumper cable connection can damage the alternator
and other electrical components.
• Do not attempt to push or tow start the car, as damage to the
catalytic converter or other parts could be caused.
Electrical Accessories Owners should note that the only approved extras and modi
-
fications are those which are specified by Lotus and carried out by Lotus or by an authorised dealer. Neither Lotus Cars Ltd. or
Lotus Cars Inc. accept any liability whatsoever for defects which arise from extras or modifications which are not approved by
Lotus Cars Ltd.
Electrical
134
oh_croft_InD.indd 13420/05/2004 07:59:14ProCarManuals.com
Page 137 of 205
WARNING:Inexper t modifications or additions to the electrical
system could jeopardise safety.
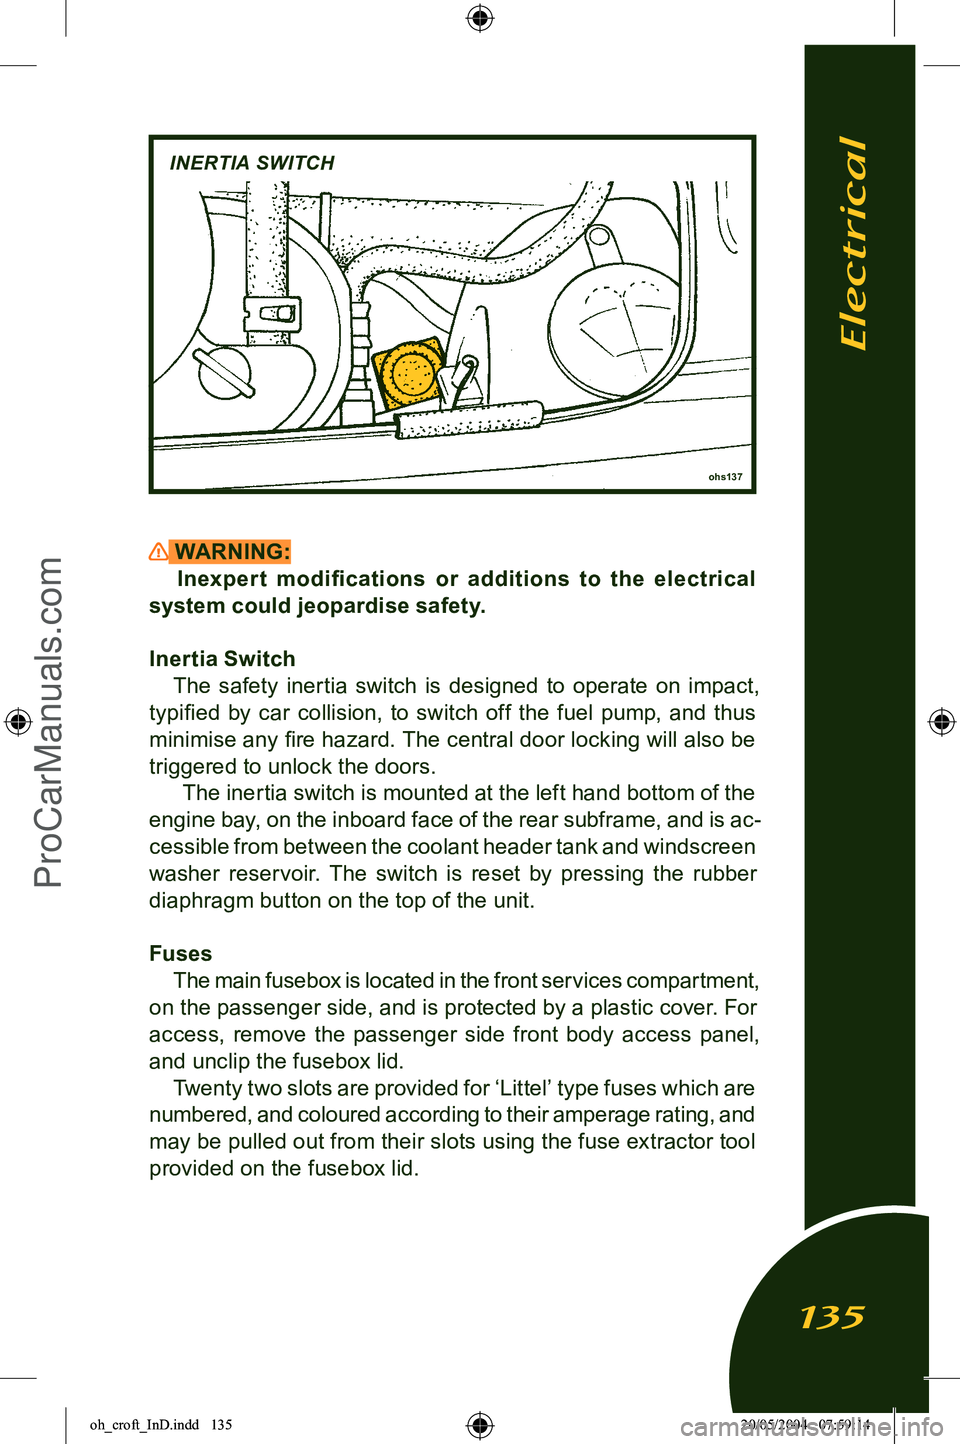
Inertia Switch The safety inertia switch is designed to operate on impact,
typified by car collision, to switch off the fuel pump, and thus
minimise any fire hazard. The central door locking will also be
triggered to unlock the doors. The inertia switch is mounted at the left hand bottom of the
engine bay, on the inboard face of the rear subframe, and is ac
-
cessible from between the coolant header tank and windscreen
washer reservoir. The switch is reset by pressing the rubber
diaphragm button on the top of the unit.
Fuses The main fusebox is located in the front services compartment,
on the passenger side, and is protected by a plastic cover. For
access, remove the passenger side front body access panel,
and unclip the fusebox lid. Twenty two slots are provided for ‘Littel’ type fuses which are
numbered, and coloured according to their amperage rating, and
may be pulled out from their slots using the fuse extractor tool provided on the fusebox lid.
ohs137
INERTIA SWITCH
Electrical
135
oh_croft_InD.indd 13520/05/2004 07:59:14ProCarManuals.com
Page 139 of 205
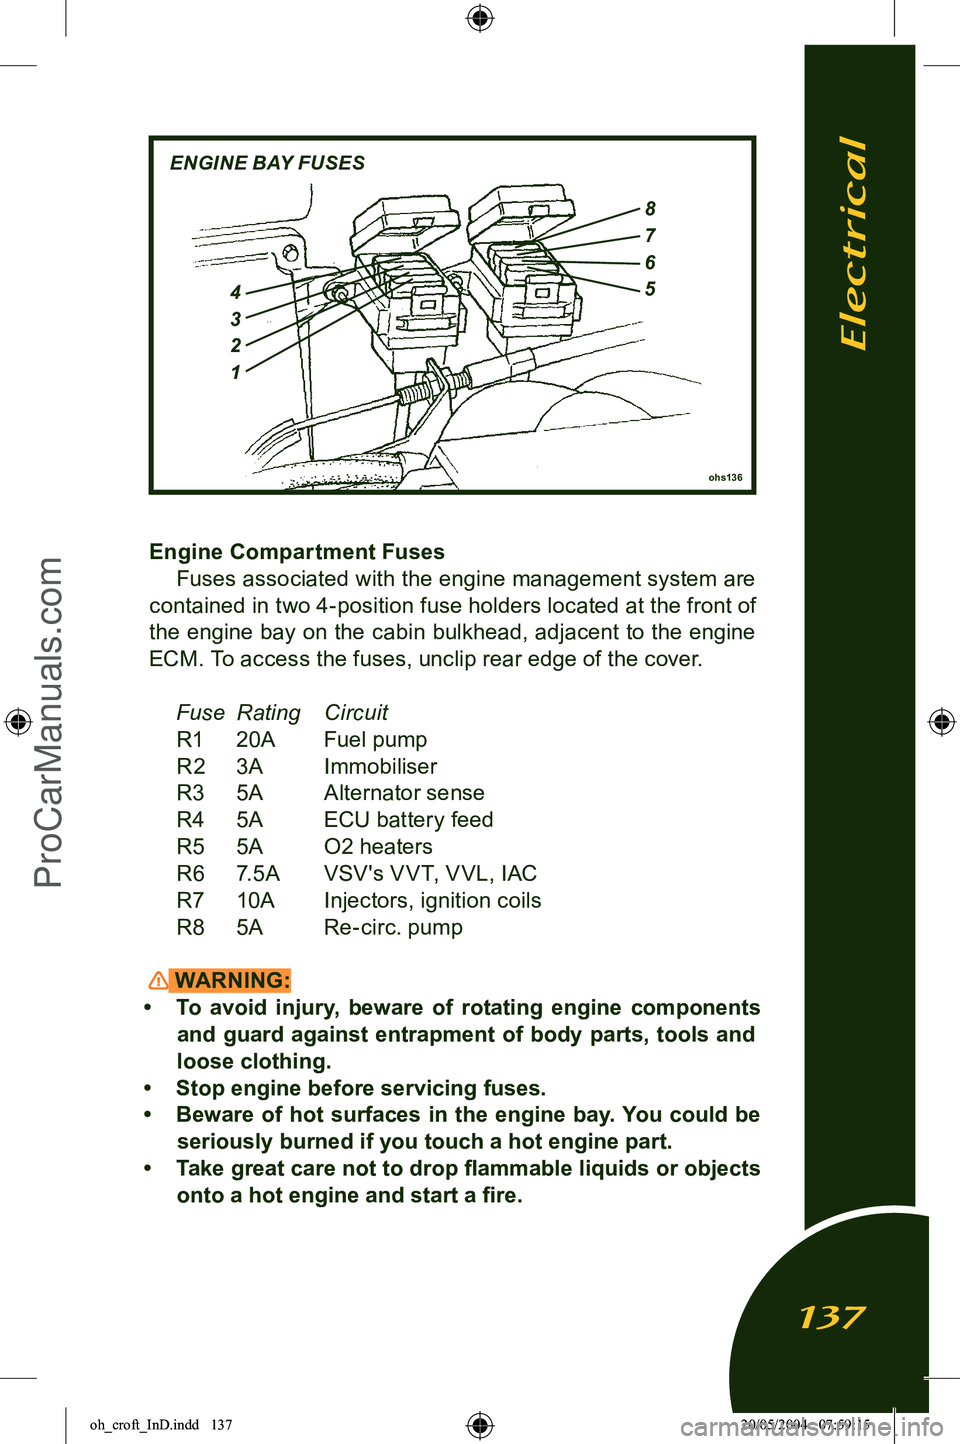
Engine Compartment FusesFuses associated with the engine management system are
contained in two 4-position fuse holders located at the front of
the engine bay on the cabin bulkhead, adjacent to the engine ECM. To access the fuses, unclip rear edge of the cover.
Fuse Rating CircuitR1 20A Fuel pump
R2 3A Immobiliser
R3 5A Alternator sense
R4 5A ECU battery feed
R5 5A O2 heaters
R6 7.5A VSV's V VT, V VL, IAC
R7 10A Injectors, ignition coils
R8 5A Re-circ. pump
WARNING:
• To avoid injury, beware of rotating engine components and guard against entrapment of body parts, tools and
loose clothing.
• Stop engine before servicing fuses.
• Beware of hot surfaces in the engine bay. You could be seriously burned if you touch a hot engine part.
• Take great care not to drop flammable liquids or objects onto a hot engine and start a fire.
ohs136
ENGINE BAY FUSES
4
3
2
1
8
7
6
5
Electrical
137
oh_croft_InD.indd 13720/05/2004 07:59:15ProCarManuals.com
Page 150 of 205
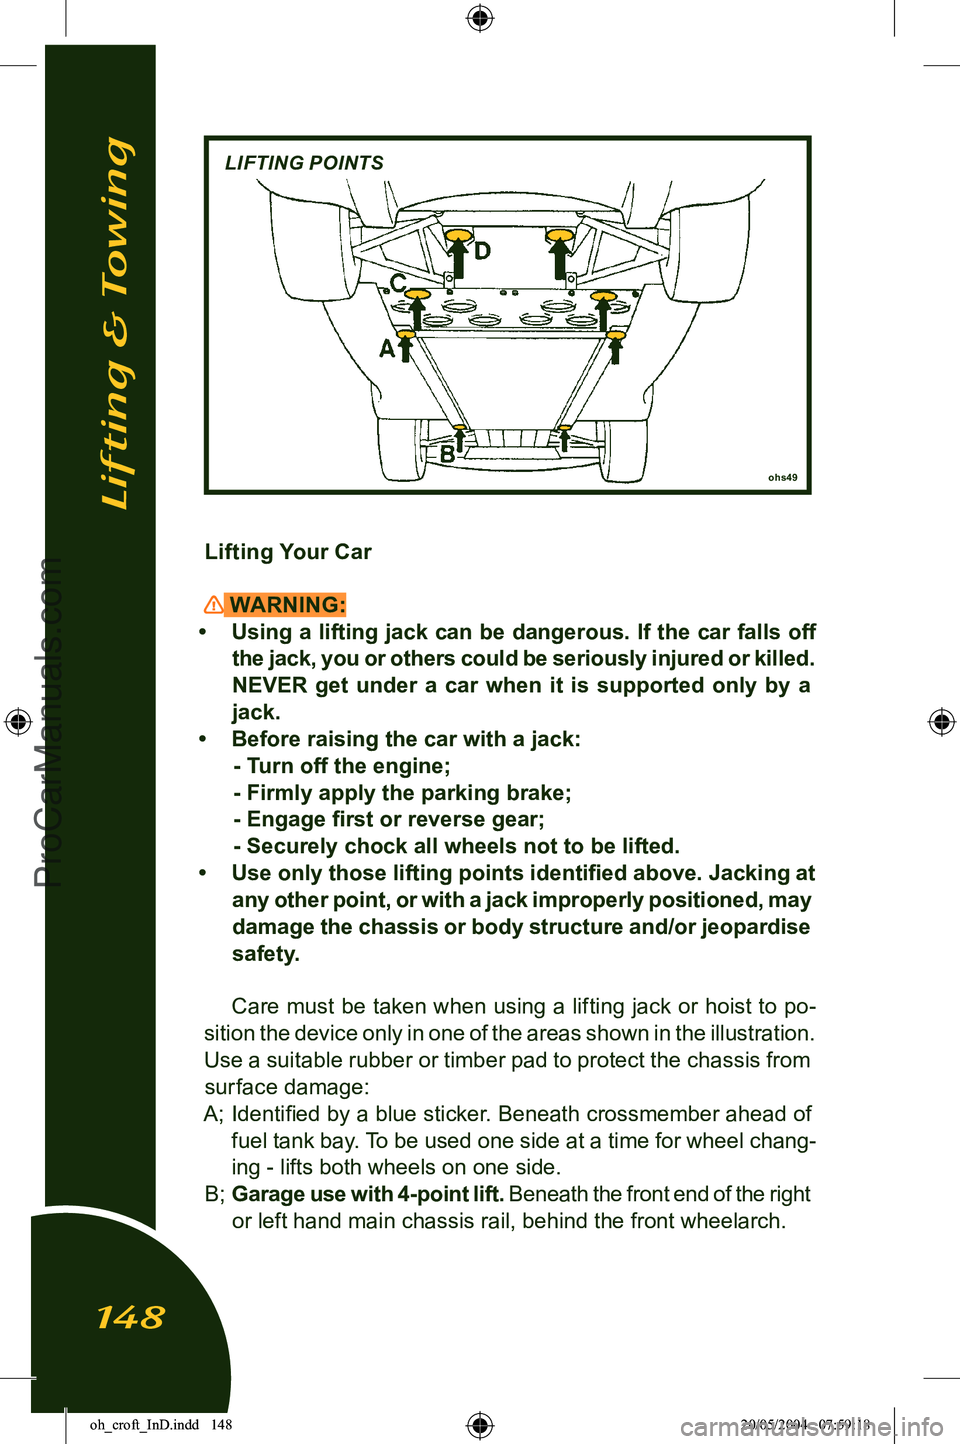
Lifting Your Car
WARNING:
• Using a lifting jack can be dangerous. If the car falls off the jack, you or others could be seriously injured or killed.
NEVER get under a car when it is supported only by a
jack.
• Before raising the car with a jack: - Turn off the engine;
- Firmly apply the parking brake;
- Engage first or reverse gear;
- Securely chock all wheels not to be lifted.
• Use only those lifting points identified above. Jacking at any other point, or with a jack improperly positioned, may
damage the chassis or body structure and/or jeopardise safety.
Care must be taken when using a lifting jack or hoist to po
-
sition the device only in one of the areas shown in the illustration.
Use a suitable rubber or timber pad to protect the chassis from
surface damage:
A; Identified by a blue sticker. Beneath crossmember ahead of fuel tank bay. To be used one side at a time for wheel chang
-
ing - lifts both wheels on one side.
B; Garage use with 4-point lift. Beneath the front end of the right
or left hand main chassis rail, behind the front wheelarch.
ohs49
LIFTING POINTS
Lifting & Towing
148
oh_croft_InD.indd 14820/05/2004 07:59:18ProCarManuals.com
Page 154 of 205
Storing Your EliseIf you intend to store your Elise for a prolonged period, con
-
sult your Lotus dealer who will be pleased to advise you. We recommend that the car is stored inside a secure garage. The
following guidelines are provided for your information:
• Ensure the engine oil and filter, coolant and brake fluid have recently been renewed. The a.c. system should be in good
working order and fully charged.
• Thoroughly clean the inside and outside of the car, including the engine compartment. If necessary, use a ‘jet’ washer to remove dirt and salt deposits from the underside, but do not
use around bearings, hydraulic components, painted surfaces or the soft top roof. Allow to dry completely.
• Chock the road wheels, leave off the parking brake, and engage reverse gear.
• Increase the tire pressures to 60 psi (4 bar). If possible, move the car slightly every month to help avoid flat spots on the
Tires.
• Either leave the battery in the car and connect a battery management (conditioner) type of charger, or remove the battery and trickle charge every two months. Note that with
the battery disconnected or removed, the alarm system is
de-activated.
• Unless the garage is equipped with a de-humidifier, the use of drying agents (Silica-Gel) is recommended in cars with
leather upholstery and in conditions of high humidity.
• The use of unapproved car covers may have a detrimental effect on the car’s paint finish and such damage will not be
covered by your car’s warranty.
In general, the Elise will be kept in best operating condition
by regular use.
Accessories
152
oh_croft_InD.indd 15220/05/2004 07:59:19ProCarManuals.com
Page 155 of 205
RECOMMENDED LUBRICANTS
EngineIn order to enhance the longevity and reliability of the car, it
is most important that only the specified lubricants are used. It
is an entirely false economy to try to save money by using lower quality oils, which may break down before the next change in
-
terval and provide inadequate protection before the end of the
term. High oil consumption may also result.
For topping up purposes during the running-in period prior to
the First After Sales Service, a top quality mineral or semi-syn
-
thetic 5W/40 oil should be used. At the First After Sales Service and completion of the running-in period, a fully synthetic 5W/40
oil such as Texaco Havoline Synthetic should be used. This oil
has been tested in all climatic conditions likely to be encountered,
and offers advantages in ease of cranking, smooth cold running
and fuel economy at low temperatures, in combination with good
wear protection at elevated temperatures and at high engine speeds. If Texaco/Havoline products are not available, an oil meeting the following specification should be used.
NOTICE: Note that Lotus does not recommend the use of any oil additives and use of such additives may invalidate the terms
of your car’s warranty.
Viscosity: 5W/40
Quality Standard: API SJEC; ILSAC; ACEA A3
Capacity - refill inc. filter 4.4 litre
(Cars fitted with front mounted oil coolers contain an additional
3.5 litres, but this oil is not drained during routine servicing) Difference between high & low dipstick marks
1.5 litre
Oil change interval Refer to Maintenance Schedule
‘Severe Service’ Conditions Certain operating conditions can cause rapid degradation of
the oil quality, either by the accumulation of dirt particles, or by
the absorption of water from condensation. If any of the ‘severe
service’ conditions described below apply, it is recommended
that the oil and filter be changed twice as frequently as is listed in the Maintenance Schedule.
Recommended Lubricants
153
oh_croft_InD.indd 15320/05/2004 07:59:19ProCarManuals.com
Page 156 of 205
• Driving in dusty areas (e.g. on unmetalled roads); Change
the oil and filter as soon as possible after driving in a dust
storm.
• Stop/start driving with frequent short trips where the engine
rarely warms up thoroughly (especially in cold weather/cli
-
mates); and/or frequent or prolonged idling.
• Track use, with repeated high rpm, wide throttle openings
and high oil temperatures. For appropriate maintenance, dis
-
cusswith your Lotus dealer. Note that use of the car off road or in a competitive manner, including timed runs or laps, will
invalidate warranty and require appropriate levels of expert
car preparation and servicing.
Transmission (gearbox & final drive) Viscosity SAE 75W/90
Quality Standard API GL-4 or GL-5
Capacity 2.3 litre (2.4 US qt)
Oil change interval Refer to Maintenance Schedule
Brake & Clutch System
Type Non-mineral (non-petroleum)
hydraulic fluid
Specification DOT 4
Capacity - brake 1.5 litre
- clutch 0.5 litre
Fluid change interval 12 months
Engine Coolant Additive
Only approved product Havoline XLC
Type Ethylene glycol antifreeze with
OAT corrosion inhibitors
Colour Orange
Concentration 50%
Quantity reqd. @ 50% 6 litres
Recommended Lubricants
154
oh_croft_InD.indd 15420/05/2004 07:59:19ProCarManuals.com