display MASERATI GHIBLI 2019 User Guide
[x] Cancel search | Manufacturer: MASERATI, Model Year: 2019, Model line: GHIBLI, Model: MASERATI GHIBLI 2019Pages: 384, PDF Size: 13.33 MB
Page 59 of 384
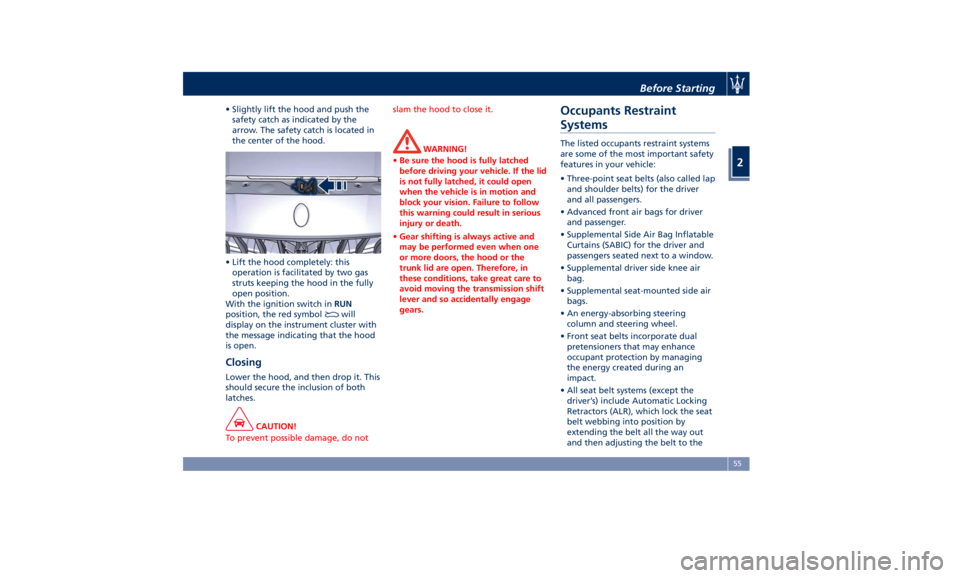
• Slightly lift the hood and push the
safety catch as indicated by the
arrow. The safety catch is located in
the center of the hood.
• Lift the hood completely: this
operation is facilitated by two gas
struts keeping the hood in the fully
open position.
With the ignition switch in RUN
position, the red symbol
will
display on the instrument cluster with
the message indicating that the hood
is open.
Closing Lower the hood, and then drop it. This
should secure the inclusion of both
latches.
CAUTION!
To prevent possible damage, do not slam the hood to close it.
WARNING!
• Be sure the hood is fully latched
before driving your vehicle. If the lid
is not fully latched, it could open
when the vehicle is in motion and
block your vision. Failure to follow
this warning could result in serious
injury or death.
• Gear shifting is always active and
may be performed even when one
or more doors, the hood or the
trunk lid are open. Therefore, in
these conditions, take great care to
avoid moving the transmission shift
lever and so accidentally engage
gears.Occupants Restraint
Systems The listed occupants restraint systems
are some of the most important safety
features in your vehicle:
• Three-point seat belts (also called lap
and shoulder belts) for the driver
and all passengers.
• Advanced front air bags for driver
and passenger.
• Supplemental Side Air Bag Inflatable
Curtains (SABIC) for the driver and
passengers seated next to a window.
• Supplemental driver side knee air
bag.
• Supplemental seat-mounted side air
bags.
• An energy-absorbing steering
column and steering wheel.
• Front seat belts incorporate dual
pretensioners that may enhance
occupant protection by managing
the energy created during an
impact.
• All seat belt systems (except the
driver’s) include Automatic Locking
Retractors (ALR), which lock the seat
belt webbing into position by
extending the belt all the way out
and then adjusting the belt to theBefore Starting
2
55
Page 82 of 384
Transporting Pets Air bags deploying in the front seat
could harm your pet. An unrestrained
pet will be thrown about and possibly
injured, or injure a passenger during
panic braking or in an accident.
Pets should be restrained in the rear
seat in pet harnesses or pet carriers
that are secured by vehicle seat belts.
Rear Parking Camera Your vehicle is equipped with a rear
parking camera that allows you to see
an image on the MTC+ screen of the
rear surroundings of your vehicle
whenever the shift lever is put into R
(Reverse).
When “Parkview Camera Off Delay”
mode is enabled, the rear view image
shall be displayed for up to 10 seconds
after shifting out of R (Reverse).
When “Rearwiew Camera Delay”
mode is enabled, the rear view image
shall be displayed for up to 10 seconds
after shifting out of R (Reverse).
To assist the driver during maneuvers
on dead-ends/roads and on
intersections, the vehicle may be
equipped with an optional surround
view camera system. In this case, the
rear parking camera is integrated into
the surround view camera system. In
both configurations (rear parking
camera only or surround view camera
system), you can monitor the rear
view. For more details on this option,
see chapter "Surround View Camera
System (optional)" in this section.
The image will be displayed along with
a caution note to “Check Entire
Surroundings” across the top of the screen. After five seconds this note will
disappear.
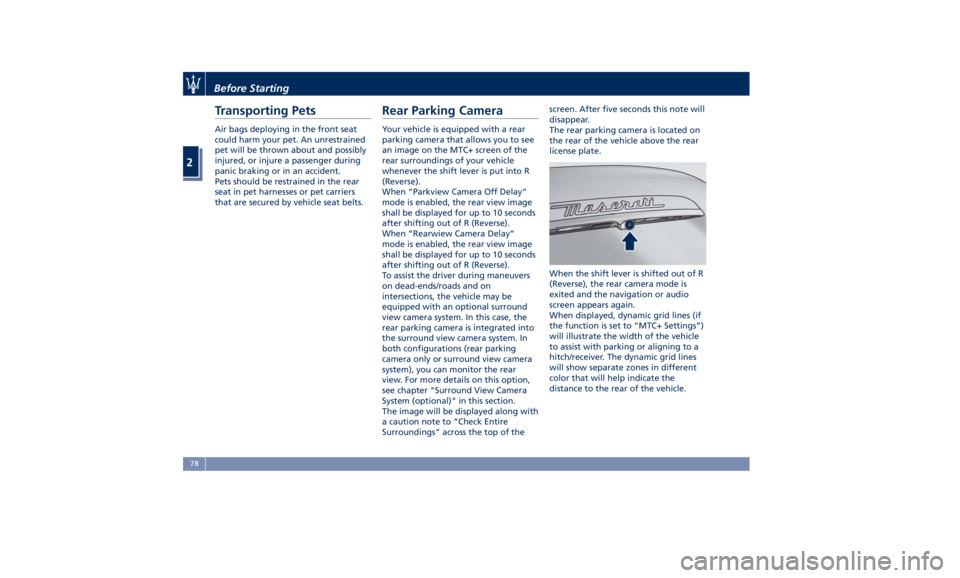
The rear parking camera is located on
the rear of the vehicle above the rear
license plate.
When the shift lever is shifted out of R
(Reverse), the rear camera mode is
exited and the navigation or audio
screen appears again.
When displayed, dynamic grid lines (if
the function is set to “MTC+ Settings”)
will illustrate the width of the vehicle
to assist with parking or aligning to a
hitch/receiver. The dynamic grid lines
will show separate zones in different
color that will help indicate the
distance to the rear of the vehicle.Before Starting
2
78
Page 84 of 384
Surround View Camera
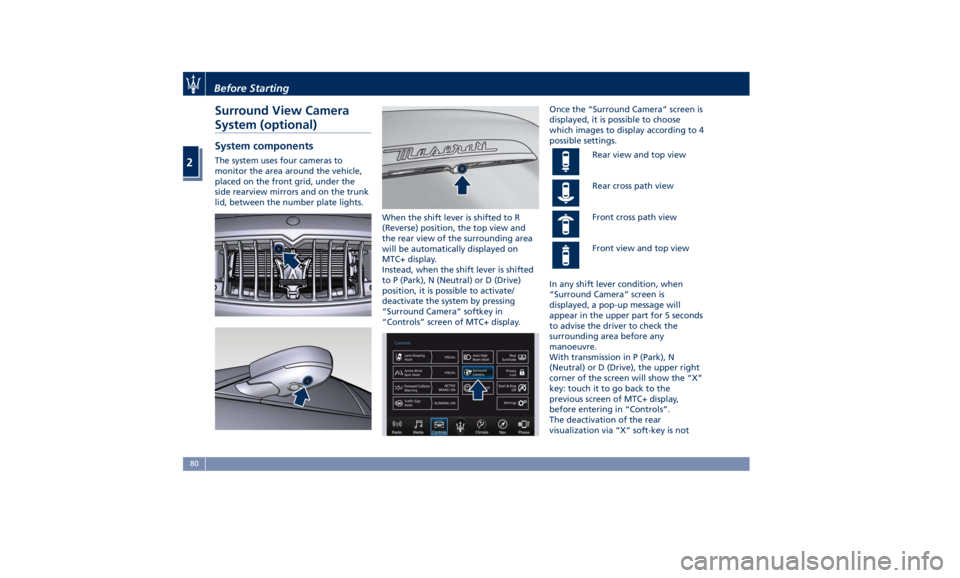
System (optional) System components The system uses four cameras to
monitor the area around the vehicle,
placed on the front grid, under the
side rearview mirrors and on the trunk
lid, between the number plate lights.
When the shift lever is shifted to R
(Reverse) position, the top view and
the rear view of the surrounding area
will be automatically displayed on
MTC+ display.
Instead, when the shift lever is shifted
to P (Park), N (Neutral) or D (Drive)
position, it is possible to activate/
deactivate the system by pressing
“Surround Camera” softkey in
“Controls” screen of MTC+ display. Once the “Surround Camera” screen is
displayed, it is possible to choose
which images to display according to 4
possible settings.
Rear view and top view
Rear cross path view
Front cross path view
Front view and top view
In any shift lever condition, when
“Surround Camera” screen is
displayed, a pop-up message will
appear in the upper part for 5 seconds
to advise the driver to check the
surrounding area before any
manoeuvre.
With transmission in P (Park), N
(Neutral) or D (Drive), the upper right
corner of the screen will show the “X”
key: touch it to go back to the
previous screen of MTC+ display,
before entering in “Controls”.
The deactivation of the rear
visualization via “X” soft-key is notBefore Starting
2
80
Page 85 of 384
possible when the transmission is in R
(Reverse) position.
Choose the most suitable setting for
the situation and the maneuver you
are performing or going to perform,
by touching the relevant button
present under the images: the edges
of the pressed button will highlight.
The button will highlight and the type
of setting will appear on each image.
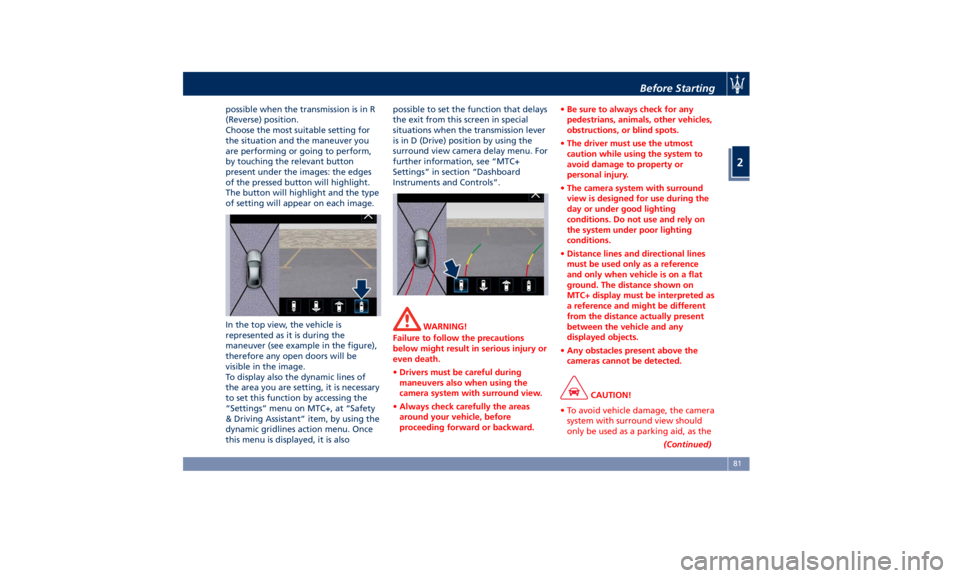
In the top view, the vehicle is
represented as it is during the
maneuver (see example in the figure),
therefore any open doors will be
visible in the image.
To display also the dynamic lines of
the area you are setting, it is necessary
to set this function by accessing the
“Settings” menu on MTC+, at “Safety
& Driving Assistant” item, by using the
dynamic gridlines action menu. Once
this menu is displayed, it is also possible to set the function that delays
the exit from this screen in special
situations when the transmission lever
is in D (Drive) position by using the
surround view camera delay menu. For
further information, see “MTC+
Settings” in section “Dashboard
Instruments and Controls”.
WARNING!
Failure to follow the precautions
below might result in serious injury or
even death.
• Drivers must be careful during
maneuvers also when using the
camera system with surround view.
• Always check carefully the areas
around your vehicle, before
proceeding forward or backward. • Be sure to always check for any
pedestrians, animals, other vehicles,
obstructions, or blind spots.
• The driver must use the utmost
caution while using the system to
avoid damage to property or
personal injury.
• The camera system with surround
view is designed for use during the
day or under good lighting
conditions. Do not use and rely on
the system under poor lighting
conditions.
• Distance lines and directional lines
must be used only as a reference
and only when vehicle is on a flat
ground. The distance shown on
MTC+ display must be interpreted as
a reference and might be different
from the distance actually present
between the vehicle and any
displayed objects.
• Any obstacles present above the
cameras cannot be detected.
CAUTION!
• To avoid vehicle damage, the camera
system with surround view should
only be used as a parking aid, as the
(Continued)Before Starting
2
81
Page 90 of 384
speed is increased to approximately
7.5 mph (12 km/h) or above. The
system will become active again if the
vehicle speed is decreased to speeds
less than approximately 6.2 mph
(10 km/h).
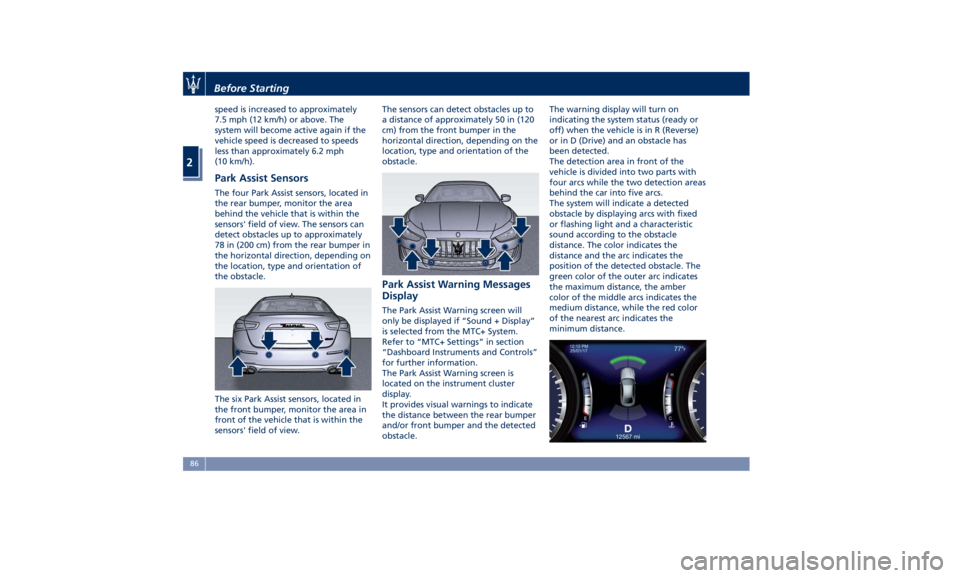
Park Assist Sensors The four Park Assist sensors, located in
the rear bumper, monitor the area
behind the vehicle that is within the
sensors' field of view. The sensors can
detect obstacles up to approximately
78 in (200 cm) from the rear bumper in
the horizontal direction, depending on
the location, type and orientation of
the obstacle.
The six Park Assist sensors, located in
the front bumper, monitor the area in
front of the vehicle that is within the
sensors' field of view. The sensors can detect obstacles up to
a distance of approximately 50 in (120
cm) from the front bumper in the
horizontal direction, depending on the
location, type and orientation of the
obstacle.
Park Assist Warning Messages
Display The Park Assist Warning screen will
only be displayed if “Sound + Display”
is selected from the MTC+ System.
Refer to “MTC+ Settings” in section
“Dashboard Instruments and Controls”
for further information.
The Park Assist Warning screen is
located on the instrument cluster
display.
It provides visual warnings to indicate
the distance between the rear bumper
and/or front bumper and the detected
obstacle. The warning display will turn on
indicating the system status (ready or
off) when the vehicle is in R (Reverse)
or in D (Drive) and an obstacle has
been detected.
The detection area in front of the
vehicle is divided into two parts with
four arcs while the two detection areas
behind the car into five arcs.
The system will indicate a detected
obstacle by displaying arcs with fixed
or flashing light and a characteristic
sound according to the obstacle
distance. The color indicates the
distance and the arc indicates the
position of the detected obstacle. The
green color of the outer arc indicates
the maximum distance, the amber
color of the middle arcs indicates the
medium distance, while the red color
of the nearest arc indicates the
minimum distance.Before Starting
2
86
Page 91 of 384
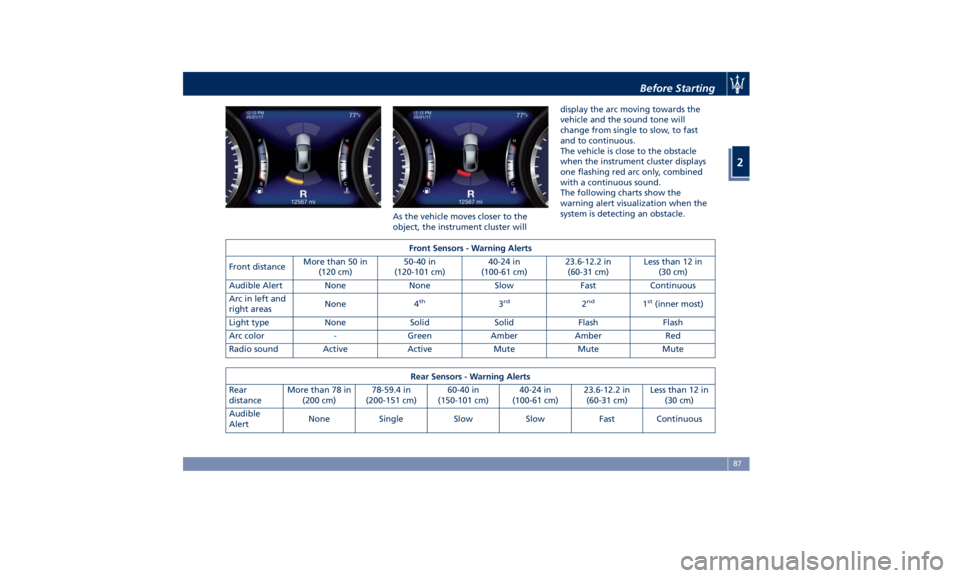
As the vehicle moves closer to the
object, the instrument cluster will display the arc moving towards the
vehicle and the sound tone will
change from single to slow, to fast
and to continuous.
The vehicle is close to the obstacle
when the instrument cluster displays
one flashing red arc only, combined
with a continuous sound.
The following charts show the
warning alert visualization when the
system is detecting an obstacle.
Front Sensors - Warning Alerts
Front distance More than 50 in
(120 cm) 50-40 in
(120-101 cm) 40-24 in
(100-61 cm) 23.6-12.2 in
(60-31 cm) Less than 12 in
(30 cm)
Audible Alert None None Slow Fast Continuous
Arc in left and
right areas None 4 th
3 rd
2 nd
1 st
(inner most)
Light type None Solid Solid Flash Flash
Arc color - Green Amber Amber Red
Radio sound Active Active Mute Mute Mute
Rear Sensors - Warning Alerts
Rear
distance More than 78 in
(200 cm) 78-59.4 in
(200-151 cm) 60-40 in
(150-101 cm) 40-24 in
(100-61 cm) 23.6-12.2 in
(60-31 cm) Less than 12 in
(30 cm)
Audible
Alert None Single Slow Slow Fast Continuous Before Starting
2
87
Page 92 of 384
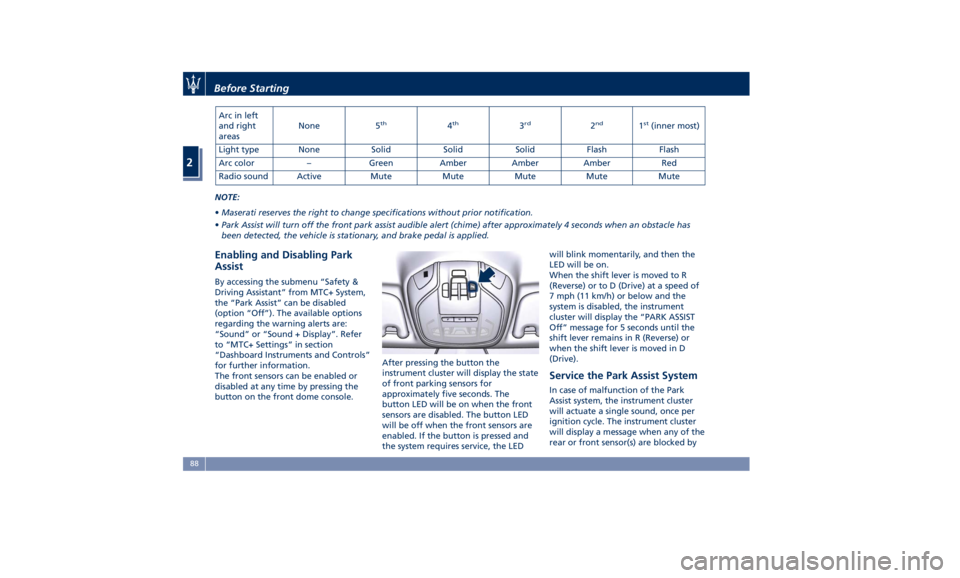
Arc in left
and right
areas None 5 th
4 th
3 rd
2 nd
1 st
(inner most)
Light type None Solid Solid Solid Flash Flash
Arc color – Green Amber Amber Amber Red
Radio sound Active Mute Mute Mute Mute Mute
NOTE:
• Maserati reserves the right to change specifications without prior notification.
• Park Assist will turn off the front park assist audible alert (chime) after approximately 4 seconds when an obstacle has
been detected, the vehicle is stationary, and brake pedal is applied.
Enabling and Disabling Park
Assist By accessing the submenu “Safety &
Driving Assistant” from MTC+ System,
the “Park Assist” can be disabled
(option “Off”). The available options
regarding the warning alerts are:
“Sound” or “Sound + Display”. Refer
to “MTC+ Settings” in section
“Dashboard Instruments and Controls”
for further information.
The front sensors can be enabled or
disabled at any time by pressing the
button on the front dome console. After pressing the button the
instrument cluster will display the state
of front parking sensors for
approximately five seconds. The
button LED will be on when the front
sensors are disabled. The button LED
will be off when the front sensors are
enabled. If the button is pressed and
the system requires service, the LED will blink momentarily, and then the
LED will be on.
When the shift lever is moved to R
(Reverse) or to D (Drive) at a speed of
7 mph (11 km/h) or below and the
system is disabled, the instrument
cluster will display the “PARK ASSIST
Off” message for 5 seconds until the
shift lever remains in R (Reverse) or
when the shift lever is moved in D
(Drive).
Service the Park Assist System In case of malfunction of the Park
Assist system, the instrument cluster
will actuate a single sound, once per
ignition cycle. The instrument cluster
will display a message when any of the
rear or front sensor(s) are blocked byBefore Starting
2
88
Page 93 of 384
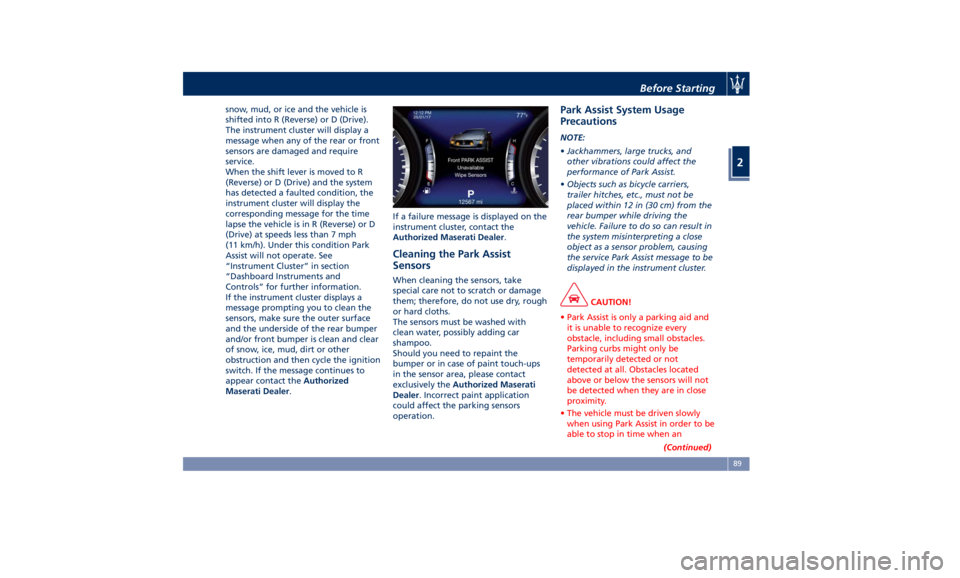
snow, mud, or ice and the vehicle is
shifted into R (Reverse) or D (Drive).
The instrument cluster will display a
message when any of the rear or front
sensors are damaged and require
service.
When the shift lever is moved to R
(Reverse) or D (Drive) and the system
has detected a faulted condition, the
instrument cluster will display the
corresponding message for the time
lapse the vehicle is in R (Reverse) or D
(Drive) at speeds less than 7 mph
(11 km/h). Under this condition Park
Assist will not operate. See
“Instrument Cluster” in section
“Dashboard Instruments and
Controls” for further information.
If the instrument cluster displays a
message prompting you to clean the
sensors, make sure the outer surface
and the underside of the rear bumper
and/or front bumper is clean and clear
of snow, ice, mud, dirt or other
obstruction and then cycle the ignition
switch. If the message continues to
appear contact the Authorized
Maserati Dealer . If a failure message is displayed on the
instrument cluster, contact the
Authorized Maserati Dealer .
Cleaning the Park Assist
Sensors When cleaning the sensors, take
special care not to scratch or damage
them; therefore, do not use dry, rough
or hard cloths.
The sensors must be washed with
clean water, possibly adding car
shampoo.
Should you need to repaint the
bumper or in case of paint touch-ups
in the sensor area, please contact
exclusively the Authorized Maserati
Dealer . Incorrect paint application
could affect the parking sensors
operation. Park Assist System Usage
Precautions NOTE:
• Jackhammers, large trucks, and
other vibrations could affect the
performance of Park Assist.
• Objects such as bicycle carriers,
trailer hitches, etc., must not be
placed within 12 in (30 cm) from the
rear bumper while driving the
vehicle. Failure to do so can result in
the system misinterpreting a close
object as a sensor problem, causing
the service Park Assist message to be
displayed in the instrument cluster.
CAUTION!
• Park Assist is only a parking aid and
it is unable to recognize every
obstacle, including small obstacles.
Parking curbs might only be
temporarily detected or not
detected at all. Obstacles located
above or below the sensors will not
be detected when they are in close
proximity.
• The vehicle must be driven slowly
when using Park Assist in order to be
able to stop in time when an
(Continued)Before Starting
2
89
Page 97 of 384
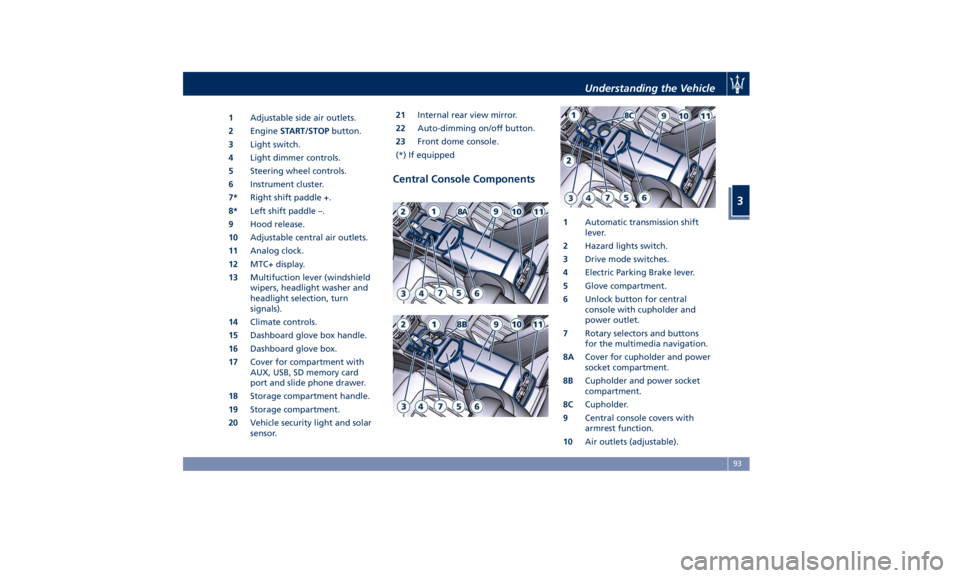
1 Adjustable side air outlets.
2 Engine START/STOP button.
3 Light switch.
4 Light dimmer controls.
5 Steering wheel controls.
6 Instrument cluster.
7* Right shift paddle +.
8* Left shift paddle –.
9 Hood release.
10 Adjustable central air outlets.
11 Analog clock.
12 MTC+ display.
13 Multifuction lever (windshield
wipers, headlight washer and
headlight selection, turn
signals).
14 Climate controls.
15 Dashboard glove box handle.
16 Dashboard glove box.
17 Cover for compartment with
AUX, USB, SD memory card
port and slide phone drawer.
18 Storage compartment handle.
19 Storage compartment.
20 Vehicle security light and solar
sensor. 21 Internal rear view mirror.
22 Auto-dimming on/off button.
23 Front dome console.
(*) If equipped
Central Console Components 1 Automatic transmission shift
lever.
2 Hazard lights switch.
3 Drive mode switches.
4 Electric Parking Brake lever.
5 Glove compartment.
6 Unlock button for central
console with cupholder and
power outlet.
7 Rotary selectors and buttons
for the multimedia navigation.
8A Cover for cupholder and power
socket compartment.
8B Cupholder and power socket
compartment.
8C Cupholder.
9 Central console covers with
armrest function.
10 Air outlets (adjustable).Understanding the Vehicle
3
93
Page 101 of 384
Power Lumbar
Push the switch 3 forward or rearward
to increase or decrease the lumbar
support.
Push the switch 3 upward or
downward to raise or lower the
lumbar support.
WARNING!
• Never adjust the seat while driving.
You could lose control of the vehicle.
Moving the seat could distract you
or make you press a pedal
unintentionally.
• Seats should be adjusted before
fastening the seat belts and while
the vehicle is parked.
• Do not ride with the seatback
reclined so that the shoulder belt is
no longer resting against your chest.
In a collision you could slide under
the seat belt, which could result in
serious injury or death.
CAUTION!
Do not place any object under a
power seat or obstruct its movement
as it may cause damage to the seat
controls. Seat movement may become limited if there is an obstruction in the
way.
Front Heated Seats The front seats are equipped with
heaters in both seat cushions and
seatbacks.
The seats comfort commands are in
the “Climate” screen of the MTC+.
They are present in the "Climate"
screen even when the A/C is off. See
“Air Conditioning Controls” in section
“Dashboard Instruments and
Controls” for further details.
WARNING!
• Persons with low skin sensitivity
because of advanced age, chronic
illness, diabetes, spinal cord injury,
medication, alcohol use, exhaustion
or other physical conditions must be
careful when using the seat heater.
It may cause irritation even at low
temperatures, especially if used for
long periods of time.
• Do not place anything on the seat
that insulates against heat, such as a
blanket or cushion. This may cause
the seat heater to overheat. Front Seats Heat Function
NOTE:
The
engine must
be running for the
heated seats to operate.
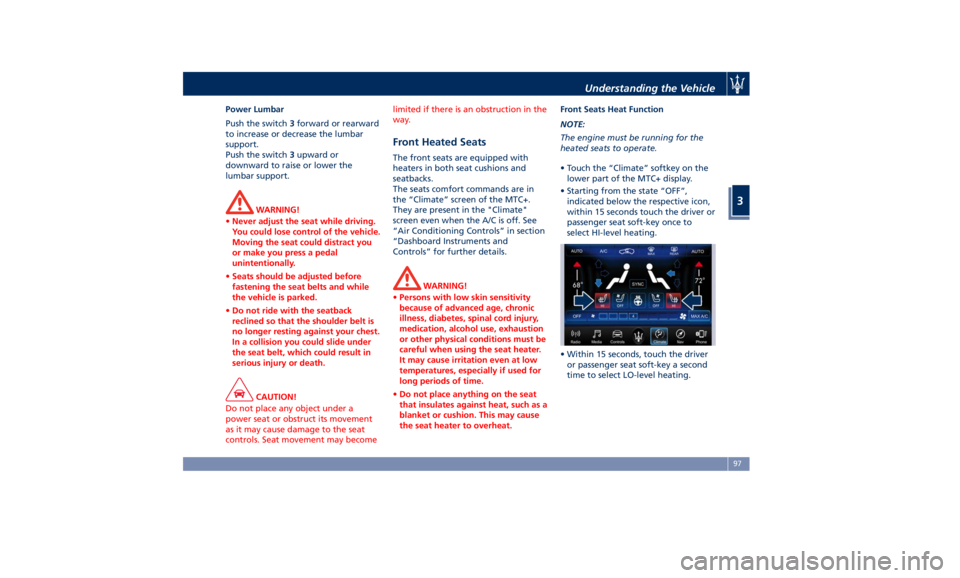
• Touch the “Climate” softkey on the
lower part of the MTC+ display.
• Starting from the state “OFF”,
indicated below the respective icon,
within 15 seconds touch the driver or
passenger seat soft-key once to
select HI-level heating.
• Within 15 seconds, touch the driver
or passenger seat soft-key a second
time to select LO-level heating.Understanding the Vehicle
3
97