headlights MASERATI GHIBLI 2019 User Guide
[x] Cancel search | Manufacturer: MASERATI, Model Year: 2019, Model line: GHIBLI, Model: MASERATI GHIBLI 2019Pages: 384, PDF Size: 13.33 MB
Page 128 of 384
arms. It will not operate under the
following conditions:
• Low Temperature Wipe Inhibit : the
rain sensing feature will not operate
when the ignition is in RUN position,
the vehicle is stationary and the
outside temperature is below 32°F
(0°C). To resume, set the automatic
feature on the multifunction lever,
start the engine and drive or wait
until the outside temperature rises
above freezing.
• Wipe Inhibit with Transmission in
Neutral Position : the rain sensing
feature will not operate when the
ignition is placed in the RUN
position, the transmission shift lever
is in the N (Neutral) position and the
vehicle speed is less than 5 mph
(8 km/h). To resume, set the
multifunction lever to the automatic
function or move the shift lever out
of N (Neutral).
Headlights On with Windshield
Wipers When activating this function, the
headlights will light up approximately
10 seconds after the wipers acting on
the windshield are turned on if the
light switch is placed in “AUTO”
position. In addition, the headlights switch off when the wipers are turned
off (position “OFF”) if they were
previously turned by using this
function. Powering on Headlights with
wipers can be activated and
deactivated with the MTC+ System, see
“MTC+ Settings” in section
“Dashboard Instruments and Controls”
for further information.
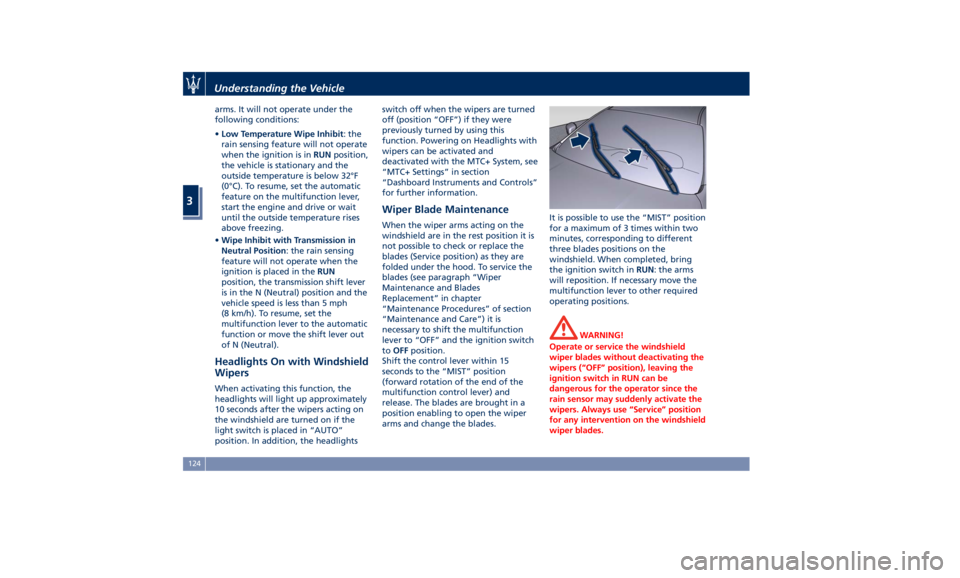
Wiper Blade Maintenance When the wiper arms acting on the
windshield are in the rest position it is
not possible to check or replace the
blades (Service position) as they are
folded under the hood. To service the
blades (see paragraph “Wiper
Maintenance and Blades
Replacement” in chapter
“Maintenance Procedures” of section
“Maintenance and Care”) it is
necessary to shift the multifunction
lever to “OFF” and the ignition switch
to OFF position.
Shift the control lever within 15
seconds to the “MIST” position
(forward rotation of the end of the
multifunction control lever) and
release. The blades are brought in a
position enabling to open the wiper
arms and change the blades. It is possible to use the “MIST” position
for a maximum of 3 times within two
minutes, corresponding to different
three blades positions on the
windshield. When completed, bring
the ignition switch in RUN : the arms
will reposition. If necessary move the
multifunction lever to other required
operating positions.
WARNING!
Operate or service the windshield
wiper blades without deactivating the
wipers (“OFF” position), leaving the
ignition switch in RUN can be
dangerous for the operator since the
rain sensor may suddenly activate the
wipers. Always use “Service” position
for any intervention on the windshield
wiper blades.Understanding the Vehicle
3
124
Page 155 of 384
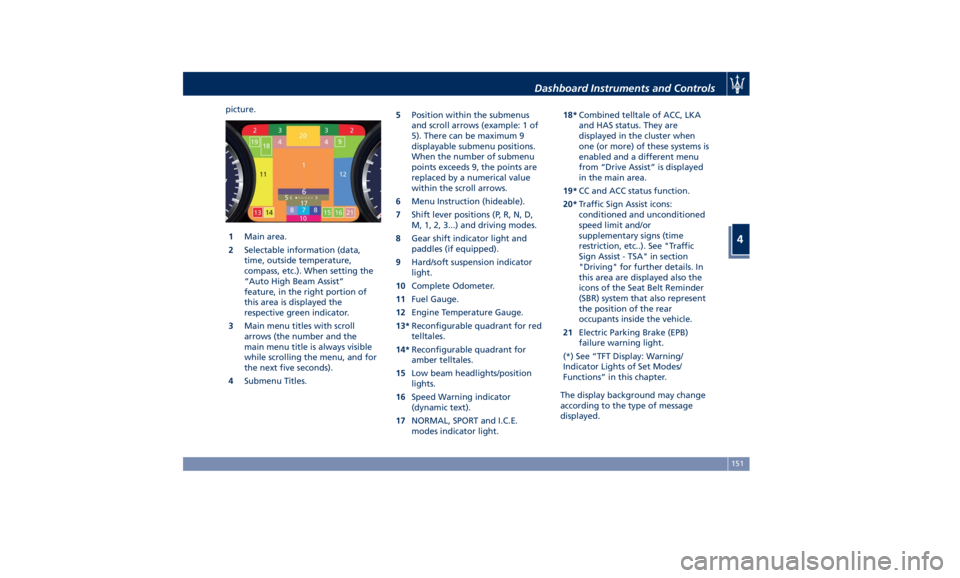
picture.
1 Main area.
2 Selectable information (data,
time, outside temperature,
compass, etc.). When setting the
“Auto High Beam Assist”
feature, in the right portion of
this area is displayed the
respective green indicator.
3 Main menu titles with scroll
arrows (the number and the
main menu title is always visible
while scrolling the menu, and for
the next five seconds).
4 Submenu Titles. 5 Position within the submenus
and scroll arrows (example: 1 of
5). There can be maximum 9
displayable submenu positions.
When the number of submenu
points exceeds 9, the points are
replaced by a numerical value
within the scroll arrows.
6 Menu Instruction (hideable).
7 Shift lever positions (P, R, N, D,
M, 1, 2, 3...) and driving modes.
8 Gear shift indicator light and
paddles (if equipped).
9 Hard/soft suspension indicator
light.
10 Complete Odometer.
11 Fuel Gauge.
12 Engine Temperature Gauge.
13* Reconfigurable quadrant for red
telltales.
14* Reconfigurable quadrant for
amber telltales.
15 Low beam headlights/position
lights.
16 Speed Warning indicator
(dynamic text).
17 NORMAL, SPORT and I.C.E.
modes indicator light. 18* Combined telltale of ACC, LKA
and HAS status. They are
displayed in the cluster when
one (or more) of these systems is
enabled and a different menu
from “Drive Assist” is displayed
in the main area.
19* CC and ACC status function.
20* Traffic Sign Assist icons:
conditioned and unconditioned
speed limit and/or
supplementary signs (time
restriction, etc..). See "Traffic
Sign Assist - TSA" in section
"Driving" for further details. In
this area are displayed also the
icons of the Seat Belt Reminder
(SBR) system that also represent
the position of the rear
occupants inside the vehicle.
21 Electric Parking Brake (EPB)
failure warning light.
(*) See “TFT Display: Warning/
Indicator Lights of Set Modes/
Functions” in this chapter.
The display background may change
according to the type of message
displayed.Dashboard Instruments and Controls
4
151
Page 170 of 384
Electronic Throttle Control (ETC)
Indicator
This indicator light indicates a
failure of the Electronic
Throttle Control (ETC) system.
If the indicator turns on while
driving (a torque decrease is possible),
have the system checked by an
Authorized Maserati Dealer .
When detecting a failure, the light
indicator will illuminate while the
engine is running.
If the indicator remains lit with the
engine running, you can still drive your
vehicle. However, contact an
Authorized Maserati Dealer as soon as
possible.
If the indicator is flashing while the
engine is running, immediate service is
required. You may experience reduced
performance, an elevated/rough idle
or engine stall and your vehicle may
require towing.
Trunk Lid and Hood Ajar Indicators
These light indicators will
illuminate to indicate that the
trunk lid and/or the hood are
ajar.
When the trunk lid or the
hood is open, a related
message will be displayed
besides the light if the vehicle is running at a speed of 5 mph (8 km/h)
or faster.
Low Fuel Indicator
When the fuel level reaches
approximately 4.2 Gallons (16
litres) this light under the fuel
gauge indicator will turn on,
and remain on until fuel is added
together with the related message. In
this condition the color indicating the
quantity of fuel in the tank, inside the
indicator on display, will go from
white to amber.
Refer to “Refueling” in section
“Driving” for fuel filling.
Windshield Washer Low Fluid
Indicator
This indicator will illuminate
for 5 seconds to indicate a low
level of the windshield washer
fluid. A related message will
be displayed.
See “Maintenance Procedures” in
section “Maintenance and Care” for
fluid filling.
Headlight Aiming System Failure
Warning Light
This warning light and the
related message indicate a
failure of the automatic
headlight aiming system. Please contact an Authorized Maserati
Dealer to check the system.
Automatic High Beam Failure Warning
Light
This warning light and the
related message illuminate to
report a failure of the
automatic high beam
headlights.
Contact an Authorized Maserati
Dealer as soon as possible.
Suspensions Failure Warning Light
This warning light and the
related message turn on while
driving if there is a failure of
the suspension system (only
with optional Skyhook active
suspension).
Please contact an Authorized Maserati
Dealer to check the system.
Ice Hazard Indicator
When the external
temperature falls below 38°F
(3°C), the temperature value
blinks for a few seconds, the
indicator light turns on, a message is
displayed and an acoustic signal is
triggered to warn the driver of the risk
of icy roadbed.
Under such conditions, we recommend
using the I.C.E. drive mode (seeDashboard Instruments and Controls
4
166
Page 173 of 384
Adaptive Cruise Control (ACC) Fault (if
equipped)
This warning light turns on
when ACC is not operating or
needs servicing, For further
details, refer to “Adaptive
Cruise Control - ACC” in section
“Driving”.
Blind Spot Assist (BSA) Failure
Warning Light
This warning light and related
message light on to report a
failure of the BSA system.
As consequence, on vehicles
equipped with ABSA also this latter
will be not working or
malfunctioning.
Contact an Authorized Maserati
Dealer as soon as possible avoiding to
use this system.
Headlight On Indicator
This indicator will illuminate
when the position lights or
headlights are turned on.
For further details, see
“Lights” in section “Understanding
the Vehicle”.
Automatic High Beam On Indicator
This indicator turns on when
the “Auto High Beam Assist”
feature is set on MTC+ (see “MTC+ Settings” in this section).
Gear Shift Indicator Light
This indicator lights up to
indicate gear shift change in
order to optimize fuel
consumption.
See “Drive Mode” in section
“Driving” for further
information.
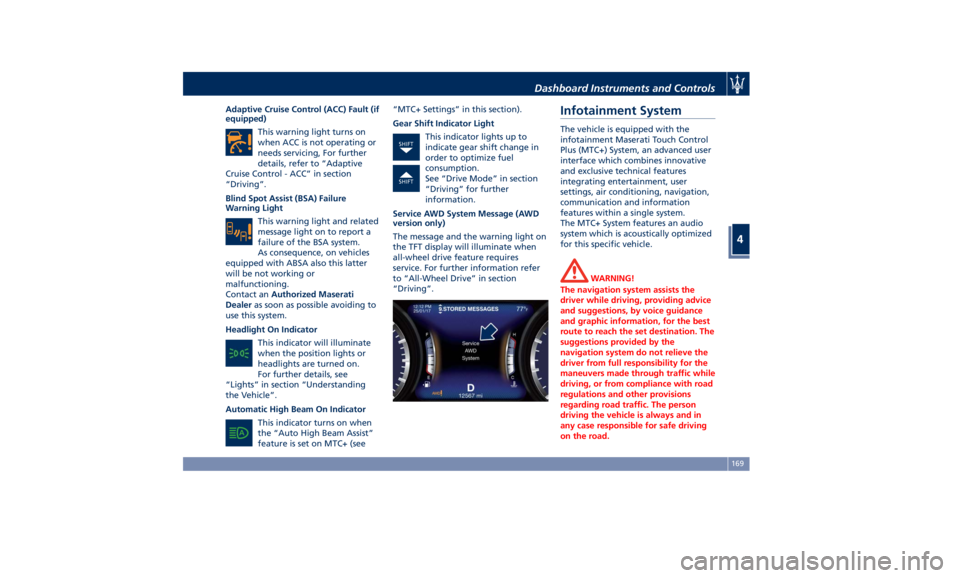
Service AWD System Message (AWD
version only)
The message and the warning light on
the TFT display will illuminate when
all-wheel drive feature requires
service. For further information refer
to “All-Wheel Drive” in section
“Driving”.Infotainment System The vehicle is equipped with the
infotainment Maserati Touch Control
Plus (MTC+) System, an advanced user
interface which combines innovative
and exclusive technical features
integrating entertainment, user
settings, air conditioning, navigation,
communication and information
features within a single system.
The MTC+ System features an audio
system which is acoustically optimized
for this specific vehicle.
WARNING!
The navigation system assists the
driver while driving, providing advice
and suggestions, by voice guidance
and graphic information, for the best
route to reach the set destination. The
suggestions provided by the
navigation system do not relieve the
driver from full responsibility for the
maneuvers made through traffic while
driving, or from compliance with road
regulations and other provisions
regarding road traffic. The person
driving the vehicle is always and in
any case responsible for safe driving
on the road.Dashboard Instruments and Controls
4
169
Page 188 of 384
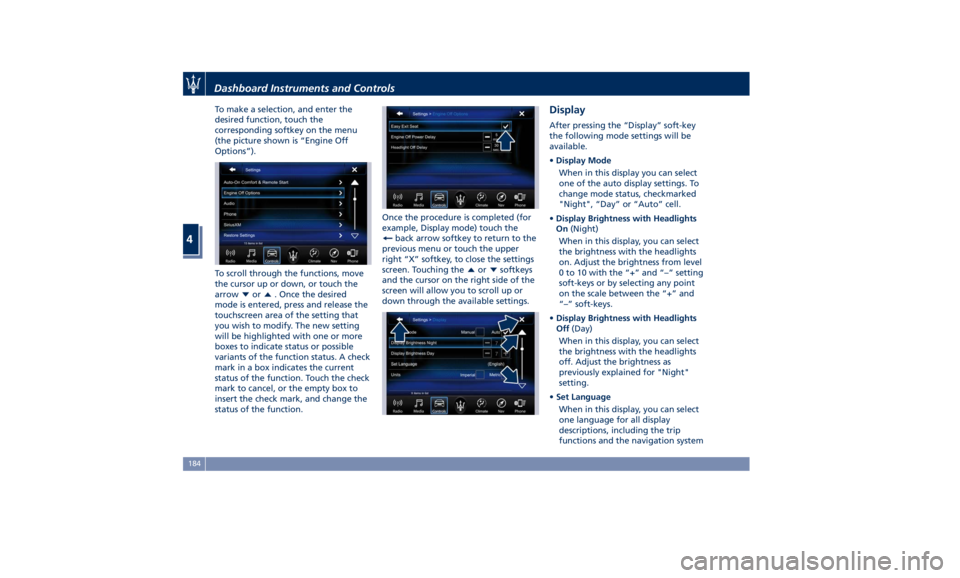
To make a selection, and enter the
desired function, touch the
corresponding softkey on the menu
(the picture shown is “Engine Off
Options”).
To scroll through the functions, move
the cursor up or down, or touch the
arrow
or . Once the desired
mode is entered, press and release the
touchscreen area of the setting that
you wish to modify. The new setting
will be highlighted with one or more
boxes to indicate status or possible
variants of the function status. A check
mark in a box indicates the current
status of the function. Touch the check
mark to cancel, or the empty box to
insert the check mark, and change the
status of the function. Once the procedure is completed (for
example, Display mode) touch the
back arrow softkey to return to the
previous menu or touch the upper
right “X” softkey, to close the settings
screen. Touching the
or softkeys
and the cursor on the right side of the
screen will allow you to scroll up or
down through the available settings. Display After pressing the “Display” soft-key
the following mode settings will be
available.
• Display Mode
When in this display you can select
one of the auto display settings. To
change mode status, checkmarked
"Night", “Day” or “Auto” cell.
• Display Brightness with Headlights
On (Night)
When in this display, you can select
the brightness with the headlights
on. Adjust the brightness from level
0 to 10 with the “+” and “–” setting
soft-keys or by selecting any point
on the scale between the “+” and
“–” soft-keys.
• Display Brightness with Headlights
Off (Day)
When in this display, you can select
the brightness with the headlights
off. Adjust the brightness as
previously explained for "Night"
setting.
• Set Language
When in this display, you can select
one language for all display
descriptions, including the trip
functions and the navigation systemDashboard Instruments and Controls
4
184
Page 192 of 384
• Rain Sensing Auto Wipers
By selecting this feature, the system
will automatically activate the
windshield wipers if it senses
moisture on the windshield. The
feature can be set to “On” or “Off”.
• Hill Start Assist
This feature allows you to disable
the HSA system. The feature can be
set to “On” or “Off”. See “Brake
and Stability Control System” in
section “Driving” for further details.
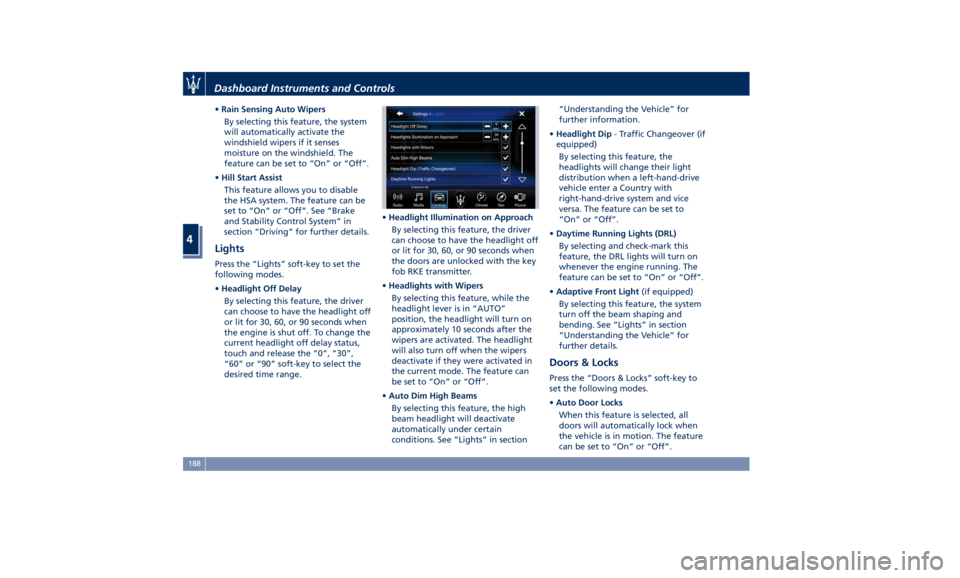
Lights Press the “Lights” soft-key to set the
following modes.
• Headlight Off Delay
By selecting this feature, the driver
can choose to have the headlight off
or lit for 30, 60, or 90 seconds when
the engine is shut off. To change the
current headlight off delay status,
touch and release the “0”, “30”,
“60” or “90” soft-key to select the
desired time range. • Headlight Illumination on Approach
By selecting this feature, the driver
can choose to have the headlight off
or lit for 30, 60, or 90 seconds when
the doors are unlocked with the key
fob RKE transmitter.
• Headlights with Wipers
By selecting this feature, while the
headlight lever is in “AUTO”
position, the headlight will turn on
approximately 10 seconds after the
wipers are activated. The headlight
will also turn off when the wipers
deactivate if they were activated in
the current mode. The feature can
be set to “On” or “Off”.
• Auto Dim High Beams
By selecting this feature, the high
beam headlight will deactivate
automatically under certain
conditions. See “Lights” in section “Understanding the Vehicle” for
further information.
• Headlight Dip - Traffic Changeover (if
equipped)
By selecting this feature, the
headlights will change their light
distribution when a left-hand-drive
vehicle enter a Country with
right-hand-drive system and vice
versa. The feature can be set to
“On” or “Off”.
• Daytime Running Lights (DRL)
By selecting and check-mark this
feature, the DRL lights will turn on
whenever the engine running. The
feature can be set to “On” or “Off”.
• Adaptive Front Light (if equipped)
By selecting this feature, the system
turn off the beam shaping and
bending. See “Lights” in section
“Understanding the Vehicle” for
further details.
Doors & Locks Press the “Doors & Locks” soft-key to
set the following modes.
• Auto Door Locks
When this feature is selected, all
doors will automatically lock when
the vehicle is in motion. The feature
can be set to “On” or “Off”.Dashboard Instruments and Controls
4
188
Page 193 of 384
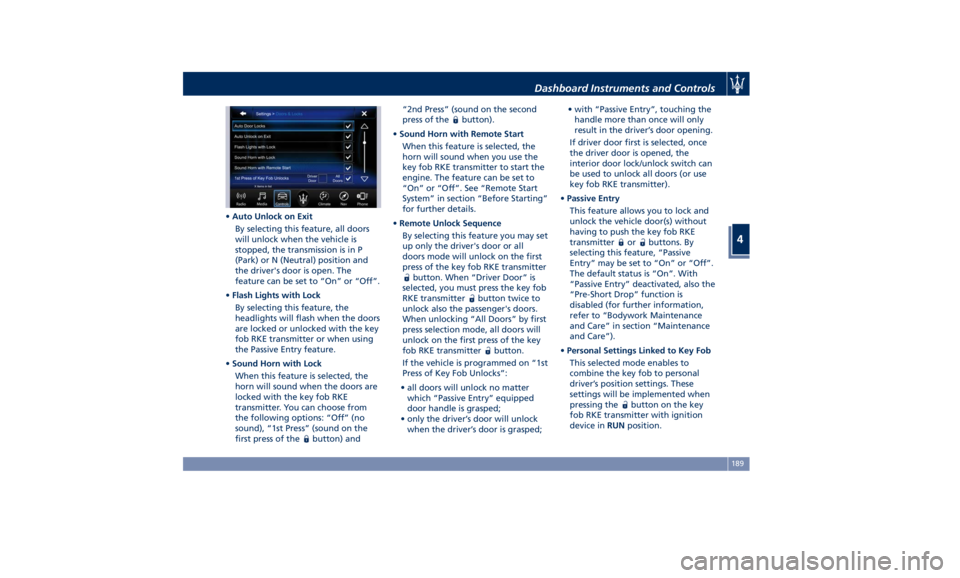
• Auto Unlock on Exit
By selecting this feature, all doors
will unlock when the vehicle is
stopped, the transmission is in P
(Park) or N (Neutral) position and
the driver's door is open. The
feature can be set to “On” or “Off”.
• Flash Lights with Lock
By selecting this feature, the
headlights will flash when the doors
are locked or unlocked with the key
fob RKE transmitter or when using
the Passive Entry feature.
• Sound Horn with Lock
When this feature is selected, the
horn will sound when the doors are
locked with the key fob RKE
transmitter. You can choose from
the following options: “Off” (no
sound), “1st Press” (sound on the
first press of the
button) and “2nd Press” (sound on the second
press of the
button).
• Sound Horn with Remote Start
When this feature is selected, the
horn will sound when you use the
key fob RKE transmitter to start the
engine. The feature can be set to
“On” or “Off”. See “Remote Start
System” in section “Before Starting”
for further details.
• Remote Unlock Sequence
By selecting this feature you may set
up only the driver's door or all
doors mode will unlock on the first
press of the key fob RKE transmitter
button. When “Driver Door” is
selected, you must press the key fob
RKE transmitter
button twice to
unlock also the passenger's doors.
When unlocking “All Doors” by first
press selection mode, all doors will
unlock on the first press of the key
fob RKE transmitter
button.
If the vehicle is programmed on “1st
Press of Key Fob Unlocks”:
• all doors will unlock no matter
which “Passive Entry” equipped
door handle is grasped;
• only the driver’s door will unlock
when the driver’s door is grasped; • with “Passive Entry”, touching the
handle more than once will only
result in the driver’s door opening.
If driver door first is selected, once
the driver door is opened, the
interior door lock/unlock switch can
be used to unlock all doors (or use
key fob RKE transmitter).
• Passive Entry
This feature allows you to lock and
unlock the vehicle door(s) without
having to push the key fob RKE
transmitter
or buttons. By
selecting this feature, “Passive
Entry” may be set to “On” or “Off”.
The default status is “On”. With
“Passive Entry” deactivated, also the
“Pre-Short Drop” function is
disabled (for further information,
refer to “Bodywork Maintenance
and Care” in section “Maintenance
and Care”).
• Personal Settings Linked to Key Fob
This selected mode enables to
combine the key fob to personal
driver’s position settings. These
settings will be implemented when
pressing the
button on the key
fob RKE transmitter with ignition
device in RUN position.Dashboard Instruments and Controls
4
189
Page 212 of 384
Normal Starting of the
Engine WARNING!
It is dangerous to run the engine in an
enclosed area. The engine consumes
oxygen and discharges carbon
dioxide, carbon monoxide and other
toxic gases in the atmosphere.
WARNING!
California Proposition 65
Operating, servicing and maintaining
a passenger vehicle or off-road vehicle
can expose you to chemicals including
such as, engine exhaust, carbon
monoxide, phthalates and lead, that
which are known to the State of
California to cause cancer and birth
defects or other reproductive harm. To
minimize exposure, avoid breathing
exhaust, do not idle the engine except
as necessary, service your vehicle in a
well-ventilated area and wear gloves
or wash your hands frequently when
servicing your vehicle. For more
information go to: www.P65Warnings.ca.gov/passenger-
vehicle
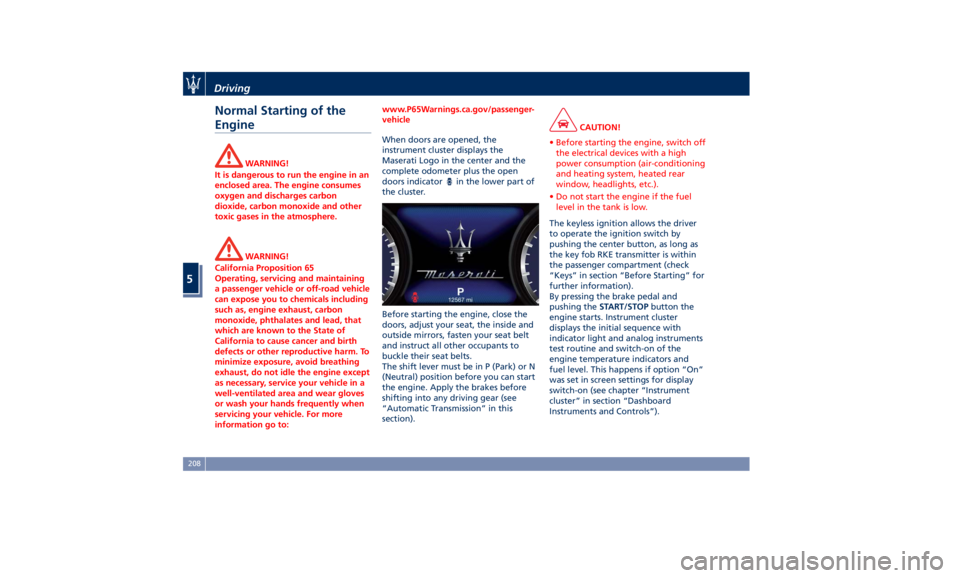
When doors are opened, the
instrument
cluster displays
the
Maserati Logo in the center and the
complete odometer plus the open
doors indicator
in the lower part of
the cluster.
Before starting the engine, close the
doors, adjust your seat, the inside and
outside mirrors, fasten your seat belt
and instruct all other occupants to
buckle their seat belts.
The shift lever must be in P (Park) or N
(Neutral) position before you can start
the engine. Apply the brakes before
shifting into any driving gear (see
“Automatic Transmission” in this
section). CAUTION!
• Before starting the engine, switch off
the electrical devices with a high
power consumption (air-conditioning
and heating system, heated rear
window, headlights, etc.).
• Do not start the engine if the fuel
level in the tank is low.
The keyless ignition allows the driver
to
operate the
ignition switch by
pushing the center button, as long as
the key fob RKE transmitter is within
the passenger compartment (check
“Keys” in section “Before Starting” for
further information).
By pressing the brake pedal and
pushing the START/STOP button the
engine starts. Instrument cluster
displays the initial sequence with
indicator light and analog instruments
test routine and switch-on of the
engine temperature indicators and
fuel level. This happens if option “On”
was set in screen settings for display
switch-on (see chapter “Instrument
cluster” in section “Dashboard
Instruments and Controls”).Driving
5
208
Page 279 of 384
instructions could result in serious
injury or death.
• The following list does not fully
represent all situations in which HAS
may not function as intended. Do
NOT solely rely on the HAS system
to control the vehicle. It is the
driver’s responsibility to stay alert
and safely control the vehicle at all
times.
• If the windshield is replaced, you
must have the forward-facing
camera remounted and aligned by
an Authorized Maserati Dealer.
Many factors can impact the
performance
of HAS
causing the
system to be unable to function as
intended. These include (but are not
limited to):
• Narrow, winding or curvy roads.
• Poor visibility (due to heavy rain,
snow, fog, etc.).
• Bright light (oncoming headlights or
direct sunlight) or shadows.
• Damage or obstruction caused by
mud, ice, snow, etc.
• A damaged or misaligned bumper.
• Interference from other equipment
that generates electromagnetic
waves. • Wet roads, roads covered or partially
covered by snow.
• Construction zones.
HAS Operation With ACC set (see “Adaptive Cruise
Crontrol – ACC” in this section), HAS
system activates by simply pressing the
button on the steering wheel.
Once the conditions are met, HAS will
engage.
CAUTION!
The Highway Assist (HAS) system may
take up to 5 seconds to engage once
all conditions are met.
The conditions for HAS to engage are
as
follows:
• HAS must be turned on or enabled.
NOTE:
In case of wet road or raining
conditions the function could be
disabled by the system in order to
minimize the risks.
• The vehicle must be on the highway
or limited access freeway.
• Adaptive Cruise Control (ACC) must
be engaged.
• Left and right visible lane lines. • Vehicle speed must be between 0 to
90 mph (0 and 145 km/h).
• No faults in the forward facing
camera, radar, EPS, or MTC+.
• Lane width between 3 to 4.6 yd (2.8
and 4.2 m).
• Turn signal not activated.
• No faults related to this system.
Speed Range of Use Speed mph (km/h)
Minimum 0 (0)
Engaged/activated
(with ACC engaged) 0 (0)
Engaged/activated
(with ACC not
engaged) 18 (30)
Maximum 90 (145)
• If set above the maximum speed,
HAS will not function after the
vehicle speed will reach the
maximum speed.
• If set below the maximum speed and
the ACC target speed is increased,
HAS will function up to the
maximum speed and then the system
will turn off automatically.
• When the ACC target speed is
reduce and speed is lower than theDriving
5
275
Page 303 of 384
• Reduce your speed, especially on
roads with no streetlights.
• Stop at early signs of drowsiness.
Continuing to drive would be a risk
for yourself and for others. Have a
rest before continuing your trip.
• Keep the vehicle at a greater
distance from vehicles in front of
you than you would during the day:
it is difficult to assess the speed of
other vehicles when you only see the
lights.
• Use the high beams only outside of
densely-populated areas and when
you are sure that they will not
disturb other drivers.
• When another vehicle is
approaching, switch from high
beams (if on) to low beams.
• Keep lights and headlights clean.
• Outside of densely-populated areas,
beware of animals crossing the road.
Driving in the Rain
Rain and wet roads are dangerous. On
a wet road all maneuvers are more
difficult since wheel grip on the road
is significantly reduced. This means
that braking distances increase
considerably and road grip decreases.
Some advices for driving in the rain
are listed below. • Reduce your speed and keep a
greater safety distance from the
vehicles in front of you. High speed
may result in a loss of vehicle
control.
• When driving on wet or slushy roads,
it is possible for a wedge of water to
build up between the tire and road
surface. This is known as
aquaplaning and may cause partial
or complete loss of vehicle control
and stopping ability. To reduce this
possibility: slow down if the road has
standing water or puddles.
• Heavy rain substantially reduces
visibility. In these circumstances, even
during the day, turn on the low
beams, to be more visible to other
drivers.
• Set the air conditioning and heating
system controls on the defogging
function, in order to avoid any
visibility problem.
• Periodically check the conditions of
the windshield wiper blades.
• In low grip conditions use “I.C.E.”
driving mode (see chapters “Drive
Mode” in this section).
• Avoid driving with ESC OFF as this
will likely cause a loss of control of
the vehicle. Driving in Fog
If the fog is dense, avoid traveling if
possible.
When driving in mist, blanket fog or
when there is the possibility of banks
of fog, please consider some advices
listed below.
• Keep a moderate speed.
• Even in daytime, turn on the low
beams and rear fog lights. Do not
use the high beams.
• Remember that fog creates
dampness on the asphalt and thus
any type of maneuver is more
difficult and braking distances are
extended.
• Keep a safe distance from the
vehicle in front of you.
• Avoid sudden changes in speed as
much as possible.
• Whenever possible, avoid
overtaking.
• If you are forced to stop the vehicle
(breakdowns, impossibility of
proceeding due to poor visibility,
etc.), first of all, try to stop off of the
travel lane. Then turn on the hazard
warning flashers and, if possible, the
low beams.Driving
5
299