warning lights MASERATI GHIBLI 2019 Owner's Guide
[x] Cancel search | Manufacturer: MASERATI, Model Year: 2019, Model line: GHIBLI, Model: MASERATI GHIBLI 2019Pages: 384, PDF Size: 13.33 MB
Page 257 of 384
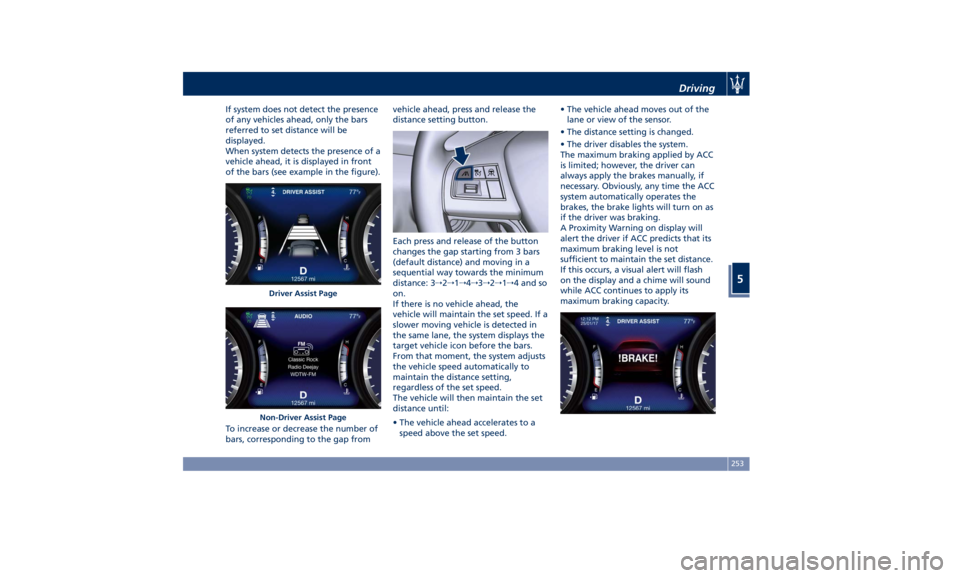
If system does not detect the presence
of any vehicles ahead, only the bars
referred to set distance will be
displayed.
When system detects the presence of a
vehicle ahead, it is displayed in front
of the bars (see example in the figure).
To increase or decrease the number of
bars, corresponding to the gap from vehicle ahead, press and release the
distance setting button.
Each press and release of the button
changes the gap starting from 3 bars
(default distance) and moving in a
sequential way towards the minimum
distance: 3 → 2 → 1 → 4 → 3 → 2 → 1 → 4 and so
on.
If there is no vehicle ahead, the
vehicle will maintain the set speed. If a
slower moving vehicle is detected in
the same lane, the system displays the
target vehicle icon before the bars.
From that moment, the system adjusts
the vehicle speed automatically to
maintain the distance setting,
regardless of the set speed.
The vehicle will then maintain the set
distance until:
• The vehicle ahead accelerates to a
speed above the set speed. • The vehicle ahead moves out of the
lane or view of the sensor.
• The distance setting is changed.
• The driver disables the system.
The maximum braking applied by ACC
is limited; however, the driver can
always apply the brakes manually, if
necessary. Obviously, any time the ACC
system automatically operates the
brakes, the brake lights will turn on as
if the driver was braking.
A Proximity Warning on display will
alert the driver if ACC predicts that its
maximum braking level is not
sufficient to maintain the set distance.
If this occurs, a visual alert will flash
on the display and a chime will sound
while ACC continues to apply its
maximum braking capacity.Driver Assist Page
Non-Driver Assist Page Driving
5
253
Page 270 of 384

Blind Spot Assist (without
ACC) BSA System Operation The Blind Spot Assist (BSA) system uses
two radar-based sensors, located inside
the rear bumper fascia, to detect
highway licensable vehicles (cars,
buses, motorbikes, etc.) that enter the
blind spot zones from the
rear/front/side of the vehicle.
The example shown in the figure
highlights the blind spots on either
side of the vehicle when oncoming
traffic is approaching from behind.
When the vehicle is started, the BSA
warning light will momentarily
illuminate in both outside rear view
mirrors to let the driver know that the
system is operational and on. The BSA
system sensors operate when the vehicle is in any forward gear and
enters standby mode when the
transmission is in (P) Park.
The BSA detection zone shown in
figure covers approximately one lane
on both sides of the vehicle
(approximately 11 ft or 3.3 m). The
blind spot area extends from
immediately behind the exterior
rear-view mirrors up to about 23 ft (7
m) behind the rear bumper. The BSA system monitors the detection
zones on both sides of the vehicle
when the vehicle speed reaches
approximately 6 mph (10 km/h) or
higher and will alert the driver of
vehicles in these areas.
WARNING!
• The BSA system does NOT alert the
driver about rapidly approaching
vehicles that are outside the
detection zones.
• The BSA might alert the driver too
late especially in case of rapidly
approaching vehicles.
WARNING!
Risk of accident despite Blind Spot
Assist (BSA).
BSA does not detect/react to the
following:
• Overtaking vehicles close on the
side, placing them in the blind spot
area. As a result, BSA may neither
give warnings nor intervene in such
situations.Driving
5
266
Page 302 of 384
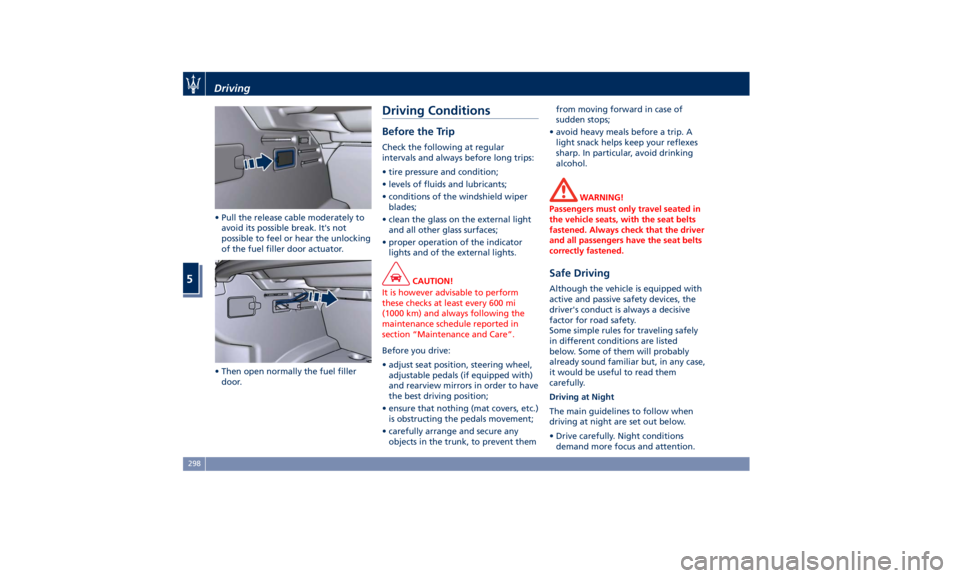
• Pull the release cable moderately to
avoid its possible break. It's not
possible to feel or hear the unlocking
of the fuel filler door actuator.
• Then open normally the fuel filler
door. Driving Conditions Before the Trip Check the following at regular
intervals and always before long trips:
• tire pressure and condition;
• levels of fluids and lubricants;
• conditions of the windshield wiper
blades;
• clean the glass on the external light
and all other glass surfaces;
• proper operation of the indicator
lights and of the external lights.
CAUTION!
It is however advisable to perform
these checks at least every 600 mi
(1000 km) and always following the
maintenance schedule reported in
section “Maintenance and Care”.
Before you drive:
•
adjust seat position, steering wheel,
adjustable pedals (if equipped with)
and rearview mirrors in order to have
the best driving position;
• ensure that nothing (mat covers, etc.)
is obstructing the pedals movement;
• carefully arrange and secure any
objects in the trunk, to prevent them from moving forward in case of
sudden stops;
• avoid heavy meals before a trip. A
light snack helps keep your reflexes
sharp. In particular, avoid drinking
alcohol.
WARNING!
Passengers must only travel seated in
the vehicle seats, with the seat belts
fastened. Always check that the driver
and all passengers have the seat belts
correctly fastened.
Safe Driving Although the vehicle is equipped with
active and passive safety devices, the
driver's conduct is always a decisive
factor for road safety.
Some simple rules for traveling safely
in different conditions are listed
below. Some of them will probably
already sound familiar but, in any case,
it would be useful to read them
carefully.
Driving at Night
The main guidelines to follow when
driving at night are set out below.
• Drive carefully. Night conditions
demand more focus and attention.Driving
5
298
Page 303 of 384
• Reduce your speed, especially on
roads with no streetlights.
• Stop at early signs of drowsiness.
Continuing to drive would be a risk
for yourself and for others. Have a
rest before continuing your trip.
• Keep the vehicle at a greater
distance from vehicles in front of
you than you would during the day:
it is difficult to assess the speed of
other vehicles when you only see the
lights.
• Use the high beams only outside of
densely-populated areas and when
you are sure that they will not
disturb other drivers.
• When another vehicle is
approaching, switch from high
beams (if on) to low beams.
• Keep lights and headlights clean.
• Outside of densely-populated areas,
beware of animals crossing the road.
Driving in the Rain
Rain and wet roads are dangerous. On
a wet road all maneuvers are more
difficult since wheel grip on the road
is significantly reduced. This means
that braking distances increase
considerably and road grip decreases.
Some advices for driving in the rain
are listed below. • Reduce your speed and keep a
greater safety distance from the
vehicles in front of you. High speed
may result in a loss of vehicle
control.
• When driving on wet or slushy roads,
it is possible for a wedge of water to
build up between the tire and road
surface. This is known as
aquaplaning and may cause partial
or complete loss of vehicle control
and stopping ability. To reduce this
possibility: slow down if the road has
standing water or puddles.
• Heavy rain substantially reduces
visibility. In these circumstances, even
during the day, turn on the low
beams, to be more visible to other
drivers.
• Set the air conditioning and heating
system controls on the defogging
function, in order to avoid any
visibility problem.
• Periodically check the conditions of
the windshield wiper blades.
• In low grip conditions use “I.C.E.”
driving mode (see chapters “Drive
Mode” in this section).
• Avoid driving with ESC OFF as this
will likely cause a loss of control of
the vehicle. Driving in Fog
If the fog is dense, avoid traveling if
possible.
When driving in mist, blanket fog or
when there is the possibility of banks
of fog, please consider some advices
listed below.
• Keep a moderate speed.
• Even in daytime, turn on the low
beams and rear fog lights. Do not
use the high beams.
• Remember that fog creates
dampness on the asphalt and thus
any type of maneuver is more
difficult and braking distances are
extended.
• Keep a safe distance from the
vehicle in front of you.
• Avoid sudden changes in speed as
much as possible.
• Whenever possible, avoid
overtaking.
• If you are forced to stop the vehicle
(breakdowns, impossibility of
proceeding due to poor visibility,
etc.), first of all, try to stop off of the
travel lane. Then turn on the hazard
warning flashers and, if possible, the
low beams.Driving
5
299
Page 304 of 384
CAUTION!
Be aware that rear fog lights can
bother the drivers following your
vehicle: when visibility is back to
normal, turn off these lights.
Driving in the Mountains
Mountain
roads usually
have many
narrow turns and curves, tunnels and
steep uphill or downhill slopes: please
consider some advices listed below.
• Drive at a moderate speed, avoid
“cutting” corners.
• When driving inside a tunnel in
daylight turn on the low beams in
advance; avoid high beams and be
aware of the rapid brightness
change. Avoid abrupt maneuvers
that could be dangerous for the
following vehicle.
• Never coast downhill with the engine
off or in neutral.
• Remember that passing other
vehicles when driving uphill is slower
and thus requires more free distance
on the road. If you are being
overtaken on a hill, slow down and
allow the other vehicle to pass. Driving on Snow or Ice
Please consider some general advice
for driving in these conditions, listed
below.
• Maintain a very moderate speed.
• Fit snow chains or specific tires if the
road is covered with snow: see the
paragraphs “Tires – General
Information” in this section.
• We recommend you to activate the
“I.C.E.” mode (see chapters “Drive
Mode” in this section).
• During the winter season, even
apparently dry roads can have icy
sections. Be careful when crossing
bridges, viaducts and roads that have
little exposure to the sun and are
bordered by trees and rocks. They
may be icy.
• Keep an ample safe distance from
the vehicles in front of you.
WARNING!
• Rapid acceleration on slippery
surfaces is dangerous. Unequal
traction can cause sudden pulling of
the driving wheels. You could lose
control of the vehicle and possibly
have a collision. Accelerate slowly
and carefully whenever there is likely to be poor traction (ice, snow,
wet mud, loose sand, etc.).
• Do not drive on or across a road or
path where water is flowing and/or
rising (as in storm run-off). Flowing
water can wear away the road or
path surface and cause your vehicle
to sink into deeper water.
Furthermore, flowing and/or rising
water can carry your vehicle away
swiftly. Failure to follow this
warning may result in injuries that
are serious or fatal to you, your
passengers, and others around you.
Although your vehicle is capable of
driving
through shallow standing
water, consider the following Cautions
and Warnings before doing so.
CAUTION!
• Always check the depth of the
standing water before driving
through it. Never drive through
standing water that is deeper than
47 in (150 mm).
• Determine the condition of the road
or the path that is under water and if
there are any obstacles in the way
before driving through the standing
water.Driving
5
300
Page 309 of 384
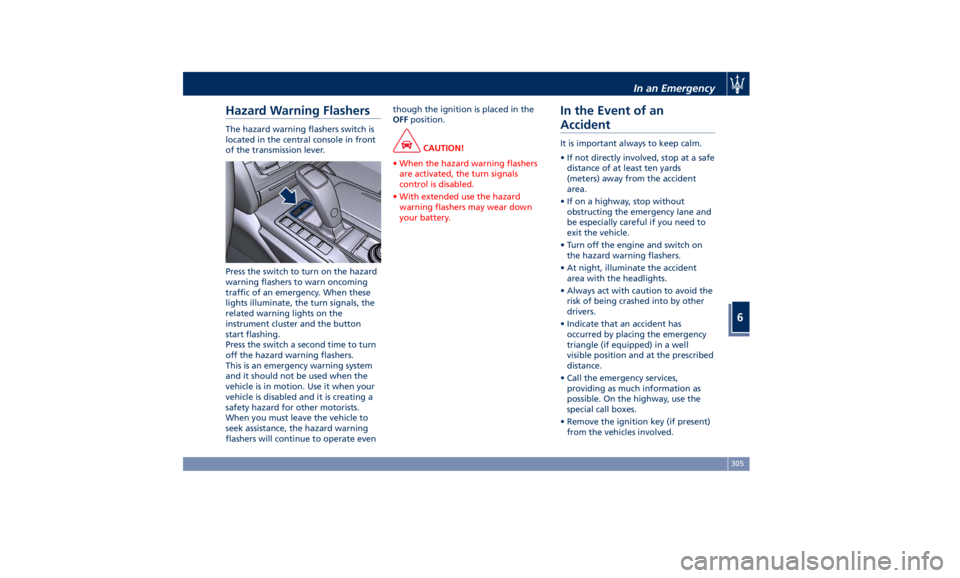
Hazard Warning Flashers The hazard warning flashers switch is
located in the central console in front
of the transmission lever.
Press the switch to turn on the hazard
warning flashers to warn oncoming
traffic of an emergency. When these
lights illuminate, the turn signals, the
related warning lights on the
instrument cluster and the button
start flashing.
Press the switch a second time to turn
off the hazard warning flashers.
This is an emergency warning system
and it should not be used when the
vehicle is in motion. Use it when your
vehicle is disabled and it is creating a
safety hazard for other motorists.
When you must leave the vehicle to
seek assistance, the hazard warning
flashers will continue to operate even though the ignition is placed in the
OFF position.
CAUTION!
• When the hazard warning flashers
are activated, the turn signals
control is disabled.
• With extended use the hazard
warning flashers may wear down
your battery.
In the Event of an
Accident It is important always to keep calm.
• If not directly involved, stop at a safe
distance of at least ten yards
(meters) away from the accident
area.
• If on a highway, stop without
obstructing the emergency lane and
be especially careful if you need to
exit the vehicle.
• Turn off the engine and switch on
the hazard warning flashers.
• At night, illuminate the accident
area with the headlights.
• Always act with caution to avoid the
risk of being crashed into by other
drivers.
• Indicate that an accident has
occurred by placing the emergency
triangle (if equipped) in a well
visible position and at the prescribed
distance.
• Call the emergency services,
providing as much information as
possible. On the highway, use the
special call boxes.
• Remove the ignition key (if present)
from the vehicles involved.In an Emergency
6
305
Page 323 of 384
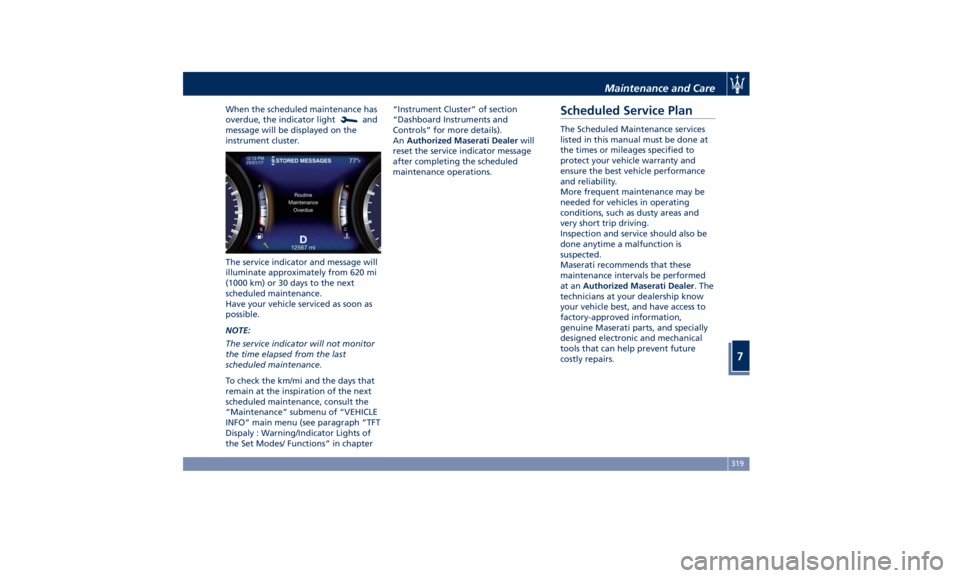
When the scheduled maintenance has
overdue, the indicator light
and
message will be displayed on the
instrument cluster.
The service indicator and message will
illuminate approximately from 620 mi
(1000 km) or 30 days to the next
scheduled maintenance.
Have your vehicle serviced as soon as
possible.
NOTE:
The service indicator will not monitor
the time elapsed from the last
scheduled maintenance.
To check the km/mi and the days that
remain at the inspiration of the next
scheduled maintenance, consult the
“Maintenance” submenu of “VEHICLE
INFO” main menu (see paragraph ”TFT
Dispaly : Warning/Indicator Lights of
the Set Modes/ Functions” in chapter “Instrument Cluster” of section
“Dashboard Instruments and
Controls” for more details).
An Authorized Maserati Dealer will
reset the service indicator message
after completing the scheduled
maintenance operations.
Scheduled Service Plan The Scheduled Maintenance services
listed in this manual must be done at
the times or mileages specified to
protect your vehicle warranty and
ensure the best vehicle performance
and reliability.
More frequent maintenance may be
needed for vehicles in operating
conditions, such as dusty areas and
very short trip driving.
Inspection and service should also be
done anytime a malfunction is
suspected.
Maserati recommends that these
maintenance intervals be performed
at an Authorized Maserati Dealer . The
technicians at your dealership know
your vehicle best, and have access to
factory-approved information,
genuine Maserati parts, and specially
designed electronic and mechanical
tools that can help prevent future
costly repairs.Maintenance and Care
7
319
Page 325 of 384
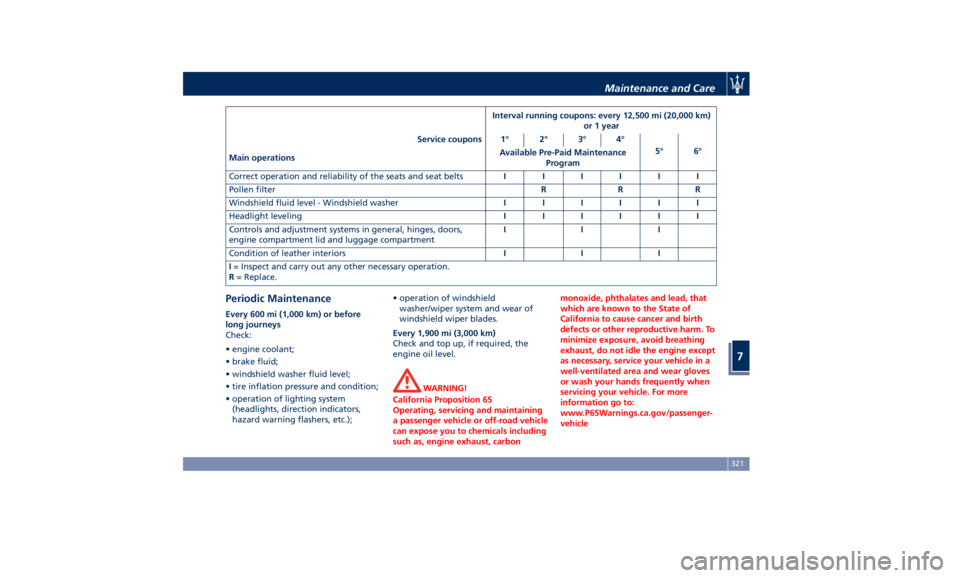
Interval running coupons: every 12,500 mi (20,000 km)
or 1 year
Service coupons 1° 2° 3° 4°
5° 6°
Main operations Available Pre-Paid Maintenance
Program
Correct operation and reliability of the seats and seat belts IIIIII
Pollen filter RRR
Windshield fluid level - Windshield washer IIIIII
Headlight leveling IIIIII
Controls and adjustment systems in general, hinges, doors,
engine compartment lid and luggage compartment III
Condition of leather interiors III
I = Inspect and carry out any other necessary operation.
R = Replace.
Periodic Maintenance Every 600 mi (1,000 km) or before
long journeys
Check:
• engine coolant;
• brake fluid;
• windshield washer fluid level;
• tire inflation pressure and condition;
• operation of lighting system
(headlights, direction indicators,
hazard warning flashers, etc.); • operation of windshield
washer/wiper system and wear of
windshield wiper blades.
Every 1,900 mi (3,000 km)
Check and top up, if required, the
engine oil level.
WARNING!
California Proposition 65
Operating, servicing and maintaining
a passenger vehicle or off-road vehicle
can expose you to chemicals including
such as, engine exhaust, carbon monoxide, phthalates and lead, that
which are known to the State of
California to cause cancer and birth
defects or other reproductive harm. To
minimize exposure, avoid breathing
exhaust, do not idle the engine except
as necessary, service your vehicle in a
well-ventilated area and wear gloves
or wash your hands frequently when
servicing your vehicle. For more
information go to:
www.P65Warnings.ca.gov/passenger-
vehicleMaintenance and Care
7
321
Page 338 of 384
To Reconnect the Battery NOTE:
When the battery cables have been
disconnected and the trunk lid has
been locked, it is necessary to pull the
emergency release lever in order to
re-open it. To access the trunk and
operate the emergency release fold
one of the rear seatbacks (see “Cargo
Area” chapter in section
“Understanding the Vehicle”).
CAUTION!
• It is essential when replacing the
cables on the battery that the
positive cable is attached to the
positive post (+) and the negative
cable is attached to the negative
post (–).
• Cable clamps should be tight on the
terminal posts and free of corrosion.
After the battery has been
disconnected
and re-connected and
before starting the engine it is
necessary to proceed as follows:
• Unlock and lock the doors using the
Key fob RKE Transmitter.
• Close manually the boot lid, unlock it
with the key fob RKE transmitter and
then lock it manually one more time. If the vehicle is equipped with Power
Boot Lid/Hand Free, manually
perform the complete closure. Then
move the lid automatically, using the
buttons on the lid itself, performing
a complete cycle of opening and
closing.
• Initialize the climate control system
by activating the system and pressing
the “AUTO” control as described in
chapter “Air Conditioning Controls”
in section “Dashboard Instruments
and Controls”.
• Turn on the MTC+ and set the date
and time (see “MTC+ Settings” in
section “Dashboard Instruments and
Controls”).
• Lift, release and lift again the lever
on the central console to initialize
the electric parking brake. Following
this operation the
warning light
on the instrument cluster will turn
off.
• For correct activation of the
approach lights on the external
mirrors, press at least once the tilt
button on the driver's door panel so
that the door mode recognizes the
mirrors position. CAUTION!
• Every time the battery is
reconnected, wait at least 30 seconds
with the ignition switch turned to
RUN before starting the engine, in
order to allow the electronic system
that manages the motor-driven
throttles to run a self-learning cycle.
At the same time, you can run the
date and time set up procedure for
the MTC+.
• Every time the battery is reconnected
the warning light
flash for about
10 seconds and then go off.
WARNING!
California Proposition 65
Operating, servicing and maintaining
a passenger vehicle or off-road vehicle
can expose you to chemicals including
such as, engine exhaust, carbon
monoxide, phthalates and lead, that
which are known to the State of
California to cause cancer and birth
defects or other reproductive harm. To
minimize exposure, avoid breathing
exhaust, do not idle the engine except
as necessary, service your vehicle in aMaintenance and Care
7
334
Page 339 of 384
well-ventilated area and wear gloves
or wash your hands frequently when
servicing your vehicle. For more
information go to:
www.P65Warnings.ca.gov/passenger-
vehicle
Useful Advice to Extend
Battery Life When parking the vehicle, make sure
that the doors, front, rear lids and
flaps are properly closed. All interior
lights should be off.
When the engine is turned off, do not
keep the connected devices switched
on for a long time (such as radio,
hazard warning flashers, fan, etc.).
CAUTION!
If the battery charge remains below
50% for a long period of time, it will
be damaged due to sulfation; its
performance and starting power will
be reduced and it will be more subject
to freezing.
We recommend you to have the
battery
charge condition
checked,
preferably at the beginning of the
cold season, to prevent the electrolyte
from freezing. This check should be carried out more
frequently if the vehicle is used mainly
for short trips or if it is equipped with
power-absorbing devices that remain
permanently on even when the
ignition switch is off. This applies
above all if these devices have been
retrofitted ("Aftermarket" services).
If the vehicle is not used for long
periods of time, please see “Vehicle
Stored for Long Periods” in this
section.
Battery Recharge WARNING!
The process of charging or recharging
the battery produces hydrogen, a
flammable gas that can explode and
cause serious injuries. When charging
or recharging the battery, follow the
recommended precautions at all
times.
• Before using a charger device
always check that this tool is
suitable for the installed battery,
with constant voltage (lower than
14.0 V) and low amperage
(maximum limit 15 A).
• Recharge the battery in a
well-ventilated environment. • Never charge or recharge a frozen
battery.
• Ensure that any sparks or open
flames are kept well away from the
battery while it is charging.
• Before using a charger to charge or
maintain the battery charge status,
carefully follow the instructions
provided to ensure the charger is
connected to the battery safely and
correctly.
It is possible to recharge the battery
without
disconnecting the cables of
the vehicle electrical system.
• To access the battery lift the ground
coverage of the trunk compartment
and remove the access cover as
previously shown (see paragraph “To
Disconnect the Battery" in this
chapter.
• Remove the protection cover and
connect the terminal clamp of the
charger positive cable (typically in
red) to the positive post (+) of the
battery.
• Connect the terminal clamp of the
charger negative cable (typically in
black) to the nut located by the
negative post (-) on the battery,
indicated in the picture.Maintenance and Care
7
335