trunk MASERATI GHIBLI 2019 Workshop Manual
[x] Cancel search | Manufacturer: MASERATI, Model Year: 2019, Model line: GHIBLI, Model: MASERATI GHIBLI 2019Pages: 384, PDF Size: 13.33 MB
Page 344 of 384
Ref. Type Function
36 Mini – 30A PCM module
primary load
37 Mini – 15A Engine secondary
load
38 Mini – 15A Lambda sensor
39 Mini – 7,5A Flow meters,
tank lackage,
canister, exhaust
by-pass valve and
relay coil
48 – –
49 Mini – 10A Pedal brake
switch - TCM
module
50 Mini – 15A +30 PCM module
51 Mini – 30A Fuel pump relay
input
52 Mini – 5A Starter solenoid
signal for PCM
and voltage
stabilizer
53 Mini – 10A AWD module
(AWD version
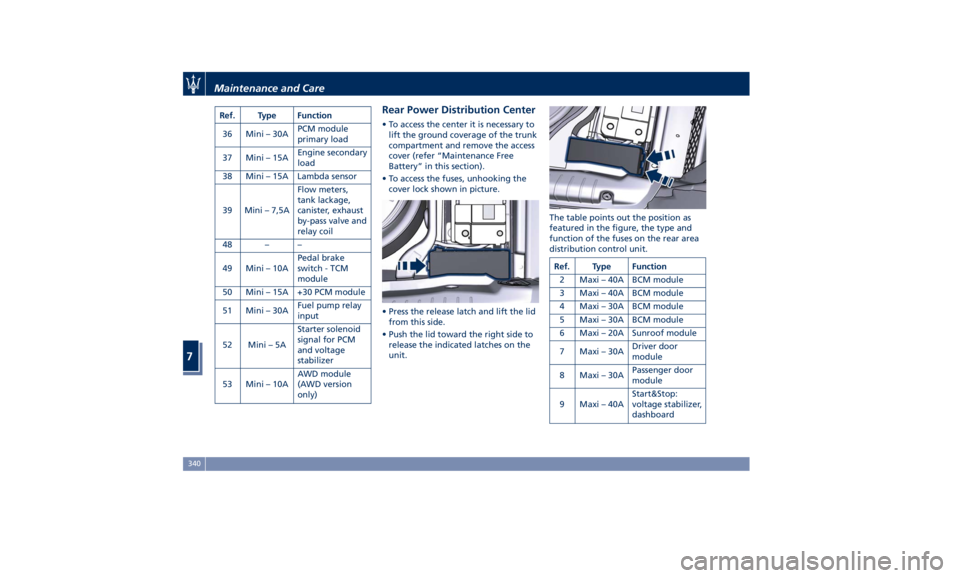
only) Rear Power Distribution Center • To access the center it is necessary to
lift the ground coverage of the trunk
compartment and remove the access
cover (refer “Maintenance Free
Battery” in this section).
• To access the fuses, unhooking the
cover lock shown in picture.
• Press the release latch and lift the lid
from this side.
• Push the lid toward the right side to
release the indicated latches on the
unit. The table points out the position as
featured in the figure, the type and
function of the fuses on the rear area
distribution control unit.
Ref. Type Function
2 Maxi – 40A BCM module
3 Maxi – 40A BCM module
4 Maxi – 30A BCM module
5 Maxi – 30A BCM module
6 Maxi – 20A Sunroof module
7 Maxi – 30A Driver door
module
8 Maxi – 30A Passenger door
module
9 Maxi – 40A Start&Stop:
voltage stabilizer,
dashboardMaintenance and Care
7
340
Page 346 of 384
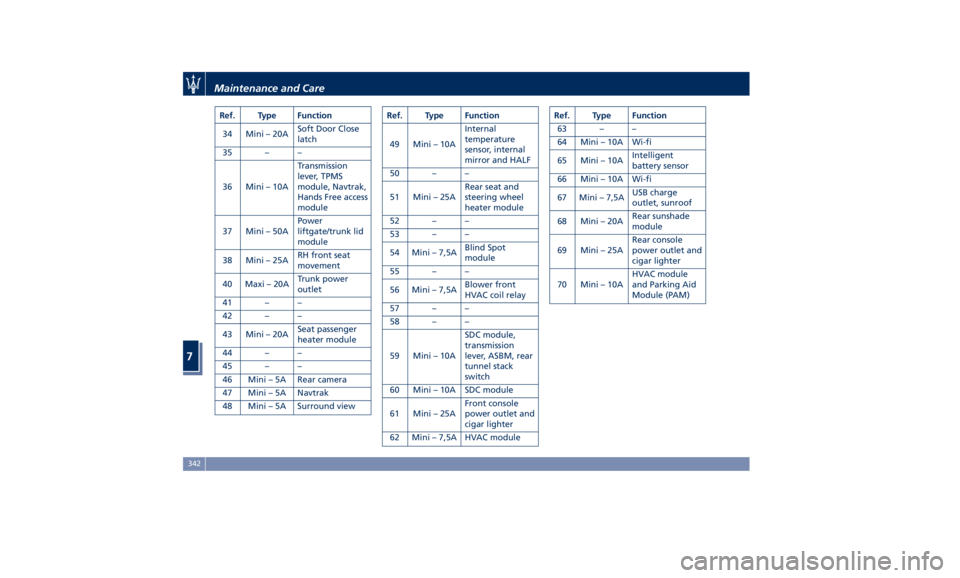
Ref. Type Function
34 Mini – 20A Soft Door Close
latch
35 – –
36 Mini – 10A Transmission
lever, TPMS
module, Navtrak,
Hands Free access
module
37 Mini – 50A Power
liftgate/trunk lid
module
38 Mini – 25A RH front seat
movement
40 Maxi – 20A Trunk power
outlet
41 – –
42 – –
43 Mini – 20A Seat passenger
heater module
44 – –
45 – –
46 Mini – 5A Rear camera
47 Mini – 5A Navtrak
48 Mini – 5A Surround view Ref. Type Function
49 Mini – 10A Internal
temperature
sensor, internal
mirror and HALF
50 – –
51 Mini – 25A Rear seat and
steering wheel
heater module
52 – –
53 – –
54 Mini – 7,5A Blind Spot
module
55 – –
56 Mini – 7,5A Blower front
HVAC coil relay
57 – –
58 – –
59 Mini – 10A SDC module,
transmission
lever, ASBM, rear
tunnel stack
switch
60 Mini – 10A SDC module
61 Mini – 25A Front console
power outlet and
cigar lighter
62 Mini – 7,5A HVAC module Ref. Type Function
63 – –
64 Mini – 10A Wi-fi
65 Mini – 10A Intelligent
battery sensor
66 Mini – 10A Wi-fi
67 Mini – 7,5A USB charge
outlet, sunroof
68 Mini – 20A Rear sunshade
module
69 Mini – 25A Rear console
power outlet and
cigar lighter
70 Mini – 10A HVAC module
and Parking Aid
Module (PAM)Maintenance and Care
7
342
Page 349 of 384
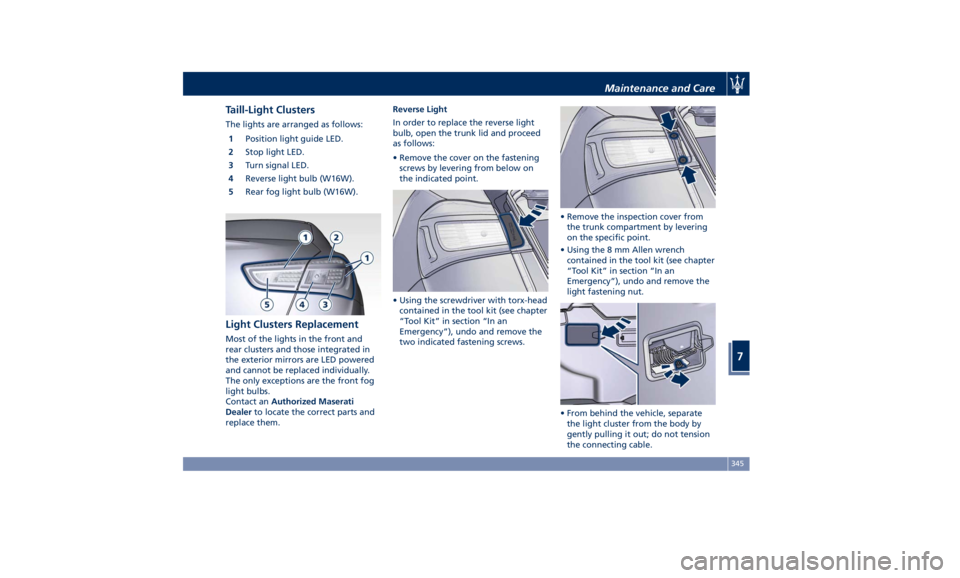
Taill-Light Clusters The lights are arranged as follows:
1 Position light guide LED.
2 Stop light LED.
3 Turn signal LED.
4 Reverse light bulb (W16W).
5 Rear fog light bulb (W16W).
Light Clusters Replacement Most of the lights in the front and
rear clusters and those integrated in
the exterior mirrors are LED powered
and cannot be replaced individually.
The only exceptions are the front fog
light bulbs.
Contact an Authorized Maserati
Dealer to locate the correct parts and
replace them. Reverse Light
In order to replace the reverse light
bulb, open the trunk lid and proceed
as follows:
• Remove the cover on the fastening
screws by levering from below on
the indicated point.
• Using the screwdriver with torx-head
contained in the tool kit (see chapter
“Tool Kit” in section “In an
Emergency”), undo and remove the
two indicated fastening screws. • Remove the inspection cover from
the trunk compartment by levering
on the specific point.
• Using the 8 mm Allen wrench
contained in the tool kit (see chapter
“Tool Kit” in section “In an
Emergency”), undo and remove the
light fastening nut.
• From behind the vehicle, separate
the light cluster from the body by
gently pulling it out; do not tension
the connecting cable.Maintenance and Care
7
345
Page 350 of 384
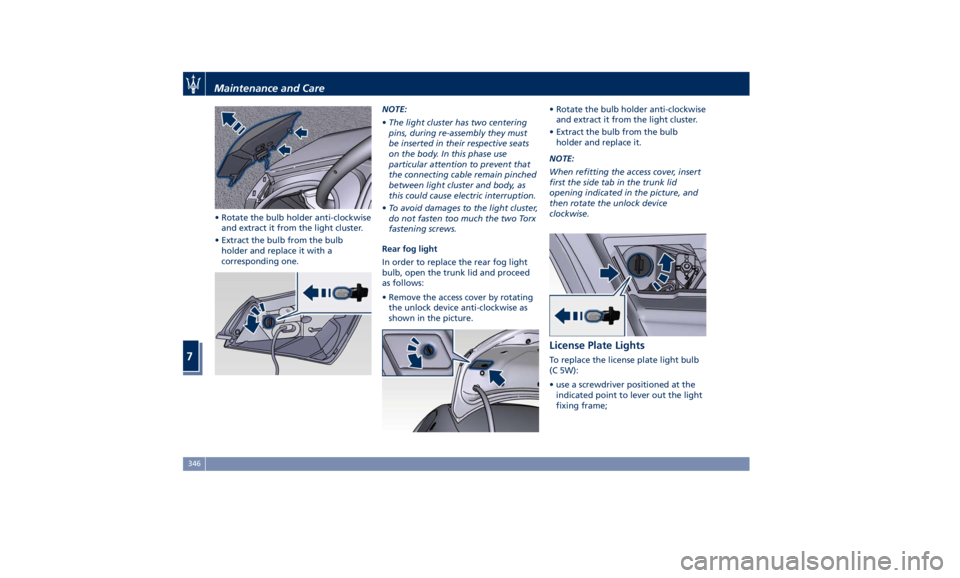
• Rotate the bulb holder anti-clockwise
and extract it from the light cluster.
• Extract the bulb from the bulb
holder and replace it with a
corresponding one. NOTE:
• The light cluster has two centering
pins, during re-assembly they must
be inserted in their respective seats
on the body. In this phase use
particular attention to prevent that
the connecting cable remain pinched
between light cluster and body, as
this could cause electric interruption.
• To avoid damages to the light cluster,
do not fasten too much the two Torx
fastening screws.
Rear fog light
In order to replace the rear fog light
bulb, open the trunk lid and proceed
as follows:
• Remove the access cover by rotating
the unlock device anti-clockwise as
shown in the picture. • Rotate the bulb holder anti-clockwise
and extract it from the light cluster.
• Extract the bulb from the bulb
holder and replace it.
NOTE:
When refitting the access cover, insert
first the side tab in the trunk lid
opening indicated in the picture, and
then rotate the unlock device
clockwise.
License Plate Lights To replace the license plate light bulb
(C 5W):
• use a screwdriver positioned at the
indicated point to lever out the light
fixing frame;Maintenance and Care
7
346
Page 351 of 384
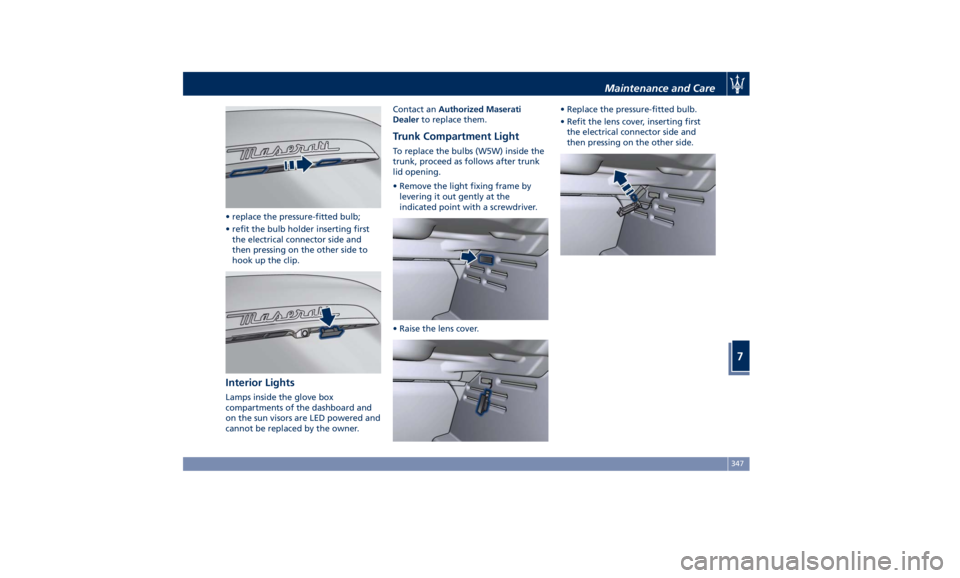
• replace the pressure-fitted bulb;
• refit the bulb holder inserting first
the electrical connector side and
then pressing on the other side to
hook up the clip.
Interior Lights Lamps inside the glove box
compartments of the dashboard and
on the sun visors are LED powered and
cannot be replaced by the owner. Contact an Authorized Maserati
Dealer to replace them.
Trunk Compartment Light To replace the bulbs (W5W) inside the
trunk, proceed as follows after trunk
lid opening.
• Remove the light fixing frame by
levering it out gently at the
indicated point with a screwdriver.
• Raise the lens cover. • Replace the pressure-fitted bulb.
• Refit the lens cover, inserting first
the electrical connector side and
then pressing on the other side.
Maintenance and Care
7
347
Page 355 of 384
wax products having high protective
power;
• spraying of plastic materials, with a
protective function, in the most
exposed points: underneath the
doors, inside part of the mud guards,
edges, etc.;
• use of ventilated box sections,
coated with protective wax products,
to avoid condensation and trapped
water which could encourage the
formation of internal rust.
Useful Advice to Keep the
Bodywork in Good Condition Paint
The paintwork does not only have an
aesthetic function but also protects
the underlying metal sheets. In the
event of abrasions or deep scratches,
we recommend to have the necessary
touch-ups made immediately, to avoid
any rust formation. Touch-ups do not
feature particular difficulties, even on
metallic finishes.
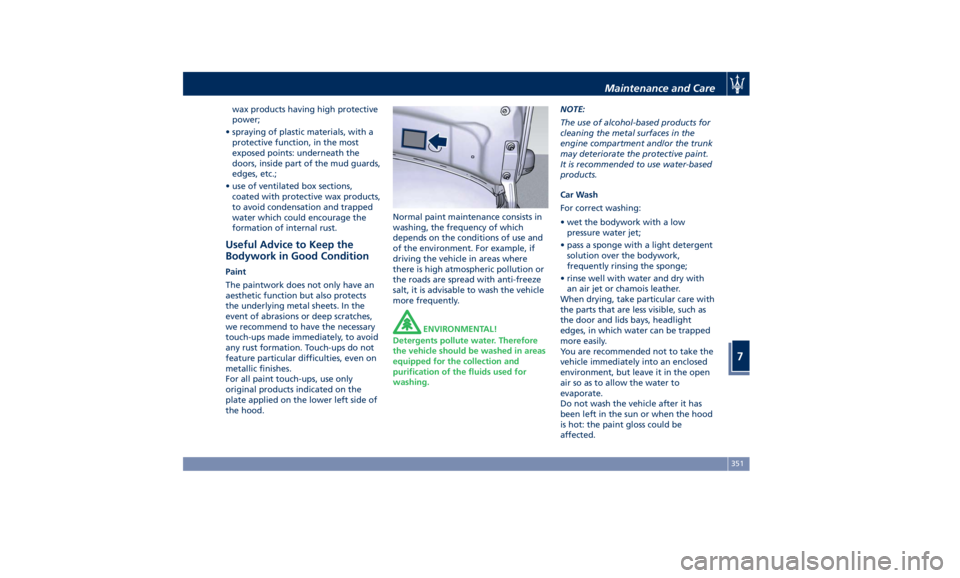
For all paint touch-ups, use only
original products indicated on the
plate applied on the lower left side of
the hood. Normal paint maintenance consists in
washing, the frequency of which
depends on the conditions of use and
of the environment. For example, if
driving the vehicle in areas where
there is high atmospheric pollution or
the roads are spread with anti-freeze
salt, it is advisable to wash the vehicle
more frequently.
ENVIRONMENTAL!
Detergents pollute water. Therefore
the vehicle should be washed in areas
equipped for the collection and
purification of the fluids used for
washing. NOTE:
The use of alcohol-based products for
cleaning the metal surfaces in the
engine compartment and/or the trunk
may deteriorate the protective paint.
It is recommended to use water-based
products.
Car Wash
For correct washing:
• wet the bodywork with a low
pressure water jet;
• pass a sponge with a light detergent
solution over the bodywork,
frequently rinsing the sponge;
• rinse well with water and dry with
an air jet or chamois leather.
When drying, take particular care with
the parts that are less visible, such as
the door and lids bays, headlight
edges, in which water can be trapped
more easily.
You are recommended not to take the
vehicle immediately into an enclosed
environment, but leave it in the open
air so as to allow the water to
evaporate.
Do not wash the vehicle after it has
been left in the sun or when the hood
is hot: the paint gloss could be
affected.Maintenance and Care
7
351
Page 356 of 384
External plastic parts must be cleaned
with the same procedure followed for
the normal washing of the bodywork.
Avoid, as far as possible, parking the
vehicle under trees; the resinous
substances that very often drop from
the trees give the paint a dull
appearance and increase the possibility
of originating corrosive processes.
It is important that the drain holes in
the lower sides of the doors, rocker
panels, and trunk bottom be kept clear
and open.
CAUTION!
• Bird droppings must be washed off
immediately and thoroughly, since
their acidity is particularly corrosive.
• To provide better protection for the
paint, polish the vehicle at intervals
with a suitable product leaving a
protective film on the paint.
• If the vehicle is washed using
high-pressure water jets or cleaners,
it is important that the nozzle of the
jet be kept at a distance of at least
16 in (40 cm) from the bodywork to
avoid damaging it. Glass Surfaces
All
glass surfaces
should be cleaned on
a regular basis with any commercial
household-type glass cleaner.
Never use an abrasive type cleaner.
Use caution when cleaning the inside
rear window equipped with electric
defrosters. Do not use scrapers or
other sharp instrument that may
scratch the elements.
When cleaning the rearview mirror,
spray cleaner on the towel or rag that
you are using. Do not spray cleaner
directly on the mirror.
Labels can be peeled off after soaking
with warm water.
When cleaning is performed, keep all
metal objects at a safe distance from
the window.
Cleaning Headlights
Your vehicle has plastic headlights that
are lighter and less susceptible to
stone breakage than glass headlights.
Plastic is not as scratch-resistant as
glass and therefore different lens
cleaning procedures must be followed.
To minimize the possibility of
scratching the lenses and reducing
light output, avoid wiping with a dry
cloth. To remove road dirt, wash with
a mild soap solution followed by
rinsing. Do not use abrasive cleaning
components, solvents, steel wool or
other aggressive material to clean the
lenses.
Condensation and Fogging on the
Light Clusters
With cold or humid climates, after a
driving rain or after cleaning the car,
the surface of the front and rear light
clusters could fog and/or form
condensate drops on the inside. This is
a natural phenomenon due to the
temperature and humidity differences
between the lens internal and external
surface, which nevertheless does not
indicate a fault and does not
compromise the regular operation of
the lights. The fogging/condensate
disappears when switching on the
lights, starting from the centre of the
diffuser and gradually going to the
edges.
Moldings and Aluminum Trims
• For cleaning moldings and aluminum
trims, avoid the use of acidic or
alkaline cleaning agents that can
destroy the protecting surface
treatment.
• After washing aluminum trim with
warm water, apply the cleaning
agent with a clean tissue or a soft
sponge on the surface. Do not useMaintenance and Care
7
352
Page 377 of 384
Clock, analog .............. .186
Console
Central Console Components ....93
Front Dome Console
Components ...............94
Controls Screen ............. .179
Cruise Control
Cruise Control Adaptive (ACC) . .247
Electronic Cruise Control (CC) . . .244
Cupholders ................ .127
Front Passengers Cupholders . . .127
Rear Passengers Cupholders . . .128
Dashboard Compartment ...... .194
Dashboard Components .........92
Defroster ...................47
Doors
Child Protection Door Lock
System ...................40
Doors Locking ..............39
Doors Manual Lock ...........39
Front Doors Components ......94
Lock/Unlock Door Flashlight ....33
Power Doors Locking/Unlocking . .39
Rear Doors Components .......95
Soft Door Close System ........41
Unlock Driver Door/All Doors with
Remote Key 1st Press .........33
DPF System
DPF Filter Replacement ...... .328
“Drive Away Inhibit” strategy . . . .237
Drive Mode, controls ......... .224
Setting the Drive Mode ...... .224 Driving Conditions ........... .298
Before the Trip ............ .298
Driving at Night ........... .298
Driving in Fog ............ .299
Driving in the Mountains ..... .300
Driving in the Rain ......... .299
Driving on Snow or Ice ...... .300
Safe Driving .............. .298
DRL (Daytime Running Light) . . . .113
EDR (Event Data Recorder) .......71
Electronic Cruise Control ....... .244
Emergency ...................5
Hazard Warning Lights ...... .121
In the Event of an Accident . . . .305
Jump Starting ............ .312
Trunk Lid Emergency Release ....53
Engine
Engine Coolant Level Check . . . .325
Engine Oil Level Check ......
.328
Hood ....................
5 4
Normal
Starting of the Engine . .208
Use of the Engine .......... .242
Entry/Exit, lights on ............30
EPB (Electric Parking Brake) ..... .233
ESC (Electronic Stability Control) . .238
Filters
A/C System Air Filter
Replacement ............. .330
Engine Air Filter Replacement . .330
Forward Collision Warning (FCW) . .258 Fuel
Carbon Monoxide Warning . . . .295
Emergency Fuel Filler Door
Release ................. .297
Emissions Inspection and
Maintenance Programs ...... .323
Fuel Consumption ......... .363
Fuel Filter Service .......... .328
Fuel Requirements ......... .294
Fuel System Warnings ....... .295
Gasoline/Oxygenate Blends . . . .294
Low Fuel Indicator ......... .166
Materials Added to Fuel ..... .295
MMT in Gasoline .......... .295
Reformulated Gasoline ...... .294
Fuses .................... .337
Fuses Position ............ .337
Fuses Replacement ......... .337
Glove Box Feature Lock (Passenger
Side) ................... .195
Glove Box Lock Feature
Handholds and Cloth Hooks . . . .131
Hazard Warning Flashers ...... .305
Head Restraints ...............96
Highway Assist - HAS ......... .274
HomeLink ................. .138
Security ................. .141
Troubleshooting Tips ........ .141
Using HomeLink ........... .141
Hood
Open and Close the Hood ......54Index
9 373
Page 378 of 384
Hood Operation ..............54
HSA (Hill Start Assist) ......... .240
Identification Labels ............19
Illuminated Entry/Exit ...........30
Immobilizer (Sentry Key) .........26
Indicator Lights
Air Bag Warning Light .........83
TFT Display: Menus and Settings .150
TFT Display: Warning/Indicator
Lights of Set Modes/Functions. . .163
Warning and Indicator Lights on
Analog Instrument ......... .146
Infotainment System .......... .169
Infotelematic System
Main Menu Bar on MTC+
Display ................. .171
Manual Controls and Devices . . .170
Personalized the Main Menu Bar.172
Instrument Cluster ........... .146
Interior Components ...........92
Interior Maintenance and Care. . . .353
Interiors Features ............ .126
iPad Holder ................ .131
iPod Connection ............. .130
Jump Start Procedure ......... .314
KeyFob ....................25
Key Fob Battery Replacement ....34
Preventing Inadvertent Locking of
key fob RKE Transmitter Inside the
Vehicle ...................43 Replacement ...............27
Requiring and setting Additional
Key Fobs ..................34
Unlock the Vehicle with Key fob . .33
Keys .......................24
Lane Departure Warning (LDW) . . .261
Level Checks ............... .325
Adding Windshield ......... .327
Brake Fluid Level Check ...... .327
Engine Coolant Level Check . . . .325
Engine Oil Level Check ....... .325
Fluid Level Check for Coolant
Transmission System ........ .330
Transmission Oil Check ....... .329
Liftgate
Liftgate and Hood Ajar
Indicators ................ .166
Unlatch the Trunk Lid .........33
Lights .................... .110
Automatic Headlights ....... .112
Automatic High Beam ....... .114
Bi-Xenon Headlight ......... .113
Bulb Replacement .......... .344
Cargo Lamps ............. .121
Dome Lights .............. .120
DRL,
Daytime Running
Lights . . .113
Fog Lights ............... .115
Full-LED Headlight with Cornering
Function ................ .113
Headlight Time Delay ....... .112
High Beam and Flashing ..... .116
Interior Lights ............. .118 Light Switch .............. .110
Multifunction Lever ......... .115
Turn Signals .............. .116
Loading the Vehicle
Loading with Rear Seatbacks
Down .................. .134
Vehicle Load Carrying Capacity . .133
Main- and Submenu .......... .152
Maintenance ..................5
A/C System Maintenance ..... .348
Air Bag System Maintenance ....70
Bodywork Maintenance and
Care ................... .350
Emissions Inspection and
Maintenance Programs ...... .323
Interior Maintenance and Care . .353
Maintenance Procedures ..... .324
Periodic Maintenance ....... .321
Scheduled Maintenance Service .318
Scheduled Service Plan ....... .319
Wheels Maintenance ........ .349
Maserati Roadside Assistance
Program ...................16
Mesh Pockets ............... .131
Messages on Main Display Area . . .150
MIL (Malfunction Indicator Light) . .147
Mirrors ................... .107
External Mirrors ........... .107
Folding Mirrors ............ .109
Integrated External Rearview Mirror
Lights .................. .122
Internal Rearview Mirror ..... .109Index
9 374
Page 379 of 384
Mirrors Positioning ......... .108
Rearview Mirrors .......... .107
Tilt Mirrors in Reverse ....... .108
MTC+ “Controls” Screen ....... .179
MTC+ Settings - Customer
Programmable Features ...... .183
Auto-On Comfort & Remote
Start ................... .190
Clear Personal Data ........ .193
Clock & Date ............. .186
Display ................. .184
Doors & Locks ............ .188
Engine Off Options ......... .190
Lights .................. .188
Restore Settings ........... .193
Safety and Driving Assistance . . .187
Voice Commands .......... .185
Occupant Restraint System .......55
On Board Diagnostics ......... .243
ORC (Occupant Restraint
Controller) .................67
Park Assist ..................85
Enabling and Disabling Park
Assist ....................88
Parking .................. .236
Parking Brake .............. .233
Passive Entry System ...........41
Pedals, adjustable ........... .107
Pedestrian Emergency Braking
(PEB) ................... .258
Pets, transporting .............78 Phone and Voice Controls on Steering
Wheel .................. .204
Phone Mode ............. .205
Phone/Bluetooth, Customer
settings ................. .192
Power Outlets .............. .126
Power Outlet Inside the Central
Console ................. .127
Power Outlet Inside the
Cupholder ............... .126
Power Outlet Inside the Trunk . .127
Rear Power Outlets ......... .127
Rear Parking Camera ...........78
Refueling ................. .296
Fuel Filler Neck Access
....... .296
Remote
Start System ...........
36
Restarting the Vehicle ........ .355
Restraint System ..............64
Child Restraint Systems ........72
RKE (Remote Keyless Entry)
Transmitter .................24
Roadside Assistance Program .....16
Roll-Over Warning .............15
Safety
Child Restraint Systems ........72
Reporting Safety Defects .......12
Safety Tips ..................55
Scheduled Maintenance Service . . .318
Scheduled Service Plan
Scheduled Maintenance
Indicator ................ .318 Seat Belt ...................55
Automatic Locking Retractor (ALR)
Mode ....................61
Enhanced Seat Belt Use Reminder
System (SBR) ...............62
Passenger Seat Belts ..........60
Seat Belt Reminder Light ..... .150
Seat Belts and Pregnant Women .63
Seat Belts Pretensioners .......62
Three-Point Seat Belts .........57
Three-Point Seat Belts Height
Adjustment ................59
Three-Point Seat Belts Untwisting
Procedure .................60
Three-Point Seat Belts Use
Instructions ................58
Using the Seat Belt in Automatic
Locking Retractor Mode (ALR) . . .61
Seats ......................96
Driver Memory Seat ..........99
Easy Entry/Exit Seats ........ .100
Front Heated Seats ...........97
Front Power Seats ...........96
Front Ventilated Seats .........98
Power Lumbar Seats ..........97
Rear Armrest ............. .101
Rear Seats ............... .101
Rear Side Heated Seats ...... .102
Seat Adjustment ............96
Service .....................10
Siri Smart Personal Assistant .... .205
Smoking Kit ............... .131
Snow Chains ............... .288Index
9 375