MASERATI GRANTURISMO 2019 Owners Manual
Manufacturer: MASERATI, Model Year: 2019, Model line: GRANTURISMO, Model: MASERATI GRANTURISMO 2019Pages: 286, PDF Size: 8.08 MB
Page 101 of 286
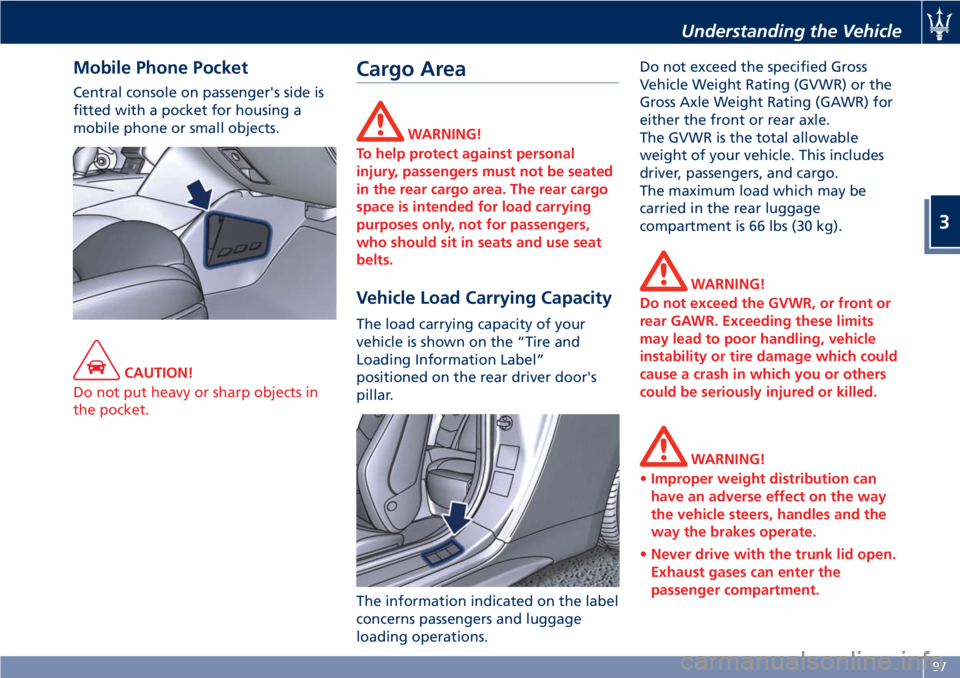
Mobile Phone Pocket Central console on passenger's side is
fitted with a pocket for housing a
mobile phone or small objects.
CAUTION!
Do not put heavy or sharp objects in
the pocket. Cargo Area WARNING!
To help protect against personal
injury, passengers must not be seated
in the rear cargo area. The rear cargo
space is intended for load carrying
purposes only, not for passengers,
who should sit in seats and use seat
belts.
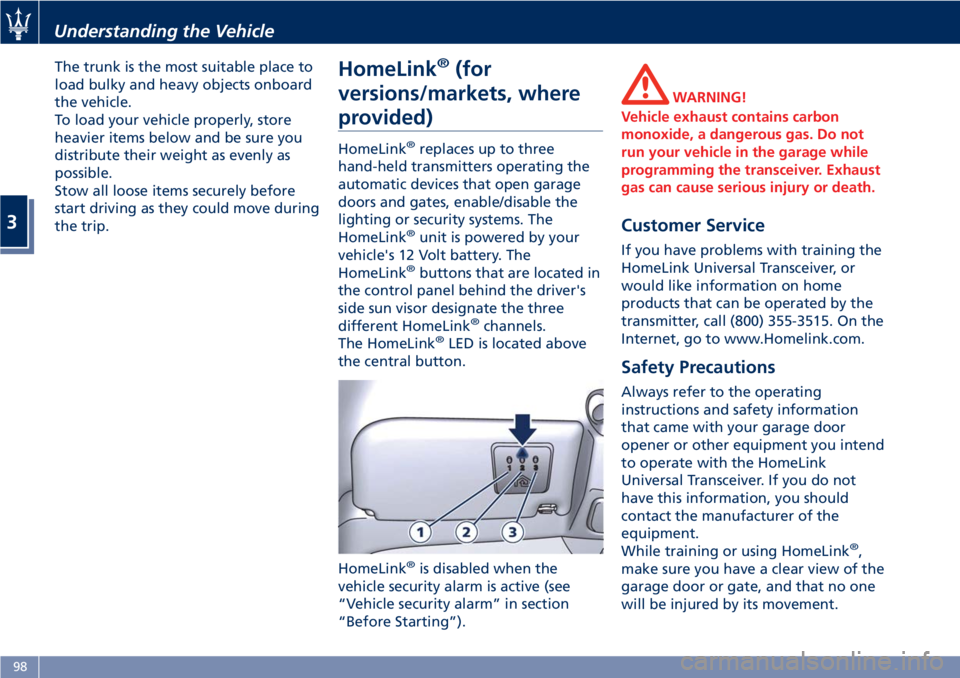
Vehicle Load Carrying Capacity The load carrying capacity of your
vehicle is shown on the “Tire and
Loading Information Label”
positioned on the rear driver door's
pillar.
The information indicated on the label
concerns passengers and luggage
loading operations. Do not exceed the specified Gross
Vehicle Weight Rating (GVWR) or the
Gross Axle Weight Rating (GAWR) for
either the front or rear axle.
The GVWR is the total allowable
weight of your vehicle. This includes
driver, passengers, and cargo.
The maximum load which may be
carried in the rear luggage
compartment is 66 lbs (30 kg).
WARNING!
Do not exceed the GVWR, or front or
rear GAWR. Exceeding these limits
may lead to poor handling, vehicle
instability or tire damage which could
cause a crash in which you or others
could be seriously injured or killed.
WARNING!
• Improper weight distribution can
have an adverse effect on the way
the vehicle steers, handles and the
way the brakes operate.
• Never drive with the trunk lid open.
Exhaust gases can enter the
passenger compartment.Understanding the Vehicle
3
97
Page 102 of 286
The trunk is the most suitable place to
load bulky and heavy objects onboard
the vehicle.
To load your vehicle properly, store
heavier items below and be sure you
distribute their weight as evenly as
possible.
Stow all loose items securely before
start driving as they could move during
the trip.
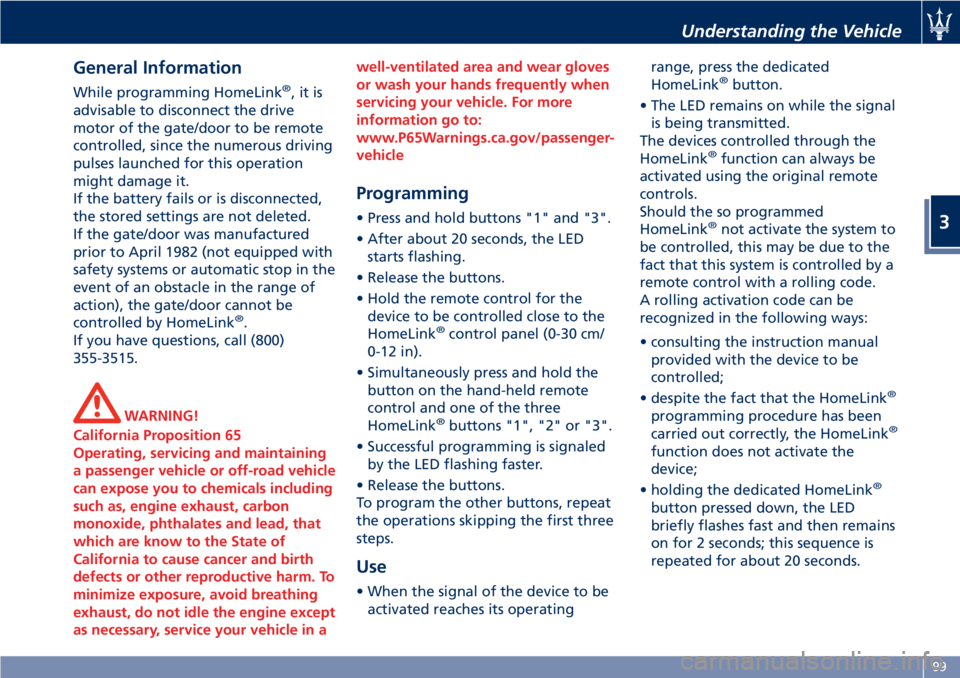
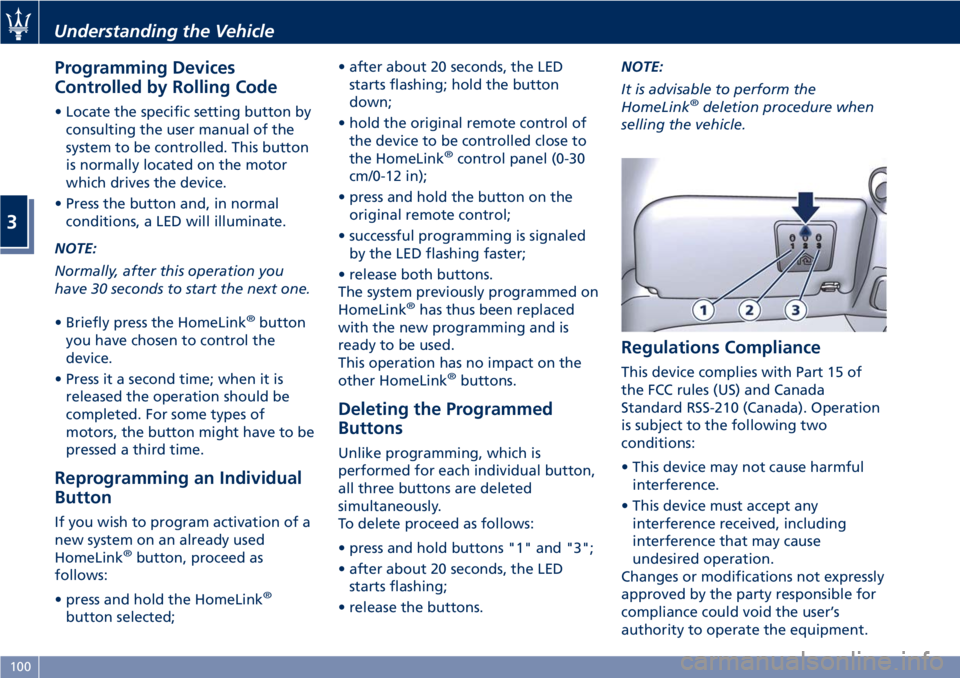
HomeLink ®
(for
versions/markets, where
provided) HomeLink ®
replaces up to three
hand-held transmitters operating the
automatic devices that open garage
doors and gates, enable/disable the
lighting or security systems. The
HomeLink ®
unit is powered by your
vehicle's 12 Volt battery. The
HomeLink ®
buttons that are located in
the control panel behind the driver's
side sun visor designate the three
different HomeLink ®
channels.
The HomeLink ®
LED is located above
the central button.
HomeLink ®
is disabled when the
vehicle security alarm is active (see
“Vehicle security alarm” in section
“Before Starting”). WARNING!
Vehicle exhaust contains carbon
monoxide, a dangerous gas. Do not
run your vehicle in the garage while
programming the transceiver. Exhaust
gas can cause serious injury or death.
Customer Service If you have problems with training the
HomeLink Universal Transceiver, or
would like information on home
products that can be operated by the
transmitter, call (800) 355-3515. On the
Internet, go to www.Homelink.com.
Safety Precautions Always refer to the operating
instructions and safety information
that came with your garage door
opener or other equipment you intend
to operate with the HomeLink
Universal Transceiver. If you do not
have this information, you should
contact the manufacturer of the
equipment.
While training or using HomeLink ®
,
make sure you have a clear view of the
garage door or gate, and that no one
will be injured by its movement.Understanding the Vehicle
3
98
Page 103 of 286
General Information While programming HomeLink ®
,itis
advisable to disconnect the drive
motor of the gate/door to be remote
controlled, since the numerous driving
pulses launched for this operation
might damage it.
If the battery fails or is disconnected,
the stored settings are not deleted.
If the gate/door was manufactured
prior to April 1982 (not equipped with
safety systems or automatic stop in the
event of an obstacle in the range of
action), the gate/door cannot be
controlled by HomeLink ®
.
If you have questions, call (800)
355-3515.
WARNING!
California Proposition 65
Operating, servicing and maintaining
a passenger vehicle or off-road vehicle
can expose you to chemicals including
such as, engine exhaust, carbon
monoxide, phthalates and lead, that
which are know to the State of
California to cause cancer and birth
defects or other reproductive harm. To
minimize exposure, avoid breathing
exhaust, do not idle the engine except
as necessary, service your vehicle in a well-ventilated area and wear gloves
or wash your hands frequently when
servicing your vehicle. For more
information go to:
www.P65Warnings.ca.gov/passenger-
vehicle
Programming • Press and hold buttons "1" and "3".
• After about 20 seconds, the LED
starts flashing.
• Release the buttons.
• Hold the remote control for the
device to be controlled close to the
HomeLink ®
control panel (0-30 cm/
0-12 in).
• Simultaneously press and hold the
button on the hand-held remote
control and one of the three
HomeLink ®
buttons "1", "2" or "3".
• Successful programming is signaled
by the LED flashing faster.
• Release the buttons.
To program the other buttons, repeat
the operations skipping the first three
steps.
Use
• When the signal of the device to be
activated reaches its operating range, press the dedicated
HomeLink ®
button.
• The LED remains on while the signal
is being transmitted.
The devices controlled through the
HomeLink ®
function can always be
activated using the original remote
controls.
Should the so programmed
HomeLink ®
not activate the system to
be controlled, this may be due to the
fact that this system is controlled by a
remote control with a rolling code.
A rolling activation code can be
recognized in the following ways:
• consulting the instruction manual
provided with the device to be
controlled;
• despite the fact that the HomeLink ®
programming procedure has been
carried out correctly, the HomeLink ®
function does not activate the
device;
• holding the dedicated HomeLink ®
button pressed down, the LED
briefly flashes fast and then remains
on for 2 seconds; this sequence is
repeated for about 20 seconds.Understanding the Vehicle
3
99
Page 104 of 286
Programming Devices
Controlled by Rolling Code • Locate the specific setting button by
consulting the user manual of the
system to be controlled. This button
is normally located on the motor
which drives the device.
• Press the button and, in normal
conditions, a LED will illuminate.
NOTE:
Normally, after this operation you
have 30 seconds to start the next one.
• Briefly press the HomeLink ®
button
you have chosen to control the
device.
• Press it a second time; when it is
released the operation should be
completed. For some types of
motors, the button might have to be
pressed a third time.
Reprogramming an Individual
Button If you wish to program activation of a
new system on an already used
HomeLink ®
button, proceed as
follows:
• press and hold the HomeLink ®
button selected; • after about 20 seconds, the LED
starts flashing; hold the button
down;
• hold the original remote control of
the device to be controlled close to
the HomeLink ®
control panel (0-30
cm/0-12 in);
• press and hold the button on the
original remote control;
• successful programming is signaled
by the LED flashing faster;
• release both buttons.
The system previously programmed on
HomeLink ®
has thus been replaced
with the new programming and is
ready to be used.
This operation has no impact on the
other HomeLink ®
buttons.
Deleting the Programmed
Buttons Unlike programming, which is
performed for each individual button,
all three buttons are deleted
simultaneously.
To delete proceed as follows:
• press and hold buttons "1" and "3";
• after about 20 seconds, the LED
starts flashing;
• release the buttons. NOTE:
It is advisable to perform the
HomeLink ®
deletion procedure when
selling the vehicle.
Regulations Compliance This device complies with Part 15 of
the FCC rules (US) and Canada
Standard RSS-210 (Canada). Operation
is subject to the following two
conditions:
• This device may not cause harmful
interference.
• This device must accept any
interference received, including
interference that may cause
undesired operation.
Changes or modifications not expressly
approved by the party responsible for
compliance could void the user’s
authority to operate the equipment.Understanding the Vehicle
3
100
Page 105 of 286
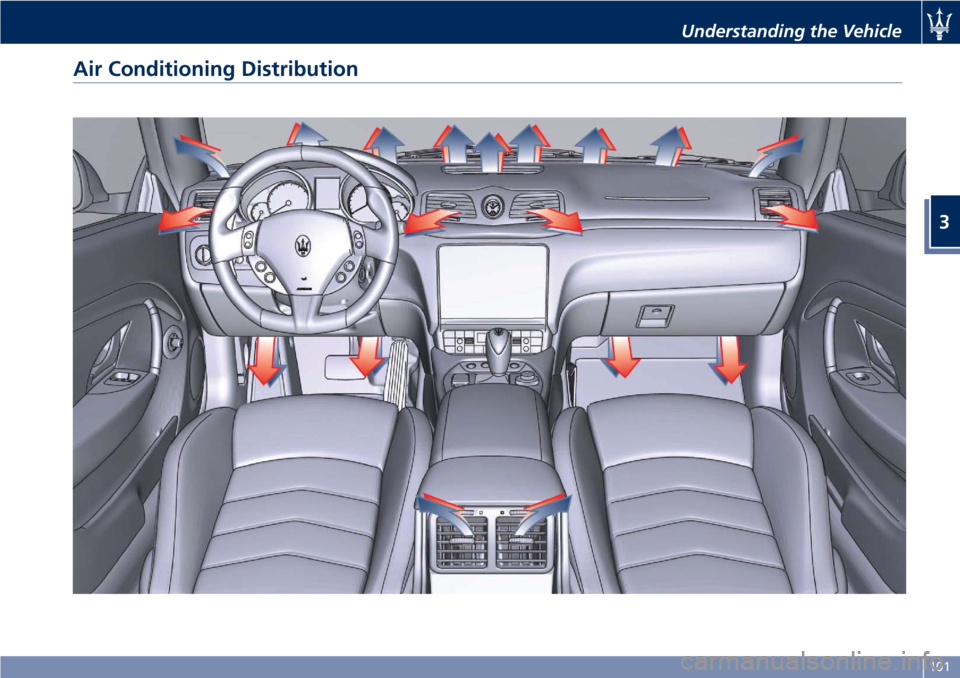
Air Conditioning Distribution Understanding the Vehicle
3
101
Page 106 of 286
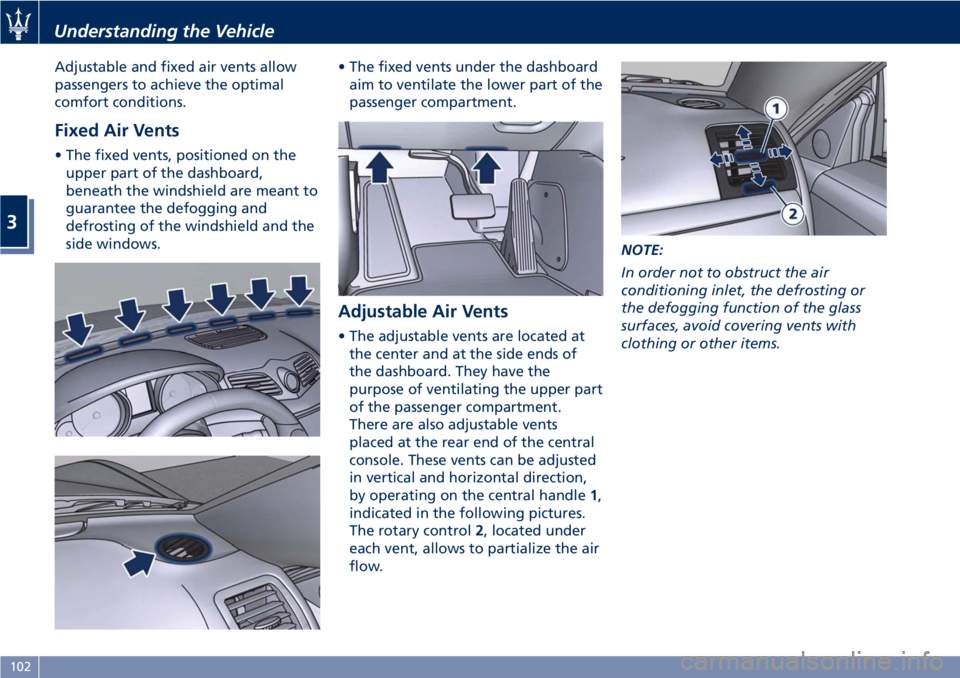
Adjustable and fixed air vents allow
passengers to achieve the optimal
comfort conditions.
Fixed Air Vents • The fixed vents, positioned on the
upper part of the dashboard,
beneath the windshield are meant to
guarantee the defogging and
defrosting of the windshield and the
side windows. • The fixed vents under the dashboard
aim to ventilate the lower part of the
passenger compartment.
Adjustable Air Vents • The adjustable vents are located at
the center and at the side ends of
the dashboard. They have the
purpose of ventilating the upper part
of the passenger compartment.
There are also adjustable vents
placed at the rear end of the central
console. These vents can be adjusted
in vertical and horizontal direction,
by operating on the central handle 1 ,
indicated in the following pictures.
The rotary control 2 , located under
each vent, allows to partialize the air
flow. NOTE:
In order not to obstruct the air
conditioning inlet, the defrosting or
the defogging function of the glass
surfaces, avoid covering vents with
clothing or other items.Understanding the Vehicle
3
102
Page 107 of 286
Sport Skyhook Suspension
(for versions/markets,
where provided) The electronic system controlling the
vehicle suspension uses the
sophisticated on board sensors and is
aimed at optimizing vehicle
performance.
The system is capable of constantly
monitoring suspension damping by
means of the actuator fitted on each
shock absorber (Skyhook type). This
way, the shock absorber setting is
suited to the road surface conditions
and vehicle dynamics, thus improving
passenger comfort and road-holding.
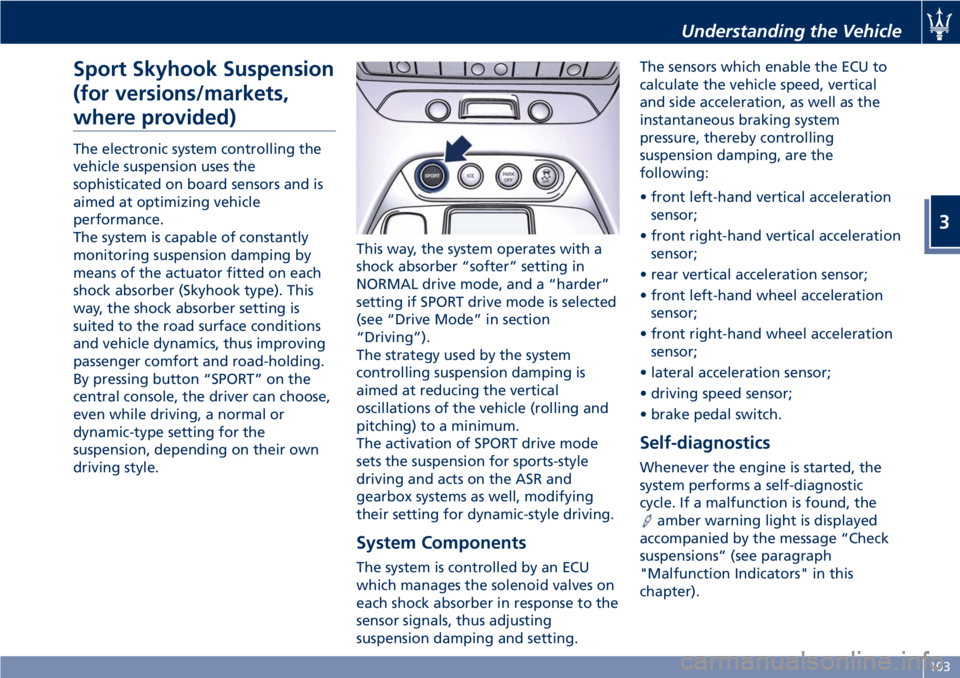
By pressing button “SPORT” on the
central console, the driver can choose,
even while driving, a normal or
dynamic-type setting for the
suspension, depending on their own
driving style. This way, the system operates with a
shock absorber “softer” setting in
NORMAL drive mode, and a “harder”
setting if SPORT drive mode is selected
(see “Drive Mode” in section
“Driving”).
The strategy used by the system
controlling suspension damping is
aimed at reducing the vertical
oscillations of the vehicle (rolling and
pitching) to a minimum.
The activation of SPORT drive mode
sets the suspension for sports-style
driving and acts on the ASR and
gearbox systems as well, modifying
their setting for dynamic-style driving.
System Components
The system is controlled by an ECU
which manages the solenoid valves on
each shock absorber in response to the
sensor signals, thus adjusting
suspension damping and setting. The sensors which enable the ECU to
calculate the vehicle speed, vertical
and side acceleration, as well as the
instantaneous braking system
pressure, thereby controlling
suspension damping, are the
following:
• front left-hand vertical acceleration
sensor;
• front right-hand vertical acceleration
sensor;
• rear vertical acceleration sensor;
• front left-hand wheel acceleration
sensor;
• front right-hand wheel acceleration
sensor;
• lateral acceleration sensor;
• driving speed sensor;
• brake pedal switch.
Self-diagnostics Whenever the engine is started, the
system performs a self-diagnostic
cycle. If a malfunction is found, the
amber warning light is displayed
accompanied by the message “Check
suspensions” (see paragraph
"Malfunction Indicators" in this
chapter).Understanding the Vehicle
3
103
Page 108 of 286
Calibration Selection The driver can select, in relation to
road surface conditions, vehicle speed,
driving style and comfort, one of the
two calibration levels provided by the
system: normal or sports-style.
• Normal calibration , active when
SPORT drive mode is disabled
("SPORT" button not pressed), favors
comfort and higher driving stability
with low and average grip
conditions.
• Sport-style calibration , active when
SPORT drive mode is enabled
("SPORT" button pressed) , favors
wheel drive and permits a
dynamic-style driving with optimal
road holding.
Whenever the engine is started, the
system automatically activates
NORMAL drive mode, even if SPORT
drive mode was selected before the
engine was last turned off.
The sport-style calibration can be
selected only with the key in the
ignition switch in MAR (ON) position
and it is enabled by pressing button
"SPORT", even while driving.
When SPORT drive mode is activated,
the word “SPORT” on the instrument
cluster display and the LED on the
button illuminate. WARNING!
SPORT drive mode should not be
activated if the road surface is rough
or slippery.
The electronic suspension control
system
works in combination with the
ESC system.
When the suspension is set to normal
calibration, stability is increased under
medium and low grip conditions, while
when it is set to sport-style calibration,
the ESC system optimizes a sportier
driving.
WARNING!
In low- and medium-grip conditions
(e.g., rain, snow, ice, sand, etc.) it is
advisable not to use SPORT drive
mode, even with the ESC system
enabled.
Malfunction Indicators If one or more electric components in
the system prove to be malfunctioning
while driving, the ECU illuminates the
amber warning light accompanied
by the message “Check suspensions”
on the display. In addition, the ECU
calibrates the shock absorbers to a preset value, thus ensuring a safe
vehicle set up.
Should the malfunction involve one
shock absorber only, this will no longer
be controlled by the ECU and will
therefore remain set as it was when
the fault occurred. It is therefore
possible for one of the four shock
absorbers to work with a fixed
calibration, different from that of the
other ones.
In any case, safe and secure vehicle
driving is always ensured at low
speeds.
CAUTION!
In the event of a malfunction in the
suspension control electronic system,
which will be indicated by the
illumination of the amber warning
light on the display while driving, keep
a moderate speed and have the vehicle
checked as soon as possible by an
Authorized Maserati Dealer .
If a malfunction occurs while driving,
and
this is signaled by the illumination
of the
amber warning light on the
display, it is advisable to stop the
vehicle as soon as possible, turn the
key in the ignition switch to STOP
(OFF) position and then restart the
engine.Understanding the Vehicle
3
104
Page 109 of 286
If the malfunction is no longer present
and the
amber warning light on the
display does not illuminate again, the
electronic suspension system will
resume normal operation. On the
other hand, if the problem persists,
the
amber warning light on the
instrument cluster display will turn on
again.
In both cases, the system must be
checked by the Authorized Maserati
Dealer .
The fault found is memorized by the
ECU and can be diagnosed at an
Authorized Maserati Dealer even if it
has disappeared spontaneously. Understanding the Vehicle
3
105
Page 110 of 286

Understanding the Vehicle
106