MASERATI GRANTURISMO CONVERTIBLE 2019 Owners Manual
Manufacturer: MASERATI, Model Year: 2019, Model line: GRANTURISMO CONVERTIBLE, Model: MASERATI GRANTURISMO CONVERTIBLE 2019Pages: 296, PDF Size: 9.01 MB
Page 231 of 296
the jumper cables reach and set the
parking brake and make sure the
ignition is off.
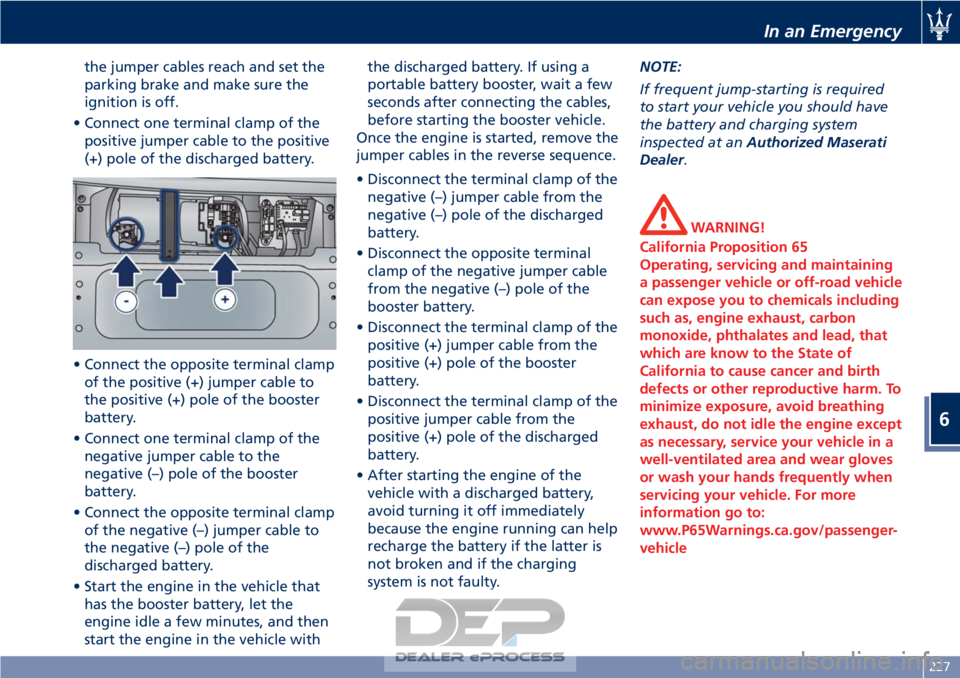
• Connect one terminal clamp of the positive jumper cable to the positive
(+) pole of the discharged battery.
• Connect the opposite terminal clamp of the positive (+) jumper cable to
the positive (+) pole of the booster
battery.
• Connect one terminal clamp of the negative jumper cable to the
negative (–) pole of the booster
battery.
• Connect the opposite terminal clamp of the negative (–) jumper cable to
the negative (–) pole of the
discharged battery.
• Start the engine in the vehicle that has the booster battery, let the
engine idle a few minutes, and then
start the engine in the vehicle with the discharged battery. If using a
portable battery booster, wait a few
seconds after connecting the cables,
before starting the booster vehicle.
Once the engine is started, remove the
jumper cables in the reverse sequence.
• Disconnect the terminal clamp of the negative (–) jumper cable from the
negative (–) pole of the discharged
battery.
• Disconnect the opposite terminal clamp of the negative jumper cable
from the negative (–) pole of the
booster battery.
• Disconnect the terminal clamp of the positive (+) jumper cable from the
positive (+) pole of the booster
battery.
• Disconnect the terminal clamp of the positive jumper cable from the
positive (+) pole of the discharged
battery.
• After starting the engine of the vehicle with a discharged battery,
avoid turning it off immediately
because the engine running can help
recharge the battery if the latter is
not broken and if the charging
system is not faulty. NOTE:
If frequent jump-starting is required
to start your vehicle you should have
the battery and charging system
inspected at an
Authorized Maserati
Dealer.
WARNING!
California Proposition 65
Operating, servicing and maintaining
a passenger vehicle or off-road vehicle
can expose you to chemicals including
such as, engine exhaust, carbon
monoxide, phthalates and lead, that
which are know to the State of
California to cause cancer and birth
defects or other reproductive harm. To
minimize exposure, avoid breathing
exhaust, do not idle the engine except
as necessary, service your vehicle in a
well-ventilated area and wear gloves
or wash your hands frequently when
servicing your vehicle. For more
information go to:
www.P65Warnings.ca.gov/passenger-
vehicle
In an Emergency
6
227
Page 232 of 296
Towing a Disabled Vehicle
Proper towing or lifting equipment is
required to prevent damage to your
vehicle. Use only towing bars and
other equipment designed for the
purpose, following equipment
manufacturer’s instructions.
Safety chains are mandatory.
Except for the front threaded seat to
fix the supplied hook (see “Tool Kit”
chapter in this section), the vehicle is
not equipped with other connection
points for towing operations with tow
truck.
CAUTION!
Any improper maneuver and use of
unsuitable equipment for recovering
vehicle in an emergency from off road
location could seriously damage the
vehicle. Contact the Authorized
Maserati Dealer or anyone having
suitable equipment and the required
expertise to safely and properly carry
out any required operations.
Make sure you comply with local
towing
regulations.
• If the vehicle's battery is discharged ,
it is necessary to shift the automatic
transmission out of the P (Park) Position and release the parking
brake (see “ Transmission Manual
Release of P (Park) position” and
“Emergency Release of the Parking
Brake” in this section).
• If the vehicle battery is still charged ,
turn off the engine and disengage
the parking brake manually (if
automatically engaged) by using the
command at the side of the
transmission shift lever (see “Parking
Brake” chapter in section “Driving”).
Shift then manually the transmission
out of P (Park) as described in
“Transmission Manual Release of P
(Park) Position” chapter of this
section. If you need to use the
accessories (wipers, defrosters, etc.)
while being towed, the key in the
ignition switch must be turned in
MAR (ON) position, do not use the
ACC position.
Vehicle Towing Conditions
Maserati only allows vehicle towing
either on a flatbed or with all four
wheels off the ground.
If flatbed equipment is not available,
and the transmission is still operable,
the vehicle may be flat towed (with all
four wheels on the ground) under the
following conditions. • The shift lever must be in N (Neutral).
• The distance to be traveled must not
exceed 30 mi (50 km ).
• The towing speed must not exceed 30 mph (50 km/h).
If the transmission is not operable, or
the vehicle must be towed faster than
30 mph (50 km/h ) or farther than 30
mi (50 km) (for example on a
highway), tow with the rear driving
wheels off the ground and on a
platform of a rescue vehicle, or with
the rear wheels raised using a wheel
lift.
CAUTION!
If you have to tow the vehicle with 2
wheels raised, ensure that the key in
the ignition switch is in the STOP (OFF)
position. If this is not observed, when
the ESC is active, the ECU will store a
malfunction and the relative indicator
light
will illuminate on the
instrument cluster display. This
requires the intervention of an
Authorized Maserati Dealer to reset
the system.
In an Emergency
6
228
Page 233 of 296
Use the Vehicle Tow Hook of
the Tool Kit
CAUTION!
The tow hook should only be used for
towing the car on flat roads. Do not
use the tow hook to remove the car
that is stuck on off road stretches.
The tow hook can also be used to tow
the
vehicle on the platform of a tow
truck.
It is necessary to inform the operators
of the rescue vehicle about the vehicle
minimum height to avoid, during its
loading, any contact of the lower ends
of the front or rear bumper with the
tow truck loading ramp.
The tow hook is contained in the tool
kit (see “Tool Kit” in this section) and
must be screwed in its seat accessible
behind the front grille, right-hand
side.
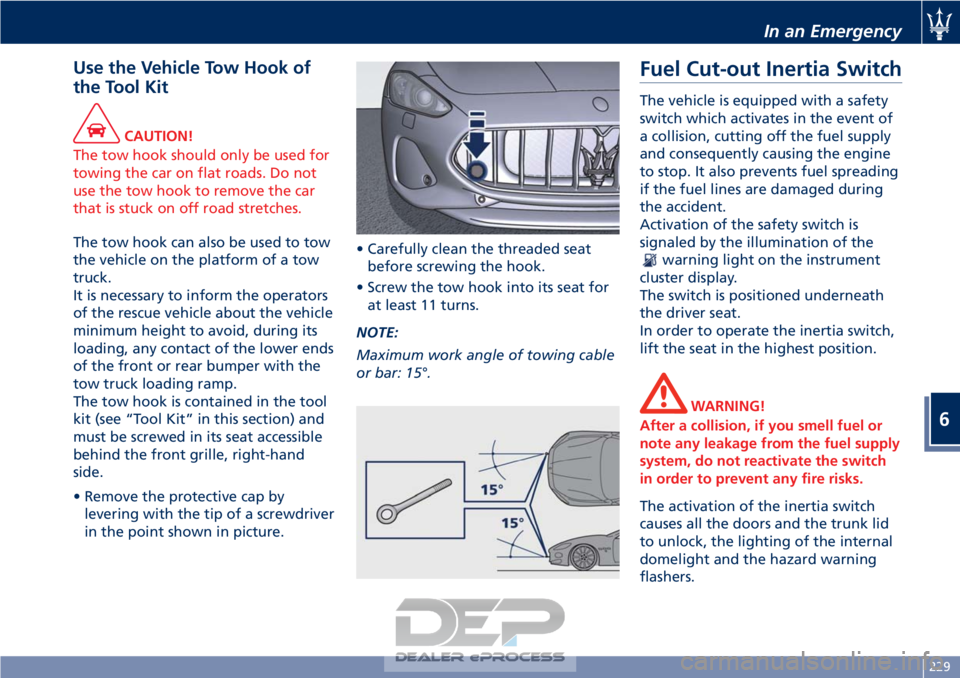
• Remove the protective cap by levering with the tip of a screwdriver
in the point shown in picture. • Carefully clean the threaded seat
before screwing the hook.
• Screw the tow hook into its seat for at least 11 turns.
NOTE:
Maximum work angle of towing cable
or bar: 15°.
Fuel Cut-out Inertia Switch
The vehicle is equipped with a safety
switch which activates in the event of
a collision, cutting off the fuel supply
and consequently causing the engine
to stop. It also prevents fuel spreading
if the fuel lines are damaged during
the accident.
Activation of the safety switch is
signaled by the illumination of the
warning light on the instrument
cluster display.
The switch is positioned underneath
the driver seat.
In order to operate the inertia switch,
lift the seat in the highest position.
WARNING!
After a collision, if you smell fuel or
note any leakage from the fuel supply
system, do not reactivate the switch
in order to prevent any fire risks.
The activation of the inertia switch
causes
all the doors and the trunk lid
to unlock, the lighting of the internal
domelight and the hazard warning
flashers.
In an Emergency
6
229
Page 234 of 296
WARNING!
California Proposition 65
Operating, servicing and maintaining
a passenger vehicle or off-road vehicle
can expose you to chemicals including
such as, engine exhaust, carbon
monoxide, phthalates and lead, that
which are know to the State of
California to cause cancer and birth
defects or other reproductive harm. To
minimize exposure, avoid breathing
exhaust, do not idle the engine except
as necessary, service your vehicle in a
well-ventilated area and wear gloves
or wash your hands frequently when
servicing your vehicle. For more
information go to:
www.P65Warnings.ca.gov/passenger-
vehicle
Resetting the Inertia Switch
• Turn the key in the ignition switch to STOP (OFF) position.
• Check that there is no leakage from the fuel system.
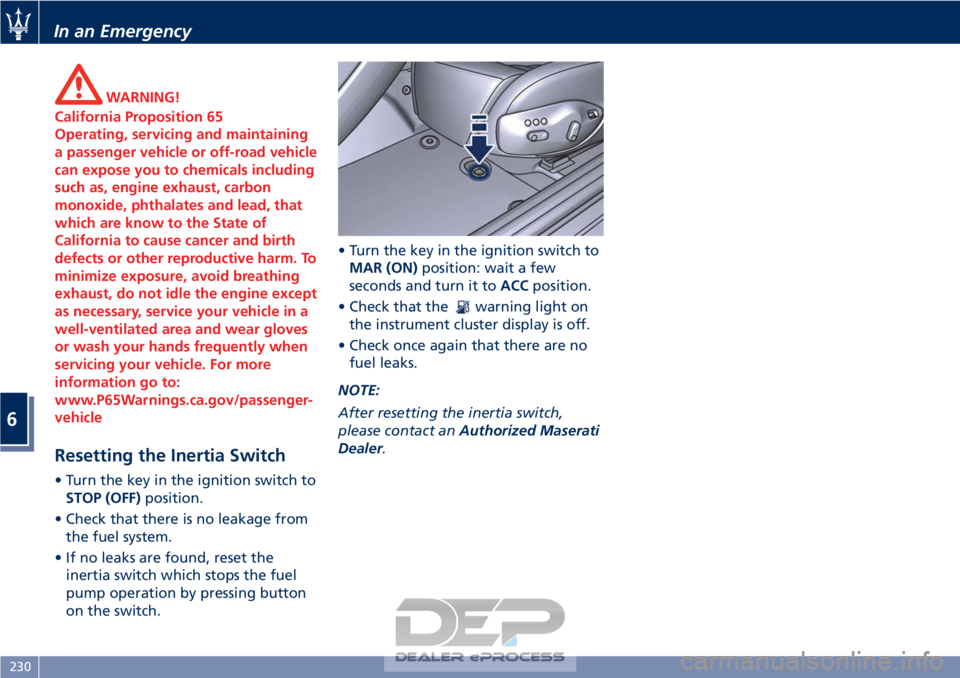
• If no leaks are found, reset the inertia switch which stops the fuel
pump operation by pressing button
on the switch. • Turn the key in the ignition switch to
MAR (ON) position: wait a few
seconds and turn it to ACCposition.
• Check that the
warning light on
the instrument cluster display is off.
• Check once again that there are no fuel leaks.
NOTE:
After resetting the inertia switch,
please contact an Authorized Maserati
Dealer.
In an Emergency
6
230
Page 235 of 296
7 – Maintenance and Care
Scheduled Maintenance Service............................ 232
Scheduled Service Plan ................................... 234
Maintenance Procedures ................................. 239
Maintenance-Free Battery ................................ 247
Fuse Replacement ...................................... 251
Bulb Replacement ...................................... 257
A/C System Maintenance ................................. 262
Wheels Maintenance .................................... 263
Bodywork Maintenance and Care .......................... 265
Interior Maintenance and Care ............................ 268
Vehicle Stored for Long Periods ............................ 269
Restarting the Vehicle .................................... 269
Battery Statement ...................................... 270
231
Page 236 of 296
Scheduled Maintenance
Service
Correct maintenance is clearly the best
way to guarantee vehicle performance
and safety features, ensure respect for
the environment and low operating
costs.
NOTE:
Also remember that the scrupulous
observance of the maintenance
procedures is essential for keeping
your vehicle operating properly. Not
adhering to the “Scheduled Service
Plan” can impact your vehicle’s
warranty.
Interval Running Coupons
Maserati has therefore provided for a
series of checks and maintenance
operations involving the 1
stservice
when the vehicle mileage reaches
12500 mi (20000 km) or after 2 years of
the vehicle's life, and subsequently
every 12500 mi (20000 km) or every 2
years.
After the 12
thservice, maintenance
must be restarted with the operations
scheduled for the 1
st,2ndand 3rd
service.
CAUTION!
The Scheduled Maintenance services
are prescribed by the Manufacturer.
Failure to have the services carried out
can affect your warranty.
The Scheduled Maintenance service is
provided
by the whole Authorized
Maserati Dealer. In the event that,
when a service is performed, further
replacements or repairs are found to
be necessary in addition to the
scheduled operations, these can be
carried out only with the specific
consent of the Customer.
CAUTION!
You are advised to notify the
Authorized Maserati Dealer of any
minor operating problem, without
waiting for the next scheduled service.
NOTE:
• Change
your vehicle's oil if it has
been 2 years since your last oil
change.
• Change your engine oil more often if
you drive your vehicle off-road for an
extended period of time or short trips without reaching operation
temperature.
• Under no circumstances should oil
change intervals exceed 12500 mi
(20000 km) or at least after 2 years.
CAUTION!
Failure to perform the required
maintenance items may result in
damage to the vehicle.
Scheduled Maintenance
(Service) Indicator
When the deadlines for maintenance
Scheduled Maintenance services are
approaching, a message on the
instrument cluster display indicates
that service is due. The deadline may
be expressed in miles/Km or days,
whichever comes first.
The message is displayed only once,
upon activating the instrument cluster,
at decreasing intervals expressed in
mi/km (100, 50...... 1800, 1600,) or in
days (27, 24, ....... 6, 3), accompanied
by the
specific symbol.
Maintenance and Care
7
232
Page 237 of 296
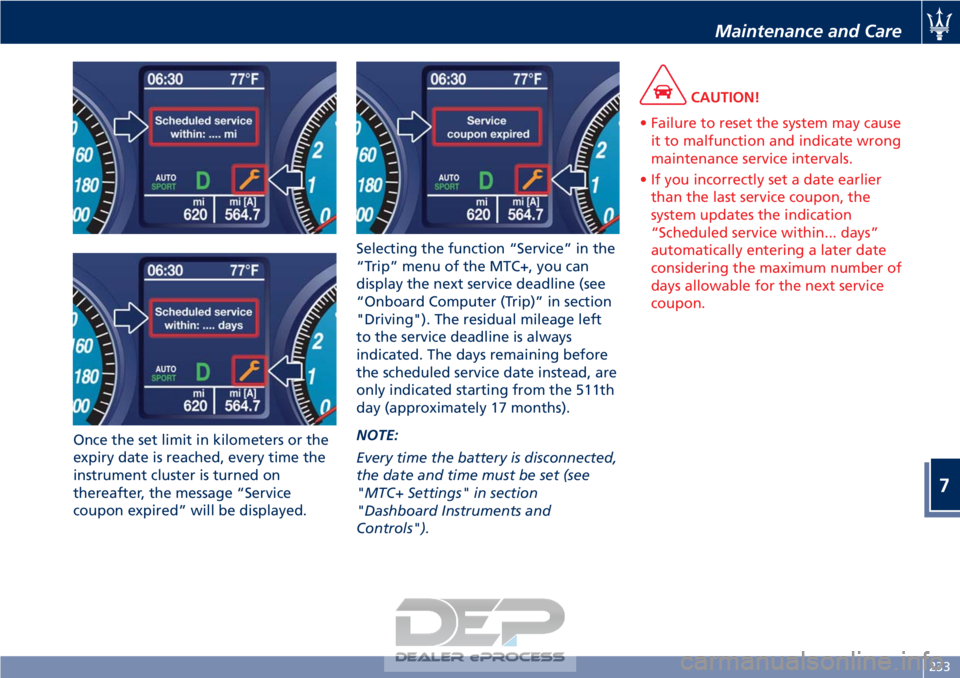
Once the set limit in kilometers or the
expiry date is reached, every time the
instrument cluster is turned on
thereafter, the message “Service
coupon expired” will be displayed.Selecting the function “Service” in the
“Trip” menu of the MTC+, you can
display the next service deadline (see
“Onboard Computer (Trip)” in section
"Driving"). The residual mileage left
to the service deadline is always
indicated. The days remaining before
the scheduled service date instead, are
only indicated starting from the 511th
day (approximately 17 months).
NOTE:
Every time the battery is disconnected,
the date and time must be set (see
"MTC+ Settings" in section
"Dashboard Instruments and
Controls").
CAUTION!
• Failure to reset the system may cause it to malfunction and indicate wrong
maintenance service intervals.
• If you incorrectly set a date earlier than the last service coupon, the
system updates the indication
“Scheduled service within... days”
automatically entering a later date
considering the maximum number of
days allowable for the next service
coupon.
Maintenance and Care
7
233
Page 238 of 296
Scheduled Service Plan
The Scheduled Maintenance services
listed in this chapter must be done
within the times or mileages specified
to protect your vehicle warranty and
ensure the best vehicle performance
and reliability.
More frequent maintenance may be
needed for vehicles in severeoperating conditions, such as dusty
areas and very short trip driving.
Inspection and service should also be
done anytime a malfunction is
suspected.
Maserati recommends that these
maintenance intervals be performed at
the
Authorized Maserati Dealer . Thetechnicians at your dealership know
your vehicle best, and have access to
factory-approved information,
genuine Maserati parts, and specially
designed electronic and mechanical
tools that can help prevent future
costly repairs.
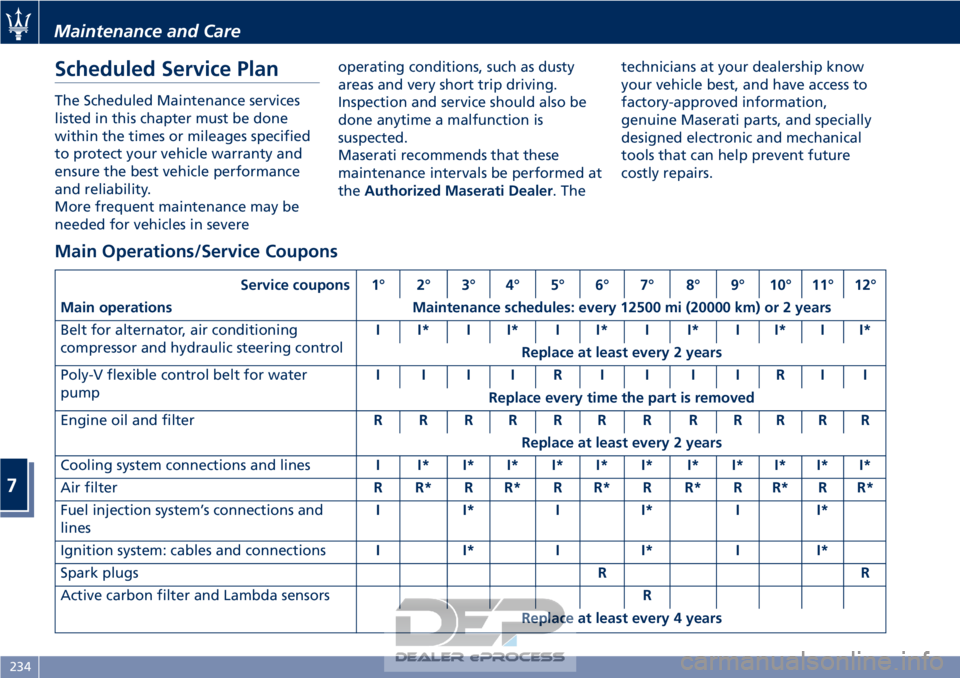
Main Operations/Service Coupons
Service coupons 1° 2° 3° 4° 5° 6° 7° 8° 9° 10° 11° 12°
Main operations Maintenance schedules: every 12500 mi (20000 km) or 2 years
Belt for alternator, air conditioning
compressor and hydraulic steering control I I* I I* I I* I I* I I* I I*
Replace at least every 2 years
Poly-V flexible control belt for water
pump IIIIRIIIIRII
Replace every time the part is removed
Engine oil and filter RRRRRRRRRRRR
Replace at least every 2 years
Cooling system connections and lines II*I*I*I*I*I*I*I*I*I*I*
Air filter R R* R R* R R* R R* R R* R R*
Fuel injection system’s connections and
lines I I* I I* I I*
Ignition system: cables and connections I I* I I* I I*
Spark plugs RR
Active carbon filter and Lambda sensors R
Replace at least every 4 years
Maintenance and Care
7
234
Page 239 of 296
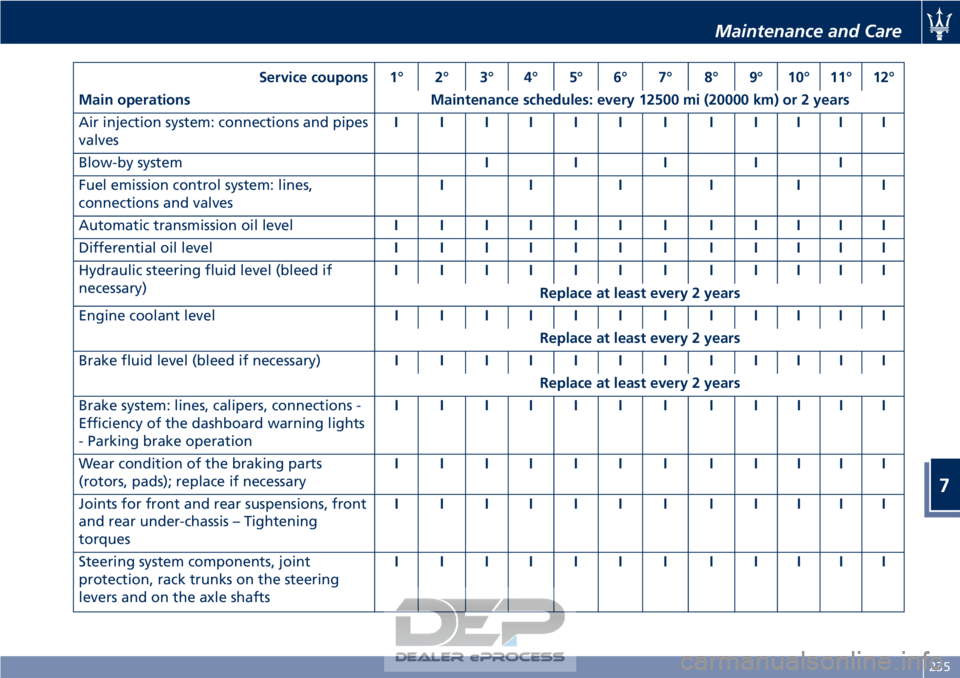
Service coupons 1° 2° 3° 4° 5° 6° 7° 8° 9° 10° 11° 12°
Main operations Maintenance schedules: every 12500 mi (20000 km) or 2 years
Air injection system: connections and pipes
valves IIIIIIIIIIII
Blow-by system III II
Fuel emission control system: lines,
connections and valves III III
Automatic transmission oil level IIIIIIIIIIII
Differential oil level IIIIIIIIIIII
Hydraulic steering fluid level (bleed if
necessary) IIIIIIIIIIII
Replace at least every 2 years
Engine coolant level IIIIIIIIIIII
Replace at least every 2 years
Brake fluid level (bleed if necessary) IIIIIIIIIIII
Replace at least every 2 years
Brake system: lines, calipers, connections -
Efficiency of the dashboard warning lights
- Parking brake operation IIIIIIIIIIII
Wear condition of the braking parts
(rotors, pads); replace if necessary IIIIIIIIIIII
Joints for front and rear suspensions, front
and rear under-chassis – Tightening
torques IIIIIIIIIIII
Steering system components, joint
protection, rack trunks on the steering
levers and on the axle shafts IIIIIIIIIIII
Maintenance and Care
7
235
Page 240 of 296
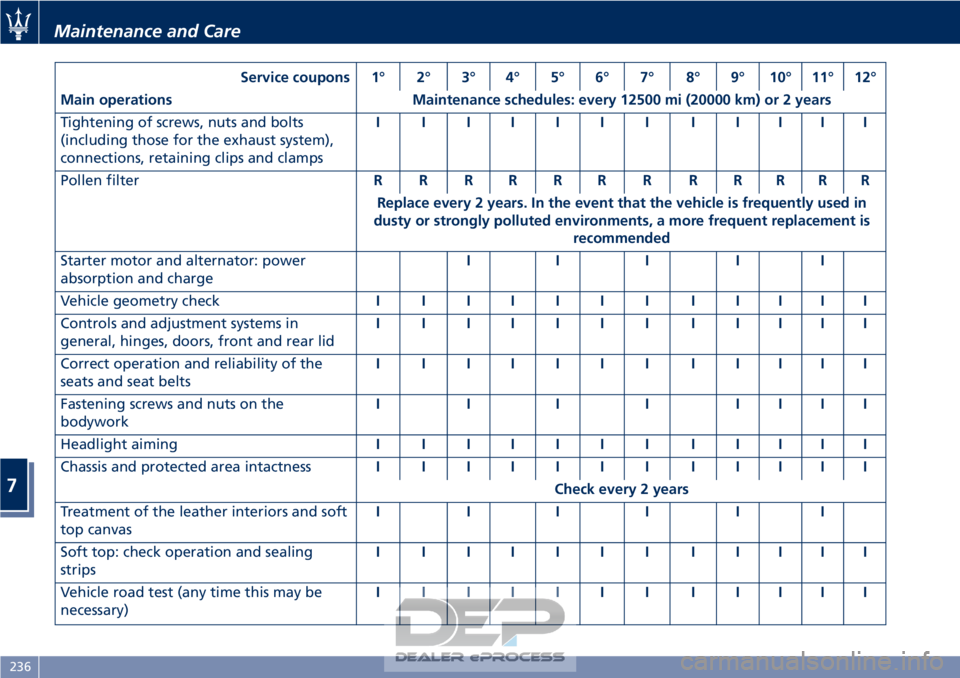
Service coupons 1° 2° 3° 4° 5° 6° 7° 8° 9° 10° 11° 12°
Main operations Maintenance schedules: every 12500 mi (20000 km) or 2 years
Tightening of screws, nuts and bolts
(including those for the exhaust system),
connections, retaining clips and clamps IIIIIIIIIIII
Pollen filter RRRRRRRRRRRR
Replace every 2 years. In the event that the vehicle is frequently used in
dusty or strongly polluted environments, a more frequent replacement is recommended
Starter motor and alternator: power
absorption and charge III II
Vehicle geometry check IIIIIIIIIIII
Controls and adjustment systems in
general, hinges, doors, front and rear lid IIIIIIIIIIII
Correct operation and reliability of the
seats and seat belts IIIIIIIIIIII
Fastening screws and nuts on the
bodywork IIIIIIII
Headlight aiming IIIIIIIIIIII
Chassis and protected area intactness IIIIIIIIIIII
Check every 2 years
Treatment of the leather interiors and soft
top canvas IIIIII
Soft top: check operation and sealing
strips IIIIIIIIIIII
Vehicle road test (any time this may be
necessary) IIIIIIIIIIII
Maintenance and Care
7
236