child restraint MASERATI LEVANTE 2019 User Guide
[x] Cancel search | Manufacturer: MASERATI, Model Year: 2019, Model line: LEVANTE, Model: MASERATI LEVANTE 2019Pages: 436, PDF Size: 15.24 MB
Page 78 of 436
Child Restraint Systems NOTE:
A child restraint system can help
protect a child in a vehicle so ensure
that the child restraint selected has a
certification label applicable to FMVSS
213 in the U.S., or CMVSS 213 in
Canada.
Everyone in your vehicle must be
buckled up all the time, including
babies and children. Every state in the
United States and all Canadian
provinces require that small children
ride in proper restraint systems. Please
be reminded that you can be
prosecuted for ignoring this law.
Children 12 years or younger should
ride properly buckled up in a rear seat,
if available. According to crash
statistics, children are safer when
properly restrained in the rear seats
rather than in the front.
WARNING!
In a collision, an unrestrained child,
even a baby, can become a projectile
inside the vehicle. The force required
to hold even an infant on your lap
could become so great that you could not hold the child, no matter how
strong you are. The child and others
could be badly injured or killed. Any
child riding in your vehicle should
always be in a proper restraint system
suitable for the child’s size.
There are different sizes and types of
restraint
systems for children from
newborn size to the child almost large
enough for an adult safety belt.
Always refer to the manual provided
with child seat to ensure it is the
proper type according the travelling
child. Use the restraint system that is
correct for your child.
Infants and Child Restraints Safety experts recommend that
children ride rearwardfacing in the
vehicle until they are two years old or
until they reach either the height or
weight limit of their rear facing child
seat.
Two types of child restraint systems
can be used rearward-facing: infant
carriers and convertible child seats.
The infant carrier is only used
rearward-facing in the vehicle. It is
recommended for children from birth
until they reach the weight or height
limit of the infant carrier. Convertible child seats can be used
either rearward-facing or
forward-facing in the rear seat of the
vehicle. Convertible child seats often
have a higher weight limit in the
rearward-facing direction than infant
carriers do, so they can be used
rearward-facing by children who have
outgrown their infant carrier but are
still younger than at least two years
old.
Children should remain rearward-
facing until they reach the highest
weight or height allowed by their child
seat. Both types of child restraint
systems are fixed to the car in the rear
seat area by the lap/shoulder belt or
the LATCH child restraint anchor
system. Refer to “Lower Anchors and
Tether for CHildren (LATCH)” in this
section.
WARNING!
• Never place a rear facing infant seat
in front of an air bag. A deploying
air bag can cause death or serious
injury to a child 12 years or younger,
including a child in a rearward facing
infant seat.
• Only use a rearward-facing childBefore Starting
2
74
Page 79 of 436
restraint in a vehicle with a rear
seat.
Older Children and Child
Restraints Children who are two years old or
who have outgrown their rear-facing
child seat can ride forward facing in
the rear seat of the vehicle in a proper
child restraint. Forward-facing child
seats and convertible child seats used
in the forward-facing direction are for
children who are over two years old or
who have outgrown the rear-facing
weight or height limit of their
rear-facing child seat.
Children should remain in a
forward-facing child seat with a
harness for as long as possible, up to
the highest weight or height allowed
by the child seat. These child seats are
also fixed to the car by the
lap/shoulder belt or the LATCH child
restraint anchorage system located in
the rear seat area. Refer to “Lower
Anchors and Tether for CHildren
(LATCH)” in this section.
All children whose weight or height is
above the forward-facing limit for the
child seat should use a belt-
positioning booster seat until the
vehicle’s seat belts fit properly. If the child cannot sit with knees bent over
the vehicle’s seat cushion while the
back is against the seatback, they
should use a belt-positioning booster
seat.
The child and belt-positioning booster
seat are fixed to the car by the
lap/shoulder belt.
Children Too Large for Booster
Seats Children who are large enough to
wear the shoulder belt comfortably
and whose legs are long enough to
bend over the front of the seat when
their back is against the seatback
should use the lap/shoulder belt in a
rear seat.
• Make sure that the child is upright in
the seat.
• The lap portion should be low on
the hips and as snug as possible.
• Check belt fit periodically. A child’s
squirming or slouching can move the
belt out of position.
• If the shoulder belt contacts the face
or neck, move the child closer to the
center of the vehicle. Never allow a
child to put the shoulder belt under
an arm or behind their back. NOTE:
For additional information, refer to
"http://www.safercar.gov/parents/
index.htm"
www.safercar.gov/parents/index.htm
or call 1-888-327-4236.
Canadian residents should refer to
Transport Canada’s website for
additional information:
http://www.tc.gc.ca/eng/motorvehicle
safety/safedrivers-childsafety-index-
53.htm
WARNING!
• Improper installation can lead to
failure of an infant or child restraint.
It could come loose in a collision.
The child could be badly injured or
killed. Follow the restraint
manufacturer’s directions exactly
when installing an infant or child
restraint.
• A rearward-facing child restraint
should only be used in a rear seat. A
rearward-facing child restraint in the
front seat may be struck by a
deploying passenger air bag, which
may cause severe or fatal injury to
the infant.Before Starting
2
75
Page 80 of 436
Here are some tips on getting
the most out of your child
restraint • Before buying any restraint system,
make sure that it has a label
certifying that it meets all applicable
Safety Standards. Maserati also
recommends that you make sure that
you can install the child restraint in
the vehicle where you will use it
before you buy it.
• The restraint system must be
appropriate for your child’s weight
and height.
• Check the label on the restraint
system for weight and height limits.
• Carefully follow the instructions that
come with the restraint system.
• If installed improperly, it may not
work when needed.
• Fit the child into the seat according
to the child restraint manufacturer’s
directions.
WARNING!
When your child restraint system is
not in use, secure it in the vehicle with
the seat belt or remove it from the
vehicle. Do not leave it loose in the
vehicle. In a sudden stop or accident, it could strike the occupants or
seatbacks and cause serious personal
injury.
Installing Child Restraint
Systems using the Vehicle Seat
Belt equipped with ALR Child restraint systems are designed to
be secured in vehicle seats by lap belts
or the lap belt portion of a
lap/shoulder belt.
All the passenger seat belts are
equipped with an Automatic Locking
Retractor (ALR) to secure child
protection through a Child Restraint
System (CRS). These types of seat belts
are designed to keep the lap portion
of the seat belt tight around the child
restraint seat avoiding to use a locking
clip.
The ALR will make a ratcheting noise if
the entire belt is pulled out of the
retractor in order to enable the belt to
retract subsequently. For additional
information on ALR, see “Using Seat
Belt in Automatic Locking Retractor
(ALR) Mode” in “Occupants Restraint
Systems” in this section.
To install a Child Restraint System with
ALR, pull enough of the belt out of the
retractor leading it through the belt
path of the protection device. Slide the latch into the buckle until it clicks,
then remove the entire safety belt
from the retractor in order to
rewound. While rewinding a click will
indicate the safety belt is now in
Automatic Locking mode.
Exert then a traction on the exceeded
lap section of the belt in order to
tighten it around the child restraint
seat. All seat belts will loosen over
time, it is therefore necessary to check
them periodically and set them
properly.
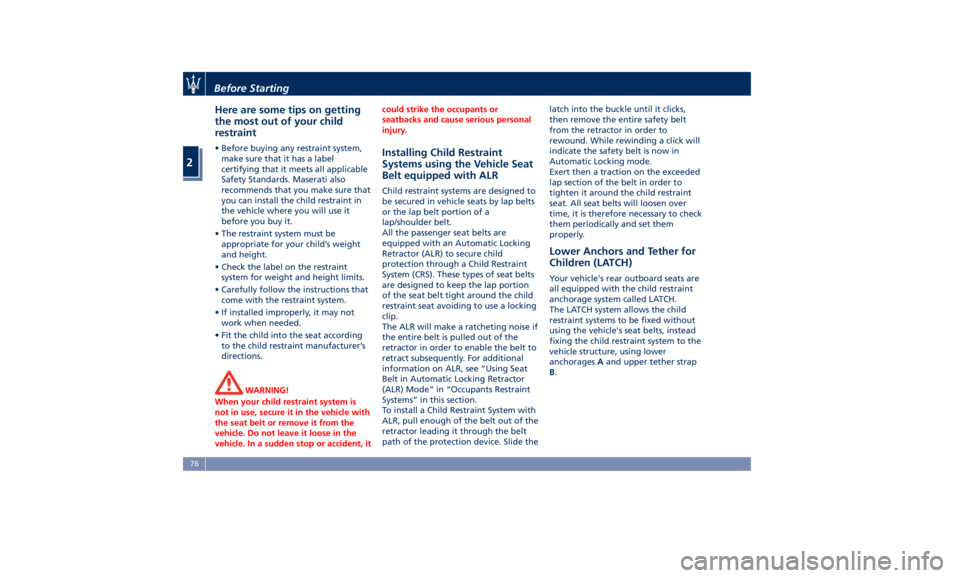
Lower Anchors and Tether for
Children (LATCH) Your vehicle's rear outboard seats are
all equipped with the child restraint
anchorage system called LATCH.
The LATCH system allows the child
restraint systems to be fixed without
using the vehicle's seat belts, instead
fixing the child restraint system to the
vehicle structure, using lower
anchorages A and upper tether strap
B .Before Starting
2
76
Page 81 of 436
LATCH-Compatible child restraint
systems are now available. You should
never install LATCH child seats so that
two seats share a common lower
anchorage.
If your child restraints are not
LATCH-Compatible, install the
restraints using the vehicle's seat belts.
Installing a LATCH- Compatible Child
Restraint System
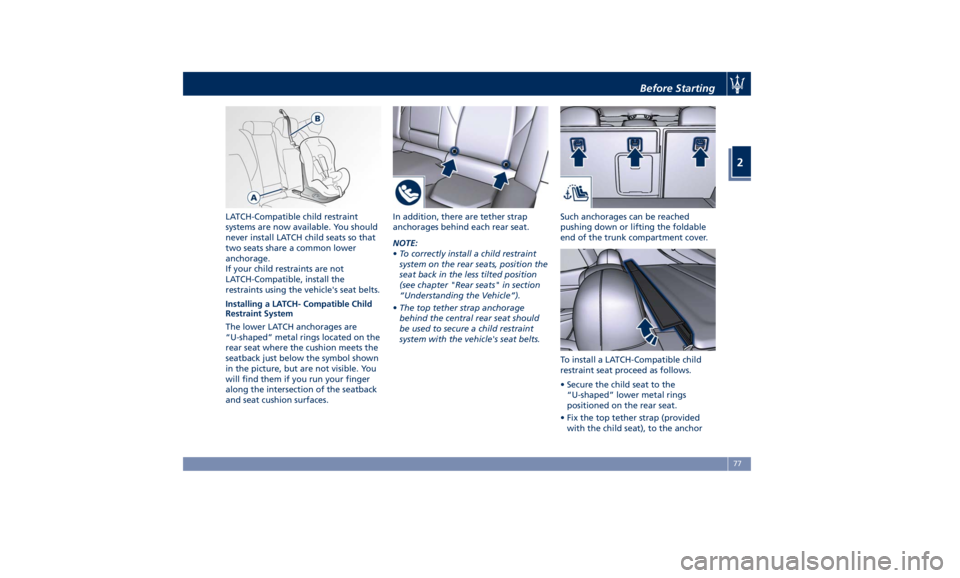
The lower LATCH anchorages are
“U-shaped” metal rings located on the
rear seat where the cushion meets the
seatback just below the symbol shown
in the picture, but are not visible. You
will find them if you run your finger
along the intersection of the seatback
and seat cushion surfaces. In addition, there are tether strap
anchorages behind each rear seat.
NOTE:
• To correctly install a child restraint
system on the rear seats, position the
seat back in the less tilted position
(see chapter "Rear seats" in section
“Understanding the Vehicle”).
• The top tether strap anchorage
behind the central rear seat should
be used to secure a child restraint
system with the vehicle's seat belts. Such anchorages can be reached
pushing down or lifting the foldable
end of the trunk compartment cover.
To install a LATCH-Compatible child
restraint seat proceed as follows.
• Secure the child seat to the
“U-shaped” lower metal rings
positioned on the rear seat.
• Fix the top tether strap (provided
with the child seat), to the anchorBefore Starting
2
77
Page 82 of 436
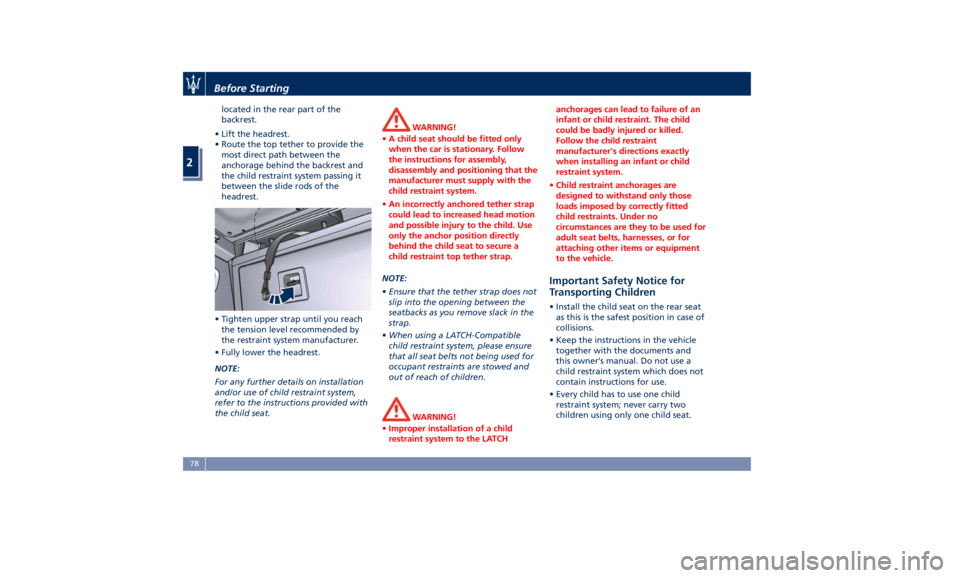
located in the rear part of the
backrest.
• Lift the headrest.
• Route the top tether to provide the
most direct path between the
anchorage behind the backrest and
the child restraint system passing it
between the slide rods of the
headrest.
• Tighten upper strap until you reach
the tension level recommended by
the restraint system manufacturer.
• Fully lower the headrest.
NOTE:
For any further details on installation
and/or use of child restraint system,
refer to the instructions provided with
the child seat. WARNING!
• A child seat should be fitted only
when the car is stationary. Follow
the instructions for assembly,
disassembly and positioning that the
manufacturer must supply with the
child restraint system.
• An incorrectly anchored tether strap
could lead to increased head motion
and possible injury to the child. Use
only the anchor position directly
behind the child seat to secure a
child restraint top tether strap.
NOTE:
• Ensure
that the tether strap does not
slip into the opening between the
seatbacks as you remove slack in the
strap.
• When using a LATCH-Compatible
child restraint system, please ensure
that all seat belts not being used for
occupant restraints are stowed and
out of reach of children.
WARNING!
• Improper installation of a child
restraint system to the LATCH anchorages can lead to failure of an
infant or child restraint. The child
could be badly injured or killed.
Follow the child restraint
manufacturer's directions exactly
when installing an infant or child
restraint system.
• Child restraint anchorages are
designed to withstand only those
loads imposed by correctly fitted
child restraints. Under no
circumstances are they to be used for
adult seat belts, harnesses, or for
attaching other items or equipment
to the vehicle.
Important Safety Notice for
Transporting Children • Install the child seat on the rear seat
as this is the safest position in case of
collisions.
• Keep the instructions in the vehicle
together with the documents and
this owner’s manual. Do not use a
child restraint system which does not
contain instructions for use.
• Every child has to use one child
restraint system; never carry two
children using only one child seat.Before Starting
2
78
Page 101 of 436
13 Door lock button with “Passive
Entry” function.
14 Door outboard opening lock.
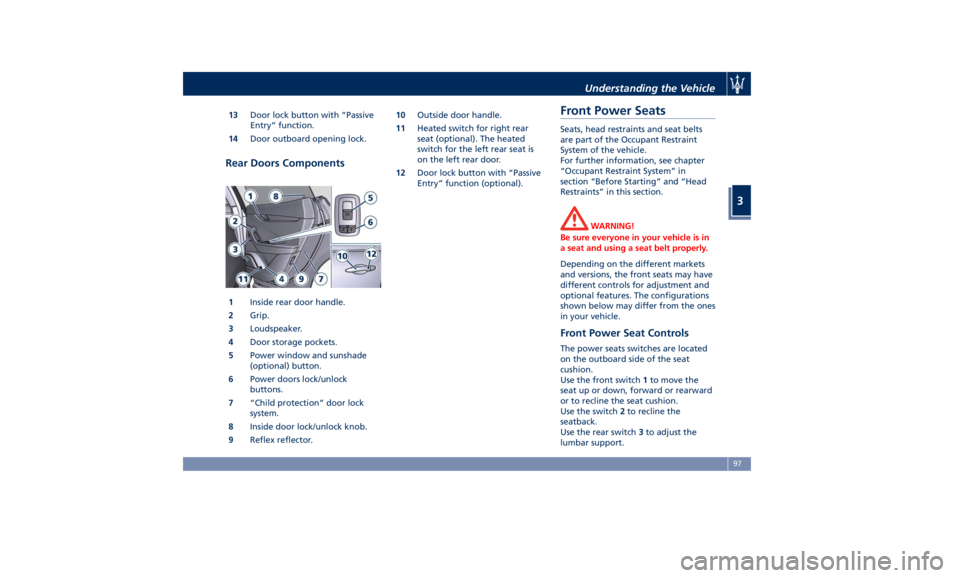
Rear Doors Components
1 Inside rear door handle.
2 Grip.
3 Loudspeaker.
4 Door storage pockets.
5 Power window and sunshade
(optional) button.
6 Power doors lock/unlock
buttons.
7 “Child protection” door lock
system.
8 Inside door lock/unlock knob.
9 Reflex reflector. 10 Outside door handle.
11 Heated switch for right rear
seat (optional). The heated
switch for the left rear seat is
on the left rear door.
12 Door lock button with “Passive
Entry” function (optional).
Front Power Seats Seats, head restraints and seat belts
are part of the Occupant Restraint
System of the vehicle.
For further information, see chapter
“Occupant Restraint System” in
section “Before Starting” and “Head
Restraints” in this section.
WARNING!
Be sure everyone in your vehicle is in
a seat and using a seat belt properly.
Depending on the different markets
and versions, the front
seats may have
different controls for adjustment and
optional features. The configurations
shown below may differ from the ones
in your vehicle.
Front Power Seat Controls The power seats switches are located
on the outboard side of the seat
cushion.
Use the front switch 1 to move the
seat up or down, forward or rearward
or to recline the seat cushion.
Use the switch 2 to recline the
seatback.
Use the rear switch 3 to adjust the
lumbar support.Understanding the Vehicle
3
97
Page 107 of 436
to the driver by moving the seat for
Easy Exit or Easy Entry.
Each stored memory setting will have
an associated easy entry/exit position.
NOTE:
The Easy Entry/Exit feature can be
enabled or disabled using the MTC+
System, refer to “MTC+ Settings” in
section “Dashboard Instruments and
Controls” for further information.
Rear Seats Rear seats can fit three passengers.
Seats, head restraints and seat belts
are parts of the occupant restraint
system of the vehicle.
For further information, see chapter
“Occupants Restraint Systems” in
section “Before Starting” and “Head
Restraints” in this section.
WARNING!
Be sure everyone in your vehicle is in
a seat and using a seat belt properly.
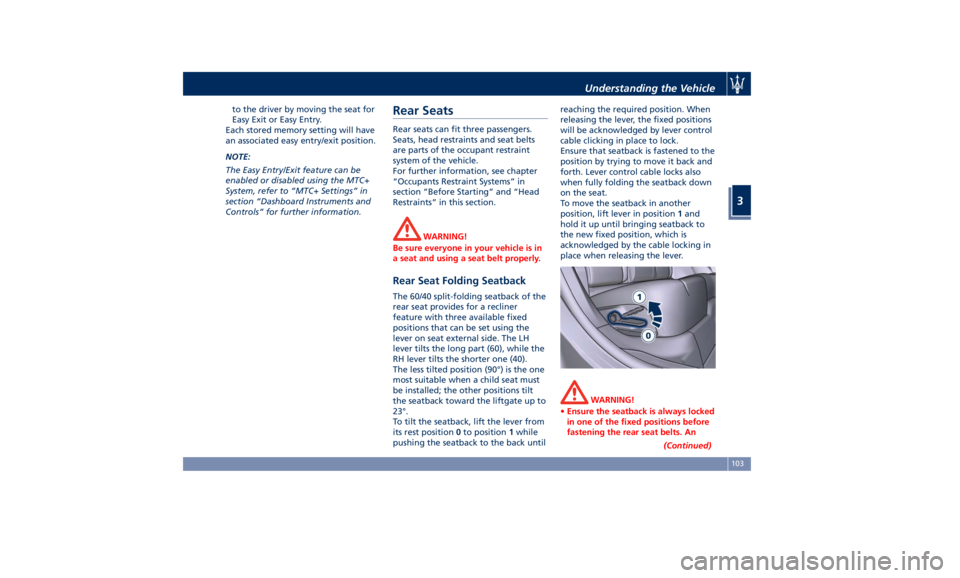
Rear Seat Folding Seatback The 60/40 split-folding seatback of the
rear seat provides for a recliner
feature with three available fixed
positions that can be set using the
lever on seat external side. The LH
lever tilts the long part (60), while the
RH lever tilts the shorter one (40).
The less tilted position (90°) is the one
most suitable when a child seat must
be installed; the other positions tilt
the seatback toward the liftgate up to
23°.
To tilt the seatback, lift the lever from
its rest position 0 to position 1 while
pushing the seatback to the back until reaching the required position. When
releasing the lever, the fixed positions
will be acknowledged by lever control
cable clicking in place to lock.
Ensure that seatback is fastened to the
position by trying to move it back and
forth. Lever control cable locks also
when fully folding the seatback down
on the seat.
To move the seatback in another
position, lift lever in position 1 and
hold it up until bringing seatback to
the new fixed position, which is
acknowledged by the cable locking in
place when releasing the lever.
WARNING!
• Ensure the seatback is always locked
in one of the fixed positions before
fastening the rear seat belts. An
(Continued)Understanding the Vehicle
3
103
Page 108 of 436
(Continued)
unlocked seatback cannot ensure the
necessary stability for passengers
and/or for child seats. An unlocked
seatback could cause severe injuries
in case of accident.
• When fastening a child seat on
external rear seats, ensure that the
corresponding seatback is in the full
upright position.
• Always check that the head restraint
of the rear seats that must be
occupied by a passenger is correctly
adjusted (see chapter “Head
Restraints” in this section).
NOTE:
Rear
seat backrest can
be fully folded
to increase luggage space. See “Cargo
Area” in this section for further
details.
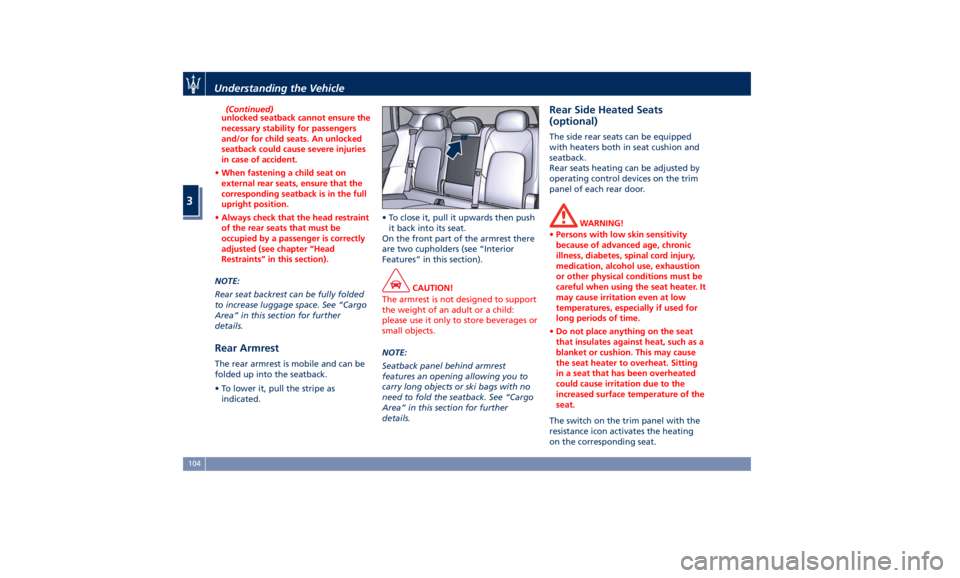
Rear Armrest The rear armrest is mobile and can be
folded up into the seatback.
• To lower it, pull the stripe as
indicated. • To close it, pull it upwards then push
it back into its seat.
On the front part of the armrest there
are two cupholders (see “Interior
Features” in this section).
CAUTION!
The armrest is not designed to support
the weight of an adult or a child:
please use it only to store beverages or
small objects.
NOTE:
Seatback
panel behind armrest
features an opening allowing you to
carry long objects or ski bags with no
need to fold the seatback. See “Cargo
Area” in this section for further
details. Rear Side Heated Seats
(optional) The side rear seats can be equipped
with heaters both in seat cushion and
seatback.
Rear seats heating can be adjusted by
operating control devices on the trim
panel of each rear door.
WARNING!
• Persons with low skin sensitivity
because of advanced age, chronic
illness, diabetes, spinal cord injury,
medication, alcohol use, exhaustion
or other physical conditions must be
careful when using the seat heater. It
may cause irritation even at low
temperatures, especially if used for
long periods of time.
• Do not place anything on the seat
that insulates against heat, such as a
blanket or cushion. This may cause
the seat heater to overheat. Sitting
in a seat that has been overheated
could cause irritation due to the
increased surface temperature of the
seat.
The switch on the trim panel with the
resistance
icon activates the heating
on the corresponding seat.Understanding the Vehicle
3
104
Page 145 of 436
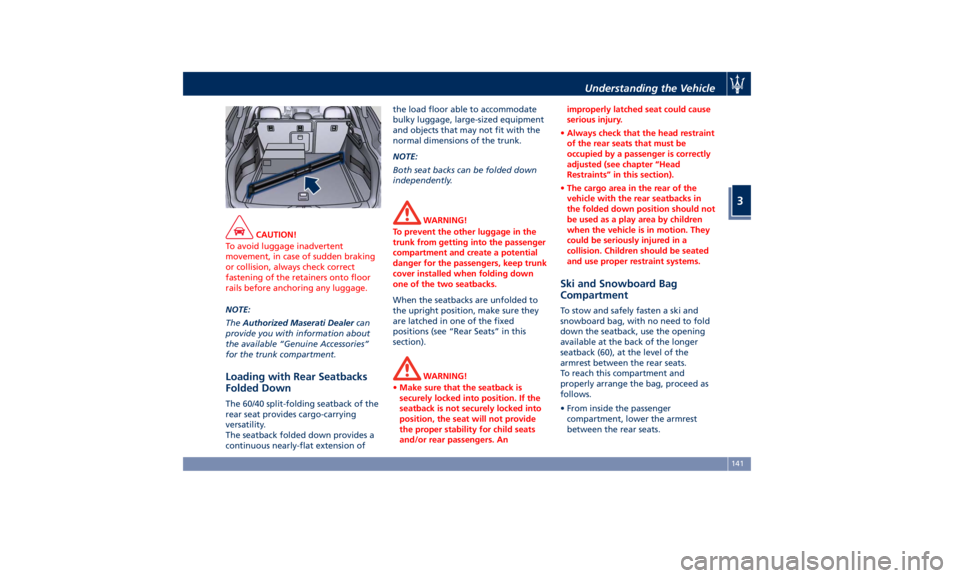
CAUTION!
To avoid luggage inadvertent
movement, in case of sudden braking
or collision, always check correct
fastening of the retainers onto floor
rails before anchoring any luggage.
NOTE:
The Authorized
Maserati Dealer can
provide you with information about
the available “Genuine Accessories”
for the trunk compartment.
Loading with Rear Seatbacks
Folded Down The 60/40 split-folding seatback of the
rear seat provides cargo-carrying
versatility.
The seatback folded down provides a
continuous nearly-flat extension of the load floor able to accommodate
bulky luggage, large-sized equipment
and objects that may not fit with the
normal dimensions of the trunk.
NOTE:
Both seat backs can be folded down
independently.
WARNING!
To prevent the other luggage in the
trunk from getting into the passenger
compartment and create a potential
danger for the passengers, keep trunk
cover installed when folding down
one of the two seatbacks.
When the seatbacks are unfolded to
the
upright position, make
sure they
are latched in one of the fixed
positions (see “Rear Seats” in this
section).
WARNING!
• Make sure that the seatback is
securely locked into position. If the
seatback is not securely locked into
position, the seat will not provide
the proper stability for child seats
and/or rear passengers. An improperly latched seat could cause
serious injury.
• Always check that the head restraint
of the rear seats that must be
occupied by a passenger is correctly
adjusted (see chapter “Head
Restraints” in this section).
• The cargo area in the rear of the
vehicle with the rear seatbacks in
the folded down position should not
be used as a play area by children
when the vehicle is in motion. They
could be seriously injured in a
collision. Children should be seated
and use proper restraint systems.
Ski and Snowboard Bag
Compartment To stow and safely fasten a ski and
snowboard bag, with no need to fold
down the seatback, use the opening
available at the back of the longer
seatback (60), at the level of the
armrest between the rear seats.
To reach this compartment and
properly arrange the bag, proceed as
follows.
• From inside the passenger
compartment, lower the armrest
between the rear seats.Understanding the Vehicle
3
141
Page 150 of 436
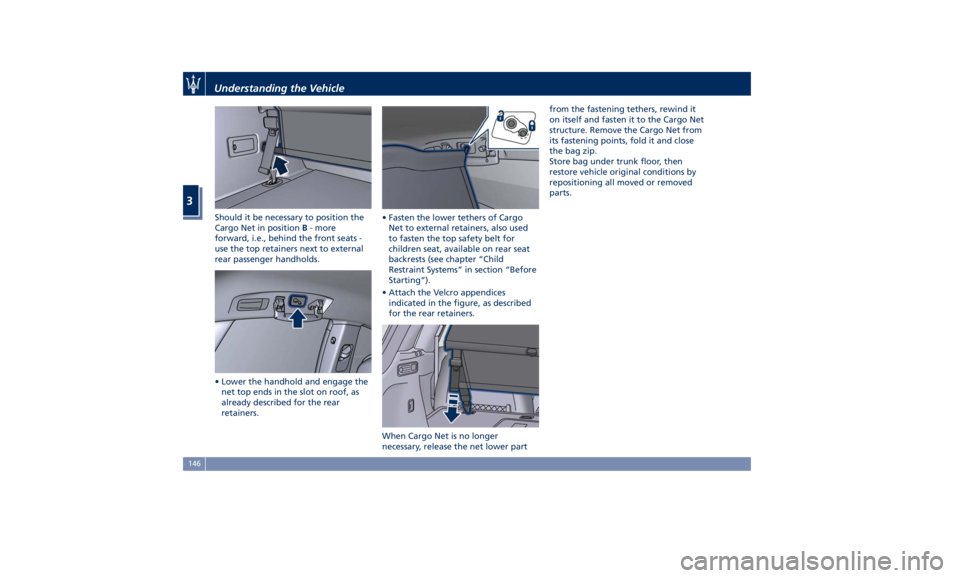
Should it be necessary to position the
Cargo Net in position B - more
forward, i.e., behind the front seats -
use the top retainers next to external
rear passenger handholds.
• Lower the handhold and engage the
net top ends in the slot on roof, as
already described for the rear
retainers. • Fasten the lower tethers of Cargo
Net to external retainers, also used
to fasten the top safety belt for
children seat, available on rear seat
backrests (see chapter “Child
Restraint Systems” in section “Before
Starting”).
• Attach the Velcro appendices
indicated in the figure, as described
for the rear retainers.
When Cargo Net is no longer
necessary, release the net lower part from the fastening tethers, rewind it
on itself and fasten it to the Cargo Net
structure. Remove the Cargo Net from
its fastening points, fold it and close
the bag zip.
Store bag under trunk floor, then
restore vehicle original conditions by
repositioning all moved or removed
parts.Understanding the Vehicle
3
146