glove box MASERATI LEVANTE 2019 Owners Manual
[x] Cancel search | Manufacturer: MASERATI, Model Year: 2019, Model line: LEVANTE, Model: MASERATI LEVANTE 2019Pages: 436, PDF Size: 15.24 MB
Page 99 of 436
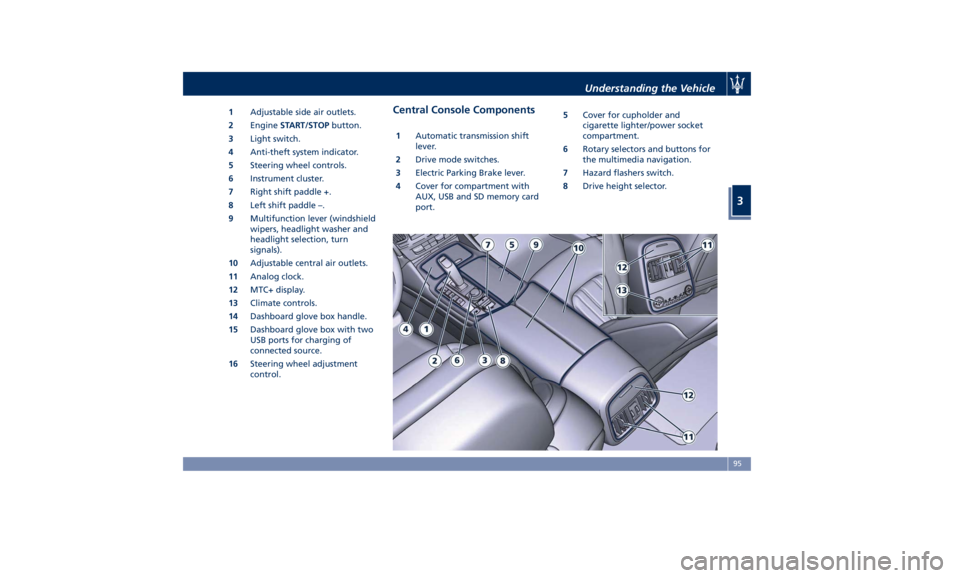
1 Adjustable side air outlets.
2 Engine START/STOP button.
3 Light switch.
4 Anti-theft system indicator.
5 Steering wheel controls.
6 Instrument cluster.
7 Right shift paddle +.
8 Left shift paddle –.
9 Multifunction lever (windshield
wipers, headlight washer and
headlight selection, turn
signals).
10 Adjustable central air outlets.
11 Analog clock.
12 MTC+ display.
13 Climate controls.
14 Dashboard glove box handle.
15 Dashboard glove box with two
USB ports for charging of
connected source.
16 Steering wheel adjustment
control. Central Console Components 1 Automatic transmission shift
lever.
2 Drive mode switches.
3 Electric Parking Brake lever.
4 Cover for compartment with
AUX, USB and SD memory card
port. 5 Cover for cupholder and
cigarette lighter/power socket
compartment.
6 Rotary selectors and buttons for
the multimedia navigation.
7 Hazard flashers switch.
8 Drive height selector.Understanding the Vehicle
3
95
Page 129 of 436
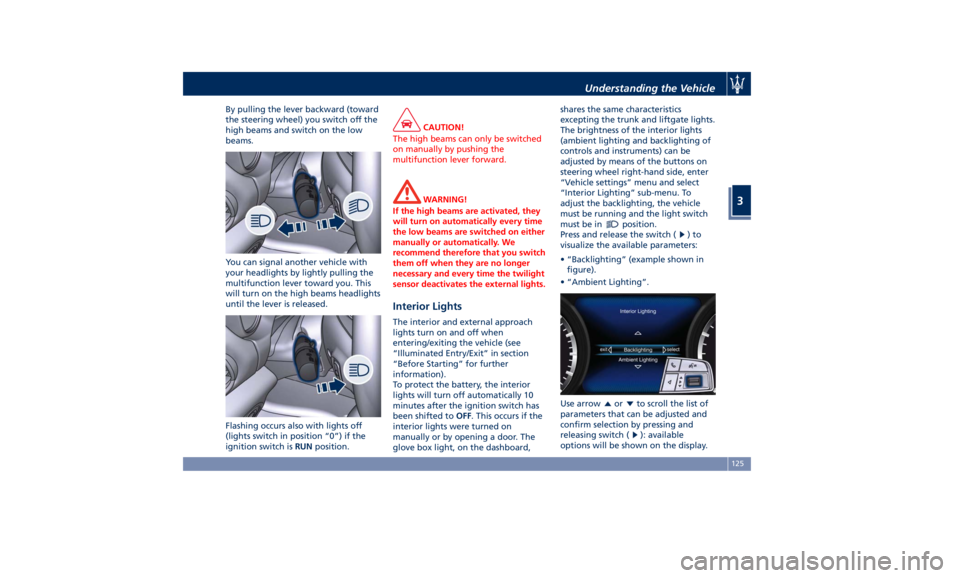
By pulling the lever backward (toward
the steering wheel) you switch off the
high beams and switch on the low
beams.
You can signal another vehicle with
your headlights by lightly pulling the
multifunction lever toward you. This
will turn on the high beams headlights
until the lever is released.
Flashing occurs also with lights off
(lights switch in position “0”) if the
ignition switch is RUN position. CAUTION!
The high beams can only be switched
on manually by pushing the
multifunction lever forward.
WARNING!
If the high beams are activated, they
will turn on automatically every time
the low beams are switched on either
manually or automatically. We
recommend therefore that you switch
them off when they are no longer
necessary and every time the twilight
sensor deactivates the external lights.
Interior Lights The interior and external approach
lights turn on and off when
entering/exiting the vehicle (see
“Illuminated Entry/Exit” in section
“Before Starting” for further
information).
To protect the battery, the interior
lights will turn off automatically 10
minutes after the ignition switch has
been shifted to OFF . This occurs if the
interior lights were turned on
manually or by opening a door. The
glove box light, on the dashboard, shares the same characteristics
excepting the trunk and liftgate lights.
The brightness of the interior lights
(ambient lighting and backlighting of
controls and instruments) can be
adjusted by means of the buttons on
steering wheel right-hand side, enter
“Vehicle settings” menu and select
“Interior Lighting” sub-menu. To
adjust the backlighting, the vehicle
must be running and the light switch
must be in
position.
Press and release the switch (
)to
visualize the available parameters:
• “Backlighting” (example shown in
figure).
• “Ambient Lighting”.
Use arrow
or to scroll the list of
parameters that can be adjusted and
confirm selection by pressing and
releasing switch (
): available
options will be shown on the display.Understanding the Vehicle
3
125
Page 138 of 436
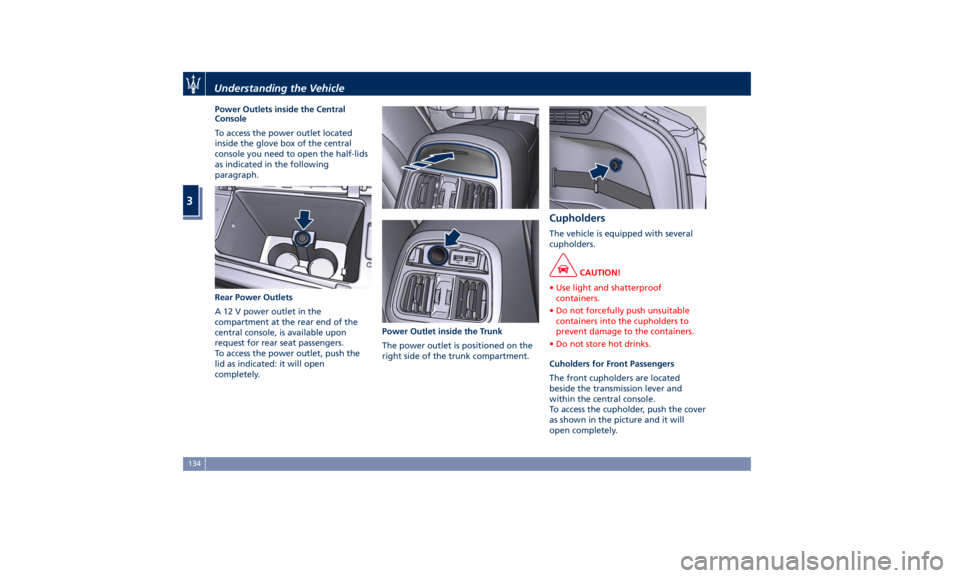
Power Outlets inside the Central
Console
To access the power outlet located
inside the glove box of the central
console you need to open the half-lids
as indicated in the following
paragraph.
Rear Power Outlets
A 12 V power outlet in the
compartment at the rear end of the
central console, is available upon
request for rear seat passengers.
To access the power outlet, push the
lid as indicated: it will open
completely. Power Outlet inside the Trunk
The power outlet is positioned on the
right side of the trunk compartment. Cupholders The vehicle is equipped with several
cupholders.
CAUTION!
• Use light and shatterproof
containers.
• Do not forcefully push unsuitable
containers into the cupholders to
prevent damage to the containers.
• Do not store hot drinks.
Cuholders for Front Passengers
The
front cupholders are located
beside the transmission lever and
within the central console.
To access the cupholder, push the cover
as shown in the picture and it will
open completely.Understanding the Vehicle
3
134
Page 140 of 436
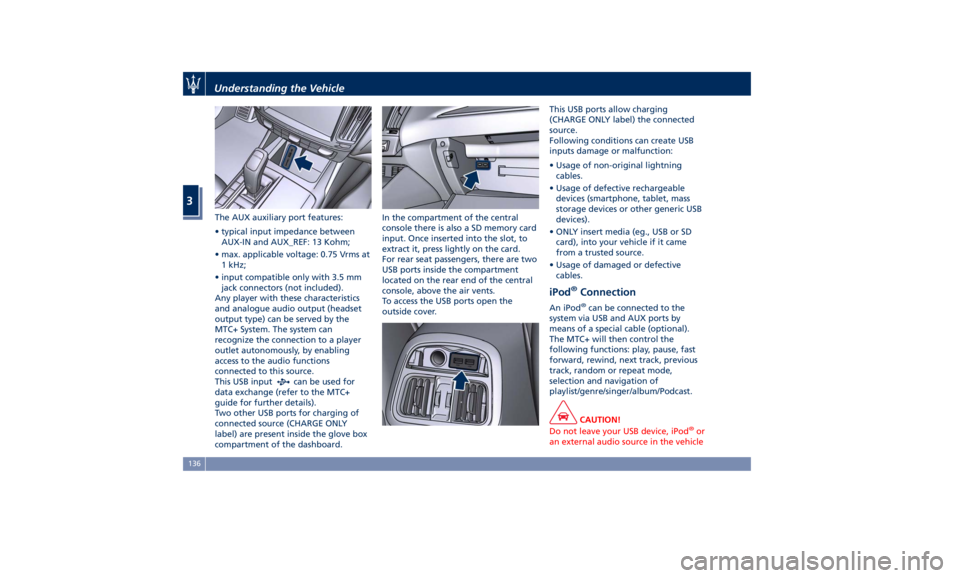
The AUX auxiliary port features:
• typical input impedance between
AUX-IN and AUX_REF: 13 Kohm;
• max. applicable voltage: 0.75 Vrms at
1 kHz;
• input compatible only with 3.5 mm
jack connectors (not included).
Any player with these characteristics
and analogue audio output (headset
output type) can be served by the
MTC+ System. The system can
recognize the connection to a player
outlet autonomously, by enabling
access to the audio functions
connected to this source.
This USB input
can be used for
data exchange (refer to the MTC+
guide for further details).
Two other USB ports for charging of
connected source (CHARGE ONLY
label) are present inside the glove box
compartment of the dashboard. In the compartment of the central
console there is also a SD memory card
input. Once inserted into the slot, to
extract it, press lightly on the card.
For rear seat passengers, there are two
USB ports inside the compartment
located on the rear end of the central
console, above the air vents.
To access the USB ports open the
outside cover. This USB ports allow charging
(CHARGE ONLY label) the connected
source.
Following conditions can create USB
inputs damage or malfunction:
• Usage of non-original lightning
cables.
• Usage of defective rechargeable
devices (smartphone, tablet, mass
storage devices or other generic USB
devices).
• ONLY insert media (eg., USB or SD
card), into your vehicle if it came
from a trusted source.
• Usage of damaged or defective
cables.
iPod ®
Connection An iPod ®
can be connected to the
system via USB and AUX ports by
means of a special cable (optional).
The MTC+ will then control the
following functions: play, pause, fast
forward, rewind, next track, previous
track, random or repeat mode,
selection and navigation of
playlist/genre/singer/album/Podcast.
CAUTION!
Do not leave your USB device, iPod ®
or
an external audio source in the vehicleUnderstanding the Vehicle
3
136
Page 199 of 436
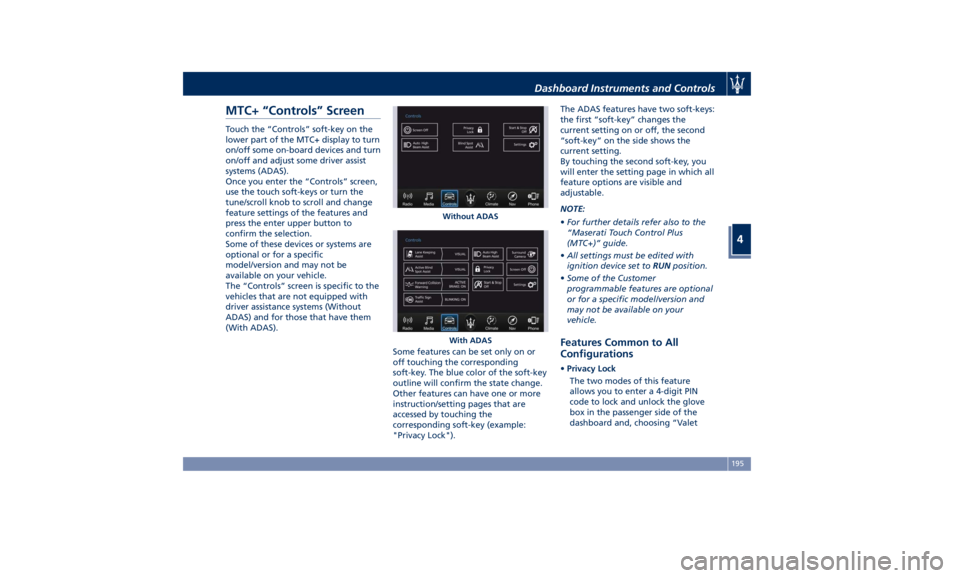
MTC+ “Controls” Screen Touch the “Controls” soft-key on the
lower part of the MTC+ display to turn
on/off some on-board devices and turn
on/off and adjust some driver assist
systems (ADAS).
Once you enter the “Controls” screen,
use the touch soft-keys or turn the
tune/scroll knob to scroll and change
feature settings of the features and
press the enter upper button to
confirm the selection.
Some of these devices or systems are
optional or for a specific
model/version and may not be
available on your vehicle.
The “Controls” screen is specific to the
vehicles that are not equipped with
driver assistance systems (Without
ADAS) and for those that have them
(With ADAS).
Some features can be set only on or
off touching the corresponding
soft-key. The blue color of the soft-key
outline will confirm the state change.
Other features can have one or more
instruction/setting pages that are
accessed by touching the
corresponding soft-key (example:
"Privacy Lock"). The ADAS features have two soft-keys:
the first “soft-key” changes the
current setting on or off, the second
“soft-key” on the side shows the
current setting.
By touching the second soft-key, you
will enter the setting page in which all
feature options are visible and
adjustable.
NOTE:
• For further details refer also to the
“Maserati Touch Control Plus
(MTC+)” guide.
• All settings must be edited with
ignition device set to RUN position.
• Some of the Customer
programmable features are optional
or for a specific model/version and
may not be available on your
vehicle.
Features Common to All
Configurations • Privacy Lock
The two modes of this feature
allows you to enter a 4-digit PIN
code to lock and unlock the glove
box in the passenger side of the
dashboard and, choosing “ValetWithout ADAS
With ADASDashboard Instruments and Controls
4
195
Page 214 of 436
Restore Settings When this feature is selected, it will
reset the “Display”, “Clock”, “Audio”,
and “Radio Settings” to their default
settings.
Run this feature and a pop-up will
appear asking user to confirm default
settings resetting. Select “Yes” to
restore, or “Cancel” to exit. Once the
settings are restored, a pop-up appears
confirming that settings have been
reset to default and then the MTC+
will restart.
Clear Personal Data When this feature is selected, it will
remove personal data concerning
settings and/or options that have been
modified compared to factory settings
and will also remove from system
memory Bluetooth devices and presets.
To remove personal information, select
this feature and a pop-up will appear
asking confirmation to delete all
personal data. Select “OK” to clear, or
“Cancel” to exit. Once the data have
been cleared, a pop up appears
confirming that personal data have
been cleared and then the MTC+ will
restart. Dashboard Compartment There is a glove box compartment on
the passenger side of the dashboard to
store small items or documents.
WARNING!
Do not operate the vehicle with a
glove compartment lid in the open
position. Cellular phones, music
players, and other handheld electronic
devices should be stowed while
driving. Use of these devices while
driving could cause an accident due to
distraction.
CAUTION!
Do not place objects weighing over
22 lb (10 kg) in the glove box
compartment.
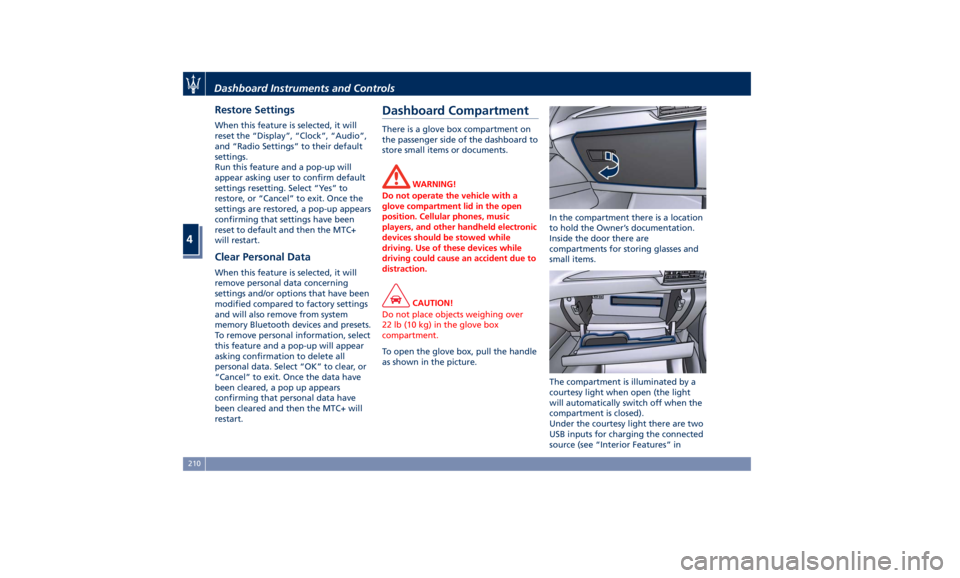
To open the glove box, pull the handle
as
shown in the picture. In the compartment there is a location
to hold the Owner’s documentation.
Inside the door there are
compartments for storing glasses and
small items.
The compartment is illuminated by a
courtesy light when open (the light
will automatically switch off when the
compartment is closed).
Under the courtesy light there are two
USB inputs for charging the connected
source (see “Interior Features” inDashboard Instruments and Controls
4
210
Page 215 of 436
section “Understanding the Vehicle”
for further details).
Privacy Lock Features The glove box is equipped with an
opening/closing electric actuator that
can be locked and unlocked via the
"Privacy Lock" menu of the MTC+, by
entering a 4-digit PIN code. When you
have to leave the vehicle to another
driver (for eaxample, to park it), the
"Valet Mode" feature is available in
the same menu. This feature, in
addition to the glove box, allows you
to lock your settings for listening and
guidance. It is important to memorise
and take note of the PIN since if it is
lost, you must contact the Authorized
Maserati Dealer that will reset this
feature. NOTE:
• “Glove Box Mode” and “Valet
Mode” can not be activated at the
same time.
• “Glove Box Mode” and “Valet
Mode” lock features must be
activated when the glove box is
already closed. If you activated one
of these lock features when the
glove box is opened, the glove box
will not close properly and will not
lock
Activation Procedure
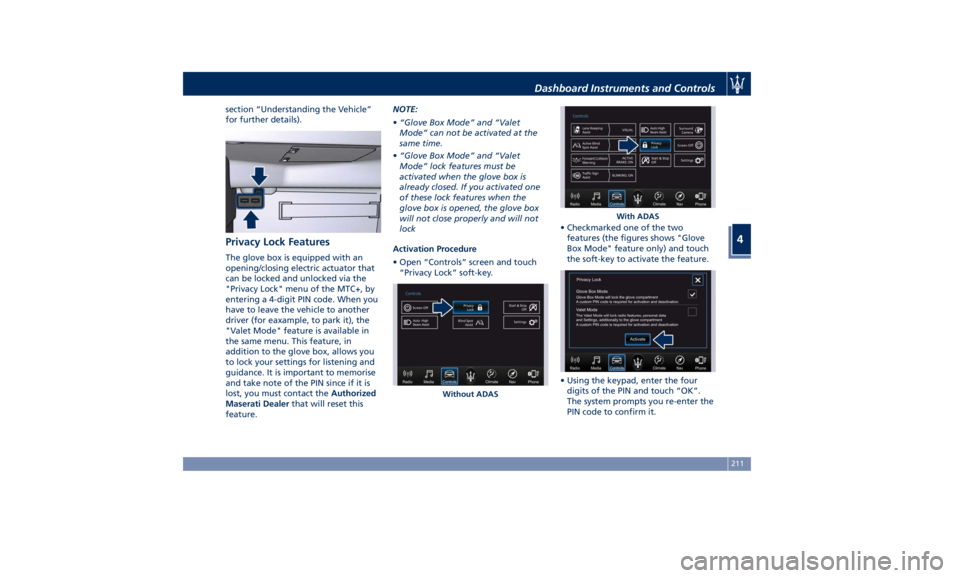
• Open “Controls” screen and touch
“Privacy Lock” soft-key. • Checkmarked one of the two
features (the figures shows "Glove
Box Mode" feature only) and touch
the soft-key to activate the feature.
• Using the keypad, enter the four
digits of the PIN and touch “OK”.
The system prompts you re-enter the
PIN code to confirm it.Without ADAS With ADASDashboard Instruments and Controls
4
211
Page 216 of 436
NOTE:
• If you do not enter all PIN digits, a
prompt will indicate that you should
do so.
• In case of an incoming call while
entering the PIN, the MTC+ system
will temporarily stop the release
function. As soon as the call is over,
the keypad screen will be displayed
again so that you can enter the PIN.
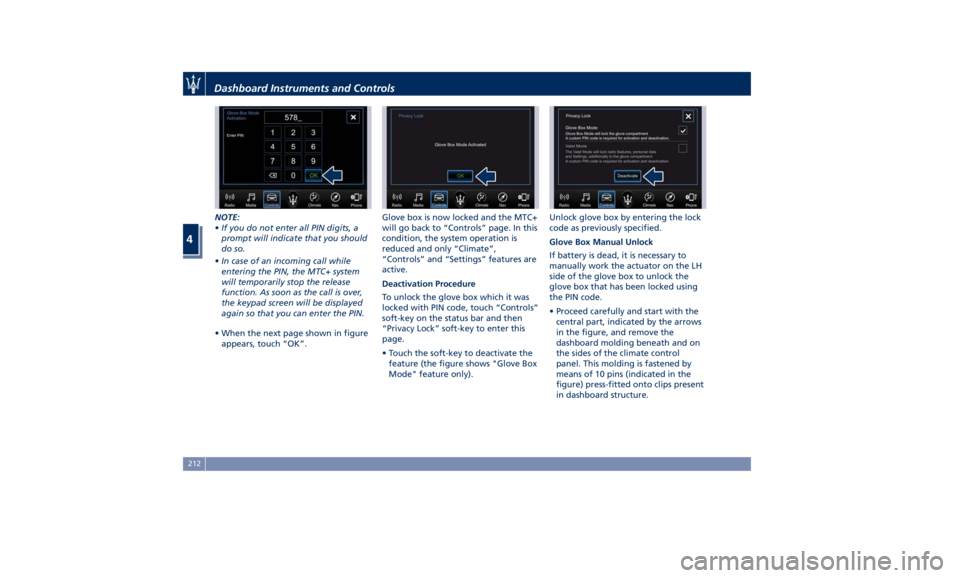
• When the next page shown in figure
appears, touch “OK”. Glove box is now locked and the MTC+
will go back to “Controls” page. In this
condition, the system operation is
reduced and only “Climate”,
“Controls” and “Settings” features are
active.
Deactivation Procedure
To unlock the glove box which it was
locked with PIN code, touch “Controls”
soft-key on the status bar and then
“Privacy Lock” soft-key to enter this
page.
• Touch the soft-key to deactivate the
feature (the figure shows "Glove Box
Mode" feature only). Unlock glove box by entering the lock
code as previously specified.
Glove Box Manual Unlock
If battery is dead, it is necessary to
manually work the actuator on the LH
side of the glove box to unlock the
glove box that has been locked using
the PIN code.
• Proceed carefully and start with the
central part, indicated by the arrows
in the figure, and remove the
dashboard molding beneath and on
the sides of the climate control
panel. This molding is fastened by
means of 10 pins (indicated in the
figure) press-fitted onto clips present
in dashboard structure.Dashboard Instruments and Controls
4
212
Page 217 of 436
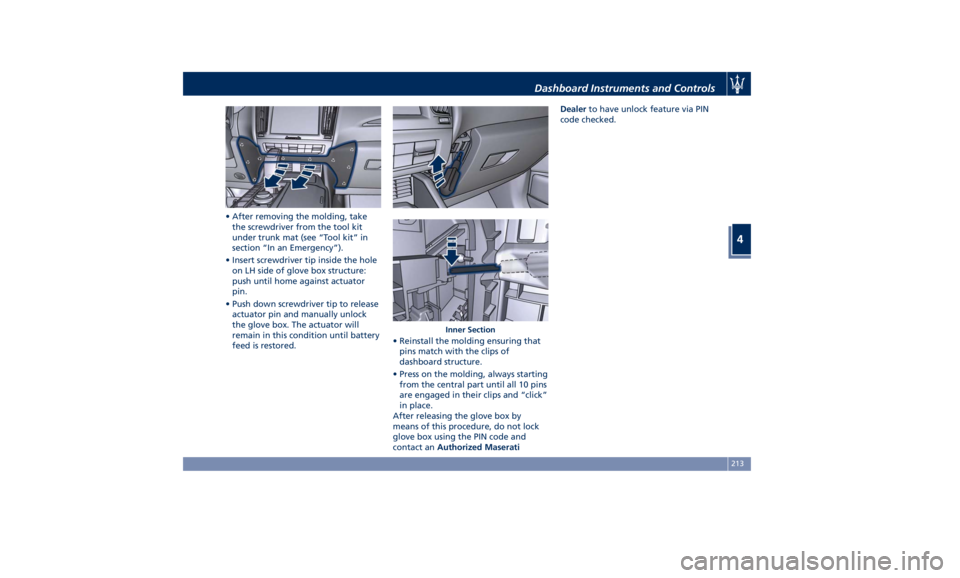
• After removing the molding, take
the screwdriver from the tool kit
under trunk mat (see “Tool kit” in
section “In an Emergency”).
• Insert screwdriver tip inside the hole
on LH side of glove box structure:
push until home against actuator
pin.
• Push down screwdriver tip to release
actuator pin and manually unlock
the glove box. The actuator will
remain in this condition until battery
feed is restored. • Reinstall the molding ensuring that
pins match with the clips of
dashboard structure.
• Press on the molding, always starting
from the central part until all 10 pins
are engaged in their clips and “click”
in place.
After releasing the glove box by
means of this procedure, do not lock
glove box using the PIN code and
contact an Authorized Maserati Dealer to have unlock feature via PIN
code checked.
Inner SectionDashboard Instruments and Controls
4
213
Page 386 of 436
(Continued)
same type (vented).
NOTE:
Remote battery terminals for starting
are located in the engine
compartment for jump-starting to be
used with an auxiliary battery or a
battery from another vehicle (see
“Auxiliary Jump-Start Procedure”
chapter in section “In an Emergency”).
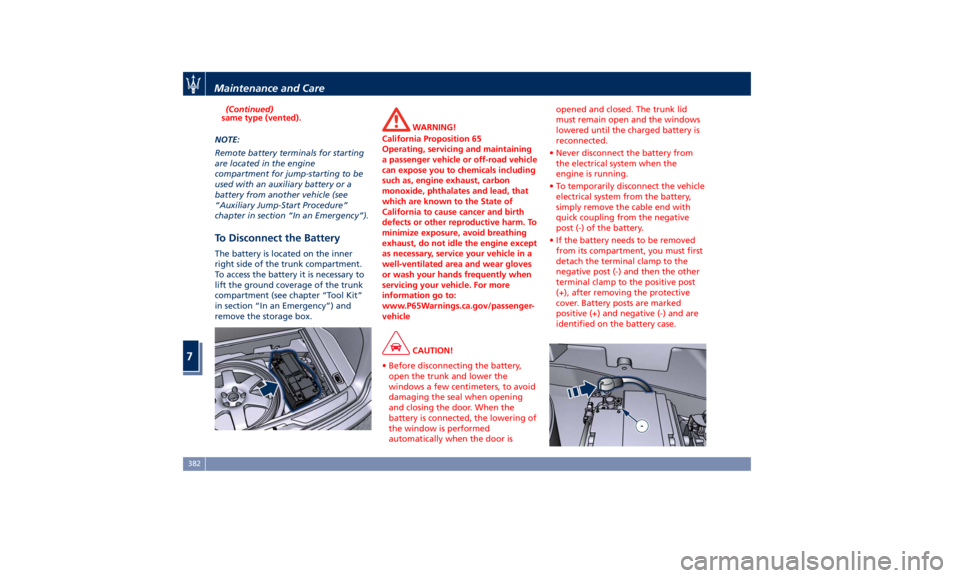
To Disconnect the Battery The battery is located on the inner
right side of the trunk compartment.
To access the battery it is necessary to
lift the ground coverage of the trunk
compartment (see chapter “Tool Kit”
in section “In an Emergency”) and
remove the storage box. WARNING!
California Proposition 65
Operating, servicing and maintaining
a passenger vehicle or off-road vehicle
can expose you to chemicals including
such as, engine exhaust, carbon
monoxide, phthalates and lead, that
which are known to the State of
California to cause cancer and birth
defects or other reproductive harm. To
minimize exposure, avoid breathing
exhaust, do not idle the engine except
as necessary, service your vehicle in a
well-ventilated area and wear gloves
or wash your hands frequently when
servicing your vehicle. For more
information go to:
www.P65Warnings.ca.gov/passenger-
vehicle
CAUTION!
• Before disconnecting the battery,
open the trunk and lower the
windows a few centimeters, to avoid
damaging the seal when opening
and closing the door. When the
battery is connected, the lowering of
the window is performed
automatically when the door is opened and closed. The trunk lid
must remain open and the windows
lowered until the charged battery is
reconnected.
• Never disconnect the battery from
the electrical system when the
engine is running.
• To temporarily disconnect the vehicle
electrical system from the battery,
simply remove the cable end with
quick coupling from the negative
post (-) of the battery.
• If the battery needs to be removed
from its compartment, you must first
detach the terminal clamp to the
negative post (-) and then the other
terminal clamp to the positive post
(+), after removing the protective
cover. Battery posts are marked
positive (+) and negative (-) and are
identified on the battery case.Maintenance and Care
7
382