fuel pressure MASERATI LEVANTE 2019 Owners Manual
[x] Cancel search | Manufacturer: MASERATI, Model Year: 2019, Model line: LEVANTE, Model: MASERATI LEVANTE 2019Pages: 436, PDF Size: 15.24 MB
Page 96 of 436
• Check the tires (see “Tire Inflation
Pressure” chapter in section
“Features and Specifications”) for
proper cold inflation pressure.
Lights and Indicator Lights
• Have someone observe the operation
of exterior lights while you operate
the controls (see “Lights” chapter in
section “Understanding the
Vehicle”).
• Check turn signal and high beam
indicator lights on the instrument
cluster (see “Instrument Cluster”
chapter in section “Dashboard
Instruments and Controls”).
Door Latches
• Check for positive closing, latching,
and locking of doors and liftgate (see
“Unlock the Vehicle with Key fob”
chapter in this section).
Fluid Leaks
• Check area under vehicle after
overnight parking for recent fluid
leaks (oil, fuel, etc.).
• If gasoline fumes are detected or
fluid leaks are suspected, contact the
Authorized Maserati Dealer . WARNING!
California Proposition 65
Operating, servicing and maintaining
a passenger vehicle or off-road vehicle
can expose you to chemicals including
such as, engine exhaust, carbon
monoxide, phthalates and lead, that
which are known to the State of
California to cause cancer and birth
defects or other reproductive harm. To
minimize exposure, avoid breathing
exhaust, do not idle the engine except
as necessary, service your vehicle in a
well-ventilated area and wear gloves
or wash your hands frequently when
servicing your vehicle. For more
information go to:
www.P65Warnings.ca.gov/passenger-
vehicleBefore Starting
2
92
Page 171 of 436
sector 23, only the main menu number
and the scroll arrows remain displayed
in the sector 3 , left side.
Within a submenu, press and release
the switch in the
and arrow
directions to scroll the menu.
Press the
button to return to the
main menu from an item of interest or
from an information screen.
Main Menu & Submenu Content
Overview
1. MAIN MENU
• View speed in mph or km/h
2. VEHICLE INFO
• Tire Pressure
• Transmission Temperature
• Oil Temperature
• Oil Pressure
• Battery Voltage
• Maintenance 3. DRIVE MODE
• Drive Mode - Ride Height - Torque
Distribution - Powertrain status - ESC
status - Suspension stiffness status
4. Driver Assist (if equipped)
• Shows the status of any active driver
assist systems: CC, ACC, LKA and
HAS. Graphics in the main area of
TFT display only refer to ACC, LKA
and HAS systems
• LKA (LaneSense) status
5. FUEL ECONOMY
• Average, Range, Current gage
6. TRIP
• Trip A: Average, Avg. speed, Elapsed
time, Distance
• Trip B: Average, Avg. speed, Elapsed
time, Distance
7. START&STOP
• Messages relating to the Start&Stop
function
8. AUDIO
• Information concerning audio status
according to current media source,
track and station.
• Information on phone incoming call.
9. STORED MESSAGES
10. VEHICLE SETTINGS • Speed Warning: enables, disables or
sets the speed limit represented in
the dynamic icon on the TFT display
• Auto apply Off/On of the Electric
Parking Brake
• Interior Lighting
– Backlighting
– Ambient Lighting
• SCREEN SETUP
– Upper Left
– Upper Right
– Main Menu: Line 1
– Main Menu: Line 2
– Main Menu: Line 3
– MPH km/h Display On/Off
– Main Menu Navigation
– Outline Coloring
– Key-On Display
– Key-Off Display
– Defaults
Messages on Main Display Area
The main display area also displays
"pop up" messages. These pop up
messages fall into several categories:
• Five-Second Stored Messages
When the appropriate conditions
occur, this type of message appears
on the main display area for five
seconds and then returns to the
previous screen. Most of the
messages of this type are thenDashboard Instruments and Controls
4
167
Page 231 of 436
5 – Driving Normal Starting of the Engine ............................. 228
Automatic Start&Stop System ............................. 230
Automatic Transmission .................................. 234
All-Wheel Drive ........................................ 243
Drive Mode ........................................... 244
Active Alternator ....................................... 264
Off-Road Drive ......................................... 264
Parking Brake ......................................... 268
Parking .............................................. 271
Brake and Stability Control System ......................... 273
Using the Brakes ....................................... 280
Use of the Engine ...................................... 281
Electronic Cruise Control ................................. 282
Adaptive Cruise Control - ACC (optional) ..................... 286
Forward Collision Warning – FCW .......................... 297
Lane Keeping Assist - LKA (optional, with ACC only) ............ 301
Blind Spot Assist – BSA (without ACC) ....................... 305
Active Blind Spot Assist - ABSA (optional, with ACC only) ........ 310
Highway Assist – HAS (optional, with ACC only) ................ 313
Traffic Sign Assist – TSA (optional) .......................... 319
Tires - General Information ............................... 321
Tire Pressure Monitoring System (TPMS) ..................... 329
Fuel Requirements ...................................... 334
Refueling ............................................. 336
Driving Conditions ...................................... 338
Trailer Towing ......................................... 341 227
Page 330 of 436
Three primary driving aspects are
affected by improper tire pressure:
Safety
WARNING!
• Improperly inflated tires can be
dangerous.
• Under-inflation increases tire flexing
and can result in tire overheating.
• Over-inflation reduces a tire's ability
to cushion shock. Objects on the
road and potholes can cause damage
that results in tire failure.
• Over-inflated or under-inflated tires
can affect vehicle handling and can
fail suddenly, resulting in loss of
vehicle control.
• Unequal tire pressures can cause
steering problems.
• Unequal tire pressures from one side
of the vehicle to the other can cause
the vehicle to drift to the right or
left.
• Always drive with each tire inflated
to the recommended cold tire
inflation pressure.
Economy
Improper
inflation pressures may cause
uneven wear patterns to develop across the tire tread. These abnormal
wear patterns will reduce tread life
resulting in a need for earlier tire
replacement. Under-inflation also
increases tire rolling resistance
resulting in higher fuel consumption.
Ride comfort and vehicle stability
Proper tire inflation contributes to a
comfortable ride. Over-inflation
produces a jarring and uncomfortable
ride.
Tire Pressure Checkup The proper cold tire inflation pressure
is indicated on the driver's side rear
door pillar and on the table “Tire
Inflation Pressure” in section “Features
and Specifications”.
Inflation pressure specified on the
table always refers to “cold tire
inflation pressure”. Cold tire inflation
pressure is defined as the tire pressure
after the vehicle has not been driven
for at least three hours, or driven less
than 1 mi (1.6 km) after a three hour
period.
Check tire pressures more often in case
of significant outside temperature
changes, as tire pressure varies
according to temperature changes.
The pressure should be checked and if
necessary adjusted; tire wear and overall conditions should also be
checked monthly. Tire pressures
change by approximately 1 PSI (0.07
bar) per 12°F (7°C) of air temperature
change. Keep this in mind when
checking tire pressure inside a garage,
especially in winter.
Example: If garage temperature = 68°F
(20°C) and the outside temperature =
32°F (0°C) then the cold tire inflation
pressure should be increased by 3 PSI
(0.21 bar) for every 12°F (7°C) for this
outside temperature condition.
Tire pressure may increase from 2 to 6
PSI (0.13 to 0.4 bar) during operation.
DO NOT reduce this normal pressure
build-up or your tire pressure will be
too low. After inspecting or adjusting
the tire pressure, always reinstall the
valve stem cap. This will prevent
moisture and dirt from entering the
valve stem, which could damage the
valve stem and the TPMS sensor
connected to it.
Tread Wear Indicators Tread wear indicators are in the
original equipment tires to help you
determine when your tires should be
replaced.
These indicators are molded into the
bottom of the tread grooves.Driving
5
326
Page 334 of 436
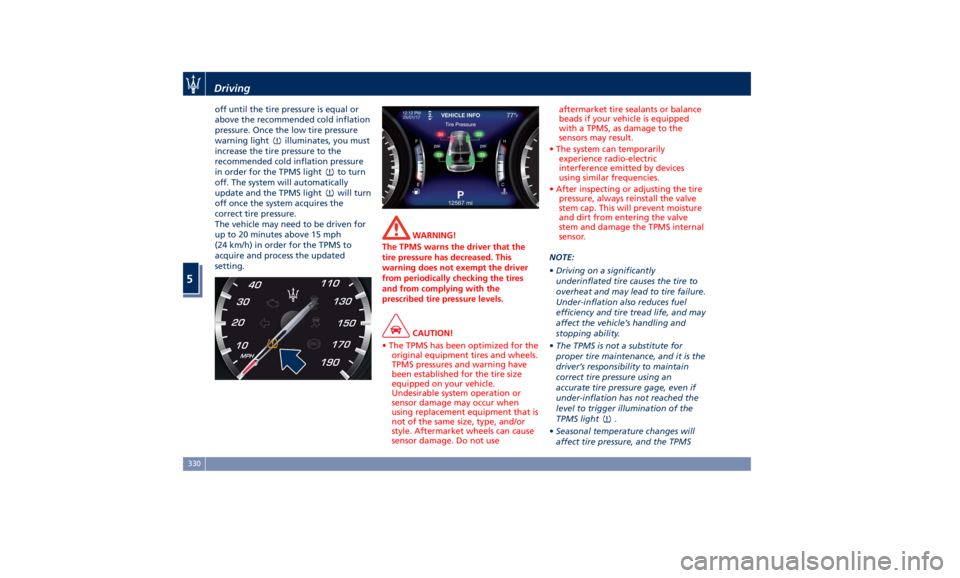
off until the tire pressure is equal or
above the recommended cold inflation
pressure. Once the low tire pressure
warning light
illuminates, you must
increase the tire pressure to the
recommended cold inflation pressure
in order for the TPMS light
to turn
off. The system will automatically
update and the TPMS light
will turn
off once the system acquires the
correct tire pressure.
The vehicle may need to be driven for
up to 20 minutes above 15 mph
(24 km/h) in order for the TPMS to
acquire and process the updated
setting. WARNING!
The TPMS warns the driver that the
tire pressure has decreased. This
warning does not exempt the driver
from periodically checking the tires
and from complying with the
prescribed tire pressure levels.
CAUTION!
• The TPMS has been optimized for the
original equipment tires and wheels.
TPMS pressures and warning have
been established for the tire size
equipped on your vehicle.
Undesirable system operation or
sensor damage may occur when
using replacement equipment that is
not of the same size, type, and/or
style. Aftermarket wheels can cause
sensor damage. Do not use aftermarket tire sealants or balance
beads if your vehicle is equipped
with a TPMS, as damage to the
sensors may result.
• The system can temporarily
experience radio-electric
interference emitted by devices
using similar frequencies.
• After inspecting or adjusting the tire
pressure, always reinstall the valve
stem cap. This will prevent moisture
and dirt from entering the valve
stem and damage the TPMS internal
sensor.
NOTE:
• Driving
on a significantly
underinflated
tire causes the tire to
overheat and may lead to tire failure.
Under-inflation also reduces fuel
efficiency and tire tread life, and may
affect the vehicle’s handling and
stopping ability.
• The TPMS is not a substitute for
proper tire maintenance, and it is the
driver’s responsibility to maintain
correct tire pressure using an
accurate tire pressure gage, even if
under-inflation has not reached the
level to trigger illumination of the
TPMS light
.
• Seasonal temperature changes will
affect tire pressure, and the TPMSDriving
5
330
Page 340 of 436
(Continued)
with proper maintenance. Have the
exhaust system inspected every time
the vehicle is raised. Have any
abnormal conditions repaired
promptly. Until repaired, drive with
all side windows fully open.
WARNING!
California Proposition 65
Operating, servicing and maintaining
a passenger vehicle or off-road vehicle
can expose you to chemicals including
such as, engine exhaust, carbon
monoxide, phthalates and lead, that
which are known to the State of
California to cause cancer and birth
defects or other reproductive harm. To
minimize exposure, avoid breathing
exhaust, do not idle the engine except
as necessary, service your vehicle in a
well-ventilated area and wear gloves
or wash your hands frequently when
servicing your vehicle. For more
information go to:
www.P65Warnings.ca.gov/passenger-
vehicle Refueling Fuel Filler Neck Access To access the fuel filler neck, the filler
door must be unlocked. From outside
the vehicle, this can only be done by
pressing the unlock
or the lock
button on the key fob RKE
transmitter, in the same way as if
opening or closing the doors. If any of
the door lock controls is pressed from
inside the vehicle, the filler door will
still remain open to allow refueling.
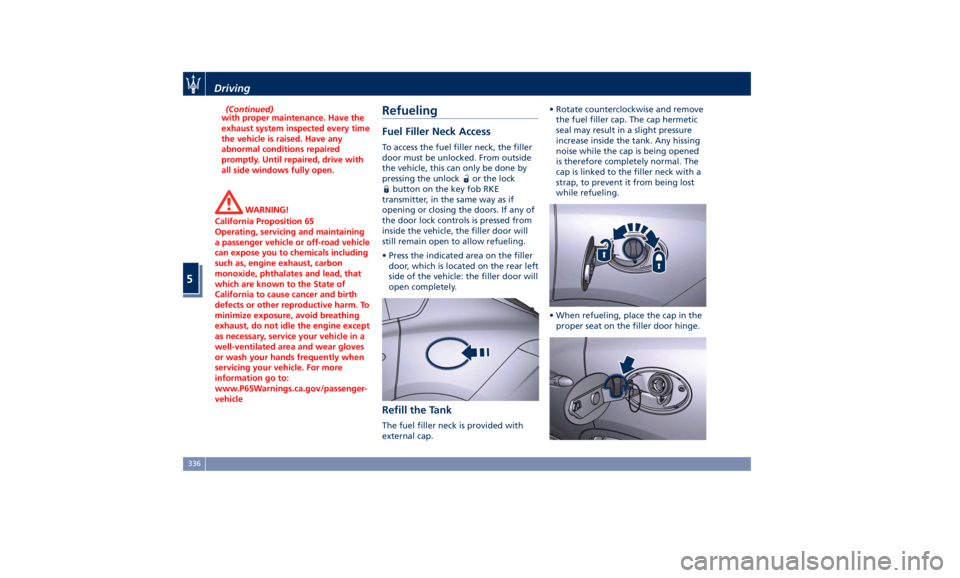
• Press the indicated area on the filler
door, which is located on the rear left
side of the vehicle: the filler door will
open completely.
Refill the Tank The fuel filler neck is provided with
external cap. • Rotate counterclockwise and remove
the fuel filler cap. The cap hermetic
seal may result in a slight pressure
increase inside the tank. Any hissing
noise while the cap is being opened
is therefore completely normal. The
cap is linked to the filler neck with a
strap, to prevent it from being lost
while refueling.
• When refueling, place the cap in the
proper seat on the filler door hinge.Driving
5
336
Page 342 of 436
Fuel Filler Cap Open Warning
Light After refueling the car
performs a check of the fuel
filler cap and the amber
warning light on the TFT
display comes on if it is not correctly
closed, after approximately 10 minutes
also depending on driving conditions.
If the problem is in the fuel system, the
Malfunction Indicator Light
also
comes on.
If the fuel filler cap is locked and the
issue remains in the system, at the next
engine start only the Malfunction
Indicator Light
comes on. In this
case, contact an Authorized Maserati
Dealer .
Emergency Fuel Filler Door
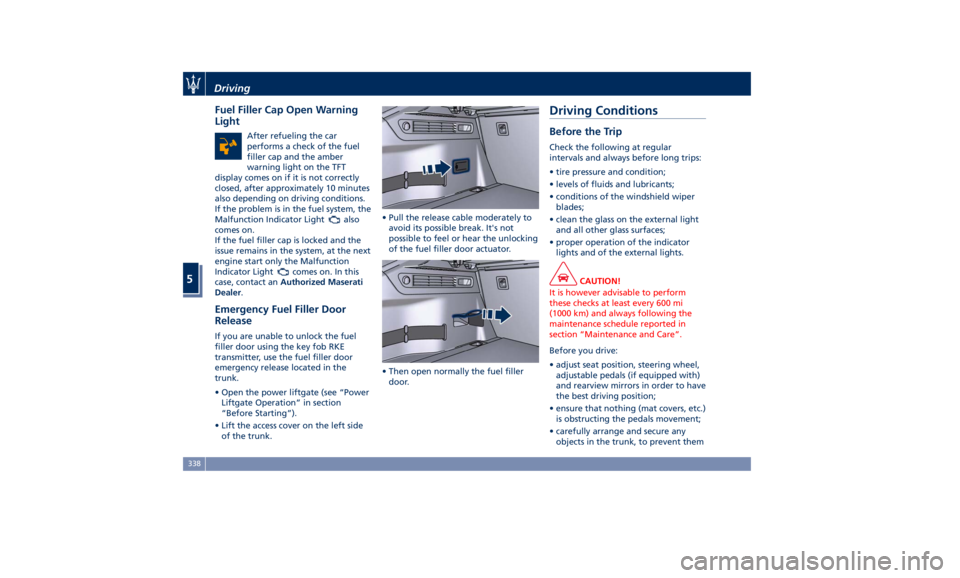
Release If you are unable to unlock the fuel
filler door using the key fob RKE
transmitter, use the fuel filler door
emergency release located in the
trunk.
• Open the power liftgate (see “Power
Liftgate Operation” in section
“Before Starting”).
• Lift the access cover on the left side
of the trunk. • Pull the release cable moderately to
avoid its possible break. It's not
possible to feel or hear the unlocking
of the fuel filler door actuator.
• Then open normally the fuel filler
door.Driving Conditions Before the Trip Check the following at regular
intervals and always before long trips:
• tire pressure and condition;
• levels of fluids and lubricants;
• conditions of the windshield wiper
blades;
• clean the glass on the external light
and all other glass surfaces;
• proper operation of the indicator
lights and of the external lights.
CAUTION!
It is however advisable to perform
these checks at least every 600 mi
(1000 km) and always following the
maintenance schedule reported in
section “Maintenance and Care”.
Before you drive:
•
adjust seat position, steering wheel,
adjustable pedals (if equipped with)
and rearview mirrors in order to have
the best driving position;
• ensure that nothing (mat covers, etc.)
is obstructing the pedals movement;
• carefully arrange and secure any
objects in the trunk, to prevent themDriving
5
338
Page 409 of 436

8 – Features and Specifications Refillings ............................................. 406
Fuel Consumption ...................................... 410
Technical Data ......................................... 411
Tire Inflation Pressure ................................... 420
405
Page 415 of 436
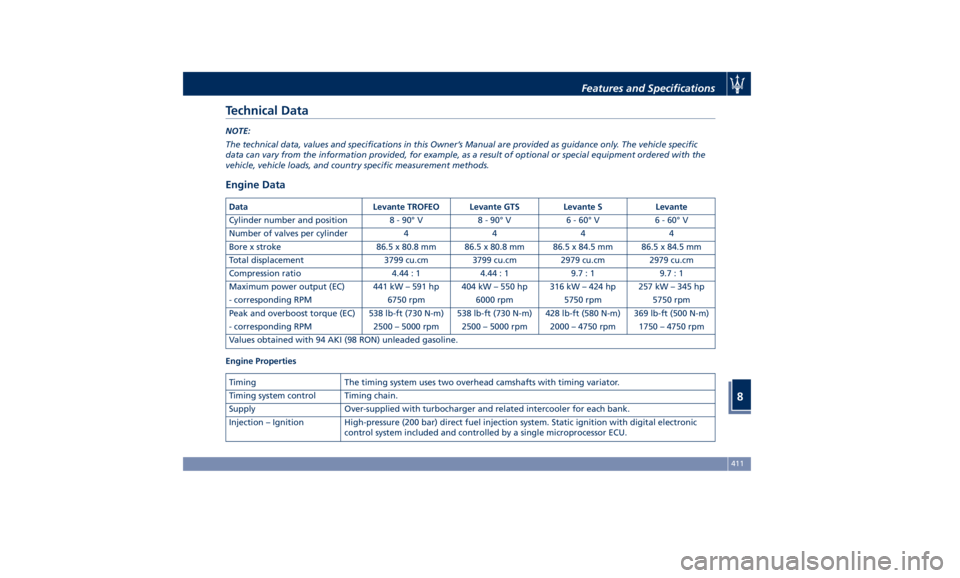
Technical Data NOTE:
The technical data, values and specifications in this Owner’s Manual are provided as guidance only. The vehicle specific
data can vary from the information provided, for example, as a result of optional or special equipment ordered with the
vehicle, vehicle loads, and country specific measurement methods.
Engine Data Data Levante TROFEO Levante GTS Levante S Levante
Cylinder number and position 8 - 90° V 8 - 90° V 6 - 60° V 6 - 60° V
Number of valves per cylinder 4 4 4 4
Bore x stroke 86.5 x 80.8 mm 86.5 x 80.8 mm 86.5 x 84.5 mm 86.5 x 84.5 mm
Total displacement 3799 cu.cm 3799 cu.cm 2979 cu.cm 2979 cu.cm
Compression ratio 4.44 : 1 4.44 : 1 9.7 : 1 9.7 : 1
Maximum power output (EC) 441 kW – 591 hp 404 kW – 550 hp 316 kW – 424 hp 257 kW – 345 hp
- corresponding RPM 6750 rpm 6000 rpm 5750 rpm 5750 rpm
Peak and overboost torque (EC) 538 lb-ft (730 N-m) 538 lb-ft (730 N-m) 428 lb-ft (580 N-m) 369 lb-ft (500 N-m)
- corresponding RPM 2500 – 5000 rpm 2500 – 5000 rpm 2000 – 4750 rpm 1750 – 4750 rpm
Values obtained with 94 AKI (98 RON) unleaded gasoline.
Engine Properties
Timing The timing system uses two overhead camshafts with timing variator.
Timing system control Timing chain.
Supply Over-supplied with turbocharger and related intercooler for each bank.
Injection – Ignition High-pressure (200 bar) direct fuel injection system. Static ignition with digital electronic
control system included and controlled by a single microprocessor ECU. Features and Specifications
8
411
Page 432 of 436
Passenger Seat Belts ..........61
Seat Belt Reminder Light ..... .164
Seat Belts and Pregnant Women . .65
Seat Belts Pretensioners ........63
Three-Point Seat Belts .........59
Three-Point Seat Belts Height
Adjustment ................61
Three-Point Seat Belts Untwisting
Procedure .................61
Three-Point Seat Belts Use
Instructions ................59
Using the Seat Belt in Automatic
Locking Retractor Mode (ALR) . . .63
Seats ......................97
Driver Memory Seat ........ .101
Easy Entry/Exit Seats ........ .102
Front Heated Seats ...........99
Front Power Seats ............97
Front Ventilated Seats ....... .100
Power Lumbar Seats ..........98
Rear Armrest ............. .104
Rear Seat Folding Seatback . . . .103
Rear Seats ............... .103
Rear Side Heated Seats ...... .104
Seat Adjustment .............98
Service .....................10
Siri Smart Personal Assistant .... .225
SmartBeam System ........... .116
Smoking Kit ................ .137
Snow Chains ............... .328
Spare parts service
Genuine Parts ..............13
Scheduled Maintenance .......13 Spare Parts Service .............13
SRS (Supplemental Restraint
System) ....................65
Start&Stop System ........... .230
Occupant Safety Function .... .232
Start&Stop Active Indicator . . . .163
Start&Stop Disable Indicator . . . .182
Start&Stop Failure Indicator
Light ................... .182
Start&Stop Function Disabling
Indicator ................ .232
Start&Stop Menu .......... .172
Start&Stop System Failure .... .234
Start the Engine
Engine Start Failure ......... .229
Engine Turn Off ........... .230
Steering Wheel .............
.108
Heated
Steering Wheel ...... .108
Phone
and Voice Controls on
Steering Wheel ............ .224
Sunroof
Initialization Procedure ...... .149
Pinch Protect Feature ....... .149
Slide Opening Sunroof ....... .148
Sunroof Maintenance ....... .150
Venting Sunroof ........... .149
Sunshades ...................48
Sun Visors ................. .137
Surround View Camera System ....87
Symbols ....................14
Danger Symbols .............14 Symbols of Prohibitions and
Compulsory Measures .........14
Tank fuel refill .............. .336
TCS (Traction Control System) .... .275
Technical Data .............. .411
Telltales
Telltales on Speedometer ..... .161
Telltales on Tachometer ...... .163
Tires
Change a Tire ............. .351
Compact spare tire ......... .329
Department of Transportation
Uniform Tire Quality Grades . . . .325
General Information ........ .321
Inflation Pressure .......... .420
Pneumatic Suspension Mode for
Wheel Change ............ .329
Punctured Tire, use ......... .351
Replacement Tires .......... .327
Tire Pressure .............. .325
Tire Pressure Checkup ....... .326
Tire Safety Information ...... .321
TPMS - Tire Pressure Monitoring
System .................. .329
Tread Wear Indicators ....... .326
Winter Tires .............. .328
ToolKit................... .348
Towing
Towing a Disabled Vehicle .... .360
Towing the Vehicle ......... .360
Use
the Vehicle Tow Hook .... .360
Vehicle Towing Conditions .... .360Index
9 428