remove seats MASERATI LEVANTE 2019 Owners Manual
[x] Cancel search | Manufacturer: MASERATI, Model Year: 2019, Model line: LEVANTE, Model: MASERATI LEVANTE 2019Pages: 436, PDF Size: 15.24 MB
Page 80 of 436
Here are some tips on getting
the most out of your child
restraint • Before buying any restraint system,
make sure that it has a label
certifying that it meets all applicable
Safety Standards. Maserati also
recommends that you make sure that
you can install the child restraint in
the vehicle where you will use it
before you buy it.
• The restraint system must be
appropriate for your child’s weight
and height.
• Check the label on the restraint
system for weight and height limits.
• Carefully follow the instructions that
come with the restraint system.
• If installed improperly, it may not
work when needed.
• Fit the child into the seat according
to the child restraint manufacturer’s
directions.
WARNING!
When your child restraint system is
not in use, secure it in the vehicle with
the seat belt or remove it from the
vehicle. Do not leave it loose in the
vehicle. In a sudden stop or accident, it could strike the occupants or
seatbacks and cause serious personal
injury.
Installing Child Restraint
Systems using the Vehicle Seat
Belt equipped with ALR Child restraint systems are designed to
be secured in vehicle seats by lap belts
or the lap belt portion of a
lap/shoulder belt.
All the passenger seat belts are
equipped with an Automatic Locking
Retractor (ALR) to secure child
protection through a Child Restraint
System (CRS). These types of seat belts
are designed to keep the lap portion
of the seat belt tight around the child
restraint seat avoiding to use a locking
clip.
The ALR will make a ratcheting noise if
the entire belt is pulled out of the
retractor in order to enable the belt to
retract subsequently. For additional
information on ALR, see “Using Seat
Belt in Automatic Locking Retractor
(ALR) Mode” in “Occupants Restraint
Systems” in this section.
To install a Child Restraint System with
ALR, pull enough of the belt out of the
retractor leading it through the belt
path of the protection device. Slide the latch into the buckle until it clicks,
then remove the entire safety belt
from the retractor in order to
rewound. While rewinding a click will
indicate the safety belt is now in
Automatic Locking mode.
Exert then a traction on the exceeded
lap section of the belt in order to
tighten it around the child restraint
seat. All seat belts will loosen over
time, it is therefore necessary to check
them periodically and set them
properly.
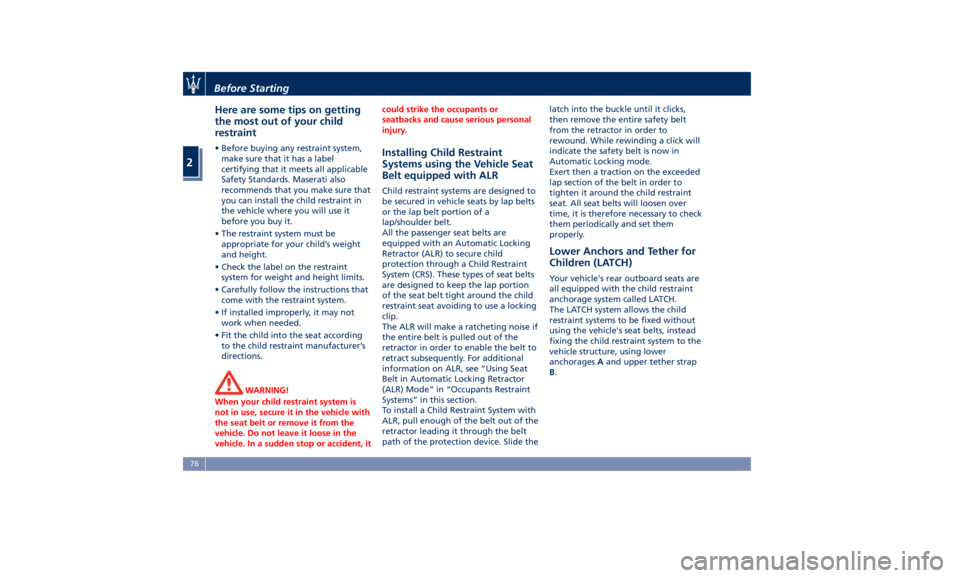
Lower Anchors and Tether for
Children (LATCH) Your vehicle's rear outboard seats are
all equipped with the child restraint
anchorage system called LATCH.
The LATCH system allows the child
restraint systems to be fixed without
using the vehicle's seat belts, instead
fixing the child restraint system to the
vehicle structure, using lower
anchorages A and upper tether strap
B .Before Starting
2
76
Page 109 of 436
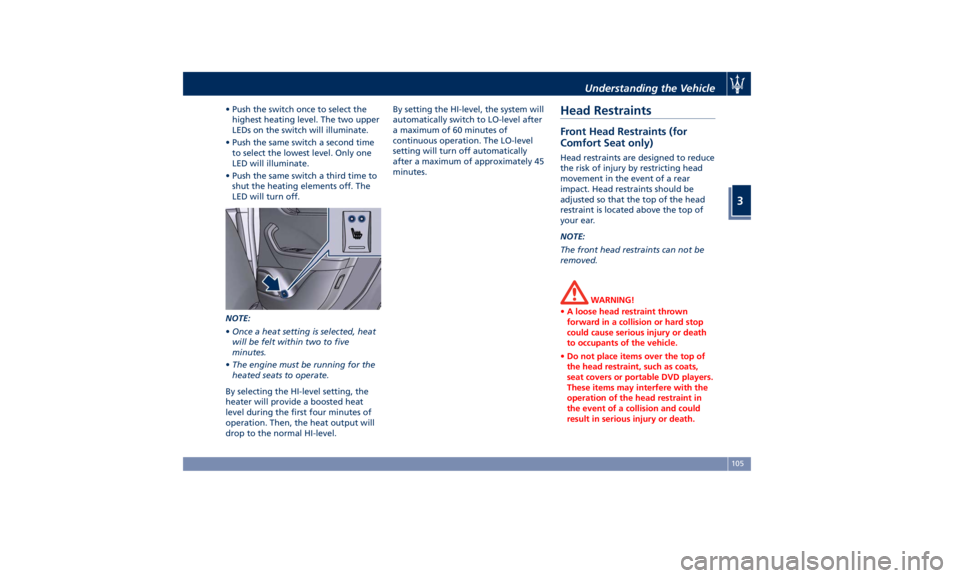
• Push the switch once to select the
highest heating level. The two upper
LEDs on the switch will illuminate.
• Push the same switch a second time
to select the lowest level. Only one
LED will illuminate.
• Push the same switch a third time to
shut the heating elements off. The
LED will turn off.
NOTE:
• Once a heat setting is selected, heat
will be felt within two to five
minutes.
• The engine must be running for the
heated seats to operate.
By selecting the HI-level setting, the
heater will provide a boosted heat
level during the first four minutes of
operation. Then, the heat output will
drop to the normal HI-level. By setting the HI-level, the system will
automatically switch to LO-level after
a maximum of 60 minutes of
continuous operation. The LO-level
setting will turn off automatically
after a maximum of approximately 45
minutes.
Head Restraints Front Head Restraints (for
Comfort Seat only) Head restraints are designed to reduce
the risk of injury by restricting head
movement in the event of a rear
impact. Head restraints should be
adjusted so that the top of the head
restraint is located above the top of
your ear.
NOTE:
The front head restraints can not be
removed.
WARNING!
• A loose head restraint thrown
forward in a collision or hard stop
could cause serious injury or death
to occupants of the vehicle.
• Do not place items over the top of
the head restraint, such as coats,
seat covers or portable DVD players.
These items may interfere with the
operation of the head restraint in
the event of a collision and could
result in serious injury or death.Understanding the Vehicle
3
105
Page 110 of 436
Front Head Restraints
Adjustment (for Comfort Seat
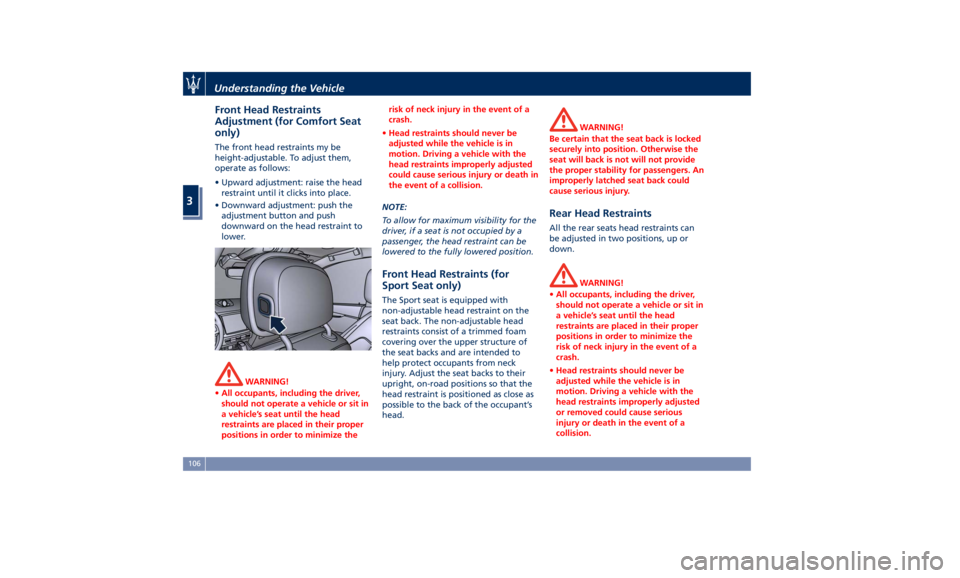
only) The front head restraints my be
height-adjustable. To adjust them,
operate as follows:
• Upward adjustment: raise the head
restraint until it clicks into place.
• Downward adjustment: push the
adjustment button and push
downward on the head restraint to
lower.
WARNING!
• All occupants, including the driver,
should not operate a vehicle or sit in
a vehicle’s seat until the head
restraints are placed in their proper
positions in order to minimize the risk of neck injury in the event of a
crash.
• Head restraints should never be
adjusted while the vehicle is in
motion. Driving a vehicle with the
head restraints improperly adjusted
could cause serious injury or death in
the event of a collision.
NOTE:
T
o allow for maximum visibility for the
driver, if a seat is not occupied by a
passenger, the head restraint can be
lowered to the fully lowered position.
Front Head Restraints (for
Sport Seat only) The Sport seat is equipped with
non-adjustable head restraint on the
seat back. The non-adjustable head
restraints consist of a trimmed foam
covering over the upper structure of
the seat backs and are intended to
help protect occupants from neck
injury. Adjust the seat backs to their
upright, on-road positions so that the
head restraint is positioned as close as
possible to the back of the occupant’s
head. WARNING!
Be certain that the seat back is locked
securely into position. Otherwise the
seat will back is not will not provide
the proper stability for passengers. An
improperly latched seat back could
cause serious injury.
Rear Head Restraints All the rear seats head restraints can
be adjusted in two positions, up or
down.
WARNING!
• All occupants, including the driver,
should not operate a vehicle or sit in
a vehicle’s seat until the head
restraints are placed in their proper
positions in order to minimize the
risk of neck injury in the event of a
crash.
• Head restraints should never be
adjusted while the vehicle is in
motion. Driving a vehicle with the
head restraints improperly adjusted
or removed could cause serious
injury or death in the event of a
collision.Understanding the Vehicle
3
106
Page 111 of 436
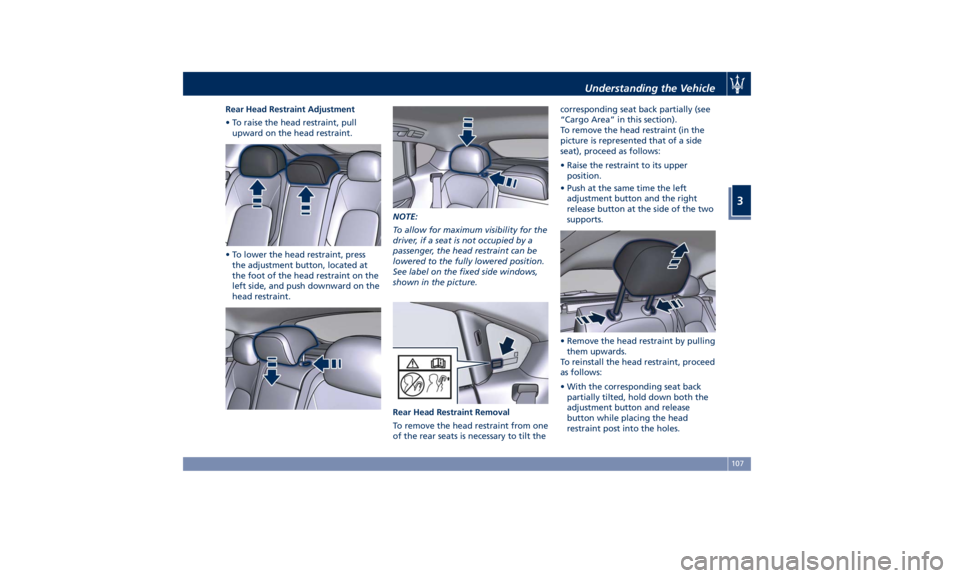
Rear Head Restraint Adjustment
• To raise the head restraint, pull
upward on the head restraint.
• To lower the head restraint, press
the adjustment button, located at
the foot of the head restraint on the
left side, and push downward on the
head restraint. NOTE:
To allow for maximum visibility for the
driver, if a seat is not occupied by a
passenger, the head restraint can be
lowered to the fully lowered position.
See label on the fixed side windows,
shown in the picture.
Rear Head Restraint Removal
To remove the head restraint from one
of the rear seats is necessary to tilt the corresponding seat back partially (see
“Cargo Area” in this section).
To remove the head restraint (in the
picture is represented that of a side
seat), proceed as follows:
• Raise the restraint to its upper
position.
• Push at the same time the left
adjustment button and the right
release button at the side of the two
supports.
• Remove the head restraint by pulling
them upwards.
To reinstall the head restraint, proceed
as follows:
• With the corresponding seat back
partially tilted, hold down both the
adjustment button and release
button while placing the head
restraint post into the holes.Understanding the Vehicle
3
107
Page 147 of 436
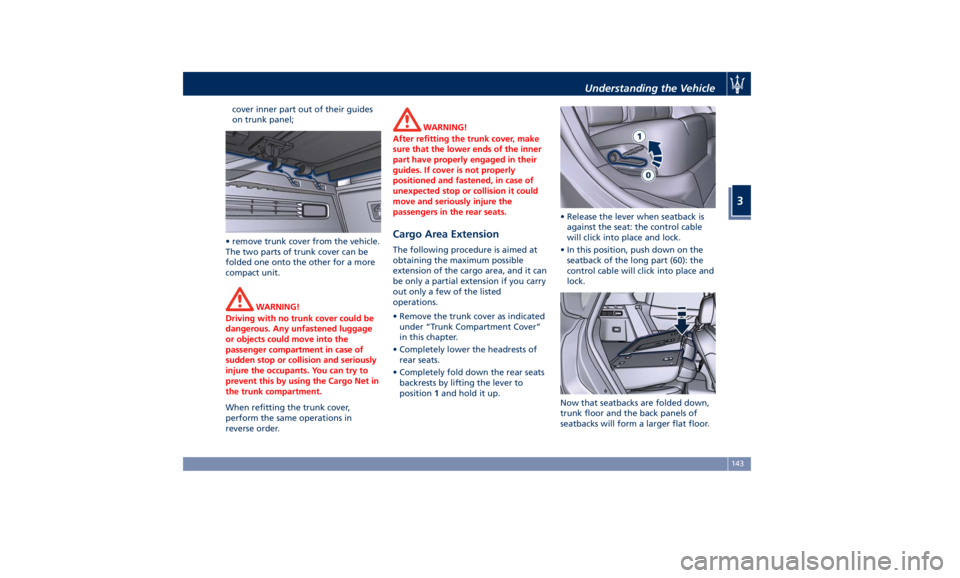
cover inner part out of their guides
on trunk panel;
• remove trunk cover from the vehicle.
The two parts of trunk cover can be
folded one onto the other for a more
compact unit.
WARNING!
Driving with no trunk cover could be
dangerous. Any unfastened luggage
or objects could move into the
passenger compartment in case of
sudden stop or collision and seriously
injure the occupants. You can try to
prevent this by using the Cargo Net in
the trunk compartment.
When refitting the trunk cover,
perform
the same operations in
reverse order. WARNING!
After refitting the trunk cover, make
sure that the lower ends of the inner
part have properly engaged in their
guides. If cover is not properly
positioned and fastened, in case of
unexpected stop or collision it could
move and seriously injure the
passengers in the rear seats.
Cargo Area Extension The following procedure is aimed at
obtaining the maximum possible
extension of the cargo area, and it can
be only a partial extension if you carry
out only a few of the listed
operations.
• Remove the trunk cover as indicated
under “Trunk Compartment Cover”
in this chapter.
• Completely lower the headrests of
rear seats.
• Completely fold down the rear seats
backrests by lifting the lever to
position 1 and hold it up. • Release the lever when seatback is
against the seat: the control cable
will click into place and lock.
• In this position, push down on the
seatback of the long part (60): the
control cable will click into place and
lock.
Now that seatbacks are folded down,
trunk floor and the back panels of
seatbacks will form a larger flat floor.Understanding the Vehicle
3
143
Page 148 of 436
CAUTION!
Seatback rear panel is not suitable to
support heavy loads and metal objects
with protruding elements that might
scratch its surface. If necessary, protect
the seatback rear panel surface using
rigid panels.
Installing the Cargo Net for
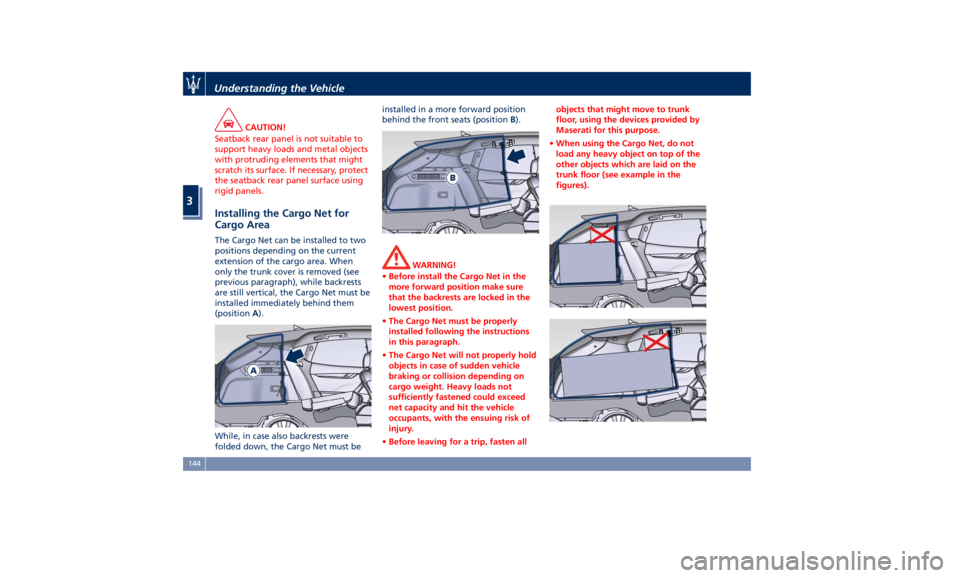
Cargo Area The Cargo Net can be installed to two
positions depending on the current
extension of the cargo area. When
only the trunk cover is removed (see
previous paragraph), while backrests
are still vertical, the Cargo Net must be
installed immediately behind them
(position A ).
While, in case also backrests were
folded down, the Cargo Net must be installed in a more forward position
behind the front seats (position B ).
WARNING!
• Before install the Cargo Net in the
more forward position make sure
that the backrests are locked in the
lowest position.
• The Cargo Net must be properly
installed following the instructions
in this paragraph.
• The Cargo Net will not properly hold
objects in case of sudden vehicle
braking or collision depending on
cargo weight. Heavy loads not
sufficiently fastened could exceed
net capacity and hit the vehicle
occupants, with the ensuing risk of
injury.
• Before leaving for a trip, fasten all objects that might move to trunk
floor, using the devices provided by
Maserati for this purpose.
• When using the Cargo Net, do not
load any heavy object on top of the
other objects which are laid on the
trunk floor (see example in the
figures).Understanding the Vehicle
3
144
Page 150 of 436
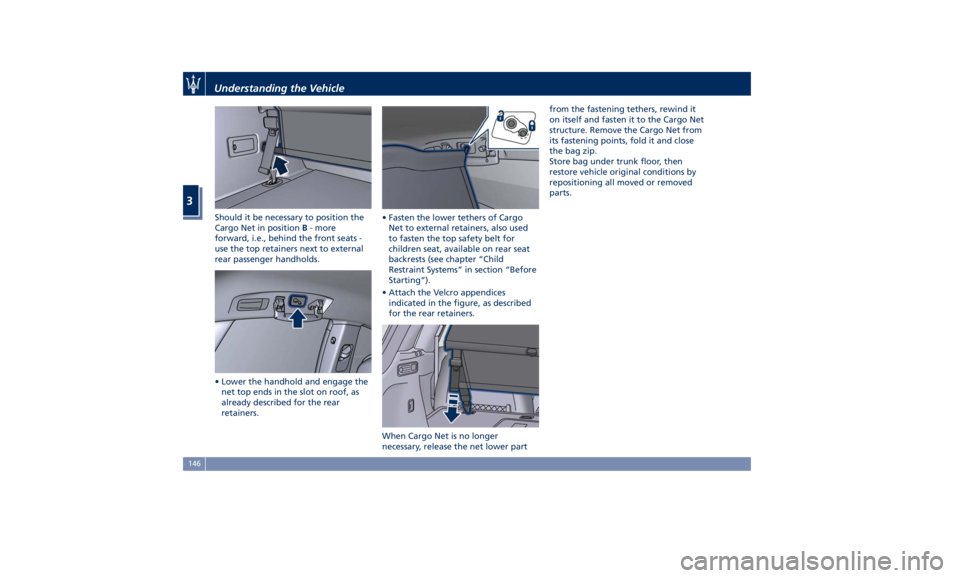
Should it be necessary to position the
Cargo Net in position B - more
forward, i.e., behind the front seats -
use the top retainers next to external
rear passenger handholds.
• Lower the handhold and engage the
net top ends in the slot on roof, as
already described for the rear
retainers. • Fasten the lower tethers of Cargo
Net to external retainers, also used
to fasten the top safety belt for
children seat, available on rear seat
backrests (see chapter “Child
Restraint Systems” in section “Before
Starting”).
• Attach the Velcro appendices
indicated in the figure, as described
for the rear retainers.
When Cargo Net is no longer
necessary, release the net lower part from the fastening tethers, rewind it
on itself and fasten it to the Cargo Net
structure. Remove the Cargo Net from
its fastening points, fold it and close
the bag zip.
Store bag under trunk floor, then
restore vehicle original conditions by
repositioning all moved or removed
parts.Understanding the Vehicle
3
146