rims MASERATI LEVANTE 2019 Owners Manual
[x] Cancel search | Manufacturer: MASERATI, Model Year: 2019, Model line: LEVANTE, Model: MASERATI LEVANTE 2019Pages: 436, PDF Size: 15.24 MB
Page 71 of 436
inflation rate is used in less severe
collisions. A higher energy output,
inflation rate, is used for more severe
collisions.
CAUTION!
• The airbag system must be ready to
protect you in a collision. The
Occupant Restraint Controller (ORC)
monitors the internal circuits and
interconnecting wiring associated with
electrical Air Bag System Components
listed below:
– Occupant Restraint Controller
(ORC)
– Airbag Warning light on the
instrument cluster
– Steering Wheel and Column
– Instrument Cluster
– Driver advanced front air bag
– Passenger advanced front air bag
– Supplemental Seat-Mounted Side
Air Bags (SAB) Air Bags
– Supplemental Side Air Bag
Inflatable Curtains (SABIC)
– Front and side Impact Sensors
– Front seat belt pretensioners
– Seat Belt Buckle Switch
– Seat Track Position Sensors
– Pyrotechnical charge to cut the
power from the battery: it is located on the positive battery
terminal
• The electronic control unit provides
for the activation of the
pretensioners, front air bags or side
air bags (front and rear) based on
different criteria, according to the
type of impact. Failure of one or
more systems to activate is not
indicative of a system malfunction.
• The front and/or lateral air bags may
inflate if the vehicle suffers a violent
impact involving the underbody
area, for example in case of violent
impacts against steps, sidewalks,
speed bumps, or when the vehicle
falls into potholes, or similar.
WARNING!
• No objects should be placed over or
near the air bag on the instrument
panel or steering wheel because any
such objects could cause harm if the
vehicle is in a collision severe
enough to cause the air bag to
inflate.
• Do not place anything on or around
the air bag covers or attempt to
open them manually. You may
damage the air bags and you could be injured because the air bags may
no longer be functional. The
protective covers for the air bag are
designed to open only when the air
bags are inflating.
• Always drive with your hands on
the steering wheel rim, so that the
air bag can inflate freely if required.
During the drive your back must be
as upright as comfort allows and be
against the seat back with the seat
belt properly fastened.
• Do not apply stickers or other
objects on the steering wheel, on
the dashboard in the passenger’s
side air bag area, on roof side trims
or on the seats.
• Do not travel with objects in your
lap, in front of your chest or
especially with a pipe, pencil or
other objects in your mouth. In the
event of a collision, the intervention
of the air bag could result in serious
injury.
• EXTREME HAZARD! Do not place a
rearward-facing infant seat onto the
front seat (see warning plate on the
dashboard and above and behind
the sun visors). Deployment of the
air bag in an accident could causeBefore Starting
2
67
Page 337 of 436
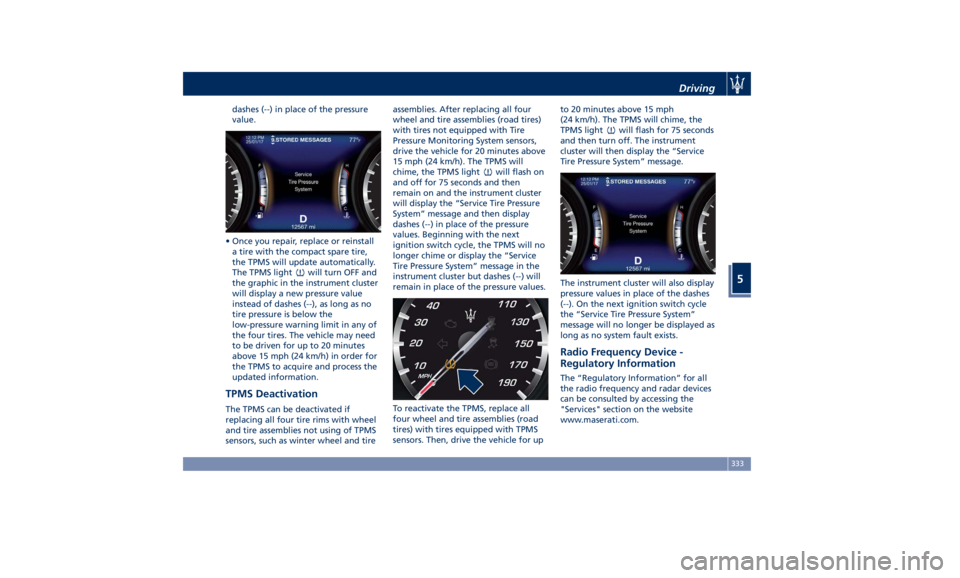
dashes (--) in place of the pressure
value.
• Once you repair, replace or reinstall
a tire with the compact spare tire,
the TPMS will update automatically.
The TPMS light
will turn OFF and
the graphic in the instrument cluster
will display a new pressure value
instead of dashes (--), as long as no
tire pressure is below the
low-pressure warning limit in any of
the four tires. The vehicle may need
to be driven for up to 20 minutes
above 15 mph (24 km/h) in order for
the TPMS to acquire and process the
updated information.
TPMS Deactivation The TPMS can be deactivated if
replacing all four tire rims with wheel
and tire assemblies not using of TPMS
sensors, such as winter wheel and tire assemblies. After replacing all four
wheel and tire assemblies (road tires)
with tires not equipped with Tire
Pressure Monitoring System sensors,
drive the vehicle for 20 minutes above
15 mph (24 km/h). The TPMS will
chime, the TPMS light
will flash on
and off for 75 seconds and then
remain on and the instrument cluster
will display the “Service Tire Pressure
System” message and then display
dashes (--) in place of the pressure
values. Beginning with the next
ignition switch cycle, the TPMS will no
longer chime or display the “Service
Tire Pressure System” message in the
instrument cluster but dashes (--) will
remain in place of the pressure values.
To reactivate the TPMS, replace all
four wheel and tire assemblies (road
tires) with tires equipped with TPMS
sensors. Then, drive the vehicle for up to 20 minutes above 15 mph
(24 km/h). The TPMS will chime, the
TPMS light
will flash for 75 seconds
and then turn off. The instrument
cluster will then display the “Service
Tire Pressure System” message.
The instrument cluster will also display
pressure values in place of the dashes
(--). On the next ignition switch cycle
the “Service Tire Pressure System”
message will no longer be displayed as
long as no system fault exists.
Radio Frequency Device -
Regulatory Information The “Regulatory Information” for all
the radio frequency and radar devices
can be consulted by accessing the
"Services" section on the website
www.maserati.com.Driving
5
333
Page 401 of 436
“Driving”). The thinner is the tread,
the greater is the risk of skidding.
• Drive carefully on wet roads to
decrease the risk of aquaplaning.
Winter Tires
These tires are specially
designed for
driving on snow and ice and are fitted
to replace the ones supplied with the
vehicle.
The specific features of the winter
tires lead to lower performance under
normal environmental conditions or
on long highway trips, compared to
the standard tires.
Therefore, their use should be limited
to the situations and performance for
which they have been type-approved.
The Authorized Maserati Dealer can
provide all necessary information
about fitting winter tires on the
vehicle.
NOTE:
• We recommend fitting winter tires
on the vehicle at temperatures
below 45 °F (7°C) since the driving
performance of summer tires is
reduced at low temperatures.
Summer tires may be permanently
damaged at extremely low
temperatures.
• Comply with all state and local laws governing snow tire and tread depth
requirements.
Wheel Rims Maintenance All wheel trims should be cleaned
regularly with a mild soap and water.
To remove heavy soil and/or excessive
brake dust, use a nonabrasive,
non-acidic cleaner.
Do not use scouring pads, steel wool,
a bristle brush, or metal polishes.
Do not use oven cleaner that may
affect and damage the brake calipers.
Avoid automatic car washes that use
acidic solutions or harsh brushes that
may damage the wheel rim protective
finish.Bodywork Maintenance
and Care Protection from Atmospheric
Agents The main causes of corrosion are:
• atmospheric pollution;
• salinity and humidity in the
atmosphere (marine areas or a damp
climate);
• seasonal environmental conditions;
• salt scattered on the roadbed to
melt ice and snow.
The abrasive action of wind-carried
atmospheric dust and sand, mud and
stones should not be underestimated.
On this vehicle, Maserati has adopted
the best technological solutions to
protect the bodywork from corrosion.
The main measures are:
• paint products and systems that give
the vehicle particular resistance to
corrosion and abrasion;
• use of galvanized (or pre-treated)
metal sheets which are highly
resistant to corrosion in the most
exposed parts;
• spraying of the underbody, engine
compartment, insides of wheel
housings, and other structures withMaintenance and Care
7
397
Page 403 of 436
External plastic parts must be cleaned
with the same procedure followed for
the normal washing of the bodywork.
Avoid, as far as possible, parking the
vehicle under trees; the resinous
substances that very often drop from
the trees give the paint a dull
appearance and increase the
possibility of originating corrosive
processes.
It is important that the drain holes in
the lower sides of the doors, rocker
panels, and trunk bottom be kept
clear and open.
CAUTION!
• Bird droppings must be washed off
immediately and thoroughly, since
their acidity is particularly corrosive.
• To provide better protection for the
paint, polish the vehicle at intervals
with a suitable product leaving a
protective film on the paint.
• If the vehicle is washed using
high-pressure water jets or cleaners,
it is important that the nozzle of the
jet be kept at a distance of at least
16 in (40 cm) from the bodywork to
avoid damaging it. Glass Surfaces
All
glass surfaces should be cleaned on
a regular basis with any commercial
household-type glass cleaner.
Never use an abrasive type cleaner.
Use caution when cleaning the inside
rear window on the liftgate equipped
with electric defrosters. Do not use
scrapers or other sharp instrument
that may scratch the elements.
When cleaning the rearview mirror,
spray cleaner on the towel or rag that
you are using. Do not spray cleaner
directly on the mirror.
Labels can be peeled off after soaking
with warm water.
When cleaning is performed, keep all
metal objects at a safe distance from
the window.
Cleaning Headlights
Your vehicle has plastic headlights that
are lighter and less susceptible to
stone breakage than glass headlights.
Plastic is not as scratch-resistant as
glass and therefore different lens
cleaning procedures must be followed.
To minimize the possibility of
scratching the lenses and reducing
light output, avoid wiping with a dry
cloth. To remove road dirt, wash with
a mild soap solution followed by
rinsing. Do not use abrasive cleaning
components, solvents, steel wool or
other aggressive material to clean the
lenses.
Condensation and Fogging on the
Light Clusters
With cold or humid climates, after a
driving rain or after cleaning the car,
the surface of the front and rear light
clusters could fog and/or form
condensate drops on the inside. This is
a natural phenomenon due to the
temperature and humidity differences
between the lens internal and
external surface, which nevertheless
does not indicate a fault and does not
compromise the regular operation of
the lights. The fogging/condensate
disappears when switching on the
lights, starting from the centre of the
diffuser and gradually going to the
edges.
Moldings and Aluminum Trims
• For cleaning moldings and aluminum
trims, avoid the use of acidic or
alkaline cleaning agents that can
destroy the protecting surface
treatment.
• After washing aluminum trim with
warm water, apply the cleaning
agent with a clean tissue or a soft
sponge on the surface. Do not useMaintenance and Care
7
399
Page 404 of 436
any other equipment such as
brushes, steel wool, abrasives or any
other equipment for cleaning.
• After cleaning, please rinse the
aluminum trim with a lot of clear
water.
• While cleaning in the car, please
make sure that the moldings and
aluminum trims only get in contact
with soft brushes or textiles.
Engine Compartment
At the end of each winter season,
carefully wash the engine
compartment, remembering to avoid
directing the jet of water for too long
on the electric parts.
To perform this operation, you must
contact an Authorized Maserati
Dealer .
Pre-Short Drop Function When in a car wash, if the driver keeps
the RKE Transmitter in his/her pocket,
or in any place outside the vehicle
within 3.3 ft (1 m) distance, the front
windows will perform a pre-short
drop. This is a shorter drop compared
to the normal short drop performed by
the “Passive Entry” function when you
grab the door handle to enter the
vehicle. In order to prevent water from
entering the vehicle between the
upper edge of the glass window and
the door outline on the bodywork,
while the car is being washed, it is
advisable to disable the “Passive
Entry” from the MTC+ System, for
further information refer to chapter
“MTC+ Settings” in section
“Dashboard Instruments and controls”.
When deactivating the “Passive Entry”,
also the “Pre-Short Drop” function will
be disabled.
Interior Maintenance and
Care Interior trim should be cleaned
starting with a damp cloth. Do not use
harsh cleaners.
The leather upholstery can be best
preserved by regular cleaning with a
damp soft cloth. Small particles of dirt
can act as an abrasive and damage the
leather upholstery and should be
removed promptly with a damp cloth.
Stubborn soils stains can be removed
easily with a soft cloth and
appropriate products. Avoid soaking
the leather upholstery with any liquid.
Please do not use polishes, oils,
cleaning fluids, solvents, detergents, or
ammonia-based cleaners to clean your
leather upholstery.
Application of a leather conditioner is
not required to maintain the original
condition.
Check at regular intervals that there is
no water trapped under the mats (due
to drips off shoes, umbrellas etc.)
which may cause the metal parts to
oxidize.
CAUTION!
Do not use alcohol, petrol or solventsMaintenance and Care
7
400
Page 417 of 436
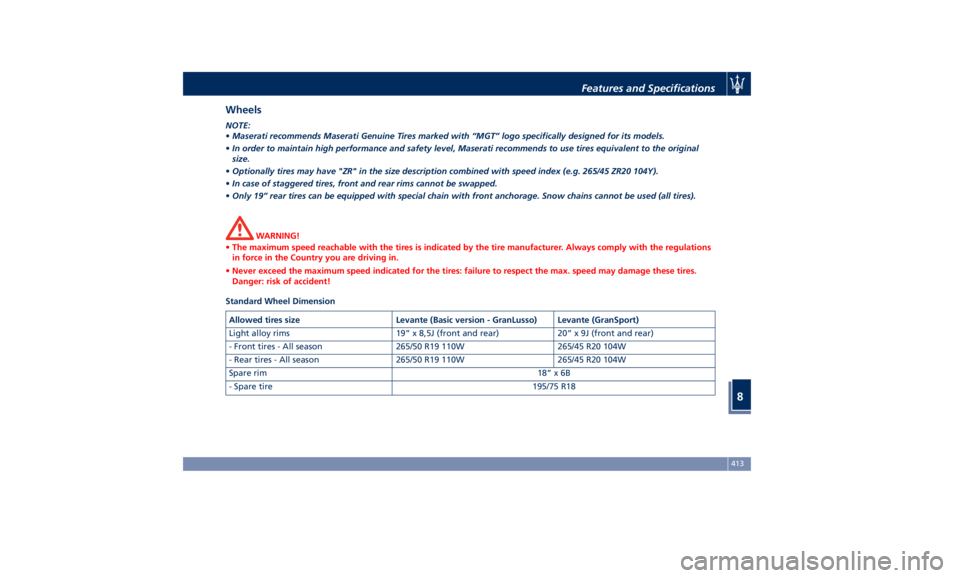
Wheels NOTE:
• Maserati recommends Maserati Genuine Tires marked with “MGT” logo specifically designed for its models.
• In order to maintain high performance and safety level, Maserati recommends to use tires equivalent to the original
size.
• Optionally tires may have "ZR" in the size description combined with speed index (e.g. 265/45 ZR20 104Y).
• In case of staggered tires, front and rear rims cannot be swapped.
• Only 19” rear tires can be equipped with special chain with front anchorage. Snow chains cannot be used (all tires).
WARNING!
• The maximum speed reachable with the tires is indicated by the tire manufacturer. Always comply with the regulations
in force in the Country you are driving in.
• Never exceed the maximum speed indicated for the tires: failure to respect the max. speed may damage these tires.
Danger: risk of accident!
Standard Wheel Dimension
Allowed tires size Levante (Basic version - GranLusso) Levante (GranSport)
Light alloy rims 19” x 8,5J (front and rear) 20” x 9J (front and rear)
- Front tires - All season 265/50 R19 110W 265/45 R20 104W
- Rear tires - All season 265/50 R19 110W 265/45 R20 104W
Spare rim 18” x 6B
- Spare tire 195/75 R18Features and Specifications
8
413
Page 418 of 436
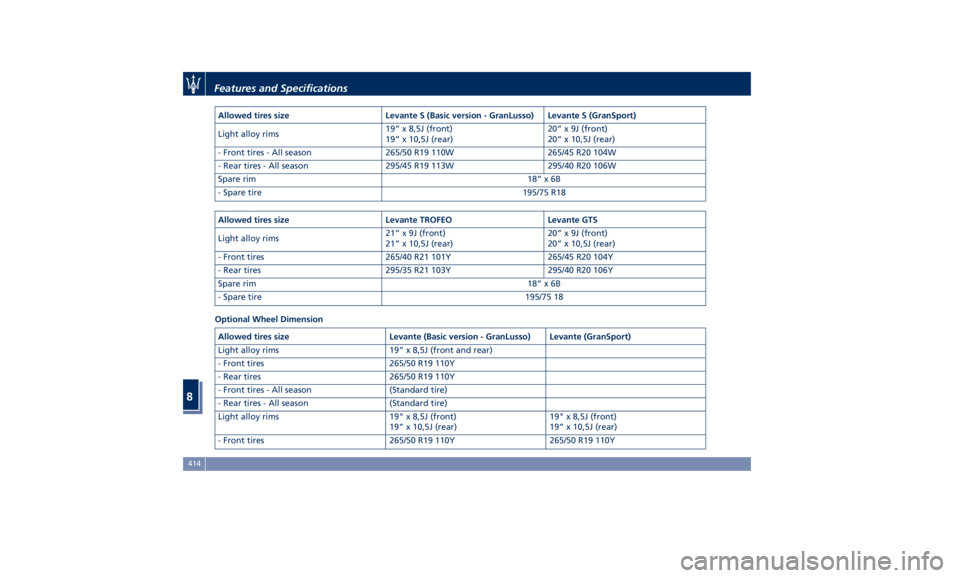
Allowed tires size Levante S (Basic version - GranLusso) Levante S (GranSport)
Light alloy rims 19” x 8,5J (front)
19” x 10,5J (rear) 20” x 9J (front)
20” x 10,5J (rear)
- Front tires - All season 265/50 R19 110W 265/45 R20 104W
- Rear tires - All season 295/45 R19 113W 295/40 R20 106W
Spare rim 18” x 6B
- Spare tire 195/75 R18
Allowed tires size Levante TROFEO Levante GTS
Light alloy rims 21” x 9J (front)
21” x 10,5J (rear) 20” x 9J (front)
20” x 10,5J (rear)
- Front tires 265/40 R21 101Y 265/45 R20 104Y
- Rear tires 295/35 R21 103Y 295/40 R20 106Y
Spare rim 18” x 6B
- Spare tire 195/75 18
Optional Wheel Dimension
Allowed tires size Levante (Basic version - GranLusso) Levante (GranSport)
Light alloy rims 19” x 8,5J (front and rear)
- Front tires 265/50 R19 110Y
- Rear tires 265/50 R19 110Y
- Front tires - All season (Standard tire)
- Rear tires - All season (Standard tire)
Light alloy rims 19" x 8,5J (front)
19” x 10,5J (rear) 19" x 8,5J (front)
19” x 10,5J (rear)
- Front tires 265/50 R19 110Y 265/50 R19 110YFeatures and Specifications
8
414
Page 419 of 436
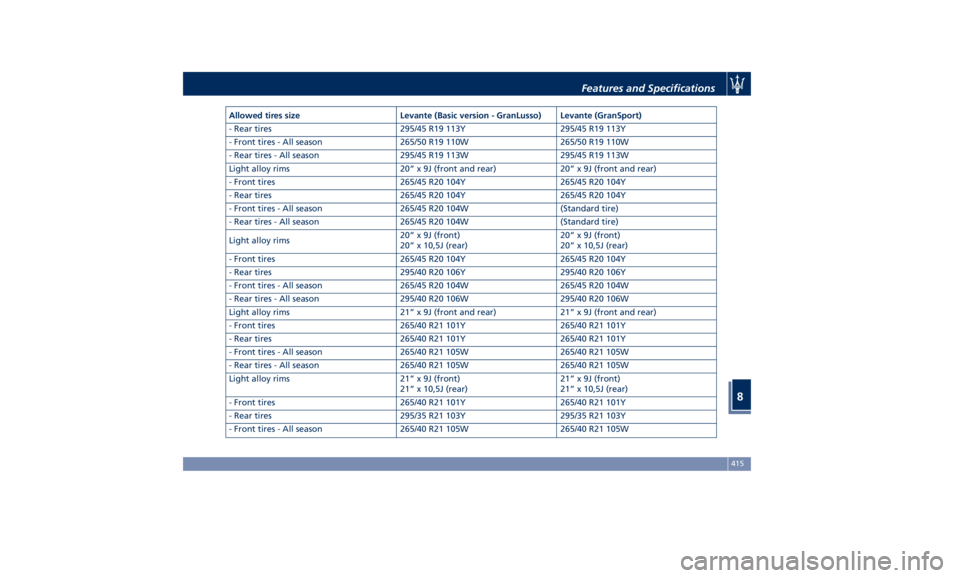
Allowed tires size Levante (Basic version - GranLusso) Levante (GranSport)
- Rear tires 295/45 R19 113Y 295/45 R19 113Y
- Front tires - All season 265/50 R19 110W 265/50 R19 110W
- Rear tires - All season 295/45 R19 113W 295/45 R19 113W
Light alloy rims 20” x 9J (front and rear) 20” x 9J (front and rear)
- Front tires 265/45 R20 104Y 265/45 R20 104Y
- Rear tires 265/45 R20 104Y 265/45 R20 104Y
- Front tires - All season 265/45 R20 104W (Standard tire)
- Rear tires - All season 265/45 R20 104W (Standard tire)
Light alloy rims 20” x 9J (front)
20” x 10,5J (rear) 20” x 9J (front)
20” x 10,5J (rear)
- Front tires 265/45 R20 104Y 265/45 R20 104Y
- Rear tires 295/40 R20 106Y 295/40 R20 106Y
- Front tires - All season 265/45 R20 104W 265/45 R20 104W
- Rear tires - All season 295/40 R20 106W 295/40 R20 106W
Light alloy rims 21” x 9J (front and rear) 21” x 9J (front and rear)
- Front tires 265/40 R21 101Y 265/40 R21 101Y
- Rear tires 265/40 R21 101Y 265/40 R21 101Y
- Front tires - All season 265/40 R21 105W 265/40 R21 105W
- Rear tires - All season 265/40 R21 105W 265/40 R21 105W
Light alloy rims 21” x 9J (front)
21” x 10,5J (rear) 21” x 9J (front)
21” x 10,5J (rear)
- Front tires 265/40 R21 101Y 265/40 R21 101Y
- Rear tires 295/35 R21 103Y 295/35 R21 103Y
- Front tires - All season 265/40 R21 105W 265/40 R21 105WFeatures and Specifications
8
415
Page 420 of 436
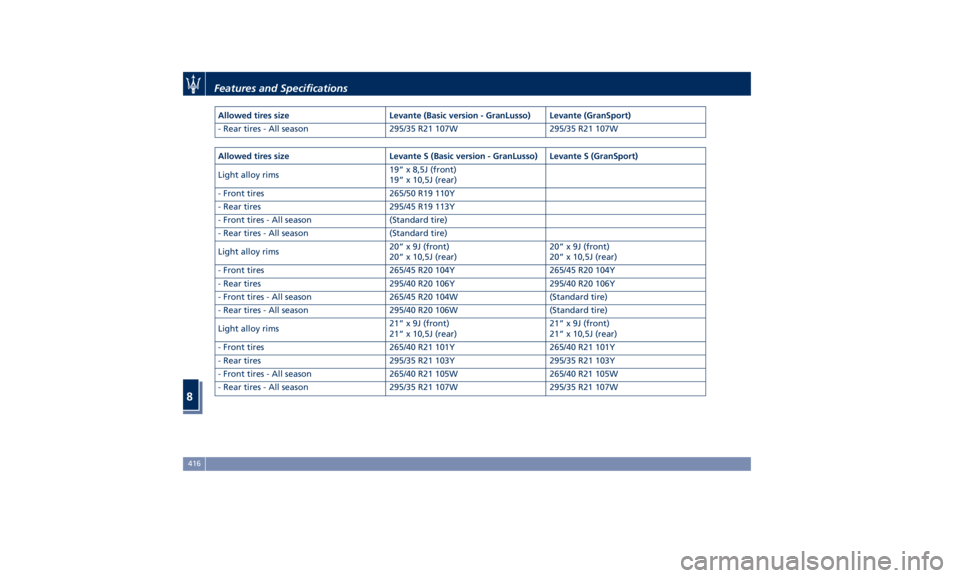
Allowed tires size Levante (Basic version - GranLusso) Levante (GranSport)
- Rear tires - All season 295/35 R21 107W 295/35 R21 107W
Allowed tires size Levante S (Basic version - GranLusso) Levante S (GranSport)
Light alloy rims 19” x 8,5J (front)
19” x 10,5J (rear)
- Front tires 265/50 R19 110Y
- Rear tires 295/45 R19 113Y
- Front tires - All season (Standard tire)
- Rear tires - All season (Standard tire)
Light alloy rims 20” x 9J (front)
20” x 10,5J (rear) 20” x 9J (front)
20” x 10,5J (rear)
- Front tires 265/45 R20 104Y 265/45 R20 104Y
- Rear tires 295/40 R20 106Y 295/40 R20 106Y
- Front tires - All season 265/45 R20 104W (Standard tire)
- Rear tires - All season 295/40 R20 106W (Standard tire)
Light alloy rims 21” x 9J (front)
21” x 10,5J (rear) 21” x 9J (front)
21” x 10,5J (rear)
- Front tires 265/40 R21 101Y 265/40 R21 101Y
- Rear tires 295/35 R21 103Y 295/35 R21 103Y
- Front tires - All season 265/40 R21 105W 265/40 R21 105W
- Rear tires - All season 295/35 R21 107W 295/35 R21 107WFeatures and Specifications
8
416
Page 421 of 436
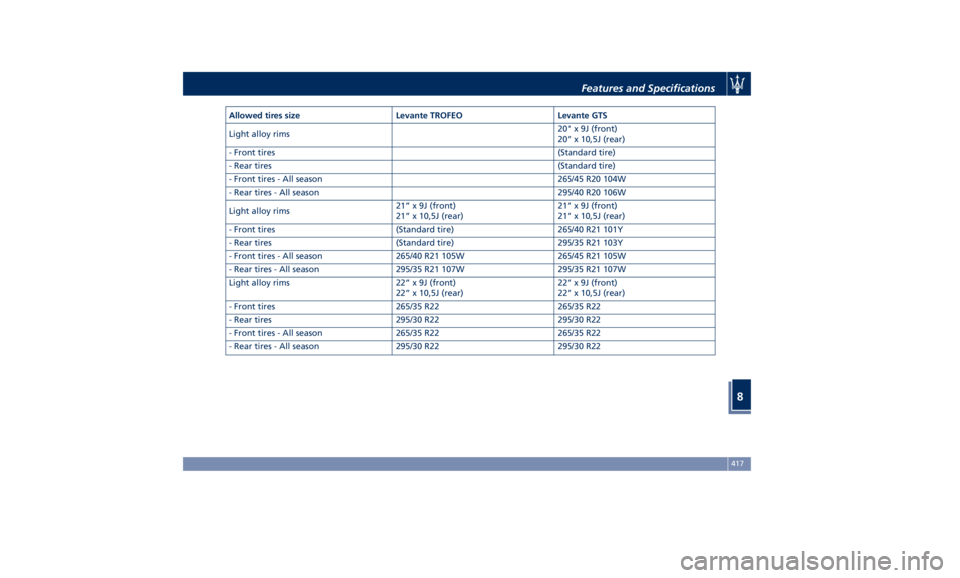
Allowed tires size Levante TROFEO Levante GTS
Light alloy rims 20" x 9J (front)
20” x 10,5J (rear)
- Front tires (Standard tire)
- Rear tires (Standard tire)
- Front tires - All season 265/45 R20 104W
- Rear tires - All season 295/40 R20 106W
Light alloy rims 21” x 9J (front)
21” x 10,5J (rear) 21” x 9J (front)
21” x 10,5J (rear)
- Front tires (Standard tire) 265/40 R21 101Y
- Rear tires (Standard tire) 295/35 R21 103Y
- Front tires - All season 265/40 R21 105W 265/45 R21 105W
- Rear tires - All season 295/35 R21 107W 295/35 R21 107W
Light alloy rims 22” x 9J (front)
22” x 10,5J (rear) 22” x 9J (front)
22” x 10,5J (rear)
- Front tires 265/35 R22 265/35 R22
- Rear tires 295/30 R22 295/30 R22
- Front tires - All season 265/35 R22 265/35 R22
- Rear tires - All season 295/30 R22 295/30 R22Features and Specifications
8
417